


c-wheeler
-
Posts
855 -
Joined
-
Last visited
Content Type
Profiles
Forums
Events
Posts posted by c-wheeler
-
-
Creating a moving image on a flipping book page.
I know its possible to add a series of animated images files as a decal, which then becomes part of an animated sequence- but how do you start and end the moving picture sequence in the right place in the cho - short of bumping the decal up with static shots.
So say the moving sequence is 3 secs long, but the whole sequence is 10 secs and you dont want it to start until 4 secs in.
How would you all handle it?
Chris
-
Try just shrinking them in the x-direction only.
Select the spline ring, then in the PWS you have a new group, called "untitled"
Expand this group by clicking again on the triangle, then again on "Transform", then on "Scale"
This gives three options, scale x, y and Z.
Scale x does the width, y the height.
Chris
-
I can make a guess at what you were trying to achieve, but I think you are getting "low light" confused with "no light" The key is to balance the scene with light and dark, so the light areas are light, and the dark areas are well....visible but dark.
Lighting is a very tricky thing to do well, but if you go slow, I think you can get the effect you want.What I think you need is some "bounce"
I would suggest you go back to your original lights.The ones with just the bulbs in.
Then make a single light object, a klieg with a wide cone angle- about 160 degrees and plenty of width softness have the intensity at about 20%, but be prepared to play around with these figures.Under options>cast shadows make it z-buffered.Call it bounce.
Then in the cho. drop this onto the floor of the hallway, pointing up at the ceiling. Make sure the fall off is long enough to reach the ceiling and change the colour to the colour of the floor say a sort of brownish - this replicates the light from the floor that hits the ceiling. What you want is to barely light the darkest corner of the ceiling in a sort of brown. Dont try to do all the hall at once, and be prepared to play with the settings youve made. Experimentation is the key.
Use the same method to light each of the walls, but give the wall bounce a greenish tinge. Once youve set up the inside, you can add a light from outside pointing to the right wall to simulate the moonlight. Make this a little blue. Internal lights can be set up to simulate interior cell lighting, or to highlight specific features, such as the bars.Turn the z buffering to ray-trace in the final render.
Hope this helps,
Chris
-
Thanks for the heads up
Chris
-
I did some research into this for an ad a while back - then this version of the add was never made.
I would not make this just in AM, but use another application as well.
The project brief was for a 10 second intro involving a fencer with a sword for the launch of a new product. The fencer was to be "on fire" with a flaming effect following the sword.
Animate your realistic figure until your satisfied with the result.
Then export your finished animation with alpha channels.This replaces the need for green screen filming required by the broject.
Import into new project in After effects
Composite footage using AE
There is a tutorial available on the web at creative cows I think.
-
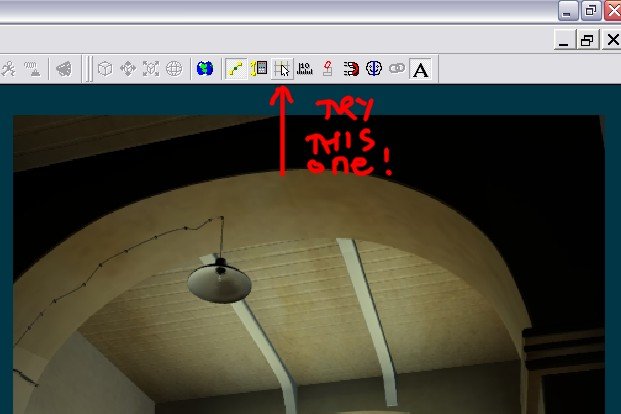
One quick-ish way would be to:-
1) Make a flat plane that would sit above the skylights
2) Get a piece of video that shows the effect you want- bearing in mind copyright etc.
3) Convert the film to a useable format
4) Decal the flat plane with the immage sequence/animation
Everything else is just lighting
Chris
-
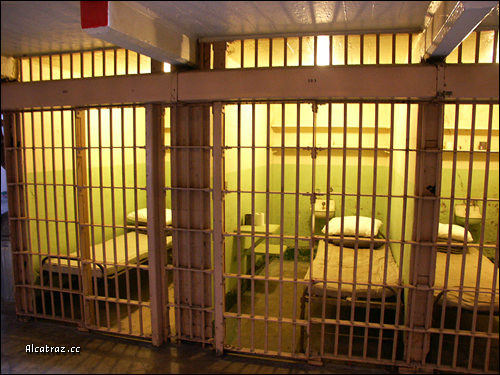
I once modeled a short cell stretch based on Alcatraz, with the toilet, bed - all the furniture. When I came to assemble them in the cho, I "discovered"(I should really have checked first) that the 2nd cell was a mirror immage of the first, so it wouldnt fit together properly. At the time I couldnt think of a way to assemble it (flip) in the cho. I had to add an extra mirrored cell in the model file first. The bars and mechanism were seperate models.
There is an automated project saver that will save incremated backups (001,002 etc each time you save your project file.


-
Loved that poem, Bendytoons.
-
Posting a picture might help, although maybe not.
Try messing with the length of the hair splines of the adjoining patches?
Chris
-
Seems like you might have "snap manipulator to grid turned ON. click the icon with the grid and pointer on to turn it OFF
Chris
-
The guard hairs(longer ones)on the fur look good. I would change the underlying fur to make it a little finer. Also I would have a direction map for the fur or comb more -Think whorls- I usualy take down the density to do this, and just step it up for rendering.
Chris
-
I'm afraid TSM2 only works with version12( or early 13?). If you intend to rig with tsm, I would have modeled in ver12(if available), then rigged using tsm, then opend and saved in 14/15.Or you gould just load a set of bones and poses from another model, re position them and reset the compensates, I think.
But a far better solution would be to use the squetch rig. Geat to install, great to animate,with cp weighting you get better flexing- plus lots of info on how to do it.
I think the splines are ok for the hips - its more to do with weighting/assigning.
-
Sorry David, I guess I should have been clearer. I had set up a resources file on a 420gb hard disk, and I use that as a resources file for or am stuff on any of the PCs(setup with thanks to rusty) I used the same method that noel suggested in that thread(wish I had read it) to set up svn, similar for libraries, materials etc. I meant that I couldn't see any difference in setting the database on a mobile drive on a network, providing the drive was re-connected each time you needed to use the information.
Hope you get it sorted,
Chris
-
I sourced it on one machine -the base, and then pointed the application at that folder from each of my networked pc's in tools options. I would think that a seperate drive may work the same.
Chris
-
Why thank you most kindly, Rodney - And i will use the new scheme, I just tend to renew in January.
Chris
-
I think since I cannot be classed as a "new user",the raffle should be open to "current subscription holder" as an extra incentive to take up the new scheme

Chris
-
-
Also now I think you need to key each bone you want mirrored, so when I do a walk cycle I key each of the major bones.
Chris
-
Not just those two, you should model the rest of her as well.......

-
Pointless?
Its all part of the "getting to know you/us "process.
Background research
Welcome wells5150, Newbie, Age Unknown, Gender Not Set, Location Unknown, Birthday Unknown.
-
Sorry Nancy- you are correct. I am just updating my svn database so I can see what you have been doing
Chris
-
Nancy, I've refined version b and uploaded it to the same place. I didnt get your post earlier, sorry.
Chris
ps Do you want a&b as well?
-
First of the lip synch tests using the updated sound files in the TWO database. Previously I have had to use one I created myself. All of them will be converted to this format, though.
And the second part
-
Sorry I dont understand what you mean by your last two posts.
Chris


prison cell
in Work In Progress / Sweatbox
Posted
I like using kliegs because I can control colour bounce effect quickly.I know its cheating, but conisider.....
If everything is lit by a series of white area bulbs, then the light you observe -the colour of something-has no change of tint whatever the incident light source(floor,ceiling, walls or skylight) is.-As I see it the reason why immage based lighting can be so effective.So a white box would apear to be the same colour wherever its put in the cell block.In the case of a room all the same colour, it doesnt matter so much, but the walls here are a little red and greenish, the floor a sort of greyish,ceiling whiteish and the light from outside is a little blueish.So the white box on the floor would apear to be a little blue, a box on the wall would apear a little redish, etc etc. I think of it as faking the Cornell box
If I was lighting this scene I would try to reproduce Mattts radiosity using both coloured spots and area lights.
http://www.hash.com/forums/index.php?act=a...st&id=34287
I would also add one or two small yellowish(If the film is white balanced for indoor spots then lower temperature bulbs appear yellowish) area lights in the cells as if there was a small light in there.And maybe pick up the bars on one or two of the cells
From looking at this :-http://www.hash.com/forums/index.php?act=attach&type=post&id=34258
I can see that the area near the camera is lit with a reddish light, making it more hospitable, whereas the area at the end of the coridor is a cold blue, making it more threataning.This can be done by changing the colour of the lights themselves(whatever you use)
Maybe a combination of methods works better. I like kliegs because I can easily moove away from "real" lighting to "emotional" lighting.If I get asked to throw a little more shadow or make something stand out, I can do so fairly easily. I gues it comes down to what you like.
Chris