edlundart
-
Posts
73 -
Joined
-
Last visited
Content Type
Profiles
Forums
Events
Everything posted by edlundart
-
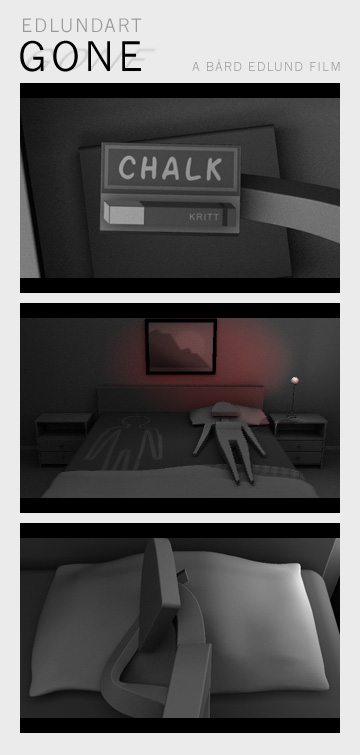
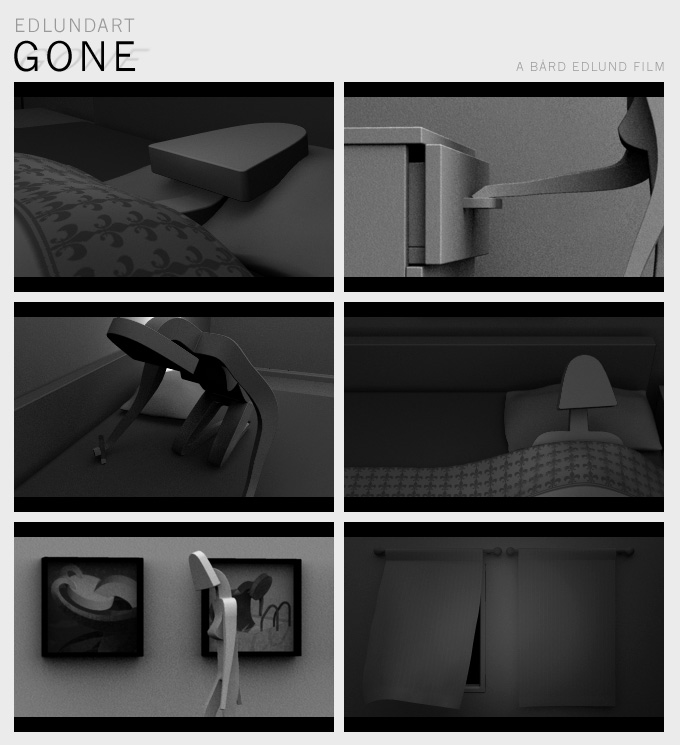
 Hello everyone, time for an update on my project. Since my first post about it, I have actually completed the final renders for several scenes. I started a file in my word processor listing the shots and their status -- "currently rendering", "ready to render", "completed", "needs tweaking" etc. (a spreadsheet would probably make more sense, but I guess I'm more of a free-form kind of guy when it comes to organization). I'd estimate that about half of my film is rendered so far (sans any kind of post production). As you can tell, I am rendering some completed scenes while other scenes don't even exist in any form yet. I will probably post some short test animations here eventually. In the meantime, here are three more stills from my film: The shots I mentioned of the character drawing with chalk are essentially ready to render, though I may need to do some more test renders to ensure the lighting is ok. Someone mentioned my posted renders look a bit dark. I am definitely riding that line, but I'm aiming to create a dark, moody look. I personally feel like it's working. I have a couple of shots where the character is turning on some lights, so there will be a nice sense of slightly different lighting situations. By the way, nimblepix, thanks for getting my name right! I live and work in New York, but was born and raised in Oslo, Norway.
-
I think your rooms and environments are too evenly lit. Try creating a better sense of real space by having some areas be darker. It can often be a good idea to have the background darker than the foreground, though that's not set in stone.
-
Why does my light shine through walls?
edlundart replied to edlundart's topic in Work In Progress / Sweatbox
I seem to have fixed the problem, but I'm not sure which one(s) of your tips did it! Thanks to all, at any rate. I think part of the answer is to have denser geometry. -
Why does my light shine through walls?
edlundart replied to edlundart's topic in Work In Progress / Sweatbox
Thanks Rodney. I tried to put six walls between the light and the room, but the light shines through them all. Does that satisfy the need for a second layer of geometry? Or do I have to model the walls differently somehow? Maybe the problem is something else. -
Hello fellow animators, For my short film, I'm trying to create a certain lighting effect using a directional light. I'm working with Ambient Occlusion. I tried adding a light, but it always appears as a spherical light source casting light in all directions. Instead I added the rim light that is default in any chor's PWS to my choreography, and that light is indeed directional. So cool, I thought I had it all figured out. The thing I don't understand is, the light is shining through walls. I'm trying to have the light partly obscured by a wall, but even if I aim it in the center of a wall, the light is just as strong on the other side of the wall! Is there some setting somewhere that will make my walls stop the light from going through them? Or am I missing some setting for the light itself? Maybe I'm using the wrong kind of light, but then how can I make a new directional light? Any help would be greatly appreciated.
-
I think that looks much better. These are very good models, I've been following along -- but this way of rendering them looks the best, imo.
-
Thanks for all the kind words. I'll post now and then with updates. Right now I'm working on a couple of shots where the character is seen drawing with chalk. It's definitely among the hardest shots I'll need for this project, but so far it's looking good. It's basically the shot you see in the middle row on the left in the image I posted.
-
hey, just checking into this thread for the first time. this is a nice project you've got going. i like how there is a consistency to the look and scale. I look forward to seeing what you come up with in terms of sets (background) for the performance shots.
-
Hey everyone. I've been reading this forum for a while, and asked a question here and there. I would love to answer some too, but usually I just don't know the answers to people's questions. Hopefully that will change over time, but I'm still a novice, for sure. I thought I could be somewhat useful though by sharing my project in the WIP section and describing my process a little bit. If this post gets any kind of response, I may continue to post updates or answer questions or more likely ask questions on how to overcome my latest technical problem as I continue working on this short. I've been working on my first animated short film on and off for several months. I got A:M about a year ago, started out doing tutorials, and once I got the basics figured out I started modeling a woman in the style I have developed in the last decade as an illustrator and artist. I have a body of work of characters in this style, but it's always been still images, and they've (almost) always had a more painterly texture. My work has not been character-driven as much as pose-driven, and often it has veered into very abstract territory. I love using these geometric forms to express various human ideas. I enjoy the contrast between the warmth of the messages I am conveying and the cool hardness of the forms. So anyway, simple as she seems, modeling and rigging this woman took me forever, mostly because I insisted on beveling every shape. I think that was crucially important though. Despite all my efforts, she is far from perfect, especially in terms of rigging. But I've been able to work with its limitations, and I'm fairly happy with how the project is coming along. Over the years I have attempted a couple of animation projects, but I always give up because I get too bored with it. To me, once I know exactly what it's going to be in my head, it feels as though the puzzle is complete and I can't stay interested. I've found my solution to this problem: I don't create a storyboard, I animate the scenes out of sequence, and I don't decide what individual scenes will look like until I start working on them. All I've got to work with is the general story outline I wrote. I intentionally refrained from working out all the details ahead of time, so that every moment of working on the film is a process of discovery, trial and error. You could argue that this is not the most effective way of working, and certainly it's close to the opposite of every piece of advice you'll ever hear about how to make a good film... but it's the way to do it for me. Due to this way of working, I initially figured my film would probably be about 5-7 minutes. Now I know it likely won't amount to even 2 minutes. This is not because I have cut scenes I planned to do, it's because I have figured out the natural pacing of it as I went along, and it's clear to me now that the story will be told in less than a couple of minutes. I did make some decisions along the way to try to save time: I knew that coloring and texturing would be a drawn out experiment, so I decided to make a black and white film without any textures. I felt this aided my story and characters anyway, and the fact that it would help cut some corners in terms of time was a great bonus. I also chose many camera positions that are hiding flaws or missing scenery, etc. I really like coming up with shots that are both really great compositions AND clever in terms of hiding "problem areas." I have well over a minute of finished animation, though some tweaks will be needed on some of the shots. The final render will probably take a couple of months running in the background on my pc... If you have comments I would love to hear them. Happy animating to all!
-
This is looking really good to me. I really like the feather edges. How did you do those?
-
i had this problem, but once i shut down A:M and restarted, it worked. also try unchecking some of the options on the right side of the plugin (i don't have it in front of me now, so i don't remember specifics). basically the fewer things you enable, the better chance it has to work, it seemed to me. but that means you may have to close off shapes yourself, etc.
-
Thanks Dhar, that's kinda what I suspected. I appreciate your thoughts, in this thread and everywhere on this forum. I look forward to one day being able to answering people's questions instead of just asking. If anyone have thoughts or ideas on how to accomplish this, do chime in. I think I've got a pretty good idea, it will just be a challenge to do it in a way that will look believable.
-
I am working on an animated short, doing scenes in order of my own ability to complete them. I'm learning as I go along. Now I have a scene coming up which will present a challenge. Basically it will have my character in bed, under a blanket and she is supposed to grab the blanketand "fold it" away from herself as she is getting out of bed. I'm thinking about trying Cloth for this (for the first time), but does that seem like the right approach to you? Maybe I could just model a blanket and put bones in it that will allow me to animate it from a more or less straight state to a folded state. Do you think that would be better in this case?
-
KenH, your suspicion was correct! i thought it was the root bone, but as it turns out, when i selected a blank area in bones mode, the giant root bone showed up. so, i can now scale and position it to my liking. i don't get what the other bone is then, but it was labeled COG and was a remnant from the cube primitive i used to create this particular model. what is that bone for? anyway, thanks so much to both you and largento for helping!
-
i've been making models for a little while, putting them into a choreography, and animating with them. but now i made a new model, and when i try to import it into my chor, the model gets a huge bounding box around it with a huge bone somewhere away from the object. if i edit the model, the root bone is smaller and placed correctly. but back in the chor, it has this huge misplaced one. how do i get the bounding box to appear normal again, so that i can easily manipulate the model (ie, rotate it, animate it) ? i have found other threads where people have this or a similar sounding problem, but i have yet to find a clear answer i cold grasp. any help would be appreciated -- thanks!
-
I enjoy watching your experiments. The second one almost looks like rain...
-
Oh, and yes, you can add color and texture. AM can do pretty much anything you've seen in any 3D animated film. Whether or not YOU personally can do it with AM as your tool is an issue largely having to do with perseverance, talent and ingenuity. That goes for any other 3D program as well, of course.
-
The backgrounds are created either in the same way (sculpted 3D objects) or you can use 2D images like photographs or drawings imported from other applications. You might find this link useful: http://www.pixar.com/howwedoit/index.html It explains how Pixar makes their 3D films. They use their own proprietary software, but the general idea is similar.
-
I see. Thanks so much David. I'll give this a go.
-
Oh -- but then won't I lose other important stuff? Like how bones are anchored together and so on?
-
Thanks for taking the time to sort this out with me, I really appreciate it. I'm sorry to possibly exhaust your patience, but I'm not 100% clear on your last instructions. In PWS, I open the Relationships folder and I then see a bones folder. Opening the bones folder reveals the list of all bones in the rig. The 1st one is Back. If I open that one I get Transform relationships and inside that Rotate relationships. In rotate relationships there is a smart skin item. Are you saying I should delete that, and then go through every bone in the list and do the same? If so, that's not a big deal, but what about "user properties relationships"? Do I have to do anything in there? Thanks again for your help and patience.
-
Aaaah.... how can I delete all smart skins to make sure I'm making new ones that are not affected by anything old from Thom? Do I have to go through each and every bone in the PWS? I'd rather not lose the skeleton...
-
Hmm... I think a theory is developing here... I did not yet create a smart skin for the pelvis, nor for the legs. But I transfered the skeleton and relationships from the Thom model. Is it possible I also transfered smart skins for Thom and that I've been altering those instead of making new ones that would be unique to my model?
-
Yup, I've picked up that lesson. I still don't know what I did with the smart skins to cause this weirdness though, but when I do this again I will attempt to be even more careful.
-
Thanks, I'll give that a shot, although I am 90% done with the remodeled arms, and prefer them to the old ones anyway. So I need to redo the smart skin no matter what. But thanks a lot for looking into it, I'll definitely try what you said to see the problem isolated. But I'm curious... I've seen people asking how they can make several smart skins per bone. Should I be doing that? What I have been doing is focus on the bicep bone, and tweak the geometry for one extreme position, then another, then another, etc. Would it work, and would it be better, to make one smart skin per extreme position? Am I asking for trouble by having one smart skin account for all possible positions of a bone? As always, thanks for all your help.