CRToonMike
-
Posts
205 -
Joined
-
Last visited
Content Type
Profiles
Forums
Events
Everything posted by CRToonMike
-
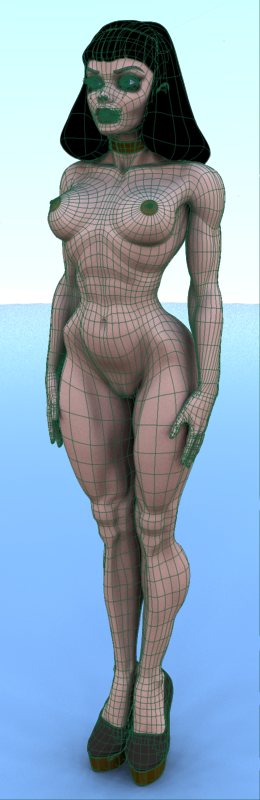
The length of the leg is okay, for leggy "good girl" art. The legs could taper more and that would take care of the kneecap bigness that Ruscular talked about. The inner thigh curves outward into the crotch where it could buldge outward a bit. One thing to help keep the leg somewhat porportional is to see where the heel ends when the knee is bent -- the heel should end up somewhere at the buttocks. One thing that could, imho, be causing the visual wackyness of the pelvis is that the stomach area. The tummy is a peanut/elongated pear shape and the bottom half is larger than the top. Not quite the case as the side view shows. Then the sides of the midsection connect into the hips. The outer hip joint is kind of a central meeting point for those muscles and the muscles of the thigh. (iirc, the thigh muscle is the longest in the body). So there's the midsection side muscles going into that hip joint and the thigh muscle going out and around to end at the kneecap. Most of the curve of the hip is those two muscle groups "weaving" together. Maybe it's that there's no indication of the lower rib cage that adds to this visual impression? And there's the outer hip bone that is close to the skin at the hips, it compresses the lower tummy and gives that part of the stomach its buldge. And the bottom of the tummy goes inward and then buldges outward just a titch for the top of the pubic area. Rusclar was spot-on in his description. Don't forget that there's a lot of "s" curves in the femme form. The muscles under the breasts curve up and become the shoulder muscles and attatch to the clavicle there. And begining at the hip joint, the thigh muscle curves around the thigh and joins into the kneecap and the lower leg bone curves out a bit (like you've indicated) and the calf muscles are pretty much like you've done. I would make the transisition between the end of the calf muscles and the upper foot a bit more severe. In the side view, the leg is fine, but I feel that the heel of the foot should jut backwards just a bit. Maybe by making the thigh/upperleg go forward a bit and the lower leg back a bit and keep the foot pretty much where it is now could help. What's helping me in my modeling is do do sketches of the figure and do contour lines so I have an idea of how the splines flow. The moment I got over my fear of unsmooth splines, I began to intuit how to use that aspect of splines to my advantage. There are dozens of areas where we want creases. Like around the shoulder and lower hip/inner thigh area. My gut feeling is that you have a good model here, now make a copy and exagerate things a bit. Go for creases where they exist in the body, like in the shoulder/bicep area. Make those lil' splines work for you. hth. Looking forward to seeing this model develop more. I've included a wireframe, not by me and I wish I knew who did it, I dl'ed it years ago and two computers ago and the author's info has been lost and haven't found it again. But it bears some close looking at nevertheless.

-
Ohh, it's so twisted. I mean that in a good way Great pix, it looks like it's done. This is going into my A:M keeper pix folder. Thanks for posting this.
-
Very cool progress. The flyaround movie was very good. I agree with CarterHawk about the fish looking old and battle-scarred. Adds a bit of backstory to 'im. Now I have the phrase "keep away from the green ones, they're not quite ripe.." going though my mind. Anyway, I think the eyes could be a bit bigger, they kinda get lost in the texturing. Have you given any thought as to this fish's personality? With the downward angled mouth, I'm assuming he's (she's) a predator. Really fun model, in anycase. Really like it.
-
Not bad for first models. If you haven't, check out the ARM for tutes on Modeling Head and bodies. Big help for me. And if you haven't, use rotoscopes. When I started drawing the objects I wanted to model, I was drawing them (front, side and rear) I was "thinking" more in 3D than usual. By the time I finished the drawings and began to model them, it was like I "knew" how to. And extrusion is your friend. Next time when you post wireframes, could you either hide the front/back/sides (depending on which view you're doing -- if the front, hide the back, etc...) or just do a screen capture of the shaded wireframe view. It's a bit confusing to me (and maybe, others) to see the entire wireframe at once. Good begining, in anycase. Looking forward to more.
-
Really good costume design. Especially like southern cross's costume. Too bad about the ZB tute. I'll experiement my self, you just keep on with this project -- it's a lot of fun it seems for all of us to see!
-
Really nice work. From the color scheme to the composition. Yeah, this one's a keeper!
-
Uhh... is there a link?
-
Been following this thread and it's lotsa fun watching the evolution of a project like this. Of course, John's great characters make it that much more fun. Am kinda curious though, about using ZBrush and A:M together. There is a tute on ARM, but it comes up 404. Where is it, John? Very interested in reading it. Great work again.
-
Hey thanks Nate! I did the changes you suggested and just couldn't get the mesh to look smooth. Then I stepped back and reworked the splines along the chin and cheek and the 5-point spline moved down to the dimple area, which if it gets creased, is just perfect. Here's the wire frames: And the final (so far) render: Although I did take your advice and then "did my own thang" I just want to make sure that if it wasn't for your good advice, I never would've had the train of thought that eventually I used. Heck, I eliminated a hook in the process. One of the probs I had with your solution, or with the way I tried to do it, is that it created two 5-pointers too close together. Ain't that the neatest thing about art -- there's no real wrong or right answers, just what works better for someone in a specific situation. I'm having a blast working on this figure in A:M, once I began to grok splines. When working in polys, I would dread moving a vertex. Now in A:M moving CP's are a lot easier and not a chore at all. next up, teeth, tongue and a body (dunno, should I do au naturale or costumed version? ) Thanks again, everyone who posted a comment! I apprectiate it a lot.
-
Thanks for the comments, Mike! I've been told that I really do well with character design, guess when I start Art School in January, I'll find out...
-
thanks for the words Francois! As far as this being "just like the Saturn Girl in the comics" -- well I'm taking a page from Tim Burton's book and "re-imanging" the Legion. So it's not supposed to look exactly like her. Just an excuse to model a fem's head, that's all... Here's the latest render, improved on the lighting, maybe... The front and side wireframe (just in case y'all wanna see it): And for the halibut, a few bird's eye view one with wireframes: The bangs will be duplicated on both sides. The figure's left side bangs will be a bit more up-n-out than the other side. Eventually she'll have a braided thing-a-ma-bob (where guys have sideburns) that some anime fems have. I'm going for Bruce Timm-style eyelashes, I think they may have to be shortened a bit, but I'm too "close" to this face to judge. Any comments? Oh, the 'lashes will be changed to be a darkish-sandy-blonde color. If anybody wants to share their technique for eyelashes, I'm all eyes, BTW, no decals are used, yet, think I'll wait for the '04 disk to arrive. Trying for a glossy-lipstick for the (duh!) lips, but just can't quite figgure it out. Help...please I'm new to A:M and to the material editor. The Gold metal link in the ARM comes up 404 (as does a number of the more interesting links in the ARM and the Forest) so I'm pleading for some 411 on it, tia. Any other comments, especially on how the mesh could be optimized would be greatly appreciated, tia, again. Oh, the neck bottom looks like that on purpose, I think it'll make it easier for me to attatch the body when I get to that point. Next up, as I'm a bit burned out on the hair, is to model the (snort ) body. Or maybe Teeth. edit: Oh, Francois, I'm not sure if it'll be toon or "real 3D" rendered. Figgure that one out when I get a better handle on modeling and working in the Chor.
-
Holy gentle giant, Batman! The curves and shape just seem really right for a big fishie. Wondering also about doing the fins as separate meshes. Seems to me by doing them separate, you could be missing out on some folding and wrinkles on the skin around the fins. Just my 2 CP (as opposed to cents) worth. When I used to work at a petshop in Berkeley CA, I would stare and watch and study the fish every chance I could get. Even had a 30 Gal aquarium at one point. Looking forward to your interpetation of a big fish. On a great start so far, it seems.
-
Like what Grubber said, the eyes are great and the shape of the face, chin and such are just perfect. Conveys (to me at least) a quiet reflective attitude. Wonderful work!
-
nice job so far, smooth surface. But the ear and jaw line's a bit off. Here's a quick 1 minute sketch I did in painter: The red lines are where the front and side views "line up" along the features. The green lines show where things are relative to other things, e.g. middle of the eyes line up with the ends of the mouth. In the side view, the green lines show that in (my cartoon in any case) that the nose is a bit further out than the forehead. And the lips are not even with the forehead, but not out as much as the nose. The lips are on a kind of curve (like a flattened barrel). Some faces have the chin jutting out past the lips and others have the chin behind the lips, so to speak. The neck is sometimes at an angle, as shown. The ear top lines up pretty much with the eyes, and the bottom of the ear is around the nose line. The bottom two drawings are basic face construction aids -- front view two circles, one is about twice as big as the other, directly above each other. Side view has the same two circles -- but aligned along an angle. Keep in mind that I'm a cartoonist and this drawing is exaggerated to show relationships. hope this helps. Looking at your face, it almost seems that the bottom half is squeezed a bit. By pulling out the nose, lips and chin you may make it look a bit more "natural." But it all depends on what kind of face you're aiming for.
-
Looking real good! The mouth is still a titch off. On a number of wireframed faces I've seen, the splines from the nose go downward to the lips, and there's rings of splines around the lips that connect with the nose splines to form patches. Very good job!
-
Here's the latest version of Saturn Girl. Fixed a buncha splines and moved around some 5-pt patches, yadda yadda yadda. Quite happy with how it looks now. As you can tell the hair is being worked on. Not using the hair ablility of A:M, just creating a shape and will muck about with the shaders/material to get the look I want. Next, along wth the hair, is to play around with the lights and background. Any and all C&C welcomed! thanks, mike r
-
Looking at the wire of your face, here's an idea. Sorta out of left field, but hey! we're artists here and sometimes approching something from an oblique angle can help... Get a largeish mirror -- or a vanity mirror-- something that's sturdy wall-attatched or someshuch, some dry-erase markers (or something that can be erased/cleaned off from the glass easily). get a comfy chair (oh no! not the comfy chair!). Sit on the chair and make sure you can reach the mirror with the marker comfortably. Now out line the shape of your skull, ears, nose, etc. These "landmarks" will help you get your face in the same postion in case you get interrupted. Now make faces and notice where the muscles are, where the bones are. Open and close your mouth, pay attention to the jaw and such. Raise your eyebrows, close one eye. Now with the knowledge of where the muscles and such are, using spline-like lines, make a wire-frame drawing on the mirror of your face. Have the spline-lines follow the contours of your face, the eyesockets and "ring" around the lips, etc. Use as many lines as you need to describe the contours of the parts of the face/head. When you have enough lines, make a freehand drawing, copying what you did on the mirror. Clean the mirror off. Now try to create a face in A:M using your drawing as a guide (you could even scan the drawing in and use it as a roto. I hope this idea will give you a "spark" to polish off your head. I've been modeling so intensively in A:M of late that when I look a something I see black spline lines with red squares in the intersections of the lines. later, mike r
-
very cool picture. If this is any indication, the short will be something else! It's the attention to details, that you listed that has me really wanting to see this. thanks for the great picture.
-
Great animation. I was all keyed up for this one. As I was watching it I alternated between delight and complete loss of control! So that's the kind of escapades keyboards do when nobody's around... Really slick job! Thanks for tooting your own horn!
-
Nice improvements, Zach. The eye sockets could be pulled in a bit and the cheekbones could be pulled out also. And the nose, lips and chin could be "angled" a bit and pulled out so the overall shape of the head is kinda like a slanted oval with the nose being the furthest out and the lips the second. Really like how smooth the model is, looks nice. There's a very slight crease coming from the middle of his eye down to the mouth, maybe with pulling out the cheeks and pullin in the eyesockets could take care of that. Ears are a real biotch, for sure. I think of an ear as a sylized "C" shape set at an angle pointing towards the chin from the side. The ear angles out from the head towards the back from the top. What helped me when I was doing my Saturn Girl head was to let the splines from the front of the head, back of the head and neck converge on where the ear would be. I made a hole about the shape of the ear. Since I was working on a half-head (to use copy-flip-attach for the other half), I could change to the left view and make that ear-hole smaller when the shape was more or less finished. Then I extruded once, made this ear-loop a single spline by breaking and reattaching CPs that were not contigious to the spline. This made selecting the ear-loop a lot easier and more controllable. Extruded again, to get the outer bowl shape. Extruded again to get that curved "lip" of the ear's top. While extruding, I worked on the bottom of the ear also to get the shape and size of the ear lobe and the part of the ear that curves inward. The thing that helped me was to just work on one ear-loop at a time and when it's "done" do another extrusion and move CPs around until it looked right. Once the top "lip" of the ear was shaped, extruded again, scaled the extrusion down a bit, and moved it upward to finish the inside of the "lip" and worked on the bottom part. And so it goes... Helps to have a few reference works on ears around and I did a few drawings to help me get a feel for the ear. My ear took shape when I realized that the ear is *not* concentric circles,but a curvy landscape of sorts. Oh, one last nit, your ears a bit high... the bottom of the ear should be just a bit below the bottom of the nose. The top of the ear should line up pretty much with the eyes. Great progress, in any case.
-
If that area that's giving you the problem a door (and I seem to think it is and the wireframe looks like it) then maybe be this tute by Jeff Cantin could help you out -- it's about creating seamless hatches and may be just what you need. You could also bevel the edges, ever so slightly (zoom in real close) and make the natural curves of the splines work for you. Hope this is of some use for you. Looking forward to this vehicle's evolution!
-
Nice cars, Amar. As far as the lumpiness goes, It looks like the CPs are twisted or wanting to go bent. iirc, adjusting bias can do stuff like that. What I've learned thus far is that if you're going for an abrupt change, try to keep the patches as squarish as possible, and increase resoluion of splines in the area. In the faces I've done, one had a problem kinda like yours, I deleted the spline, CPs that the spline was on and then added new CPs and Splines. ymmv. Putting up a wireframe could help in this problem. hth, mike
-
Thanks Zach! Fergot about dem there hooks, I believe they've been zapped in the resultant smoothing, but I'll check and make sure. Should have another pix up here later on in the day. Finally "got" lights in A:M. Once I figured out lights, it's surprising how much easier they are to use than the ones in C*rr*r*. Later mike
-
Here's the first result that I'm willing to share as a WIP. Eventually she'll be Saturn Girl from DC Comics Legion (of Super-Heroes). The face still needs some smoothing. The eyes are from the Animation:Master 2000 handbook by Jeff Paries. I only tweaked the Iris area by moving it inward. In some lighting situations, it'll look cool, as it'll have a hilight in the shadowed area. That's the theory, anyway. Still getting the hang of renders and lighting in A:M, being used to Carrara for lo these long months. Plan on checking out the Forest or ARM for some tutes on them. Any suggestions? I used the SAY boneHed as reference, as a number of other resources. The wireframe that Jim Talbot posted in the Alpha 11 hair thread was inspirational for me and I learned a lot by looking at it and trying to apply it to my head. Cindy Grove's tute on facial modeling really helped me get the eyelids right. The ear is entirely mine, though. I did what could be called a "Reverse Extrusion" -- like with the lips, you start with the shape and then move outward and such. Did about the same thing with the ear, only I shaped a hole, selected the edges of it and extruded and scaled it smaller. Moved CPs around and repeated. Still needs some work. Think I'll just do a shape for the hair. Eventually I hope to get some kind of "modeled out of clay" type render look for this. Let me know what you think, no nits too small to pick! Thanks! Mike R.
-
Here's some stuff that helped me making faces/heads: Download the SAY hed (find it at the ARM) and then select points and hit the comma key to see where the spline goes. Learned a lot about construction that way. Using rotos help a lot, at least it made a big difference for me. As Jim Talbot said in the thread (Alpha v11 hair, iirc) a key point in meshes is to try to keep the patches as "square" as possible. Putting splines where muscles/bones are in the "real" face is a big help in getting the contours right. Having a mirror handy helped me a lot in getting the nose bridge/eye socket depth-contours better. hth