
TacoBallZ
-
Posts
201 -
Joined
-
Last visited
Content Type
Profiles
Forums
Events
Everything posted by TacoBallZ
-
Awesome work Eric! I'm from Arizona and I am wondering where you took that photo. It definately looks like the hills from around here, but I don't remember ever seeing that old building. Can you give me a location?
-
Can we get a screenshot of your cloth object? I'm pretty sure Rodney's right on this one. I've had that error when the cloth starts to fold on itself and the CPs are a little too close together, and the simulation just goes a little crazy
-
Usually when there is a file error like this, the only way to fix it is to go in an manually edit it with a text editing program. However I have heard that if you send a copy to the support team at HASH, they might be able to recover it for you.
-
Very nice! I am a big FSN fan and I think you did a great job with the model
-
Here is a model I created based off the Anime character Aisha in "Outlaw Star". She is more of a Beast-type than the traditional cat-type. (OK I am showing my uber nerdyness here) I have an older Cat-girl model I made and animated a while back (2000?) and I will post it later when I can find the files.
-
Very nice scene, I like where you are going with this.
-
There's a way around that... Make the stuff 'in the hole' weighted to a bone that is a child of the boolean bone...and they do not get cut away! Thanks John, I'll have to try that next time. I figured there was a way to do it, but it seems to render pretty well with the cookie cutter for right now. Progressive renders look kinda weird however
-
I tested all three ways you described. Boolean was the most obvious choice, however when doing so, whatever ended up in the boolean hole was also cut out by the boolean object. Modeling the hole would have taken a substantial amount of time.... The solution with the best results was the cookie cutter!! Using an extra cookie cutter image for texture color helped me align the fan objects into place.
-
I just purchased 1 seat of the Hash 2008 Web Subscription. I'm liking it so far, but I've always been a fan of A:M. Speaking of Fans.... here is something I've been working on over the last couple of days. The real tricky part was actually figuring out how to make a hole in the wall for the fan assembly. There are several ways to do this but I would like to give the Hash Forum community a couple chances to guess what technique I used before exposing my final solution.
-
It's pretty much my favorite mech. It's like a lion and a tiger mixed... built for its skills in magic. Man you had me laughing so hard on that. But yes, The Liger Zero is one of my favorite's too. I have my fair share of ZOIDS and transformers
-
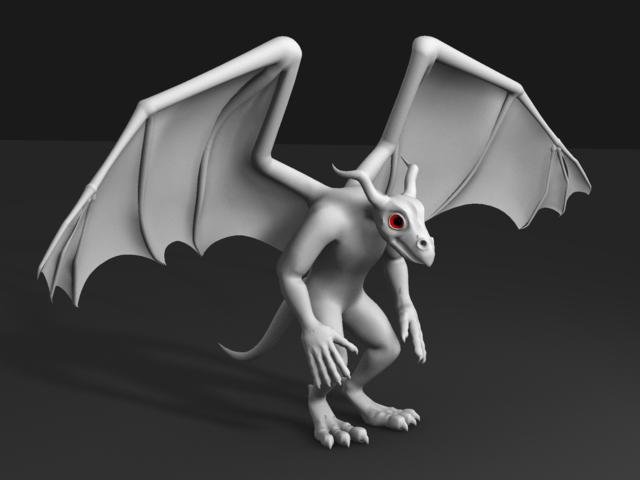
This is a model that I started a couple years back for the Siggraph cloth demos, however I didnt have enough time to get a successful project going but I kept him around because I liked the posture. Well here he is now with a full set of wings, new schnoz and tail. I will post more replies later with wireframes and progression pics. I hope you enjoy. The wing skin isn't quite attached yet. I just threw it in there so it wouldn't look so bad. The slow process of stitching it into the wings will eventually be done. [attachmentid=21341]
-
Ordered mine just now. David still owes me a signature for buying his first copy.... Ohwell I'm sure he can now take a break and join our shennanigans on the forum or in the chatrooms.
-
Oh no, another Sorry Vista AM-er. Just kidding, when did you get into A:M? I've been using it since like 98. What kinda stuff are you into, 3d wise, animating? modeling, or just getting started?
-
Bah, rain is for Garage Bands from Seattle... I happen to like my dry heat.
-
Hair can be simple or it can be extremely complex. I am attaching a scene which I used a animal print graphic I found on google. The basic steps for recreating this in AM v12 is this Open new project Import the animal print graphic Create new material, change the attribute type to particle ->hair Create a new model, a lathed dome works as a good example Apply the hair material to the dome model (the hair should show up, if not, hit Shift-8 ) After this point you can adjust the hair's individual properties to your liking, but first we will try something cool. Apply the Animal print image as a decal on your dome, apply it from the top view. You will see that the decal 'Type' under the image section will be set to color. Change this to 'Other' from here, you will see a new line appear below the Type setting called 'Properties Driven'. Right click on this line and pick 'Add Property' Pick Density... The decal will control the amount of fur depending on the color, Black for none, and white for 100% of whatever you set your density in the hair material. If you duplicate the decal steps again, but leave it as default settings, you will get something like this. You will end up with something like this. fuzz.zip
-
I've done several fur tests however it's only for small areas, doing whole body fur takes a lot of time and patience. From what i've seen, 2 or 3 simple hair materials work better than 1 complex hair material. I will upload some examples in a bit. I need to get settled in and remember what I did before. -Mark -edit, er oops, I kinda got side-tracked. I'll get something uploaded when I get off owrk today. In the mean time, what kind of fur effect are you trying for, any specific type of animal you had in mind?
-
I've had a similar problem like this before. You must have either your video card settings to force Anti-aliasing or the AM opengl settings panel to enable Anati aliased (lines i think). Try it out. See if that fixes it.
-
 He has a TAIL! It's not working right quite yet... I'll post a nicer render when I figure it out. 1MB sorenson3 quicktime http://renderwild.com/3d/keeper_tail2.mov
 -
Yeah, in trying to eliminate the pop, and fixing the torso trajectory, I may have dulled the pose of takeoff, which gives it less of a dynamic feel. Ohwell, its back to tweaking. I should probably rename this thread to animation sketching, because there is no real goal but to just practice. Thanks for keeping a sharp eye on it.
-
Updated: http://renderwild.com/3d/26rig_test_anim.mov I will also be pasting the updated clips in the first post.
-
Thanks all for the comments so far. I'm just adapting the basic rig from Dadiv Rogers Animation Master, Complete Guide. Even though the book is several years old now, most if not all of the constraints work the same way. This block man is pretty straightforward rig, I will upload it. I "borrowed" the feather from the Constantine wing post. (Thanks Entity) http://www.hash.com/forums/index.php?showt...hl=constantine# [attachmentid=14147] block_man.zip
-
I was just trying to teach myself how to rig a character (again) and decided to start out with a simple model. It's just a Box with boxy legs. It's not very refined, the jump aspect I think needs the most work. The knee targets will *pop* when extended fully and I think that's my problem. Here it is, enjoy. Updated 2-5-2006, 2MB Sorenson3, quicktime http://renderwild.com/3d/26rig_test_anim.mov
-
Now with new ears! They could use a little more tweaking to get the creases out, but I am happier with them than the previous ones.
-
Well, I created a simple gradient that used the following settings, you have to make sure you use your rulers to determine the start and end point from within your model window. I am looking at the material window from the right side. The yellow starts from the tip of the nose at about 1.8cm Z and ends at -.25 Z (eyebrows). The rotation is handled by the Y axis, in which it was mostly trial and error to get it to look right on my model.
-
I found this on the net today as well as some video footage I am taking from the game. These angles give a much better impression ofthe form of the ears. However it also makes me want to redo the whole model already. Ohwell. The snout has been shortened, and dealing with tweaking it all over again has taken up my whole day. Ears will come next. (Also forgot to mention that I remade the teeth as with separate tops and bottoms so that they can be animated.)
