SplineSoup
-
Posts
104 -
Joined
-
Last visited


SplineSoup's Achievements
Apprentice (3/10)
0
Reputation
-
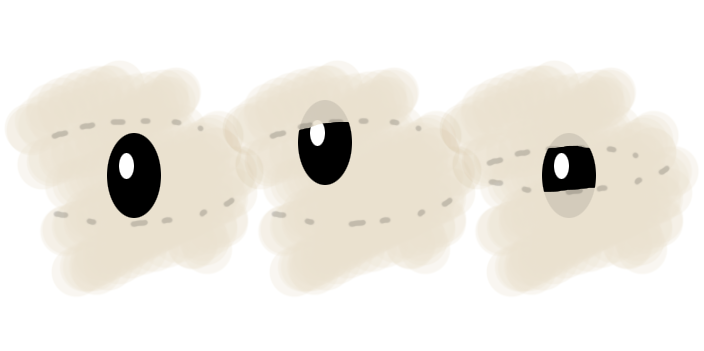
The eyelids are, in fact, flattened and distorted spheres that protrude out of the character's head. I figured this would give me the flexibility to punctuate his "extreme" looks with visible eyelids but then hide them the rest of the time by pulling them back into his head and just stretch or narrow the eye-beads for most expressions. The connection between the lids and his eyes is a challenge I'm pondering. As for the output styling, I'm thinking flat shading but, in reality, I'll probably end up with some sort of hybrid blending of toon and 3D shading like this: In any case, the presence of actual, skin-toned eyelids would leave undesired traces on the existing face geometry in the way of toon shadows. To simplify this challenge, I think just focusing on these eye beads would be a good step for now, without separate lids. Here's a quick diagram of what I'm thinking: The eyes would sit within an invisible boundary such that they could appear (1) their full size, (2) roll up or down into an imagined eyelid boundary, or (3) be obscured by the boundary line closing. I like the idea of creating decal poses for discreet eye shapes (ala Bubble Guppies) and will look into that further, though for this character I'd like to keep the eyes 3D. Holmes Bryant had an interesting tutorial on animating distortion boxes that I looked at a while back that could be used for things like flat tires. Perhaps this is a viable option for eyelids, as well? I'll see what I get later this week. Chris

-
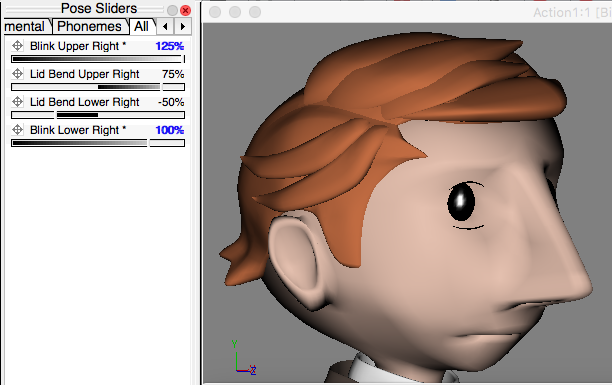
I'm working on rigging a character right now that has black bead eyes (like the Peanuts characters) that can track slightly around his face to give him the illusion of looking around. I'd like to add a bit of expressiveness to his eyes by adding equally simplified eyelids that would render as a flat line or an arc. To do this, I created flattened spheres and pose sliders to control their up/down and arc properties. I was just about to start with poses that would conceal the eyes as the lids close but stopped when I realized I was about to have a huge problem with this approach: if the eyes are looking anywhere but straight ahead, I had no strategy for making sure they stayed matched up with my eyelid positions, which are parented to the head. I'm curious if anybody has suggestions for rigging a head with black bead eyes so that the eyes interact correctly with visible eyelids. The combination of eye movement and blink percentages is giving me an interesting puzzle. Some possible directions I've considered are boolean cutters, decals, "maybe expressions...something-something?", and giving up and just animating the eyes frame by frame (eek!). To maintain the look of this character, I'd like to avoid actually having eyelids protruding from his face to cover over and mask his eyes. Any suggestions or lessons from experience are much appreciated! Chris
-
I'm a little late to the game on this one, but I did discover a relatively simple work-around in version 19.0f on my Mac when I discovered that newly-created pose sliders did not display the indicator bar. I'm posting my solution here because I know how much of a show stopper this issue can be for the affected users if they are trying to create a model. The problem occurs when the pose slider is left with the default "-not set-" state in the PWS. To resolve the issue, you need to open the disclosure triangle for your model in the PWS and open User Properties. If any pose shows up as -not set- you'll need to add a default percentage value for the slider. Once that's taken care of, your pose sliders should work again with a visible indicator that you can click and drag about like normal. Hope this helps anyone stuck at a pose slider dead end in version 19.0f. Best, Chris
-
Marvelous! I had actually forgotten there was an entire section of the forums devoted to rigging. I am currently running my A:M subscription on my MacBook Pro and am doubtful that this license will work for A:M v16 if I virtualize Windows on this same computer (pretty sure the machine ID is different), but I'll give it a shot, nonetheless. Pretty cool to see the range of rigs and techniques that have popped up as alternatives, too. Thanks, Robert! Chris
-
I was just going through some of the old Character Rigging tutorials that Raf Anzovin compiled for Animation:Master back in the early 2000's and remembered that Anzovin Studios, which currently produce a set of killer rigging/animation plug-ins for Maya, began by programming for and working with A:M. Does anyone know if The Setup Machine can still be found anywhere for A:M or if it even would still work? If not, has anything come along since then that assists with the rigging process for humanoid and non-humanoid characters? Just puzzling...
-
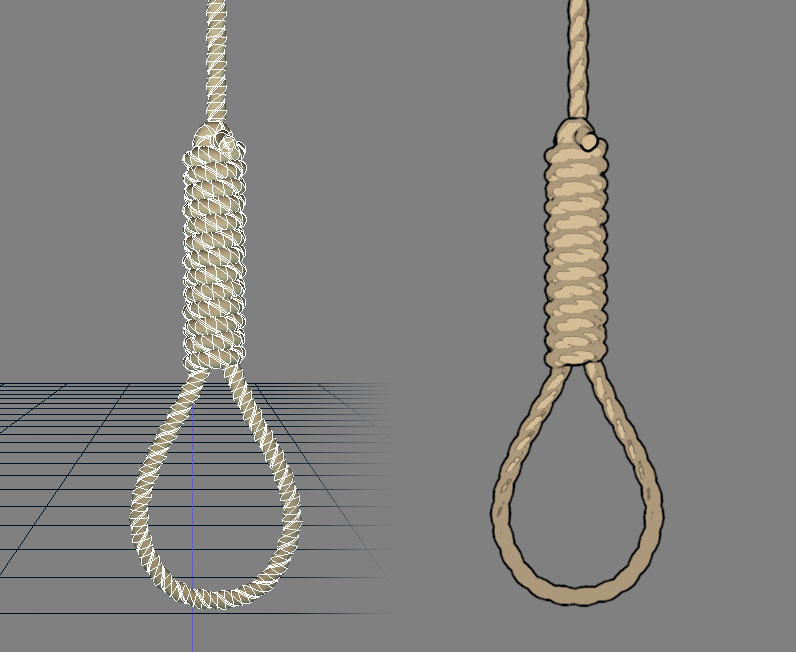
Maybe that could be a future mascot competition for Animation:Master. Call it "Weapons with Personality" or something like that. But actually, this noose is a key prop in a short animated adaptation of "A Ballade of Suicide" based on the poem by G.K. Chesterton. I'm creating the first promo image for it and will post it here when completed.
-
Good information, all of this! I'll take a closer look into the DarkTree material plug-ins as I reacclimate to A:M in the coming months, as they seem to contain a wealth of possibilities for adding low-CP details. I went ahead and tried Rodney's suggestion to try the Sweeper wizard and found that it both simplified the creation of the noose knot and resulted in a satisfying texture when rendered with the toon shader, which I'll be using extensively for this project. Thanks for the excellent options! I am impressed by how quickly this came to a good result! Best, Chris
-
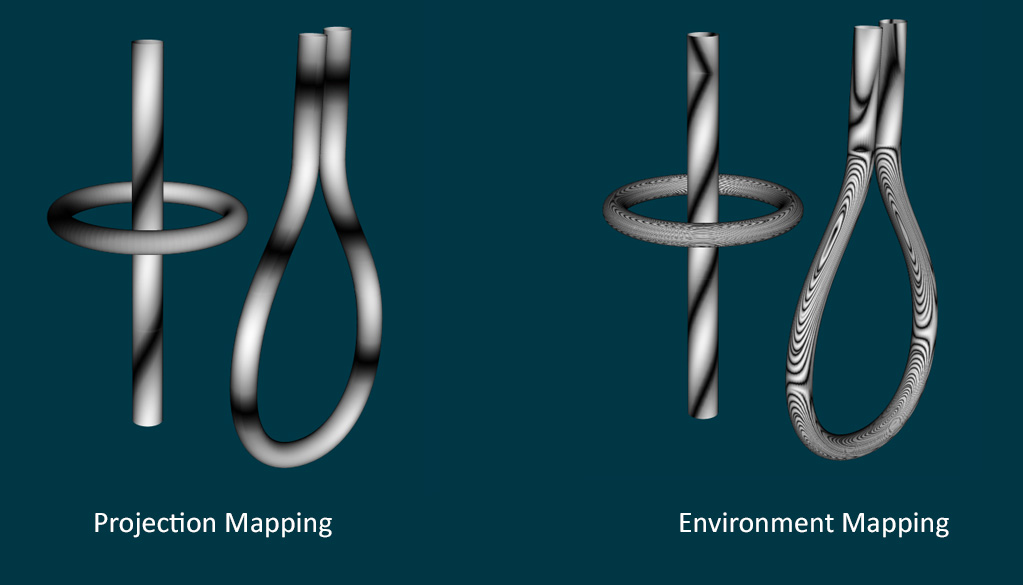
Thanks! I created the avatar while demoing stereo 3D principles for a group of students a few years back while taking a hiatus from A:M. Oddly, while much of my A:M program knowledge has leaked out of my ears in this interim period, I still seem to remember all of the keyboard shortcuts I used. The texture map works well mapped to a cylinder and appears to be seamless from all sides. At this point though, I've run into the limits of my materials recollection. I have tried mapping the texture using both projection and environment mapping, but get weird results on everything but a basic cylinder. My inclination was that decalling is the wrong way to apply such a regular texture but the Technical Reference (p70 "Add Image...") is leading me to suspect otherwise. What method might suit this challenge best? Appreciated, Chris
-
Howdy all! I'm looking for a good way to create an animatable hangman's noose for an upcoming project, but am stumping myself with how to texture the rope, ideally with some displacement to indicate the twisting structure. Either a procedural or image map solution would be fine, I think. Any tips or pointers to existing work that I can pick apart would be greatly appreciated! Chris
-
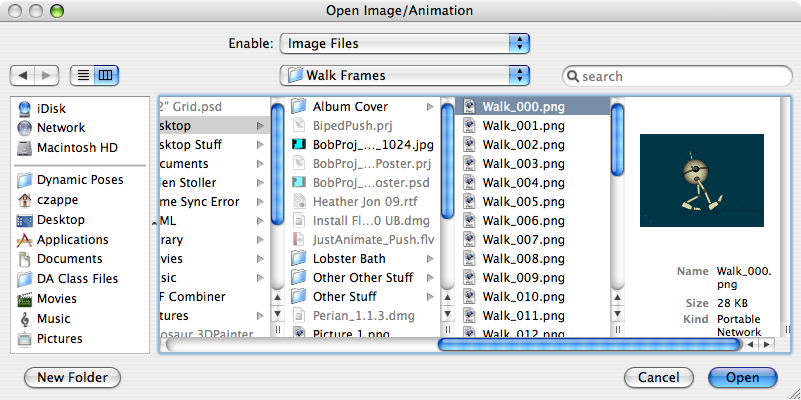
Well, it works! It was a little round-about but I successfully imported a PNG sequence into A:M using the model you provided and following your steps. The decal did a weird spill-out glitch on render but that could be resolved by tailoring the object to the aspect ratio of the decal a little better on my part. The missing component was the frame range property that I didn't get if I'd try to import the PNG images myself. Shockingly, danf, the TGA workaround in QTPro worked flawlessly! For whatever reason, even though there is still no checkbox to specify a sequence when I go to import, if the image I select in the browser is the first frame of a TGA sequence then it proceeds and treats it as a sequence automatically without any other fiddling on my part. PNGs don't seem to work like this on a Mac, by default. I'd been consciously avoiding the TGA format in the past, favoring PNGs because of their small(er) file sizes. Looks like I'll go ahead and break my taboo in the name of progress! Double kudos to robcat! The input is highly appreciated. I'm teaching compositing to middle school students and wanted to make sure I had a sound method to combine images and load sequences before dragging them through it themselves. Sometimes the troubleshooting process makes me feel like a middle schooler too! Chris ImageSequenceUser2.mov
-
It looks like you have another problem along the seam of your model between the left and right halves. Make sure before you do the C/F/A operation that center spline loop is sitting exactly on the y-axis from front view. The usual method for this is to: 1. go into front view, select all of the points that comprise this middle section. This should be a roughly vertical alignment of points. 2. activate the scale manipulator (hit S on the keyboard) and in the properties, adjust the X pivot location to 0 and the X scale to 0. 3. this will squash all of these points into a flat line directly on the y-axis from the front view and make your C/F/A ambitions a bit less irritating. Chris
-
I'm familiar with the black background when rendering to a Quicktime movie with alpha channels on. What perplexes me about this suggestion is that rotoscopes render in the alpha channel, which would mean A:M would only render grayscale information for the rotoscope since alpha channels don't store RGB data. At any rate, I digress. When I import a single image file as a layer or a rotoscope, I have no rendering problems at all. The images show up with perfect clarity. This is only with Quicktime movies and there's a number of other areas where these don't work in A:M that I'm working on as a side. The main problem here is in importing a sequence. I noted the checkbox in your screenshot to 'Import as an animation or sequence of images' and was confused about why the mac version didn't have this option (see screenshot from my previous post). In my current situation, I can only import one image at a time or a LOT of images at a time, but no sequence option is apparent. I'm wondering if other Mac users have encountered this. Ever since Macs have shipped with multi-button mice (like the Mighty Mouse) the Mac OS has supported programming a right-click without the control key modifier. I use a third-party 3-button mouse for all of my animating, though if I were inclined, I could still control-click instead of using the right mouse button. They do the exact same thing in my experience. Chris
-
Hmmm. You're right, I actually am asking two questions. The whole thing stems from the problem that the process of importing a sequence through the PWS (right clicking on the Images folder) gives me no option to import the images as a sequence to begin with. I remember seeing this button in any number of tutorials but I don't seem to have the option for a sequence in the import browser. As for movies, when I render to QuickTime from A:M and import the movies to a chor layer, all I get is black. This part sounds like a plug-in problem. The sequence issue, though...I'm not so sure. Where do missing buttons go? Chris
-
If you're not aiming to rotate around these bullet objects or have them spin in 3D space while they're being fired/ejected you might achieve a good effect with relatively little setup using sprite particles. If your objective is more of an energy bolt, streaks would work well. This will allow you to fire hundreds if not thousands of bullets (and who wouldn't want to!) while taking advantage of gravity and collisions throughout the process. As for making bullet holes, it occurs to me that you really can't see bullets making these holes and could simulate the effect with an animated decal for transparency, bump and other channels as appropriate on the object you intend to riddle. Combining the two is more of a technical dance. Chris
-
As I understand it, one should be able to import a sequence of images into A:M and treat them like a movie. I'm seeking to bring in a previously rendered sequence to A:M Composite to merge with other layers but each time I import a sequence on my Mac, all I end up with is a PWS stuffed to the gills with individual pictures that can only be referenced or manipulated one at a time. 3 layers of 300 frames each suddenly becomes an all day head-to-the-desk-tedious task. I think I've seen a screenshot of how this theoretically should work and a sequence ought to import as a single object with the individual pictures nested inside of it. A:M can do this, right? Am I having a problem with my import plug-in? Have I uncovered another Mac dilemma? Thanks, Chris