


Luuk Steitner
-
Posts
623 -
Joined
-
Last visited
Content Type
Profiles
Forums
Events
Posts posted by Luuk Steitner
-
-
Here is an example of the previous test but with the Zign Track update too fix the rotation of those bones:
It doesn't look all that different to me and the mouth does something strange in the last few seconds. It is possibly a combination of me not getting the bones positioned correctly and bad miming. I really should finish this model and get the weighting done too.
No real animation here. Just a few rough poses at the beginning.
Can you show a picture of your face rig? And can you check what happens at the end of the time line for the mouth bones in the action? I noticed in one of my tests that one bone had a strange ending. I'm not sure what caused it, but I'll try to find out what happens.
-
There was a good tutorial about this on zandoria.com but the site is off line at the moment. Here is what was still in Google's cache:
If you've ever wanted to use motion capture for any of your A:M models, but thought that it was probably too complicated, then this tutorial is for you.In this tutorial, I will show you how to add a calibration pose into your model that will allow you to import and use motion capture data with the click of the mouse. While I'm going to be using BVH files for this tuitorial, you can repeat the set-up for several different types of motion capture devices. NOTE: version 9 of A:M doesn't support motion capture but it was restored in Version 10. This tutorial is done in version 8.5p+
Step 1
Import the model or skeletal rig that you want to use motion capture with. In this example, I'm going to apply this set-up to a basic skeleton. At Zandoria Studios, we use default skeletons that are set-up with spherical limits, kinematic constraints, and fan bones. Since these poses are assigned to a simple skeletal model (with no geometry), you can use the "import model" command to bring in an appropriate skeleton with all of the rigging set up. Once this motion capture pose is created, all of the models that use this rig will be automatically set-up for motion capture. In A:M version 10, there is an "autoassign bones" feature, that makes this workflow even faster!
Create a new Action. Right-click and choose New>Motion Capture Device>BioVision BVH File.
Right-click The "shortcut to BioVision BVH File1" and choose "Capture Sequence". This will load the BVH file into the Action.
Scale the BVH so that the markers roughly line-up with your skeleton, It is important to try and match the lengths of the legs with your skeleton so that the "stride" will be correct.
Step 2
Now you have to make some Constraints that will make your skeleton move and orient like the BVH file.
Use a "Translate to" to lock the hip of your skeleton to the hip of the BVH. Follow this constraint with an "Orient like"-- Use "compensate mode" to keep your skeletons hip/pelvis from moving when you apply the constraint.
Align the legs of your skeleton to the BVH, by using "Aim like two" constraints. Use the drop-down list of bones to pick the targets for your constraints. Target 1 is where the small end of the constrained bone points. Target 2 is where the base of the constrained bone points. In the illustration below the Calf bone of the model skeleton is constrained to aim at the RightAnkle and RightKnee of the BVH.
In this example, I used "Orient like" constraints to align the bones of the torso and upper body to the BVH skeleton. You can pick the constraint targets with the eyedropper tool, just as you normally do when making a constraint.
Step 3
Once your skeleton is constrained to follow the motion capture, create a Pose from the Action. Be sure that the Key filters are set as shown below. Name your pose "BVH" and save your model. This pose will now be usable to load any BVH file that is set-up the same way.
Step 4
To load a new motion capture file for your model, create a new action and drag-and-drop the "BVH" pose into the action. Version 10 of A:M will support motion capture, but Version 9 does not...
Right-click the channel for the "shortcut to BioVision BVH File1". NOTE: Do not right-click the shortcut, make sure that it's the channel. Choose "Capture sequence" and load the BVH file that you wish to use.
Your model will follow the new BVH file, it doesn't matter which file you used for making your constraints, just be sure that the BVH file was set up the same way. You can find lots of free BVH files on the web to practice with.
-
It appears to be mostly just up and down movements of the jaw.
No sound forming lip shapes as far as I can tell.
Now why is this?
Mike, you were right! This video was made with the A:M action bone control. I was just doing a lot of tests to improve the output accuracy (for all formats) and I used A:M actions with bone control because that's the fastest way to test it. For some reason the mouth shape wouldn't do what it's supposed to do. I took me a while before it occurred to me what mistake I had made; I used the same method as I did for the BVH for controlling the bones. I forgot that the BVH axis orientations are different and I didn't adjust it for the mouth bones. So, in stead of rotating the Y axis I was rotating the Z axis... doh...
Sorry Paul, I'll finish some more things and I'll send you the new test version. You'll find the output results are much better this time

-
Hey Luuk,
You might make adjustments like this optional.
The way I build poses, the widening of the smile is driven by the wide/purse pose. the smile pose drives only the corners of the mouth. I never let any pose overlap action with another pose, that way they can all combine together but never create unnatural action.
That is actually a good idea. The reason I made the smile reduce the wide pose is because it is harder to 'model' the smile in the the pose when the mouth isn't wide. But that could be solved by applying the wide pose while creating the smile, and when the smile is done remove the link the 'wide' from the pose. Is that how you do it?
-
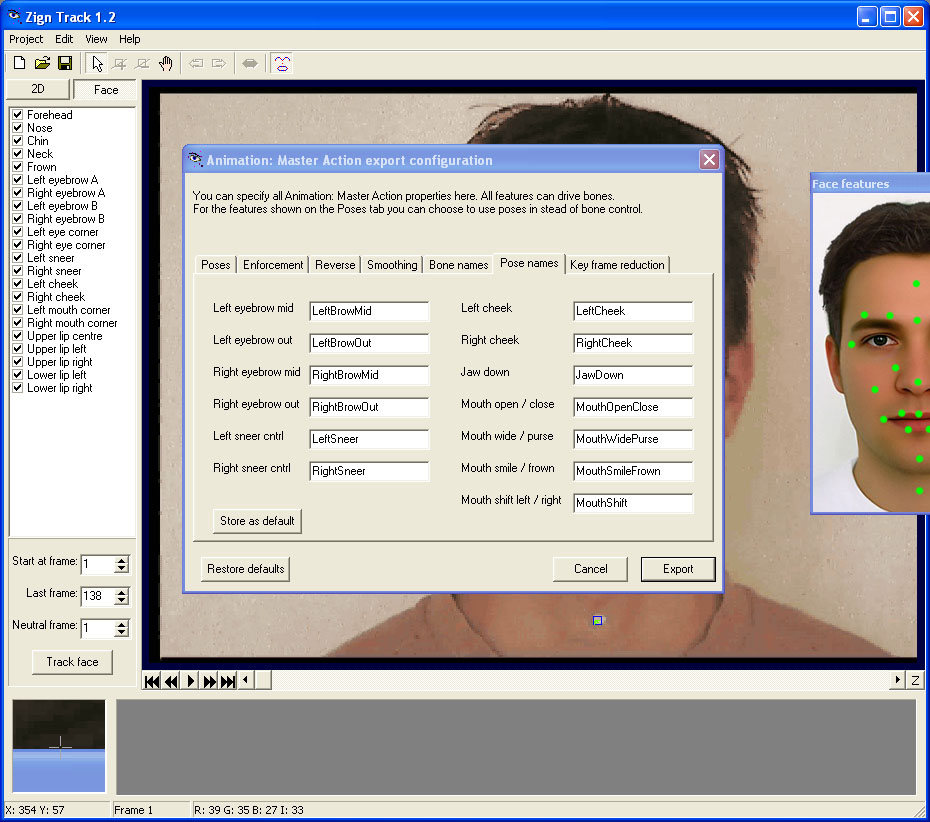
Maybe it's a good idea to show what I'm working on for version 1.2. The new A:M action feature works quite well, as far as I have tested. Here is a picture so you can see what the possibilities for the poses are.

The eyebrow poses involve up and down movement, the others speak for themselves I guess. I did some tests with these poses, and it looked pretty good. One thing I'm not sure about yet is if the mouth poses work 100% like they should. I need to do a few more tests to see if the result is good on all movements, and maybe I have to adjust the scaling of those movements. I hope Paul and Ben have some time to test the mouth poses, if not I'll do an extensive test later this week.
I''l explain what the mouth poses do: The mouth wide/purse pose should contain exactly what it's name says. This is also true for the mouth smile/frown pose. As you know, the mouth also gets wider on a smile, so when Zign Track detects a wide smile it reduces the mouth wide pose, so they don't add. The mouth open/close and shift left/right would be obvious.
Using these poses is a little bit less accurate like the original tracked footage, but the advantage is that the shapes it produces always suit the face (if the modeler made nice poses of course).
Tell me what you guys think about this. I want to have it as good as possible before I release it. Maybe I'll change some things if that can give better results.
Other than this, I'm working on some improvements for the output for all formats. On the left you can see that I have added an extra "neutral frame" spin box. This can be used to specify on which frame the face is most neutral. I did this because Zign Track was giving some strange offsets if the face in the first frame was not neutral. I'm also changing some calculations to improve the accuracy while the face is moving. This should solve the lip issues that sometimes occur. When this is done there should be very little manual tweaking required for the animation.
-
I think people should realize that Zign Track is a facial motion capture solution, not an overall workaround for a good face rig and lip synch poses. The more you rig your face and setup mouth poses the better Zign Track's results will be for you... am I right Luuk?
Yep
-
I think that's a really good image. There is a pattern visible, but if you don't tell anyone no one will notice
I didn't use hair much so I don't know all tricks to speed it up, but do you really need that transparency? Transparency can slow down the render significantly. Maybe you'll get the about same result if you just make the hair thinner at the tips.
-
I exported this as an action but I had used the wrong name for the head bone so there is no head motion with this one.
This is why you should always save your tracked Zign Track projects. Just open up the project file go to the export settings, change the name and export the action again. In 20 seconds you can have the corrected action applied to your model.
You also could just change the name of the bone in A:M.
-
It appears to be mostly just up and down movements of the jaw.
No sound forming lip shapes as far as I can tell.
Now why is this?
Is it the limitations of the software or are the results dependent on how the user sets up
the facial bones/smartskin?
This would be mostly set up of the face and can be related to the quality of the video. Bendytoons's videos show better results concerning mouth shape. Zign Track does track the shape of the mouth, not only open and close movements.
The new A:M Action feature that I will release soon can be setup to directly drive mouth shape poses. When set up correctly that can give even better results because for example you can make the lips curl on the mouth purse pose and other things like that. This can also be done by adding smartkin when you prefer to drive the bones directly by an action or BVH file. Once a character is completely set up and "fine tuned" it is only a matter of loading a new action and it should look perfect.
-
I looks good. Did you hold your head perfectly still or did you eliminate the head movement?

And, is the face controlled by bones or poses?
BTW, I forgot to involve the enforcement values in the test version... Maybe you noticed.
-
What if you scaled up the model before using surface baking? Wouldn't that result in a higher resolution decal when it was scaled back down?
That would be a good work around (or scaling them down for large models) I placed a feature request for the size option. I hope they'll add it.
-
Hey Paul, you gave away the surprise!
Oops! The cat's out of the bag now!
Droevig, Luuk!
Geeft niets Paul, no problem

-
Hey Paul, you gave away the surprise!

I will add reverse rotation options for the bones and change some more things. You really should try the poses. When you use the poses the expressions will never exceed the limits you gave them. The test I did was very satisfying. If you find some things I need to fix/alter let me know by email.
Thanks!
EDIT: I'm not sure you get the meaning of the pose functions. In short: create poses for your model and name them the same as you have named them in Zign Track (or use the default names) and set the range the same in A:M and Zign Track. Zign Track will now control these poses. For example; if the eyebrows go down, the action gives a negative value to the related eyebrow pose. If the eyebrows go up, the action will give a positive value the the related pose.
-
Now I know how yall fell sitting at the dest the desk a long hr's working in the choreograph is there a way to copy and past in the choreograph instead importing the same model a buch on times. I got a little ways to go but getting there .
As far as I know you can't copy and paste in the chor. Your scene is looking good so far. Keep us posted on your progress.
-
-
You have applied the material directly to the model. If you apply it to a group, only that group is affected by the material.
-
Thank Luuk! Woaaa.... Do you speak Russian?
Just a little bit. I'm half Russian and learned a bit just out of interest.
-
That looks great. Мне это нравится!
-
If you're copying models with lots of splines and CPs A:M can get slow at copy and paste. You will also notice it will take longer to load your project file. This is why I always try to keep the spline count as low as possible. One time I had to wait for 20 minutes when I copied parts of a large model...
If you want to use the same model more then once in your chor, it's best to place several shortcuts to the same model in the chor in stead of putting them all in one model.
-
First, happy new year to you too. I think the video looks great.
The beechcraft is a bit too small, but that's not very obvious.
The smoke is what makes it look unrealistic, because of two things:
1. The trail has very straight edges. Maybe that can be solved by using less of bigger sprites.
2. The smoke rises too fast. The vertical force may be decreased to 50% or less of what it's now.
Keep up the good work!
-
That looks great! I like how you have used the upper eyelids as eyebrows, by deforming them.
-
i trying this, it make my work window black and that is all and i cant see anything
Maybe you need to update the drivers for your video card. If so, go to the website of the manufacturer and do a search for the latest drivers for your card.
-
Changing your real time graphics driver might help. Go to Tools->Options, Global tab. You can choose OpenGL or Direct 3D.
-
I take it that I would have to buy 3DPainter to get that, right?

Yep
Facial MoCap experiments
in Showcase
Posted
Are you sure all mouth bones are actually moving? I think you might have given them wrong names so they don't move. I only see the jaw and lower lip moving. Maybe I'm wrong, but that's what it looks like.