ArgleBargle
-
Posts
140 -
Joined
-
Last visited
Content Type
Profiles
Forums
Events
Everything posted by ArgleBargle
-
I never did quite get things fixed with the one null. It turns out that if I create a second null everything works just fine. I didn't do anything at all different with the 2nd null than with the first. I'll probably have to make a streamlined project and see if I can reproduce the bug and report it. For what it's worth, there were already 4 constraints in the choreography for the null. I'm not sure how that influences things.
-
Thanks to a trick I learned in these forums some time ago, I'm implementing some motion with a chain of bones, of which the end bone has a kinematic constraint to a null, and the null has a translate-constraint to another object. (Imagine, for example, an octopus leg hanging on to an object moving in a perfect circle. This method realistically is the only way to do it.) Anyway, so far I've not had any problems with this until today. I have a null that successfully translate-constrains to several objects. Then I constrained the null to a bone of an object (not the model bone). I tested the motion and it looked good. Then I positioned to a frame prior to enforcing the constraint and played the video and the null didn't move with the bone it was constrained to. Whisky Tango Foxtrot? As I stepped through the frames, I noticed in the properties window that the enforcement was set to 0%. I could manually set it to 100%, but it immediately returned to 0% on playback. I watched the timeline in graph mode and I could see that the enforcement graph showed 100%, but the properties showed 0%. The more I think about what I'm seeing, the more sure I am that it's a bug. Meanwhile, I have another object identically translate-constrained to the same bone and it continues to move with the bone properly. After I post this, I shall attempt to constrain my null to that object as a workaround. Anyone have any ideas or advice for me on this one? Note: I'm sure someone is going to ask how I got painted into this corner. Here are some further details: I have an animated, talking computer. Her mouse is at the end of a chain of bones. She's using the mouse to move around several objects, then she's opening a drawer and pulling out an object from inside it. I attach the null to the objects moved around, then apply a kinematic constraint of the end of the bone chain to the null. Finally, I attach the null to the drawer (which is a sub-part of a larger object) and I constrain a small object to the drawer so it appears as the drawer opens. The object and the null should move in lock-step with the drawer, and in turn, the mouse constrains to the null. However, the null is failing to move properly after the initial test. I.e., I get a one-shot behaviour, not repeatable behaviour.
-
BTW, if you wonder about the contents of the phoneme dictionary, google for the "moby phoneme dictionary" and you should find some docs.
-
Look at the "Animate Mode" button. If it's not selected, then all changes you are making are just to keyframe 0. It's an easy thing to get screwed up.
-
Actually, the checkers were a material. I showed him how to do it after he got the pieces made.
-
There's probably too many answers to that question. Off the top of my head: * Scale down the image size * Increase compression * Buy a commercial compressor (I like Sorensen Squeeze)
-
Sometimes it's kinda cool when you can see the news "live" (so to speak). Also kinda cool that your net-friends can know about things like that, too. When the biggest recorded tornado came through Oklahoma, I got e-mail and messages from friends in several continents asking me if I was close and if I was ok. (I was, though it was as close as a mile away from me.) I guess it's years too late to ask, but did you see the events on 9/11 (other than on TV)? I got a call from a friend who said "turn on your TV." I said, "which channel?" He said, "any channel." You know you gotta worry when someone says that.
-
Isn't that heresy? Seriously, though, I thought a major part of the plan for an animation was to use a re-usable action... especially for things like walking. Up to now, my animations haven't involved much in the way of re-usable actions. But then, my characters have been a camera on a tripod, a ruler and a computer. Frankly, they don't travel a lot. Sorry if I seem to be walking into something philosophical, but after watching films like "Alien Song", "Duel" and others of the cooler productions, I'm trying to figure if I'm seeing any use of re-usable actions in those videos. Am I?
-
Ah, now there's a neat idea. Thanks. I'm pretty sure I've got some things where that'll be handy.
-
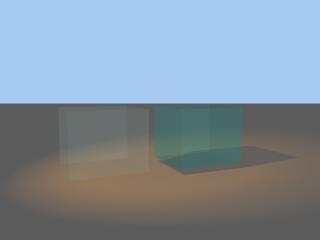
In my example we're looking across the diagonal of the cube so the edges would be the thinnest and the center would be the thickest. The coloration of the cube doesn't indicate that, however. OK, I went back at this with some of the previous comments in mind. [attachmentid=16255] Here are the cubes again. All have the same color and 95% transparency. Cubes 2 and 3 have an IOR of 1.05. Cubes 3 and 4 have a density of 4. It almost seems that density tends to push the color back to the less saturated color of cube 1. My understanding of IOR (as I recall it from college) is that the angle of a beam of light changes as it moves from one transparent medium to another. I had assumed that density might provide the effect I'm seeing in cube 2, but apparently not. I guess I'm no closer to getting cube 1 with just refraction added, not any color saturation change. I've actually moved on from the original problem and did a work-around. However, what I'm trying to fix now is my own understanding of how it's supposed to work. I don't think I've yet arrived. I never really had problems with this until now, mainly because I've always been using something whose base color was white. This time around, I was trying to model a glass with some murky water. I didn't quite get what I wanted because I had a bit of color to the water.

-
I had that happen in v10 and v11. Not that I've noticed it in v12. Maybe an update is in order.
-
Well, it's not that. Notice in my example the two cubes are dealing with the same lighting and ground. Using quick-render when editing the model and with models in situ, there is still a profound difference in two objects I really only expect to differ in how they refract, not in how they are colored.
-
I'm at a bit of a loss understanding why I'm getting the results I am with the index of refraction. I know all the theoretical aspects of it (that is, learned from college physics). What I don't understand is the rather profound deepening of color I see with applying even the smallest index of refraction (1.01). [attachmentid=16239] The two objects in the image have the same color and 95% transparency. The item to the right has 1.01 index of refraction a it gained a deeper-blue color. In another model I made, a small bit of transparency and a bit of refraction produced a profoundly deep-colored plastic that I liked. However, this time around I want to keep a soft color like the block on the left, but also having an index of refraction. I've played with the color numbers after turning on refaction, but could never get a color match. Can anyone give me a clue about this?
-
Hm.... a floating KeeKat. Check position from some view other than the camera angle (like left=Keypad-4, or front=Keypad-2).
-
I'm his dad. I'm also jenfelizr's dad. Two of my kids have been watching me making videos the last few months and wanted to give it a go themselves. I told them to do what I probably should have done myself... I know I've still got weak areas in the basics. The work is educational software, with lessons taught by computer animated characters. Considering the amount of dialog and material covered, and a single animator (me) the videos have probably less detail than the usual Veggie Tales. I think I've put together about 80 minutes of video so far. So far we've got a talking computer, ruler and camera. Attached is a blurb that starts a video where the subject is dependencies. The ruler is depending on the camera to hold the ladder steady. Here are the results: [attachmentid=16069] The quality here is a bit low. Final size is actually 640x480. dependenciesIntro.mov
-
I've read as many tutorials as I've been able to get my hands on (and had time to read), but nothing beats watching the videos. There are the free ones from the main Hash web page, plus others that are linked to in these forums. I feel like I made massive leaps forward watching the few videos I've seen that Hash sells. I haven't seen any of the Anzovin videos, but I'd love to.
-
I've got a few shorts I'd love to upload, but the hash upload page hasn't been right for me as long as I've tried. For example, here's a copy-and-paste of the upload page: humbnail: Byg to allow A:M Films viewerso save it, copy it, or s your own, and that yogement or copyrig Animation Info - Step 2 "yogement?" "copyrig?" Is this me? My attempts to upload have failed. Any suggestions?
-
About the same here... and the last few days I'd find myself pressing T, Z or M to get around in what I'm editing only to find myself smacking the key harder when A:M didn't respond. I'm not fond of anything radio/battery run, so I took to cussing the keyboard. Then I realized I wasn't having trouble in other apps on the same computer (notepad, mirc, photoshop). Restarting A:M cured the problem, but I'm at a loss to suggest why I had the problem in the first place.
-
12.0s Ah, to be honest, that never dawned on me. I tried it now and it works fine. That's what I meant about not being totally sure I've got it right. However, the other problem I've had with things in graph mode is that I'll tweak some points, then later discover those keyframes totally missing. After this happened to me enough times, I finally realized that I had points selected in graph mode, switched to channel mode, did something to another object, said "whoops, didn't mean to do that" and deleted the new keyframe. However, that delete took out the points still selected in graph mode. At least, that's what I've concluded has happened. I haven't been about to duplicate the problem consistently, so I haven't reported it. I'm sure someone's going to ask "how do you know that's what happened?" The last time it happened to me, I moved a model bone a few times, then went to graph mode, selected just one of the channels and adjusted several points at once (I think by switching them to spline from zero-slope), then I moved on to the other parts of my chor in channel mode. Then during playback I found the model bone not doing what I had it do, but the points I had previously selected were simply gone.
-
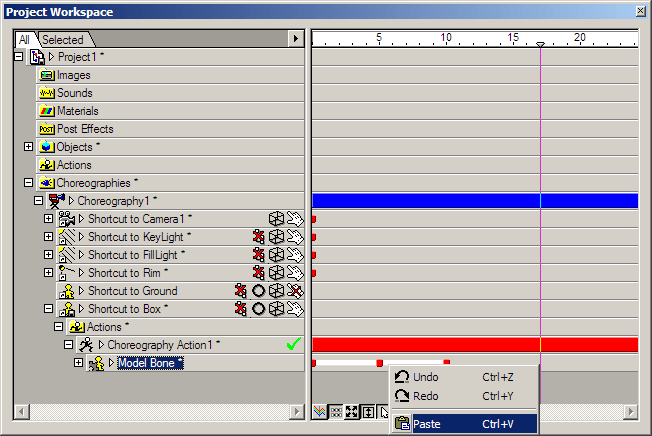
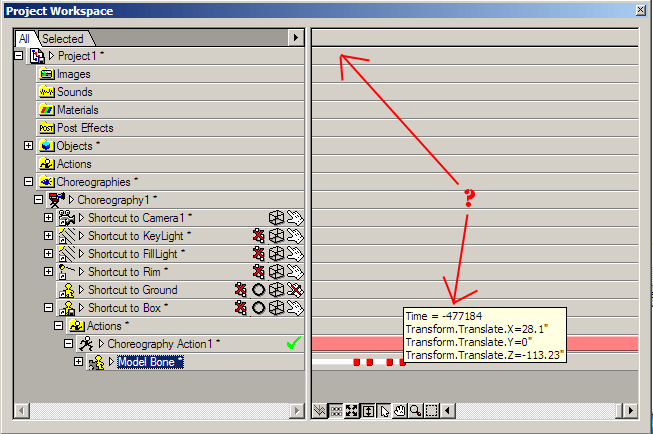
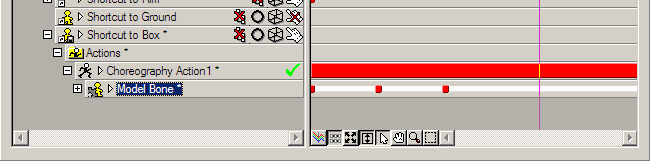
I want to preface my question with the comment that when you think you've found a bug in something very basic, usually it means you have a flawed understanding. In a choreography, numerous times I've needed to copy and paste a block of keyframes and I've been unable to get them to paste exactly where I want it to go. For example: [attachmentid=15565] After selecting some keyframes that I want to paste elsewhere, I've tried setting the frame number to where I want the keyframes to go and then do a paste: [attachmentid=15566] Now, when I captured these images, it was my intention to show my problem. That is, the keyframes only approximated going to the frame I wanted. For example, I might get what what you see below: [attachmentid=15567] The selected keyframes would be interleaved with the original keyframes. Basically, it was a disaster. If I wanted the keyframes to start at, for example, frame 17, I might have to set the current frame to maybe 26. I say "maybe" because it was never consistent. I just took to setting the frame to later than I liked and then sliding the keyframes into place. But now that I've described my problem, I have to confess that I photoshopped the above image a bit to show my problem. In trying to reproduce the the problem, I got a different problem (which I intend to report): [attachmentid=15569] My paste put the keyframes somewhere... but where? I did a zoom to extents and found where they got to. I had to scroll a bit too, but you can see what happened: [attachmentid=15568] Anyway, aside from the bug, precisely where is the paste supposed to happen when pasting multiple keyframes?
-
Ugh... forgot about particles. Now I don't dare sneeze while I animate. Certainly a lesson learned by flick-makers like George Mucus.
-
I couldn't resist making the post. But it was just rhetorical. What would we do without rhetorical questions, anyway? Well, I gotta boogie.
-
If you have an object in a choreography that is a nose, should you set it to be pickable? or not?
-
It's really pretty easy. But when I tried to figure this out myself, I felt like I took too much time doing so. There are a couple different techniques I've tried for different purposes, but here are the basic things: * Make sure advanced options are turned on (not sure why it's off by default since it seems so many answers to questions start this way) * Put a couple different decals on a surface * Open up the properties of the image used on one of the images and set its opacity to 0% * In your choreography, set the "show more than drivers" for the object (that subject addressed just recently) * at the point in the chor you wish to change images, change the opacity of each image and they'll switch. I'm doing some educational videos and in one of them, the characters are looking at a picture of an animal and discussing its habitat. I had two decals, one of the habitat, one of the animal and the animal's picture had a transparent background. At the point in the video the habitat needed to be seen, I used a slope from 0% to 100% opacity over about 1.5 seconds to fade in the background. It looked very slick when it was done. Alternately, you can make a targa sequence that forms a short movie (even just 1 or two frames) and then in the choreography, in the properties for the decal, set the frame number. Speaking of the latter, I combined two techniques in another video. I made a short video of cels being slid on and off an overhead projector. Then I dropped that onto a Kleig light and in the chor, I'd stop and start motion by controlling which frame the video was on. (And a sub-note for anyone curious: to make overhead cels, use a wide-angle lens with almost 0 depth of field and then render sheets with decals on them and deform the sheets as you take them on and off the fictional overhead surface.)
-
I don't know a way to do exactly what you're trying to do, but I tried thinking what I'd do if I was a real-world photographer and wanted to do the same thing. Basically, I'd throw on a telephoto lens and back up a long ways. In a virtual world, that's easier and cheaper. Set your lens focal length to something really large (like 2000) and back the camera a few hundred feet.