MikeV
-
Posts
164 -
Joined
-
Last visited
Content Type
Profiles
Forums
Events
Everything posted by MikeV
-
And voila... found the rogue CP, deleted it and now everything's fine. How crazy. Rob and mtpeak, thank you both for taking a look at that! Though now I'm curious why mtpeak is able to make it work even with the rogue CP there. That's interesting. I promise I'll try not to make a habit of finding oddball issues like that lol. Unless you want me to that is :-p. Thanks again! Now I can actually continue on and finish the thing!

-
Ha! Something you've seen maybe only once before, and I managed to recreate it. Go figure. I seem to have a knack for finding bizarro issues. I did QA at a software development company for a time and the programmers there hated me 'cause I would find these obscure bugs that they could never find or reproduce themselves. However rare they were, because they *could* happen, the programmers had to address them. And so they hated me. Anyway! As far as how it was modeled, I basically just made a cross-section and extruded it out up to the point where the inset begins, which is one spline after the one with rogue CP. Now, after that I may have made changes that affected that particular CP/location, but I couldn't begin to tell you what it was or at what point or what I was trying to do specifically in the process. Regardless.. that is crazy. Let me see if I can fix it myself now.
-
Hmm.. Tried what you suggested and it didn't work. Still won't let me make a 5 Point Patch there. Maybe something really bad will happen if I succeed and A:M is simply trying to protect my life. It could happen!
-
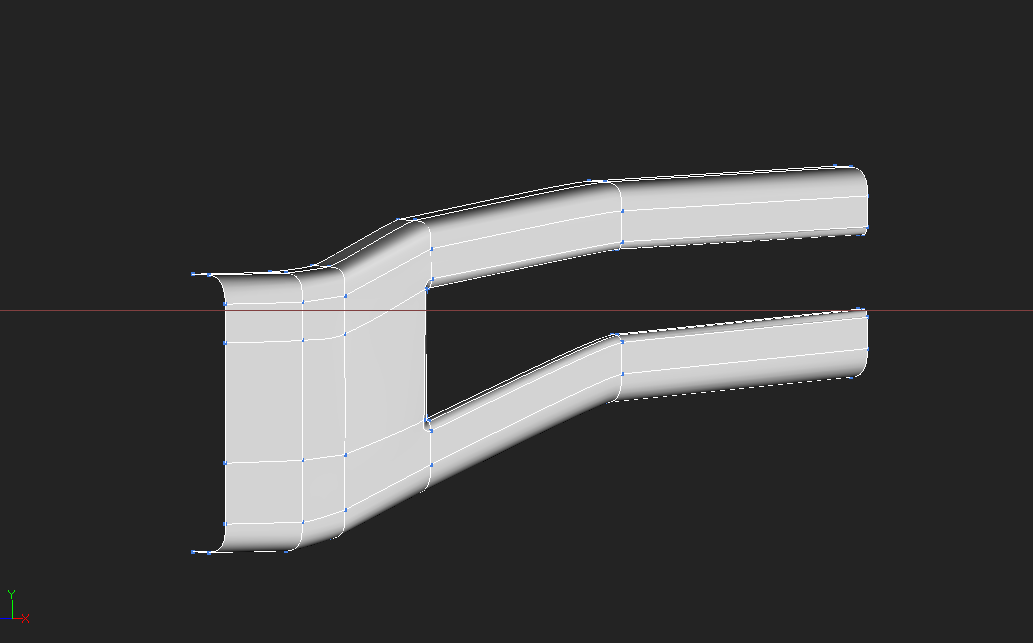
Me, either. Robert noting that it had him stumped made me feel better about it at least. Like, "oh so actually *isn't* me this time?" lol. It's stranger still that for a little bit, it *would* light up the 5-Point Patch button. It just wouldn't do anything when I clicked it. It would gray out and I'd have to select it again. After a few times it wouldn't even light up anymore. Your fix is pretty much what I did prior to it working the time before that. See, at first it didn't work because I had a "broken spline". It wasn't dead-ended, but it ended at one CP and a new one started from the same CP (if that makes sense). I detached and deleted the points, then reattached them to make it one continuous spline. And then it worked. I then did an extrude operation on the "inset" part to bring it in so I could create the flat portion of it. After I did that extrude is when that 5-point patch disappeared and all the trouble started. Oddly enough, the opposite 5PP on the bottom of that section wasn't affected. I'll give what you did a try and see what happens. Thanks!
-
It's basically supposed to be a "market stand". It was one of 3 different sizes I was creating for a prototype of a game I was working on before deciding game design isn't really what I wanted to do. I figured 'cause I know what the end result is supposed to look like, and I can do a literal 1-to-1 comparison of the two, it would be a good exercise of my own to learn A:M. It's turned out to be a huge headache, though and I'm wondering if it's worth doing it at all. Even though I said I was done for the weekend, being a stubborn person who hates leaving things remain unresolved/unfinished, or letting things "beat me", I decided to give it another go. I was going along nicely, until I hit a 5 point patch that just will not cooperate. I've tested the splines out and fixed one. Every one of them now is continuous. No dead-ends. No 3-splines into one CP. Every spline forming the 5 sides is its own continuous spline. In fact, A:M would actually highlight the "Make 5 Point Patch" button, but nothing happened when I would press it. That happened a few times. Now it won't light up anymore, no matter what I do. Click selecting, lasso selecting, selecting and pressing "." twice.. Nothing. I've closed the program and re-opened it. Nothing. So... Twinkies and gratitude to who ever can help me solve this one. Anyway.. here's the model. I'm beginning to feel like a "special needs" case here, but if someone wants to take a look at it and can tell me what I'm doing wrong this time, that'd be awesome. Will be nice when I can complete something on my own without having to run to the forums for help. I think I'm gonna go kill a bunch of stuff in Torchlight now or something lol. MarketStand.prj
-
Hey guys.. Thanks for the replies and help! I went and tried to replicate the beveled edge like Robert shows in his picture, but by beveling the outside and inside of the area as Fuchur suggested and, after 15 minutes of fussing with CPs and lines and going cross-eyed in the process... forget it lol. That's *wayyyyy* more trouble than it's worth. At least I have an idea of how to tackle it in a future project, that is if I can't avoid having to do it altogether. Thanks again for the help guys. It's appreciated. Edit: Said I was going to take a break 'til tomorrow. Didn't happen :-p
-
Thanks for the feedback! Ack! I never even thought of that, the other dead-end splines in the window. So, I failed my self-test in other words. And here I thought I'd gotten it figured out. Well that's a downer. I guess you can't take anything for granted when it comes to using splines. Even in the simplest tasks, something's always going to pose a potential problem. I'm not able to envision what you mean by beveling getting rid of the dead-end spline though? Is there an example you can point to to demonstrate that? As for the curving I actually went back into A:M after posting that and tried it out for myself. The idea of working with the CP handles occurred to me literally while I was typing that post, so I hadn't actually tried it yet lol. Here's the results. Could use a bit of tweaking, but it's pretty much what I'm after.
-
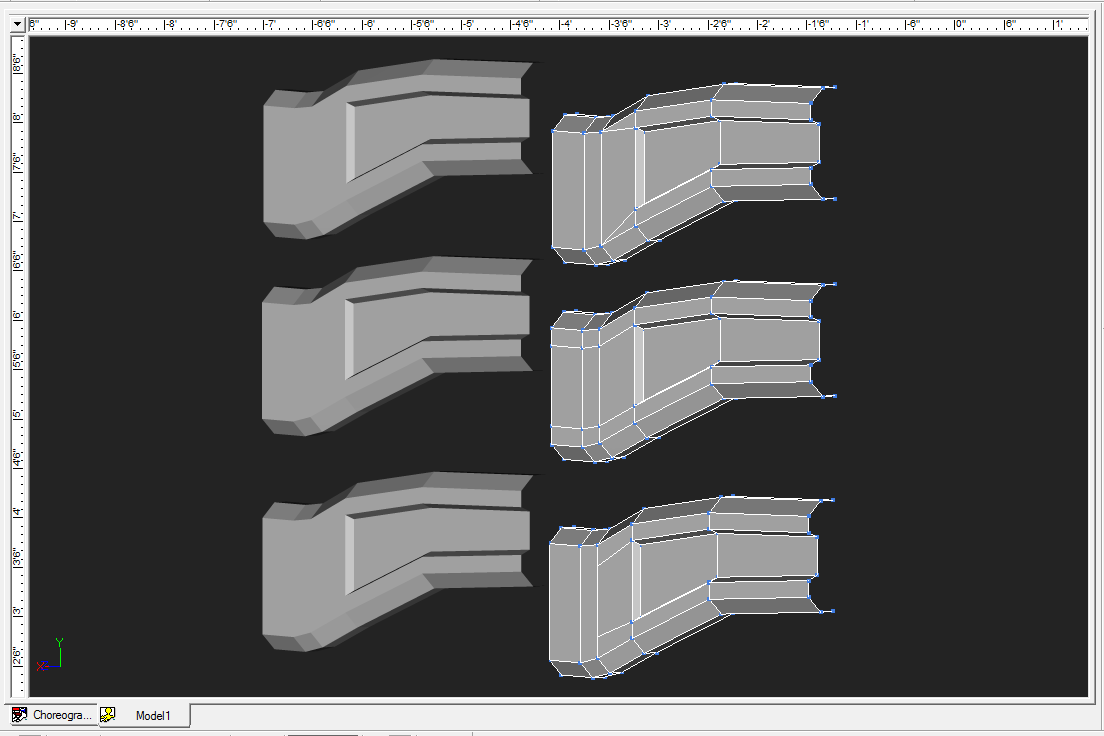
So, as a test project, I'm working on recreating the smaller market stand I talked about in this post. I got the upright legs done easily enough, just created the basic shape of the legs and extruded and scaled. I'm now working on the larger cross-beam that you can see peeking out from beneath the canopy. Being the most "complex" piece of that particular model, it provides a new challenge for me, in that it has an area recessed into the "wood" and isn't one big flat piece. With polygonal modeling, it's a matter of some extruding and scaling. With patches, of course, it takes a bit more planning. So, started thinking about how to best reproduce that piece. I decided to test myself with a bit of an experiment to see how well I understand spline/patch construction, by seeing how many ways I could go about getting the same result. In the end I came up with 4 different ways. The result of the 4th looked indistinguishable from one of the others, so I left it out. It was just a different way of getting the same spline layout. In the end, I'm kinda curious if there's any one approach that's "better" than the others. I mean, the first one is using a dead-end spline to simulate a typical polygon reduction technique in poly-modling. So that's probably a no-go just on principle. But of the remaining two, would one be preferable over the other in terms of "proper splinemanship"? Might seem like I'm making a big deal about a little thing, but it's one of those deals where experimenting can help me learn things that will help me in future projects. And it was a fun little "self-test" to give myself . The screenshot shows the same 3 objects side by-side.. I rendered one set to show the result, and kept the other set in their normal wireframe/shaded view. My other question about that is, if there's any tricks to getting that shape so the profile of it curves a bit more naturally, while keeping the sides "flat". I tried setting the CPs running along the edge splines to "curved" and it kinda gets the result I want, but it's very uneven and there's some "bulging" where I don't want it. I'm thinking maybe I need to work with the curve handles to tweak it?
-
Thanks! That there is the core concept of CG animation work flow (and most hand drawn animation, too). You nail down the big landmarks of your performance and then refine the motion by staking out smaller and smaller landmarks in between. Also known as "Pose to Pose" animation. No prob! Credit where its due I think what helps with that video in particular is that it's so basic nuts and bolts. You're tackling a single technique that's very simple and straight-forward by itself, but is a crucial building-block for much more complex projects. "Pose-To-Pose 101", basically.
-
Now, that was an awesome tutorial/example. Thanks for sharing that! Between yourself and others whose videos I've seen, there's an amazing wealth of great assistance/instruction spread out on these forums. I think I'm gonna have to start downloading and keeping a categorized library of them. Watching that video of you doing the walk cycle, how you start "big" and break it down step by step "clicks" far better than any verbal or written instruction could. I've read explanations of what you demonstrated there, and I've gotten the gist of it. However, I think seeing it in a context-specific situation is a hundred times more effective, especially with you explaining it as you go. At least for me.
-
It's your first encounter with it. You don't have to master it all in the first try. Oh, agreed. I just mean getting the gist of how they all work together, etc. I don't have any expectations beyond that at this point. For the other info, that's very helpful. I think I understand what you're saying with the "two pass" approach. I'll perhaps give that a shot and see how it works out tomorrow. A bit tired to get into it now. My bed is starting to call to me... Thanks again!
-
Hmm... so if I use the rabbit model you linked there, and make sure I have the hip null selected when I copy and mirror the frames, it should work okay? Would it be the same issue with the Knight model, too, then? 'cause the same thing happens with the Knight. Well, not the same thing. Or is it that they're both using the same rig? I'm still kinda wrapping my head around the model > rig > action thing, though I think I get it. I see people make their own skeleton rigs and I guess each is specialized for a different range of motion and such?
-
Seriously? Someone else nutty enough to live in Small-Bany??? I'm in Scotia...lovely little Scotia. Actually, I'm in Mt. Marion, about 5 minutes from Woodstock, about 10 from Kingston. I figured Albany might be more recognizable as an overall region. Google maps says I'm about an hour S. of you. Google Maps has been wrong before, though.
-
A little drilling and milling for fun...
MikeV replied to MMZ_TimeLord's topic in Work In Progress / Sweatbox
Now how come I can never get holes that smooth when I drill them? Seriously.. that's pretty awesome! -
Like I said, I'm going to go back and do it manually. The reason I'm intent on doing it the CPM way is because: 1) That's the way the tutorial is instructing me to do it, so I want to follow through in that way. 2) I want to make sure it isn't the result of something I'm doing wrong, or if it is, find out what it is and correct it. For my own peace of mind. Doing it manually and doing it the CPM way aren't mutually exclusive. I can do both. In fact, at this point I could probably do the 4 key poses entirely from memory lol. I can definitely see the value in doing it manually, especially when you don't want it to be a perfectly "symmetrical" animation cycle. I'm not against doing it that way, and I'm not dismissing your suggestion or ignoring your "hints" - subtle as they are... -cough- . I'm just being "anal", if you will, about getting the results the book illustrates, doing it the way the book instructs it. There's no hurry, and plenty more for me to do and learn in the meantime.
-
Okay, well I can definitively say it's not the rabbit model/rig. It's doing the same thing with the Knight model. With the knight, though, its torso starts sliding backwards on each frame after 16, which is nutty, considering I only nudged the body up or down based on the pose at a given frame. The feet stay in place, though. So, yeah. Some weirdness going on there. I'm gonna take a break from this exercise for now and then maybe come back later and re-do the animation frames manually, so I can complete it. Actions are something I want to become more familiar with, so it'll be worth it. Think I'll do some modeling instead heheh. Play with some patches! So, I'll leave this thread as "To Be Continued..."
-
Yeah, that is unfortunate. It definitely has benefits over polygons, that's for sure. And I'm sure, had the technology gone the way of splines, versus polys, we'd have seen no less of the progress and power increase over time. Well, voxels seemed to have a similar situation. Some companies tried to use those for real-time simulation (at least a couple games come to mind, like Outcast), but I think they were too blocky at the time. People are revisiting that tech now, though, for a so-called "infinite detail" graphics tech. 'course, you have pretty much infinite detail possible - or at least "infinite smoothness" - with hash patches as well, given how it subdivides continuously as you zoom in. I saw that thread here on the forums where someone's showing how that all happens "under the hood". Very cool stuff. What I love about patches is just how elegant they are. So much detail can be attained with such little geometry. Also how smoothing - something that you're constantly fighting with in polygonal modeling - pretty much comes for free. I'm still a newbie, and there's way more I need to learn about the tech and how it all works, but the more I learn, the more fascinated I am with it.
-
Indeed. Truth to tell, Blender3D, I think, is already on par with most of those higher-priced programs. It can do pretty much anything they can, and more, and is completely free. It's extendible via Python and, in fact, was designed specifically for a Production studio environment. I have nothing but good to say about that program, and the man who "started it all", Ton Roosendaal. The reason I chose not to go with Blender for my projects is that it's *too* much. As I'd mentioned in another post somewhere on these forums - or maybe it was on my blog; I forget - is that using Blender instead of A:M would be like using a tractor/plough when a hand trowel is sufficient. I'm all about practicality and simplicity and having exactly what you need for the job. If I can get the job done without all the extra bells and whistles, then why have them? Why needlessly complicate it? Also, it's that A:M is designed specifically for this kind of thing, from the ground-up. That means every tool is focused on the task at hand. I like that. Plus, working with Hash Patches is pretty darn cool - even if I haven't quite tamed them yet. But I'm working on it! It's a very cool program and I'm psyched as heck to see myself improve and get deeper into what I can do with this baby.
-
Ahhh okay, thanks! That's a nice shortcut lol. I was manually going to each key frame and doing the Edit > Delete Keyframe route. I'm going to do a test to rule in or out whether it's the rabbit model/rig issue. I know the Knight model I have now is a current/compatible one because I downloaded it after having an issue with "It's a Pitch!". Sooo... My theory is, if I can animate the knight following that tutorial, and everything works okay, then I know it was the rabbit rig. If I get the same issue, then it's something else. What that something else is, I still won't be sure. But at least I'll have that ruled out. Will post back when I get it figured out.
-
I considered that, as a last resort. At the same time, if there's something I'm doing wrong that would cause the Paste Mirrored not to work right, I should definitely know what that is so I can correct it in the future. Especially if it's something that might affect other areas of a project. Incidentally, I don't know why I put this in this forum section. Meant to put it in the TAoAM section. My bad. So I decided to do the exercise again from scratch. Everything up to frame 15 is fine and, in fact, I got up to that point a lot faster (so that's a positive at least lol). However, the copy and paste-mirrored bit is still not doing what the tutorial says it should. Instead of "floating" at the highest point for frames 16-40, it now is slowly "sinking" back down to the starting height from frame 0. Also, the hands are really wonky, too. Now, I'm wondering. Might it be a similar issue like there was with the knight model, being a different rig version? I ask because I notice when I'm saving the file for the first time, it gives me that warning about the rig being created with an earlier version of the software or something along those lines. Then it asks if I want to "embed" or "save" the model. I could go ahead and finish up the animation by moving everything back by hand and it would be good practice. That's good advice from Rob for sure. By the same token, I would feel kinda like that's a "work-around" for an issue that might well be due to something I'm doing wrong. So I could do it by hand, just to continue on and complete the tutorial - there's a few more bits to it after that. I'd still want to resolve the weirdness with the copy and paste mirrored and find out why that's happening, though. Hmm.. Maybe I'll move on to another exercise in the meantime and come back to this one. I intend to get alot of learning/practice in with A:M this weekend, so I don't want it all spent on a single exercise. Edit To Add: I didn't see your last response when I started typing this, Rob. So, yeah... some of what I say will seem redundant to you lol. Also, I checked and both the skeletal keys you note are enabled.
-
I considered that, as a last resort. At the same time, if there's something I'm doing wrong that would cause the Paste Mirrored not to work right, I should definitely know what that is so I can correct it in the future. Especially if it's something that might affect other areas of a project. Incidentally, I don't know why I put this in this forum section. Meant to put it in the TAoAM section. My bad.
-
So, I'm working on the "Take A Walk" exercise. Up through frame 15, it's all fine. There's some tweaks I need to make, but it looks good to my eyes for a first go. Where the trouble begins is in the steps where I'm copying and "paste mirrored" on the keyframes (0:00:00 mirrored to 0:00:20, and so forth). It's copying the bone positions, but it doesn't seem to be tracking the vertical position of the rabbit itself. So, it goes through the first step just fine, but then it stays at the same height when playing out the "paste mirrored" frames. There's nothing I can see about changing any settings or anything, other than to zero out Balance and Balance Rigid, which I did before I started animating. It's confusing to me because it's literally just "Ctrl-C" at frame 0, Shift-Ctrl-V at frame 20, and so on. So I'm not even touching the model or anything at that point. I tried deleting the keyframes from 0:00:20 on up through the end and doing it again, but I get the same results. Sooo, I'm at a loss as to what I'm doing wrong or how to fix it. I'm uploading the project file here. If someone wants to give it a look-see, that'd be awesome. Thanks! TakeAWalk.prj
-
I know! All these kids and their newfangled pixel-shaders and dynamic tessellation! :-p It's not a big deal. I'm using OGL since that's the one that works best for me. Was just one of those "huh, who'd-a-thunk it" type things for me. A DX card performing better with OGL than it does with DX.
-
Cool! Accepted!
-
Is it just me, or does the OpenGL mode in A:M seem to perform substantially better than the DX8 mode? It also looks a lot clearer. I can crank the patch detail level all the way up to the 4th/full detail level in OGL and it's perfectly smooth, and the splines are nice and clear. The only artifact I get from it is that if I draw a selection box or drag a guideline it causes a "blank spot" 'til I release the mouse button. If I go into DX8 mode, it's smooth up to level 2, but as soon as I get to level 3 detail, and more so level 4, it chops up pretty bad. Also the grid lines become jagged and "broken up" looking. The one positive is that I don't get the "blank spots" during selections or moving guides. It's not a complaint by any means. I'll gladly continue to use OpenGL. I just find it funny that on a 560ti Nvidia card, one I would *think* is optimized for DirectX, OpenGL is pretty much kicking its butt. Funny how graphics tech works.