MikeV
-
Posts
164 -
Joined
-
Last visited
Content Type
Profiles
Forums
Events
Everything posted by MikeV
-
Yeah. The most important thing, I figure, is to keep moving forward and keep working on stuff. My current challenge is finding a good set of comprehensive tutorials on materials. I can't seem to find any. Most I find are for very specific applications. I'm sure I'll find something though.
-
Seriously? Someone else nutty enough to live in Small-Bany??? I'm in Scotia...lovely little Scotia. Actually, I'm in Mt. Marion, about 5 minutes from Woodstock, about 10 from Kingston. I figured Albany might be more recognizable as an overall region. Google maps says I'm about an hour S. of you. Google Maps has been wrong before, though. straight up the thruway...sounds about right.. Nice! Well, howdy neighbor!
-
I just realized I had set my birth year wrong in my settings. The forums said I'm 38. I'm actually 39 today :-p I also learned I share the same birthday with Kevin Smith! So that's kinda cool
-
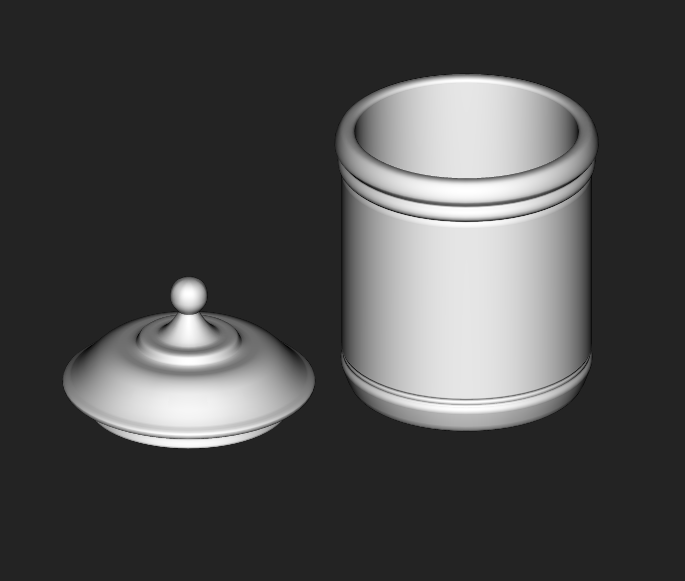
In the meantime... Got my first "prop" model done... Just need to work on the material for it now. I'm gonna look for some good material tutorials and see what I can learn. Cap and main canister are separate objects, so I can have them not on fully or what not, just to add a bit of "life" to the setting. Also, the cap actually properly fits the opening... so that's a bonus :-p. Lathing an object isn't a major challenge, and so this is more just a "I got this part done on this day" sort of mile-marker. Will be interesting to go back and look at how things progressed later on. Here's a quick render of it...

-
Thanks everyone! @Rodney Splines.... -whimper- lol
-
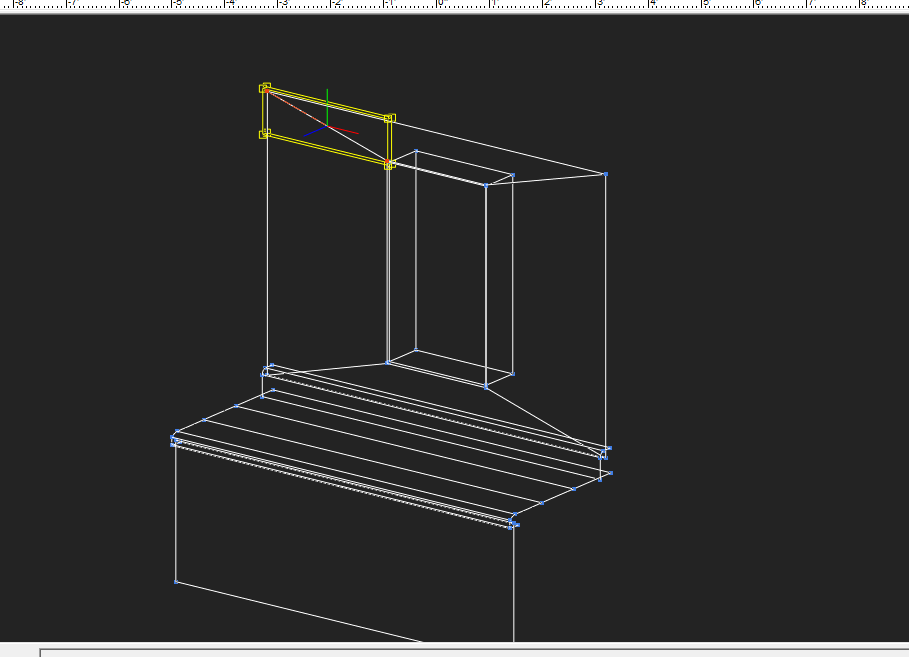
Okay... quick self-check here. I'm filling out and tweaking the basic counter/cabinet set right now, just getting things into a scale I can work with, etc. I put a window into my back wall using the approach Jeff Cantin describes on his site (or at least how I understood it). However, I am finding that there are 4 dead-end splines connecting the main wall spline to the window spline. I could probably re-connect them so they flow into the splines forming the frame of the window, but then I'd have to contend with the splines wanting to curve. Which I don't want, obviously. What I'm wondering is, since it's a flat surface and the intention is to have a somewhat sharp corner where the wall meets the window, is it an exception to the "no dead-ends", or at least permissible in this case? Is there a different/better way I should be doing it? I want to get this right and I want to learn the right way to do this stuff as early as possible, and if doing things over is what it takes to drill it into my head, then that's what I'll do... Here's a shot of it... Thanks!
-
You know, it's funny you mention that, because on the way home from work, I was thinking about setting up the "proxy models" that Rodney mentioned earlier in the thread, for things like the cabinets and such. Given the "project" nature of A:M, I can easily create the basic/starting models - making sure to bevel the edges as you note (which would definitely be good practice) - and just have those models ready for when it's time to complete the finished objects. And then I got to thinking, well, some things are fairly straight-forward to model.. like a bowl, or a canister (for sugar, flour, etc). Things like that. And I want to do the whole thing with having "Sugar" and such "embossed" into the surface of the canisters, which I think would be a good candidate for becoming more familiar with the material system which I haven't delved into too much yet. I'd like to get a sorta polished earthenware look which, I imagine, would require the use of a few of the settings and such. So that should be good practice. So... it's not taking as long as I thought it might, but I'm feeling that "bug" coming back to create stuff. Which is good! Certainly not complaining about that!
-
Hey, thanks all! Gotta say, this is the first time I've had a thread started specifically to wish me one on a forum. Cool!
-
Hey Rodney, I was just thinking (stand back! it could get messy!) Since this thread has basically morphed from a "one-off" post and is likely going to become about a work in progress, perhaps it would be better to move it to that forum section? Was just thinking about that.
-
Thanks for that! Yeah, I like to always keep the creativity flowing, and I hate letting things "beat me" so even if the "gotta model something" bug hasn't quite bit me again yet, I'm keeping myself creative in another way. I don't intend to jump into the animation part for a bit yet, and the modeling will be basic at this point, and there's still a lot of modeling to be done, which will probably be good practice for me in general since it covers a variety of different things. Will be good material and texturing practice, too, which I haven't gotten into beyond the decaling of a couple tutorials. I also have to come up with some art for a fictitious Macaroni and Cheese brand. I have an idea for that, though. I was thinking that could be a neat "sub-project". I'll use A:M to create the assets required for the box art itself, then slap the rendered image on the box in the full animation. It's not going to be anything fancy... the idea will be one of those really "child-targeted", silly-looking box art deals, but there's a few key things on it that are important to the story and action itself. As for using proxies... good idea! I hadn't considered using proxy models. I'd like to have a corner modeled in on one side of the counter, with a refrigerator on the other side... just to sorta "box in" the set, and assure that however the camera's angled, it'll always be seeing "something". You'll never be looking away from the counter, so I'm not worried about that. No shortage of things to do! But, I have to start getting ready for work, so that'll all have to wait 'til later.
-
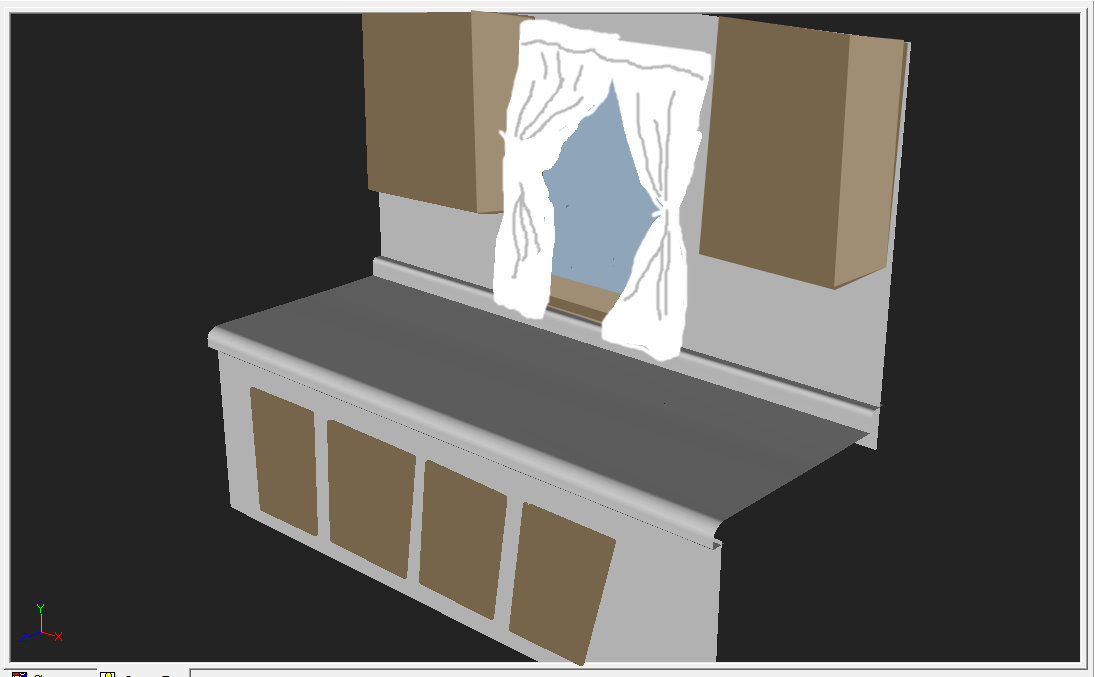
I wasn't sure if this belonged in "Work In Progress" or this section. Since I'm not actually physically working on anything in A:M at this point, I figured this was the better option. If I'm wrong and it belongs in the "Work In Progress" section, by all means kick it over there . So, after reading through the posts in that last thread, I decided that while I wait for my "juices" and inspiration to fully get flowing again in terms of learning in earnest with A:M, that I would start doing some planning for what will be my first full animation with it. I am by no means jumping straight into that project. I'm just doing all the early work that doesn't require any modeling or what-not to take place... storyboarding and so forth. This way, when I feel I'm ready to take that step and really begin work on it, I should have most everything I need in place. That's the plan, anyway. Up 'til now, I've thought through the animation as a sort of "fuzzy" movie... kinda like someone with really bad eyesight (like me!) watching TV without glasses. You can make out the shapes, you can see stuff happening, but the details aren't very clear. Other than a few key props, I havent' had much else worked out. There are a few bits of the action that I'm still sorting through and I'm not sure what order they'll happen in just yet. Hopefully the storyboarding will help with that. So anyway, what I did is jumped into A:M and just mocked up a quick kitchen counter (based roughly on the one in my kitchen, but not exact), and then went into GIMP and did a very rough (emphasis on "very") "paint over" of a screenshot of it to sorta "block in' where major set pieces will be. Stuff you'll see in the background to make it look like an actual kitchen counter but that won't be part of the main action. The smaller props that will be more specific to the movie itself aren't drawn in yet, 'cause it's getting late, I'm getting tired and my mouse drawing skills were bad enough as it was. In the meantime, I'm going to also do some reading on creating stories for animation and try to get some "formal education" (ie. more of a clue than I have now) in that regard. I know there are some experienced people on these forums who have actually "walked the walk" already and lived to tell about it.. so I might be picking at some of your brains as well . Anyhow.. I'm rambling here and probably not even making sense lol. So here's a picture of my -cough- paint-over job. Yes, it's pretty much all mechanical modeling at this point (sorry, Rob!). Well, except for the curtains, which will be interesting to model, for sure. But other elements will be more round and fluid and less rigid and "straight". I thought maybe some folks could take a look at the roughed out sketch and let me know if anything sends up red-flags for you right away? Anything you think might be an issue, etc? I know there's not much going on in the picture, but hey... gotta start somewhere, right? 'night all! P.S. Aren't the curtains simply breathtaking? So realistic! >.>
-
I think you were really close with what you had, there were just a couple bumps to diagnose. After you have made some more models you will start to see the bumps before you hit them. Ah, I getcha now. Yeah I can agree on that point. I definitely don't fall into that category of only wanting to do mechanical. Mechanical objects will be very necessary in my projects, though. Incidentally, I just got done watching both of your introductory vids you linked earlier in the thread. Very good! I was already a fan of your method of explaining and illustrating things based on your other videos.. so I wasn't expecting to *not* like them. They were a great introduction, though. I take it nothing more ever came of those? Regarding the information you cover with the magnitude and such of using the bias handles, those things I had a pretty good grasp on. I work with Corel Draw every day at my job (I work in the art dept. of a company that produces patches, labels, pins, shirts and so forth...), and am often tracing over images and having to match curves and such, so the concept of curves and handles and CPs is pretty "solid" with me. What's tripping me up is more the A:M-specific pit-falls and things that can happen to break the continuity of a spline, or change its direction, or cause ghostly rogue CP's to linger around behind legitimate ones :-p. Basically the things that have been tripping me up in this thread with that particular project.
-
I appreciate all the feedback, everyone. And I'm glad y'all haven't just written me off as a "whiner" lol. I *would* like to learn and become proficient at A:M @ everyone: What put me off is purely the idea that I've been moving along under the assumption that I've been learning and building a solid foundation of what I'm doing. I felt I had a good, working understanding of how splines work and of how patches work. That project with the beam, which was really part of a bigger project (an entire "market stand"), was intended as both a project and a sort of application of what I've learned. Something that I would want to do for my own use, rather than something I'm instructed to do from a book or a video. The realization I've come to with all the "aftermath" of that is that I really feel I haven't really learned a thing beyond the absolute basic of basics. Or at least that I haven't learned a thing correctly. It's a very discouraging realization to have after feeling like I'd been moving along and being overall happy with my progress. So, the enthusiasm has been sucked right out of me. Now all I can think is, "if I proceed from this point, how much farther will I get this time before I find out that I've been doing everything wrong again, and feel I've wasted even more time spinning my wheels?" @robcat: I get what you're saying about A:M not being ideal for mechanical modeling, but it also confuses me that you say that. Because when I look through the gallery, I see stuff like these: http://www.hash.com/stills/displayimage.ph...um=2&pos=30 http://www.hash.com/stills/displayimage.ph...um=2&pos=37 http://www.hash.com/stills/displayimage.ph...um=2&pos=48 http://www.hash.com/stills/displayimage.ph...um=2&pos=92 http://www.hash.com/stills/displayimage.ph...&fullsize=1 ... and many more you've no doubt seen many times... ... I get the impression that A:M is perfectly well suited for mechanical modeling. I mean, those models look damn good to my eyes. Is it optimal for flat, mechanical objects? Probably not, in much the same way that polygon modeling isn't optimal for obtaining smooth curved surfaces. To me, Hash Patches and Polygons seem to be kinda balanced at opposite ends of the see-saw, so to speak. The strengths of each balancing out its weaknesses compared to the other. I do intend to create characters and the like. But I also intend to create set-pieces and backdrops and things that are going to be more straight and hard-edged in nature. If you would say definitively that A:M is not the program for me if I intend to create such objects, then maybe my best choice would be to move on and return to a polygon-based approach. Though I suspect you wouldn't be quite prepared to make that suggestion. I could be wrong though. I'm not "going away mad". I'm just rather bummed and deflated for right now. I'll probably pick it back up at some point. Maybe not "right now", but I'll be sticking around. Appreciate the "talk" folks
-
These exist already, in the form of Barry Zundel's tutorial series. You can buy them one at a time, for like five bucks. So you can stop *wishing* they exist. They already do. It's great that they exist, and I've seen that video set mentioned with high regard a number of times. My one problem with offering that as a solution is this... If what he's demonstrating in those videos is critical to developing a comprehensive early understanding of patch modeling, of the behaviors and quirks of CPs and splines, and provides instruction/advice on how to properly approach modeling something, to start you off on the right foot, with those characteristics in mind, then they, or something equivalent, should be included with the software itself. We're not talking specialized topics like how to model a character, or how to compose and render a scene well. We're talking nuts-and-bolts, "this is information that will carry over into everything you create with our software" basic information. People buying your software, and then being told "now go spend more money on some videos that teach you the ins-and-outs of patches, splines and CPs and how to plan and work with them properly" seems more than a little unreasonable to me. I would fully, and reasonably, expect to be provided that information with the price of the software itself, especially if such info is as critical to proper modeling technique as it clearly is in this case.
-
Excellent post, Vertexspline. I think you sum it up perfectly. A:M is fine. The way it works is fine. The results it can produce are awesome. None of this is debatable, in my opinion. The thoroughness of the tutorials/excercises and the comprehensiveness of all the things that *really* go into spline/patch modeling, however, need an overhaul. When someone, however new, is running into issues that they didn't even know could be issues to begin with, and it's resulting in the loss of hours, or even days of work... there's something very wrong.
-
Fair enough, though pointing to face rigging in Blender has nothing to do with modeling a simple beam in Animation Master. It certainly has nothing to do with the issues I'm encountering. I'm not trying to rig a face. I'm trying to model a fairly simple and straight-forward static object. If you want to do a comparison with Blender, then at least keep the comparisons 1-to-1. As in, "modeling the same, simple object in each program". And it's not "because polygons are superior to patches". So please don't take it as me implying that. I think they're both equally useful. Each has its benefits and its drawbacks. It's just that patches are more complicated in their use with more underlying rules to be aware of at every step of the process. Polygons are more free-form and forgiving and have less "baggage" involved in their usage. The simple explanation for that would be that polygon modeling is a lot more.. actually much more straight forward than spline modeling. What you see is quite literally what you get. There are no hidden secondary and tertiary rules governing every single edge and vertex on the surface of a polygon mesh. You don't have to worry about which direction your edges are flowing, or if more than 2 edges meet at a given vertex. There's no such thing as "dead-ending". If you select two faces and then extrude/inset them into another shape, you're not automatically breaking any rules of "proper edge flow". You don't have to worry about internal faces because they don't occur unless you specifically and intentionally create them. The greatest concern you have in terms of the structure of a polygon mesh is "are the normals all facing the right way?", and a fix for that is typically a button or key press away. So, to answer your question earlier in the thread about what I would have been able to do when I first started with Blender... Yes, I would have been able to model something like that - and more. Within the first few hours. No question. With any poly modeler, Blender or otherwise. Because vertices, edges and faces don't carry all the caveats and conditions that splines and patches do. It's constructed with three of the first and most basic tools you learn.. extrude, transform and scale. We're talking the Day One poly-modeling equivalent of creating an S out of a spline and lathing it into a vase in A:M. I don't have to worry about having some mistake I made unknowingly suddenly coming to light an hour or two later when I'm well beyond that point and doing something on another part of the model.
-
Hey there. Thanks for the feedback/info. You say it's all about spline continuity, and that was my initial perspective. But that doesn't really seem to be the case when you get down to it, because there are so many little individual things that can alter a splines continuity without someone (especially a new user) even realizing it 'til much later. With the model in this thread, I had been checking spline continuity and such to make sure nothing was dead-ending, etc. And nothing was. At one point, even Robcat was stumped because, I presume, he couldn't see any reason why it wouldn't work. It turns out there was a "rogue CP" that he found that seemed to be the problem. But then there was a CP that another user noticed that seemed to be the problem. So, in that case, even having proper spline continuity didn't guarantee anything. Also the thing with peaking the CPs. That part kind of confused me, because at one point - maybe in this thread, perhaps elsewhere - someone suggested peaking the CPs and then using the bias handles to get the curve I wanted. But then later, I think it was Nancy, questioned why I was using the bias handles so early in the modeling. That brings to light another "secondary or tertiary rule" that I seem to have slammed into face-first without even knowing it existed. I had no idea there was a "right" or "wrong" time to use bias handles. To me it was a matter of tweaking the splines at a given CP to get the shape you want. Apparently it's more involved than that. And that, on balance, is what's really throwing me off with A:M. All those hidden rules that seem to go along with, seemingly, everything you can possibly do in the program. I realize for someone more experienced, all of those things are second nature and completely instinctual. I'm not saying "A:M sucks. It's all the program's fault". Again, I've seen what the program is capable of and what it can do. I'm just saying that, to someone just learning the program and trying to come to grips with the absolute basics, it's more than a little overwhelming. And, apparently, the basic tutorials I've been following have not been doing a thorough job of pointing all that out. Speaking of tutorials, another thing that's struck me is how someone earlier in the thread noted that the tutorials in the TaoAM are a bit outdated and not really up-to-date with how the program works now, or with the best practices of how to approach different specific tasks. But then on the other hand, what is the first thing people are told to do when starting out with A:M? To go through the TaoAM book. I mean, think about that. I don't know. I think A:M is a solid and very cool program that can do some amazing stuff. I think it's the structure of the tutorials and such that need to be be revisited, perhaps. Especially if much of it is outdated, using approaches that are no longer valid or ideal in newer versions of the software. Just my two cents. I think I'm gonna take some time away from this program and maybe come back with a fresh brain. We'll see how I do. Thanks again for all the feedback and help. Despite my frustration with learning A:M at the moment, it is appreciated.
-
There's the core misstep at the outset... approaching splining as if it is variation of polygon modeling. A very common misstep among people who have been using polygon modelers but it's still a misstep. If you start out wrong it WILL BE HARD to get right again. I may have phrased that bit poorly. I don't mean I realized I started out approaching it as though it were a polygon model and then realized "oops, I'm using patches" and then changed my approach. What I meant is that I was making it with sharp edges because I was trying to recreate it as it looks in Blender. I created it that way in Blender because it was intended to be a low-polygon model to be used in a game engine, and so I had to do it that way to keep performance up when the final model was placed in a real-time environment setting among a lot of other geometry. Once I remembered that I wasn't doing it for a "low poly" or "low resolution" application, and didn't have to worry about a final polygon count, that I could go ahead and let A:M do what it does well, which is handling curved surfaces. The statement had to do with the final look I was going for, not the approach I was taking to it. I just didn't phrase that bit very well
-
You just have to stop trying to model like it is polygons, Mike...it's a tough transition for some. It takes a little more thinking...I approach mechanical modeling and organic modeling totally differently. For mechanical modeling, Rodger Reynold's tutorials explained it best for me. The biggest eye-opener would be the Modeling Edges and Corners tutorial. Hope that helps. Appreciate those links I don't think it's that I'm trying to model like polygons. I'm aware of the differences between poly and patch modeling. Polygons can be modeled a bit more "arbitrarily", patches/splines require more planning and care in their layout. That part I'm fine with and I realize I have to work on. What's getting to me is that there seems to be all these sorta secondary and tertiary rules that are just as important, but are, seemingly, extremely situational and not at all obvious or "tell-tale" in any way.. at least to me. Nancy ran down a long list of questions earlier in the thread that really made that hit home to me. I also notice that in different tutorials, discussions and such, it seems to make all the difference in how you create a new spline, how you connect a new spline, how you continue an existing spline, how you add a new CP to an existing spline, do you press Shift when connecting or not, how you delete or detach a new spline, what direction is the spline going in, how is it flowing through the CPs, when to use peaked, when to use curved, when to set CPs to peaked before adjusting their curves with the handles, when to use the CP handles, when not to use CP handles, when is something mandatory, when is it optional... etc. etc. All these "little things" that seem to have potentially big impacts on the resulting models. It's just so much to take in. Everything seems to have several additional "sub-rules" associated with it, and it seems that if you're not completely versed and understanding of all of them, and all situations that each of them applies in, that you're bound to make mistakes that may not even show up 'til several steps after you've made them - such as with my beam project here. I'm getting feedback about mistakes I'm making that I never even knew you *could* make to begin with. I'm honestly and without sarcasm amazed and all the more impressed at how people are able to grasp and master it all as well as they do. That's what makes me wonder if it's just beyond me. I mean, I consider myself a fairly intelligent person, capable of learning new things... but this spline/patch thing making my head spin.
-
I think the TAOAM is a good start, but they are not the endall. They introduce new user to one of many ways to do something, but not necessarily the only way, nor are they very deep. Just don't take them as gospel, never to be questioned. Some of the interface(s) has/have changed. Some of the models are faulty. New users run into the quirks, get frustrated. But the exercises are worth looking at, trying, and then asking questions, and moving on to other tutorials, examples. And yes it's hard to find the info here on forum doing a search. That's why questions are always good, at whatever level you're at. Hmmm...I don't have a real answer other than I too have noticed quirky behavior when switching between peaked and not peaked cps, and with extrusion. As I said before, I'm not a mechanical modeler. I do squishy characters, and am not that picky about exactness. I traditionally work only with continuous curves (not peaked). If I need something to look sharper or rounder, smoother, I will add splines, or work with bias handles (less usual). When I took your model and then hit the "curve switch" I get a very funny looking splines. When I hit the peaked switch again, I get another funny model, different from your original. Me no likee. More importantly, I also notice that if I take your left most spline that you used for extrusion, that it is NOT a continuous spline - so I will guess you peaked that original spline from which you extruded - not a good idea, I don't think. As an alternative, or something to add to toolbox, I find I have more luck with getting "protrusions" or "indents" on/in a surface when I think of the surface as a grid (after extruding with continuous spline). Outline the cross section or shape to be protruded on the grid/surface with a continuous spline ring, thus creating 3 and 5 point areas. Then select all of the inner area and move it in 3D space out or in from the surface. To refine the indented shape, or protrusion, stitch in more spline rings. Then select all those 5 point areas (when everything is happy), and green donut your way to nirvana. Yeah, I think I'm gonna have to just start over with that thing, if I continue to work on it at all. I hate to say this, but I'm beginning to really feel that maybe A:M and patch modeling is just beyond me or something and I'm barking up the wrong tree trying to learn it. I'm going on a week at least now since I started learning and I feel like I haven't learned or absorbed anything. I figured recreating that market stand would be within my reach, and a good self-assigned project to put what I've learned to practice, to test myself and create something that doesn't come specifically from a pre-written tutorial or exercise. I figured, that beam took me maybe 10 minutes to model and refine in Blender. How difficult could it possibly be with splines and patches? Well, I think I've gotten my answer lol. Apparently I haven't learned anything, 'cause darned if I'm not making mistakes left and right.. most of which I'm not even aware of. All the issues people are pointing out to me about it is really putting it in stark contrast that I really have no clue what I'm doing. Is it *supposed* to be this difficult to learn to use A:M and patches? Am I expecting too much of myself, or am I just not wired for it?
-
DirectX is still Windows-only according to the always-reliable Wikipedia. Yeah, OGL predates DX and was Silicon Graphics's way of trying to provide a standardized graphics API across different 3D hardware, as their proprietary API was too "locked in" and incompatible with competing 3D hardware. So, they were losing market share as new hardware vendors entered the market. DX came a few years later and was Microsoft's way of trying to attract game developers/programmers to the Windows platform, starting with Windows 95. Game developers preferred programming in DOS, since they could directly access the hardware. With Windows, they couldn't do that so easily. Of course, Microsoft wanted to move people away from using DOS, and wanted to showcase Windows 95 as being a "gaming capable OS" so they had to do something to make Windows more appealing. So basically, both technologies were an attempt by their respective developers to bring people to their hardware/software, or keep them there in SGI's case. At least that's my understanding of it. Some details may be off a little. I remember when OGL first hit the scene and it was all "Ooh! Colored lights! Smooth textures! No more ugly pixelated graphics! High-Color visuals! No more limited 256 color palettes!". Suddenly, almost every new 3D tech demo released was drenched in over-saturated reds and blues and oranges. It was the "programmer art" way of showcasing that technology in newer (for the time) 3D engine technology. Personally it gave me a headache. It was nice when I finally saw a game that used it wisely, to enhance the visuals rather than define or override them. I think the game Unreal was the first time I personally saw a good, responsible use of colored lighting during that time.
-
Hmm... I re-downloaded the broken project, deleted that CP and rebuilt it. The 5 point patch button lit up, but no patch was made when I clicked it. So I opened the file again, with the issue still there, deleted that CP again and rebuilt it, and the second time, it worked on the first try. So... it seems to be tempermental or something. Anyway! Thanks again for taking a look at it and helping to track down the issue... and enjoy your Twinkies! Are your normals facing the right direction? I checked and, at least on the fixed model, they are. I'd have to check to see what the case was with the "broken" one.
-
That seems to remain the mystery lol. It's the first and only time I've gotten that particular problem. If it happens again, though, then I'll try and keep better track of the process I used up to that point. Ahh yes, the coffee cup with the wacked-out handle that copy and paste "cured". That was another odd one lol. As for my process, I don't remember all the steps 'cause I was just working along 'til that 5-point patch issue happened. I can give you a basic 10,000 foot overview. There were two shapes, or cross-sections to be more accurate, to start with. One being the solid piece, which I'll call "Base Shape", and the part with the recess, which I'll refer to as "Recessed Shape". I extruded out the Base Shape up to the point where it would connect to the Recessed Shape. Then I split the right-most middle spline Base Shape and lined the CPs up with where they'd need to be to line up with the Recessed Shape. I then lined up the Recessed Shape with the Base Shape and connected those. Then I extruded from that point on out to the end of it. This is all in context of working left to right, using the "Right" viewport (3 on the keypad). At this point, I had all the CPs peaked as I was originally going to have hard edges. You can see the result of that in my first post with the 3 different spline layouts. After that, I decided I wanted it to be more curved, since I'm working with patches and not polygons, I figured I could make it look a lot nicer, less "chunky" and a bit more elegant, by bringing curves into it. It had also been pointed out that I had a dead-end spline running into the recessed area. So I reworked it to try and get bevels into it, which was frustrating at first, but I eventually got to work, more or less. I still have to do another beveled section for the inside of the recessed area. Everything was great up to the point where I extruded the spline for the recessed area in to give it depth. That's when the 5 point patch disappeared and that whole weirdness started. There were certainly smaller in-between steps in there, but I couldn't tell you what they were. Hopefully that wasn't too confusing lol. Well, I peaked everything because initially it was going to be a harder-edged shape. Then, when I remembered I wasn't working with polys, I decided it would look nicer to have it more rounded. So, I started with peaked edges, and then went back and adjusted the CP handles to get them more round. I think someone earlier in the thread suggested it that way, actually, rather than just pressing "o" and letting A:M do it automatically. I did find using the CP handles gave me much more direct control over it. Though, I'm guessing that might not be the best way to go about it? Well great! 'cause I can tend to be full of them! And I enjoy talking to people about anything that's a shared interest ( in case you haven't noticed :-p). You should hear me when I get going on games or game design. It's good to know about the TAoAM exercises... though now it makes me wonder. Am I well served by doing those actual exercises, then? Should I maybe be taking the information provided (regarding animation and such) and apply it to other tutorials outside that manual? I mean, if it's possible that what's in the book is no longer the correct or best way to go about doing something, perhaps I shouldn't be going about it the way it does?
-
Wow. Yet another awesome resource for A:M. It continues to amaze me how much helpful information there is scattered about these forums and the website in general, in terms of videos, articles and people sharing their knowledge/expertise. I need to set up a special Bookmarks folder specifically for this stuff, as well as download all the helpful videos I've been referred to and otherwise found. This way I can be a bit more "self-helping" and won't have to ask others to use their own time helping me with something that there's already a perfect resource available for. As much as I appreciate the help I receive here, I'm also eager to "take off the training wheels" and start solving and working through things on my own, or being able to recognize issues that other newer users encounter. Will be a great moment when I realize I've reached that point. Right now I'm in that phase of not always knowing what questions I should be asking, or what I should be looking for help with. But anyway, I'm rambling. Thanks for sharing that!
-
Hmm... I re-downloaded the broken project, deleted that CP and rebuilt it. The 5 point patch button lit up, but no patch was made when I clicked it. So I opened the file again, with the issue still there, deleted that CP again and rebuilt it, and the second time, it worked on the first try. So... it seems to be tempermental or something. Anyway! Thanks again for taking a look at it and helping to track down the issue... and enjoy your Twinkies!