wildcard
-
Posts
101 -
Joined
-
Last visited
Content Type
Profiles
Forums
Events
Everything posted by wildcard
-
Selection draws grey boxes instead of transparent
wildcard replied to wildcard's topic in Open Forum
Oh nice! Holding down the space bar, kind of gives me a flickering shutter effect, but at least an option to see through the grayish barrier blocking my view otherwise, this makes things very workable, not ideal, but better than what it was. I'm using a GTX game orientated card for I still very frequently kill some time playing a video games, downgrading drivers isn't really a valid option as new game release often require the opposite and the latest driver updates. As it frequently gets updated, I might get lucky and the issues gets resolved over time, but I'm not counting on it. As for other video cards, besides the onboard integrated GPU in my i7, my previous generations cards either died, passed on to others or sold. But I'll dig through my old GPU collection, might even have an Quadro card laying, if it's PCIe I might try it. Anyway's attached a quick video of what I'm seeing, for describing what I'm seeing and getting others to actually understand what I'm seeing isn't one of my strong points https://filenurse.com/download/f7e80262b2f5a4e683c113f69ececa77.html Uploaded on: 2017/20/06 Accessible until: 2017/27/06 -
Selection draws grey boxes instead of transparent
wildcard replied to wildcard's topic in Open Forum
Any kind of screen update, adding CP's zooming, panning, changing viewing angle results the screen returns back to normal. So it's workable, it's just highly annoying that when attempting to select items, everything within the selection turns grey completely masking what's in the selection from view. On top of this, reducing the selection, doesn't reveal, undo the masking. It's stay's masked, until selection is released/confirmed and an object is selected or a change to the screen is made. A well, stuck with AM32, Direct3D for now I fear... -
Selection draws grey boxes instead of transparent
wildcard replied to wildcard's topic in Open Forum
Thx Robcat for the swift response... Don't have a subscription based copy, got the full package way back and it allowed me to use updates up to v17, seeing I'm just started again, I'm not keen on jumping straight on a new subscription just yet. And was hoping to make due with what I got at the moment. If this issue has been solved in the newer released version 18?19 or what ever is current and the 64bit version is compatible with Windows 10 and doesn't have any of the selection issues I am currently experiencing, I might consider it. But if possible, I'm attempting to avoid spending money this early, not even sure if I can back in to AM and be able to enjoy it as I used to do. As for OpenGL3, did some searching, this has been added to V18 and it's not listed for V17 assuming the wiki hold correct information. I doubt it can be used in V17. Getting a gut feeling I'll be stuck using AM32, but keen to learn if AM works well on Windows 10 with a GTX card instead of a Quadro and with out selection issues or other annoying visual corruptions -
Hi Folks, I've an issues with AM and I'm not quite sure where to start looking for a fix. It's has been 4~5 possible more years that I had to set AM aside for other projects, hobbies and other time consuming things like family... A lot has changed, AM has it's share of updates as well as my own system OS & hardware. I'll be using my training wheels again to familiarize myself with AM again, but got an annoying selection issue to deal with first. Running on Win10, 64Bits OS, GTX 980ti Both AM32 and AM64 version 17g are installed and both have the issue. Only with the 32bit version there is an render option for Direct3D v8, that fixes the issue, but bind me to AM32 I've an 64bit OS and I would assume AM64 would be able to take advantage of some of the advantages a 64bit OS has to offer. Did some searching, got some hits like the suggestion to use Direct3D rendering instead of openGL, but I'm keen to know if there is a fix/workaround to make it work for AM64

-
Managed to get it working, again, but don't have a clue what and how I did it. Will continue learning/experimenting with bones at a later time. Will be getting the key to my new apartment in a few days and there will be plenty of other work to do before I can pickup tinkering around with AM again.
-
*Face Palm* Got it to work, but don't have a clue how I did it. Unable to recreate it from scratch, I've tried so many things, I can't recall exactly what made it work. Bones.prj
-
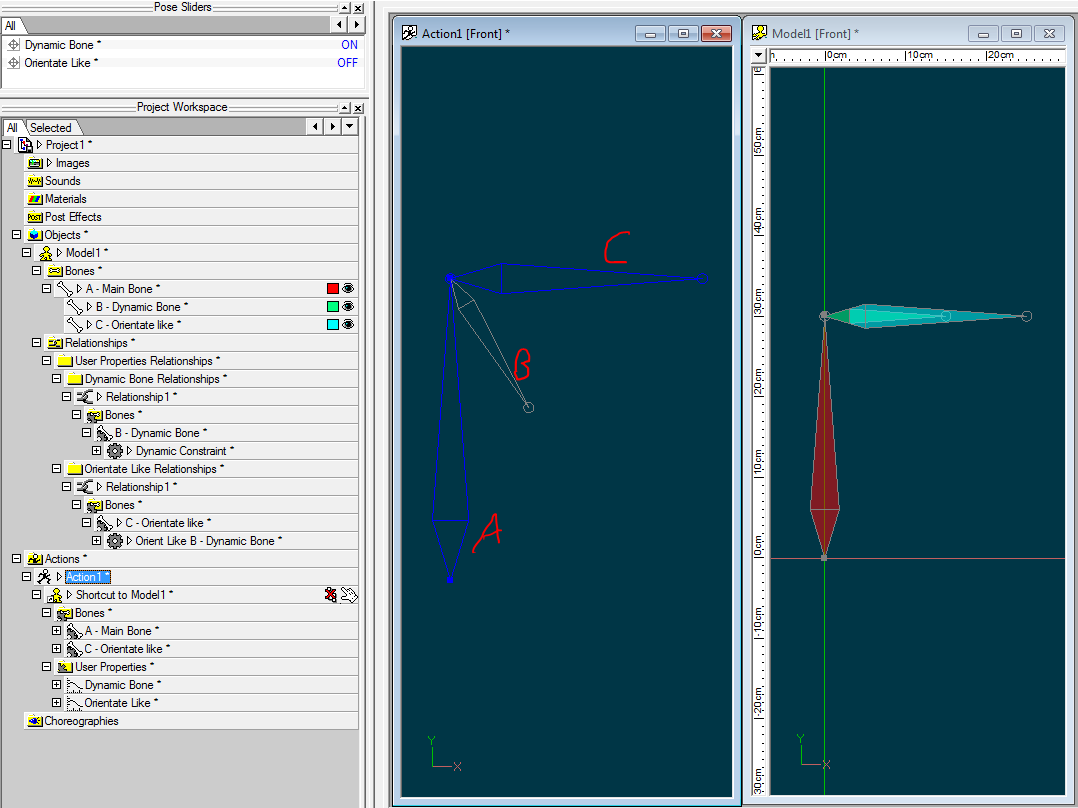
Its not working for me and I'm not exactly sure what I'm doing wrong, but I'm pretty sure its possible. Here a snapshot. 3 Bones, Bone A, the main bone with bones B and C, both a child of bone A. One pose setup with a dynamic constraint put on bone B, with a spring system. One pose setup with a Orientate like Bone B. At frame zero in the action time line I enable the Dynamic pose for Bone B, that works. Giving Bone B be a few seconds to bounce and become idle before I enable the pose to orientate like bone B. The moment I turn it on it snap to match the exact same position of bone B. This isn't what I'm looking for, I want it to copy the movement of bone B, from it's current position, not snap to it to exactly match it. I fooled around with and with out compensate mode, but see little effect.
-
Bits and pieces make sense, going to experiment and see if I can get it working
-
I'm back to the drawing board trying to figure if I can get to work in the first place. So I've got two bones, one intended to be setup with dynamic constrains and the other to copy the movement of the first bone. The second bone will be controlling the cp's. Both setup in a on/off pose of there own. Both bones are positioned horizontally The idea was to enable the dynamic constraints pose and have it get effected by gravity, once it's in a resting position (stopped bouncing around) enable the other pose and copy any movement changes from there on the second horizontally positioned bone. However, I'm failing to get it to work. It either snaps in the same position of the dynamic bone or snaps to an other un intended position when enabling the pose. I'm starting to wonder if it is actually possible with AM? Any one able to throw me a bone and help?
-
Spot on, Thanks
-
I'm trying to create a Choreography, that is better suited to make reflective metallic surfaces more realistic. The default Choreography with ground and background makes a reflective objects look a bit unrealistic and dead. Adding more objects helps, but also increase render time. I've created a 360° skydome, what does a good job making it more live like and realistic looking, but it's missing a visible light source, the sun. SO I'm trying to make a light source to actually show up in the reflection instead of just emitting light with out being able to be seen. Problem is, I'm doing something wrong and I don't know what, any one able to give me nudge in the right direction?
-
As far as I know, the CD version isn't hardware bound like the subscription version. However, it does require the CD to be present when your running AM. So this limits you to using one installation at the time, no matter on how many PC's you installed it on for the CD is required when running AM. I hope this kind of fills in the blanks.
-
It worked for me in V15j, but not in V16.0a (32bits, PC) As I was creating a video for a bug report, it suddenly decided to work in v16.0a. This makes me wonder if the successful run in V15j had anything to do with it now working for me in V16.0a...
-
Will try the project file when I get home and really hope it's me doing something wrong. Would it fail, I'll dig up my v15 CD version and give that a go. Still not sure, if I've a knack for finding problems or that they find me, do know it's handy during beta testing
-
No that ain't it, but that topic did lead me to what I was looking for. The plugin is named ReSurface. However I'm unable to get it to work for me. Can any one confirm it's working for V16.0a Do you mean the plugin won't launch, nothing happens when you use it or just bad results? I've never used it before so this was just a quick test in v16a on a Mac. Looks like its working. It's pretty straight forward looking on how to use it, but it simply doesn't do any thing for me. I've an inner shape as in your video and an outer lathed mesh similar to your video I need to fit around it, but selecting what needs to be resurfaced, right click > plugins > wizards > resurface simply doesn't do anything for me. i'm using the PC version.
-
Seeing how the video tutorial from Will Sutton really helped me visualize things better for me and got me going, I'm gonna follow up your advice and get myself some of those training videos and if there as good as you say they are, I'll get the others as well.
-
No that ain't it, but that topic did lead me to what I was looking for. The plugin is named ReSurface. However I'm unable to get it to work for me. Can any one confirm it's working for V16.0a
-
I've no idea whats it called, nor had much luck finding it. Best thing I can do is describe what I'm looking for. A while back, when I was digging through toe forums killing time, I ran in to a tutorial (believe a video), where a very fine spline mesh of the lower torso and legs got scaled down to tightly fit around the legs and keep a set distance. Pretty sure it's mostly used to make cloth pieces fit correctly and keep the required distance for so it can be animated. I'm unable to find it, nor do I have an idea whats it's called. All I know I've need for it now I hope some one understand what I'm talking about and can point me in the right direction Now that I've found what I'm looking for, I'm unable to get it to work. can any one confirm if it's working for V16.0a and if so. How does it work, because for me it ain't working
-
Have you tried exercise 11.5 "Make A Face" in The Art of Animation:Master? There are multiple approaches to making a face and this is just one, but it will be useful. I've tried using the build order before, but I don't know what, but at the time I used it, it' simply didn't feel right nor did what I was creating look good enough. Out of frustration I've been looking for an other route or more guidance on how to use it. Once you get something that works, it makes sense to re-use it. Some people re-use existing models and modify them to get what they want. Others will re-use complicated parts such as ears. Even though I managed to make a face, it didn't feel right with me, felt to much like cheating and not actually modeling myself, but it did work Thanks those video's really really helped out a lot! Seeing the method from chapter 11.5 actually being used in action really changed my perspective on how to model. Static pictures and steps didn't get the idea across correctly The quick introduction and the talk about the hot key's 1 through 6 gave me a good idea when the can be of good use to me. I knew they where there, but never really had seen a situation when I could use them. The frequent use of the extrude tool gave me a much better picture there are many more situation it can be used in than I believed possible. Still need to make another attempt at modeling a face, but I'm pretty confident I'll be able to create something I'll be pleased with.
-
I’m looking for guidance, some step by step guide or tutorial, movie some other form of instructions on how to model a head/face. Currently I’m struggling with the creation of a head for my model. I’ve lost count of how many times I’ve started over from scratch again. The body of my female model has been created through the use of a front, side and rear view picture of the basic shape. Through the use of the lathe tool, extruding tool, scaling and lots of tweaking. Took sometime getting the body modeled right and I've started from scratch plenty of times that really aided and improved my ability to model. However, I have tried repeating the same way I created the body, with the head, but it’s not working for me. Been digging around the forums to find some guidance, but didn’t find a whole lot that aided me on how to create a head from scratch. Eventually I ended up with taking a wireframe & shaded head from my Hash Library CD to aid with modeling. Merged and shaped it to fit in a picture with in Gimp and then use that as a rotoscope. Somewhere it feels like cheating and I’m now simply connecting the dots, but as simple as it may sound I still find it difficult to form and shape the face. Any one able to add some guidance on how to model a head/face?
-
Great to hear that its possible. I'll add it to my to learn list
-
Character customization is a big thing in games, specially role playing games. Through sliders, you alter/modify body parts making them large, longer, thicker, etc. I was wondering if something similar could be achieved with in AM, to reuse a model and modify it through sliders. http://www.youtube.com/watch?v=2EVVPmnU484...tailpage#t=171s
-
I don't believe this is possible, but I'm very new to AM myself so I might be wrong and I hope I am wrong for I like the idea of adding a CP to a spline and be able to move it along the spline with out altering it's curve.
-
Not sure if I fully understand your question. If you can move a CP around a spline with out altering the curve of the spline?
-
Add that as a "note" to the AMReport. I think it's the Hooks that are getting messed up. I believe your spot on with your conclusion it might be the hooks that are causing the problems. Removed all the hooks I could find, didn't make any other kind adjustments to the model (scale x to 0 as was talked about) and with the exception of all the holes I created by removing the hooks, the CFA worked flawlessly. Created a sphere with 8 lathe steps, created two hooks on one side, cut it in half and did a CFA bam, CP's gone out of whack. Repeated the sphere creation, but now with 64 lathe steps and on one side create two hooks, cut in half CFA and nothing, worked perfectly.