wildcard
-
Posts
101 -
Joined
-
Last visited
Content Type
Profiles
Forums
Events
Everything posted by wildcard
-
I find it a tad annoying how the camera rotation works when modeling. When adding splines you have to re-select a CP in order to have the camera rotate around it, else AM reverts back to the center XYZ coordinates and rotates the camera around there. Depending on the size of the model and how far away you are from the X or Y axis, when having nothing selected, camera rotations feels clumsy and some what disorientated. Does AM hold an option to rotate around last selected CP or CP group or some manipulation key to have AM not fall back to the center XYZ camera rotation.
-
Hit the "Show Manipulator Properties" button in the top toolbar. Then select a CP. You should then be able to enter specific XYZ coordinates in the onscreen widget. Thanks HomeSlice, Like you explained, I've already been selecting both points and scale them down to 0 along the Y and Z axisnow Now that I know of the "Show Manipulator Properties" I find it less hassle to get CP moved to the right spot.
-
Got the "Snap to Mirrored point(s)" thingy to work or at least it works most of the time. The problem, or I should say the my frustration, is more that when it doesn't work, I've to manually align one point to match to mirror position of the other. I don't know what the conditions are or what allows AM to find the mirror CP(s), but there are times I've to manually align them and it's the manual positioning of one CP that I find a real pain to do. AM doesn't allow me to simply enter the (mirror) XYZ coordinates to move the CP. Would there be an option to move a CP to a designated location by entering XYZ values, please share how... *Quick Edit* Thanks Fuchur, Changing those values made my live easier, my model is of large scale so the default 0.05cm is way to small. Will have to toy around with it a little bit to find the sweet spot that works well for me and my model scale.
-
Try this. If you have CPs in a symmetrical model that have lost contact with their mirrored counterparts in "Mirror Mode" after "Copy/FlipAttach", you can reconnect them as follows; First turn Mirror Mode OFF. Then left click the troublesome CP to select it. Now right click on the selected CP and a contextual menu will appear. From it select "Snap to Mirrored point(s)". Turn "Mirror Mode back on and they should be reconnected now. Thanks for the guidance. I recall using it before but it didn't work for me, must have been because mirror mode was still on. I'll toy around with it some more, and make sure mirror mode is toggled off.
-
How I hate finding the solution shortly after I posted on the forums for guidance. Selecting both points, scaling down to 0% along the y and z axis, wile both still selected inverse the x axis Pivot value in the Translate X axis. Or at least that`s how I got both points to be mirrored again. If any one has a quicker way, please let me know. *edit* Or at least it seems to work most of the time. Any way I can Manually entering x, y and z coordinates for a control point? Working with the Transform properties, by adding/subtracting small changes to move the CP around is a royal pain in the
-
When ever I do Copy, Flip and Attach to a model, depending on how complex the model is, I'll end up making minor changes to fix things. Correct some splines re do some patches, nothing major. Pretty much everything that wasn't modified is still nicely working with Mirror Mode, but those control points I modified are no longer mirrored. Once my model has been made whole with copy flip attach, I've to worry about making adjustments to both half's Mirror Mode takes care of that. So, is there any way I can get control points back in sync again with there mirror control point, so they work again with Mirror mode?
-
15J+ CD version, running on Windows 7
-
Thanks for the help, will eventually be using both. Quick dirty render I did before AM gave me the finger and I'm back to starting all over again. I keep reminding my self how often I've to save even if it's just a simple project, but always when it's to late untitled.zip AVI file inside, Render with only Newton physic's, will soon setup up something similar, only to have Newton Physic's aid in getting more realistic looking bounce and path, will retrace it's steps with a 2nd ball model that can squash and stretch and replace the other one.
-
I've toyed around with hair and cloth dynamic's a little bit and they need to be setup with a deflector. But now I want to try and have two object to not pass through one an other like they ain't there. Did some searching, but not really sure what the right search terms are. Most hits I'm getting are hair and cloth threads. I'm starting simple, a Sphere what will act as ball and the ground. How do I proceed from here? (Is there a tutorial, online or may be even in the AM documentation/guide what I've missed?)
-
Multiple way's for my problem. Thanks! Didn't had much time to set it up yet and test it proper, but I believe I had Fuchur's method working on the first try before AM decided to crash on me. Had one to many crashes to day, so AM is on a Time out and I'm letting my frustration out by killing some Zombies in Left 4 Dead
-
I'm fooling around with the lights and camera to get a better feel in how to use them fast and easy and tried to have them circle around static object (model) With both the light/camera I through I could easily draw a circle path around my object and have aim at the object to keep it centered all the time. But both don't seem to want to snap to the path and attach them selfs to it. I've tried manually setting up the camera/light to do a circle motion around an object but this is very time consuming or at least the way I'm doing it. I'm pretty sure there is an easy way to move the camera/lights around in a fluent circle motion Searched around looking for a guide but came up empty handed. Are there any guides?
-
When using the rotate tool, it rotates in steps of 5°, is the a key that can override this rotate snap angle? For I'm quite happy with the rotate snap and all, but there are situation I don't want it and I find it a bit to much trouble going in to the settings tab to turn it off.
-
Ah, so thats why it didn't work. Will give the plugin a shot in V16 later The branch in the project I uploaded is not longer the same in my current project. I guess I groomed it right on the first attempts and with all the tweaking/tinkering I did with my current branch I made a mess out of it. Beginner luck
-
Nope don't have that plugin. Noticed that my original Christmas ball almost matched your tweaked one. Just copying those changes in to my project didn't make much of a difference. Lights and more elements to be seen in the reflection where needed to give to a whole lot more realistic look. The branch did you brush/groom the hair in place? for it looks really nicely done and evenly spread out. Or did you apply an other trick to get them in place?
-
Looks really nice, not having the floor appearing in the reflection does give it a much better look. the altered branch is also much better looking. Would you mind sharing the adjusted/new project file? So I can get a better look/feel for the property fields that have been altered. I'm not very accustomed yet will all the AM settings (what they are called and their location in AM) so often I'm looking for a needle in a haystack even when it's right under my nose. To many option to drown in for a beginner
-
Will do when I get back home from work
-
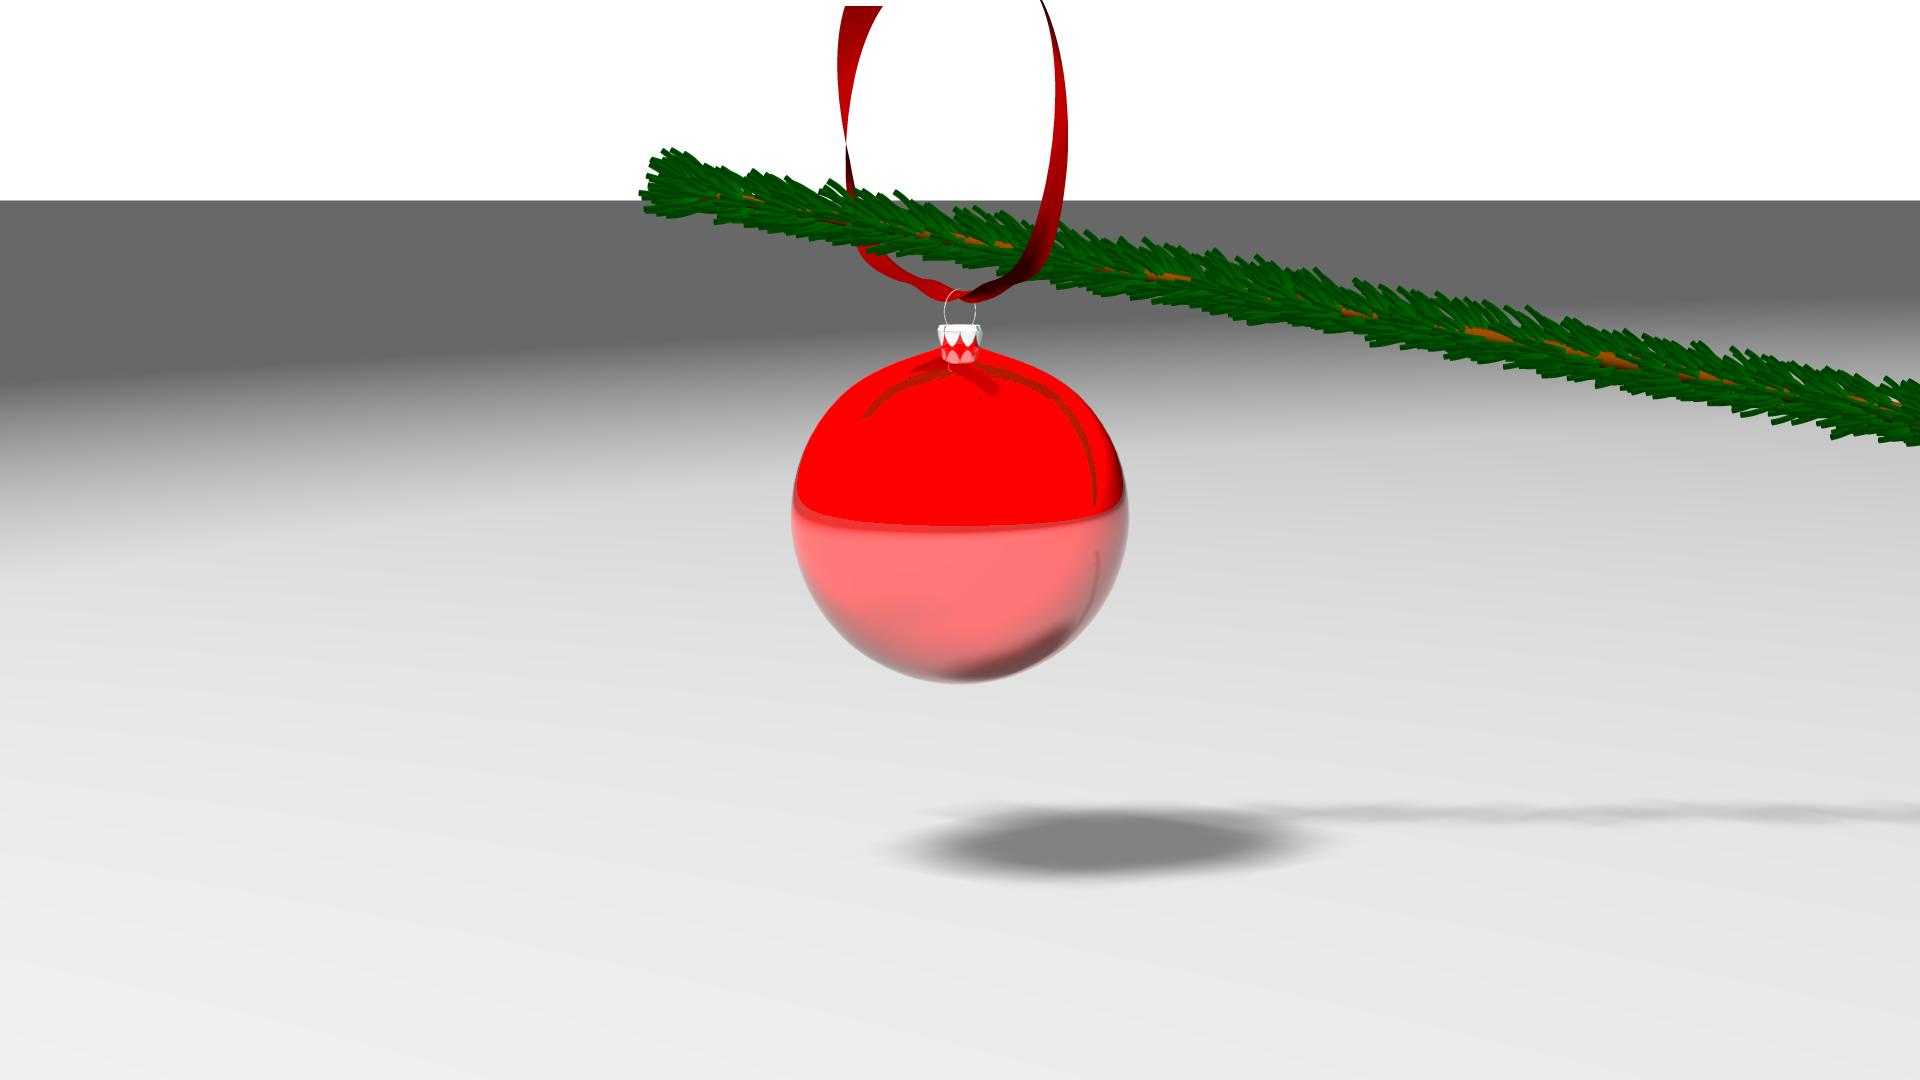
Almost Christmas and already Christmas cards are landing on my doormat and I expect I’ll find some digital Christmas e-card in my email box any time soon. So instead of building my own e-card online with often pairs with unwanted e-mails I thought why note create my own digital Christmas card created with AM. Quick easy and simple... or at least I initially thought it would be easy... I’m expecting it’s not a whole lot of work, but for someone who is still learning never done any kind of animating before it’s really time consuming and a challenge. The idea is, White background/ground, Render 1 or 2 Christmas balls, hanging from a branch, shadow cast on the ground Text added (what should be seen in the reflection of the balls) Pretty much the following image I’ve created a branch with thick green hair that would qualify as Christmas tree branch, best I could come up with in the least amount of time Not really that good looking, but quick and easy and will pass for a branch. (So if any one has any points on modeling a more realistic looking branch in a short amount of time I'm all ears) Created spheres to pass for Christmas balls, but I’ve not much experience setting up a reflective surface and the color don’t feel right, but I guess that’s due to the reflection, shiny, bling bling look that is missing and very likely the light sources around it. Added a Ribbon tying the ball with the branch, but the ribbon looks... leather/plastic like. If anyone could assist me in setting up the proper color/reflection settings that will make a ball look like an actual Christmas ball as well as getting the ribbon to look like actual piece of cloth that isn’t reflective, shiny like plastic/leather. Any help/points more then welcome ***Edit*** My current trial 'n error project file xmas.prj Quick render of what I got so far Made few changes based on the advice been given, but didn't quite understood everything The sphere is low patch count, but thinking about redoing it to get a slightly better rounder looking ball. The Ribbon looks much better, but hoping to improve it a bit more. It still has a real thin look when twisting and turning. Anyway to make it more fluffy cloth looking? Though about adding hair to it as well but, very dense but extremely short, just to buff up the thickness a bit, but I expect that there is an other way. What bothers me the most is still the look 'n feel of the ball it self. Might be because I've little to no object to show up in the reflection of the ball, but i expect there a more settings I'v not played with yet that can improve the look.

-
I’m having some issues with an “Ork” flag banner I’m creating. The banner is hanging from a “T” shaped pole similar to the following image. On top of the banner I will be modeling a skull with hair tied in a very long ponytail sticking out on top slightly backwards. But for now, it`s a sphere with one patch with a very dense amount of hair. The banner (or Cloth) I’ve under control, the pole is setup as deflector and the cloth will not pass through it. The hair on the other hand I don’t seem to be able to control From time to time, it will pass through the sphere or pole but most of the time it`s looking ok. But it’s piercing through the banner like it isn’t there. Any way I can setup a deflector for the hair to prevent it from passing through objects similar to the Cloth constraints?
-
The missile pod is free hand mostly. When it comes down to drawing straight lines, my years drawing building plans with a rules come in hand. Snap to grid manipulator and peak splines. No use of decals yet, so the render you see is splines only I've only one Battletech minature tin model and its the Mad Cat. What is a great help already, being able to hold it, rotate it and use it for drawing reference. Mechwarrior, battlemech or the mech name it self results in a decent amount of good images in google and bing But if your looking for front/side view drawings http://www.solaris7.com and http://www.mektek.com might be a good place to have a look at. pretty pleased with this find, for it gave the height of the battlemechs along with a crude front/side view. (off topic, any way I can scale image shown in forums, this is to darn large) . . . . . . Duplicator Wizard . . . . . . That looks pretty darn easy compared to how I've been wrestling and trying to beat some sense in those splines all day long. every day we learn something new Also didn't know a 4 point circle was possible, looks like I'm rebuilding that missile bay to get a good feel for that duplicator wizard thingy.
-
I'm still learning the basic's and am experimenting a lot by simply modeling and running in to problems and learning from those. Trying to build a Mad Cat (aka Timber Wolf), a battlemech robot. It has a lot of square,cylinder, octangle shaped elements in its design. out of a square shaped cube, like this missile pod, where missiles are sticking out. It took me a good deal of time of patch up the front (rendered as lines) but with all the patching I had the task of, trying to reduce the cp's and trying to reduce them. and this really gave me a headache, ran in to a lot of odd looking patches when making hooks. So i'm wondering if I could eliminate some of the patch and splines drawing by having a cube like shape already fully patched and rendered and having the missiles stick through on of the patched surfaces not connected. Can this be done or will this cause problems down the road some where with an other process?
-
Yup, mirror mode was the problem... Installed V16, looking good so far.
-
So I've a section of a model that I grouped and named group1, when reselecting it, I'm missing bits and pieces of my selection that I grouped. Now I've regrouped it renamed it and so on but it keeps on happening. Oddly enough when I change view point to any thing but front or back, I'm seeing all selection points of the created group. So only when I'm looking at the group form front or back view, its looks like I don't have cp's selected. This a common problem? using AM V15J+ (CD)
-
I've been modeling basic object, with the least amount of patches and control points when ever possible. But as I'm exploring the forums and the Exta's DVD I've ran across a few projects that contained not all to complex model with a very high patch count. What are the advantages (or disadvantages) of having a high patch count on a model?
-
. . . . . . Well huh, that was simple. Manipulator Properties are linked to what manipulator mode your in. What a silly beginners mistake Thanks,
-
I'm seeing the "Show Manipulator Properties" being selected in quite a few tutorial video's, the seem to be different looking than the one I'm seeing when I've multiple CP's selected. I've Animation:Master 2002:A Complete Guide, and it has tutorial video's that show the Manipulator Properties to show X,Y,Z Scale and X,Y,Z Pivot when having multiple CP selected. Mine only shows X,Y,Z Offset when having multiple CP's selected. Now I know I can find Scale and Pivot also in the Properties Tab, but I'm human and in nature very lazy, so if I can do some thing with less moving of my mouse I like to take the easy way All joking aside, is there an option to change and what the "Show Manipulator Properties" tool shows? or has it changes over the years in AM?