


Rob_T
-
Posts
261 -
Joined
-
Last visited
Content Type
Profiles
Forums
Events
Posts posted by Rob_T
-
-
I did not see anything obvious but the master bone on the flower model was quite large as if you started large then went to smaller modeling. I played with the project a lttle and added a pose to control the petals just for fun and an action for one of the flowers to misbehave and a camera path etc
here's what I got also renamed and zipped the project
Wow. I could barely pose the thing without the leaves popping off and you did that? Amazing. Robcat also mentioned the model bone. Thank you for that. I did not however, change the scale of my flower during this process. I don't know how that bone got so big but I'm about to go invest some time in finding out.
I'm going to download your project file and take a look at it and see if I can tell what you did differently.
Thank you so much for the help.
-
I'm posting a little help notice in here because I need some help with lesson nine and other than Robcat and Rodney I haven't seen too much of anyone else in the TAO area.
Any help would be greatly appreciated. I'm real stumped on this one. My bones just wold not stay together and when they came apart leaves seperated from stems... it was madness I tell you; madness!
http://www.hash.com/forums/index.php?s=&am...st&p=300932
EDIT: Yes apparently I'm in such a twist about this I can no longer spell "could." Super. <_>
-
I was very happy with my walk cycle for Lesson 6. Even though it wasn't part of the lesson I felt much more comfortable with it and I felt it looked right as well.
That said, this part of it:
I just reread that and I'm confusing myself. To put it short, I would adjust the stride length but I'm not sure exactly the right way to do that without recreating the choregraphy and path from scratch every time I make a stride length adjustment.No. I never figured out how you could adjust a walk cycle's stride length while in a choreography.
-
I've had a lot of problems on this lesson (shocking I know). Oddly not where I thought I would have them. From playing with the program and messing around with some of the models I really thought my trouble would be with the splines. But in reality using the splines was a breeze and I understood the workflow very quickly.
The rigging on the other hand gave me all sorts of problems.
I was able to make and pose my flowers. BUT; and it's a big but; I don't consider this a passing grade.
I need some help and then I'm going to redo this lesson. I'm just not happy with it.
I'm attaching my project file (I've saved in several stages so I can go back to the point of my errors and fix them) and of course the image.
But it's the only image and that's part of the problem. I wanted to take 2 images and I repositioned camera one. I saved to file the same way I always do. In fact I've done it six times with the same result each time. It renders the image for me to look at and when I click off it it isn't saved as a Jpeg. I've tried adjusting the settings. I've tried saving it as an image file instead of a Jpeg. I've tried saving it as an animation. Despite showing me the image that I want, and the fact that I have "1" selected for the camera 1 view, it will not render it to file.
But that's the least of my problems.
The biggest issue I had in this lesson was without a doubt the bones. I only deviated from the lesson a little (I added a third leaf on the stem and at an off axis from the other two, I also made more petals than the lesson called for but I did the math and none are overlapping). The video lesson showed these big yellow circles around the bones when he was adding them to the flower. I did not see that.
Also, sometimes when I selected a bone and tried to change something my whole screen would go flashing yellow (like for example when I auto assigned my bones... it made that flashing yellow all over my screen despite doing what I asked and assigning the control points to the bones).
Lastly, and I think most importantly, my bones did not seem to marry up to each other right.
When I was posing the flower the bones in the stem would detach from each other (the ones in the leaves did it too) which would cause the leaves to bust out of the stem and appear to be floating on thier own.
My project file is a mess. I tried to do some stuff in model windows that didn't quite work (probably because I haven't learned to use the extruder yet) but everything I did on this project is there.
If someone could take a look at it and tell me what I'm doing wrong I would really appreciate it. I'm going to try again and stick strictly to the lesson probably later tonight or tomorrow. So the sooner someone can give me some pointers the better.
Thanks.
EDIT: It actually is letting me save multiple images.... it just isn't letting me change the file name for some reason and it is overwriting the file name I had for the first image without asking for permission. Wierd. For example, the first image was saved as Lesson 9 flower power 1.jpeg and the second image was saved as Lesson 9 flower power 2.jpeg. When it didn't work I tried it again and flower power 2 took over for flower power one. When I just tried again I tried saving it just as Lesson 9 flower power.jpeg... no number and it still saved it as number one and overwrote the image I already posted here.
Really wierd.
2ND EDIT: I forgot to mention that I had some majopr issues with the smart skin as well. The lesson shows it working on a leaf and encourages you to try it on any joint you may be having issues with. So since my bones were coming undone from one another and causing my leaves to pop off the stem I figured I would try using the smart skin to force the leaves to stay on the stem regardless of where the joins bend.
It seemed like it was going to work, I bent the flower one angle, made the corrections, bent the flower another angle and so on. But I ended up trying this like three times. And every time it ended up the same way. The flower would shoot off like a rocket into infinity and leave just the smallest traces of the stem behind. It took off at about a 45 degree angle and no amount of "undo" wold fix it and no matter how far I zoomed out I could never see the actual flower, just the thin trail of stem leading to where it went into oblivion. So I ended up deleting the smartskin each time and trying again with the same result.
I have no idea what gives with this.
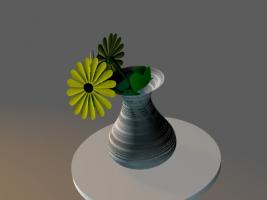
3RD EDIT: In case you are wondering the coffee table (that's how it was labeled but it doesn't really look like a coffee table to me, more like a bar table or a breakfast nook table) came from the props on the A:M Extra's Disc and the vase I made myself (another little add to the lesson) and put one of the planet (I think it was supposed to be Jupiter) textures on it. I think it came out pretty cool.
-
I have a friend who's an author (his 12th novel is coming out in July) and he has told me that working on your own, from home, is a very precarious thing. If you don't get yourself into a schedule and stick to it with the same discipline you would have if you had a job and a boss you can lose yourself very quickly. One thing I've learned from being unemployed for the last year. If you have the time there is always, always something to fill it. You have to force yourself to do the important things. I struggle with that all the time.
-
I don't know who does the video lessons, it's a shame they aren't credited especially if the person who did them is part of the community. They are for the most part quite excellent.
But has anyone else noticed how much his voice sounds like "Reverend Lovejoy" from the Simpsons?
It makes me laugh sometimes when I should be paying attention.
I'm up to lesson 9 now and I noticed that with the exception of the giraffe lesson all the forthcoming lessons are pretty short (in estimated time frame for completion). There are several under 30 minutes. I'm pretty psyched about that. The more I learn about this program the more I want to learn. It's like throwing gas on a fire. Repeatedly. I'm happy to know that I'll be done with the lessons soon and will be able to start working on my own stuff.
I'm a little nervous about the modeling. I'm not a good artist. Can't draw for crap. And the artist I have working on my webcomic is disconnecting and becoming less involved by the week. I hope modeling is easier than drawing. Otherwise I'm going to be making some pretty ugly people soon. And animals. Ugly animals.
I've also heard a lot of talk about plugins (the guy who sold me this assured me that there were no plug ins or extra programs to buy... that I got it all except an actual hard copy of the manual and digital is fine for me), different versions of the program and After Effects (which I not only have but have a tutorial program for that I never used). This makes me more nervous as I know that even after I learn the lessons I will still have so much to learn.
I love learning but there is nothing.... nothing like completing a project. I hope I get to start some soon.
-
since selecting the hips and pressing shift+keyframe DOES NOT force a keyframe on them (believe me I tried, it only keyframes the first four channels despite having key translations, scale, rotations, and constraints clicked on)
You're doing something wrong.
 I don't know what, but you're skipping something. But I know you're doing something wrong because that keyframe test topic I put up today had people do the procedure for forcing keyframes on bones that don't have keyframes and everyone seemed to have it work. No one reported it not working.
So I can only conclude you're doing something that is not the same as what is supposed to be done. I don't know what, but you're doing it.
When you find out, let me know, and then we can warn people to not do this thing that they are not supposed to do.
But I have no idea what you are not doing.
Well you are right. That doesn't answer the question. But at least I got a laugh out of it. When I figure out what I did wrong I will be sure to let you know so you can warn others to do it... or not do it.. as the case may be.
-
Sorry I didn't get back to you sooner. I missed your edit and didn't see I had been acknowledged.
Yes I picked up Animation:Master at New York Comic Con and I tinkered with it a bit after that but since I got back from a trip around the country a few weeks ago I've been burning through the TAO lessons and learning as much and as fast as I can.
So generally, I've been driving poor Robcat and Rodney out of thier minds. Fortunately they are both patient and live outside stabbing distance.
I'm up to lesson 9 now. All previous lessons posted in the TAO forum.
I may be delusional but I'm hoping to have something related to my comic to show (as far as animation goes) by the time Connecticon rolls around near the end of July.
I am of course assuming that animation willl make my small webcomic wildly succesful and me rich and famous.
I will make sure to thank Animation:Master at the Oscars.

-
It is a complicated thing to express. Your diagram helped me tremedously. If I may put my two cents in as someone who just"got it";
if someone had shown me your diagram when I started working on keyframing and said
1) a channel is the grey bar and white line that appears (usually under bones if you are working with a rigged model which, this early in your training you will pretty much always be) in your timeline or Project Work Space.
2) Keyframes will appear, as they are made, on the white line (channel) of the corresponding bone or bones in which you created a keyframe.
3) A channel usually will not appear in the timeline or project work space unless a keyframe is made on that bone. Once you keyframe a bone and the channel appears that channel is "Pre-Existing."
4) When forcing a keyframe on multiple bones you can filter the bones that are keyframed by choosing whether they have a pre-existing channel or not. Many attributes of a model may not have channels and choosing to keyframe these attributes en masse can have unexpected consequences and is usually unnecessary.
5) You can also choose to filter the way a bone is selected for keyframing by using the buttons at the lower left of the A:M interphase (See image) to choose whether the bones chosen will be keyframed for scale, translation, rotation, constraints, as well as several other options that you won't be using for awhile.
6) Lastly you can also choose to focus the area (of the model) in which you intend to force keyframes by using the bone, the bone and the bones locally connected to it, or the entire model buttons. By selecting the model's (for example) left ankle control point you can choose to keyframe just that control point, the control point, leg and foot, or the entire model by utilizing these buttons.
If someone had given me this information, along with your tutorial and diagrams I would have understood much better and sooner what was going on. I still would have had the problem with the hidden control point channels popping up on me later, but I would have understood this stuff just fine. I also would have tried selecting just the hip control point and forcing keyframes on all filtered channels to see if it keyframed those hidden channels for me. As it was, the only time I ever tried using that selection was on the whole model... which cause over a thousand keyframes to be made and generally screwed the entire project for me.
There are lots of other things I might have tried to get around my problem if I had understood this better. As it is, I'm very grateful to the info you gave me and the efforts you have made to refine it as I can pretty much guarantee I would be lost in the woods still and stuck on lesson 2 or something without it.
-
-
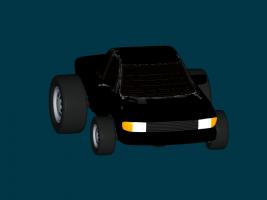
I have to say I was surprised at how easy this lesson was. I don't consider that a good thing. I felt kind of cheated. I thought I was going to learn stuff that really wasn't even touched on. This was the kind of thing that I basically did by myself, just screwing around with the program, before I even started the TAO.
I know it's probably important to someone but this lesson didn't really teach me anything and I'm kind of disappointed because I thought I was going to at least learn decaling (then I could have fixed this poor vehicles awful paint job or maybe given it some nicer rims).
Ah well.
All I did here was move the control points around. It's funny but I spent the most time rotating the tail lights 90 degrees and squaring them to look more like my Mustang's tail lights and now I realize you can't even see them in the image.
Durrr.
Anyway, collapsed the back end in, kind of like a Del Sol, and got rid of the ugly side stripes; changed the color (obviously), and increased the tire and axel size.
If it was a real car it would probably be completely undriveable but it still looks kind of cool.

-
Seven is done. I didn't deviate from the lesson much at all here. This lesson was easy as Rodney said but it was also very familiar. I've done a lot of Machinima so matching up audio to action is old hat. This taught me a few new things but it felt very familiar.
I imagine the sophistication of the model's rigging to be able to handle the Phenome detector has to be pretty high up on the scale of complexity.
I rendered it in preview so it looks lousy but I just couldn't justify waiting 10 or more hours for this six second clip to render.
I seriously considered recording a new audio clip (the one they use has so much distortion and background noise on it it sounds terrible) and changing the words to "I've got a secret. Can you keep a secret? I'm going to kill you all!" just to get a laugh (because the idea of Keekat slaughtering the innocent: for me anyway, is right up there with the killer rabbit from Monty Python's Quest for the Holy Grail) but I think I matched the audio and action pretty well and fulfilled the requirements of the lesson and once again recording new audio would just seem like doing more stuff I already know and slowing down the learning of new things. So I left it as is.
Comments? Thoughts?
http://s172.photobucket.com/albums/w37/Qui...nYouSayThat.flv
-
I said it before in the Exercise 6 thread where we are discussing this in excruciating (LOL) detail but I thought I would thank you here as well. Thanks for the diagram. It really helped.
-
Robcat, thanks for the extended explanation and diagram. I think I'm finally getting it. The only issue remaining I think is to confirm that while all this information is useful it doesn't solve what was probably the biggest problems I had with this lesson. I took a picture, sorry it was with my camera, with the duel monitor setup "print screen" and paste into Photoshop simply doesn't work for me. I've got a really crappy graphics card.
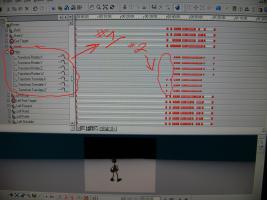
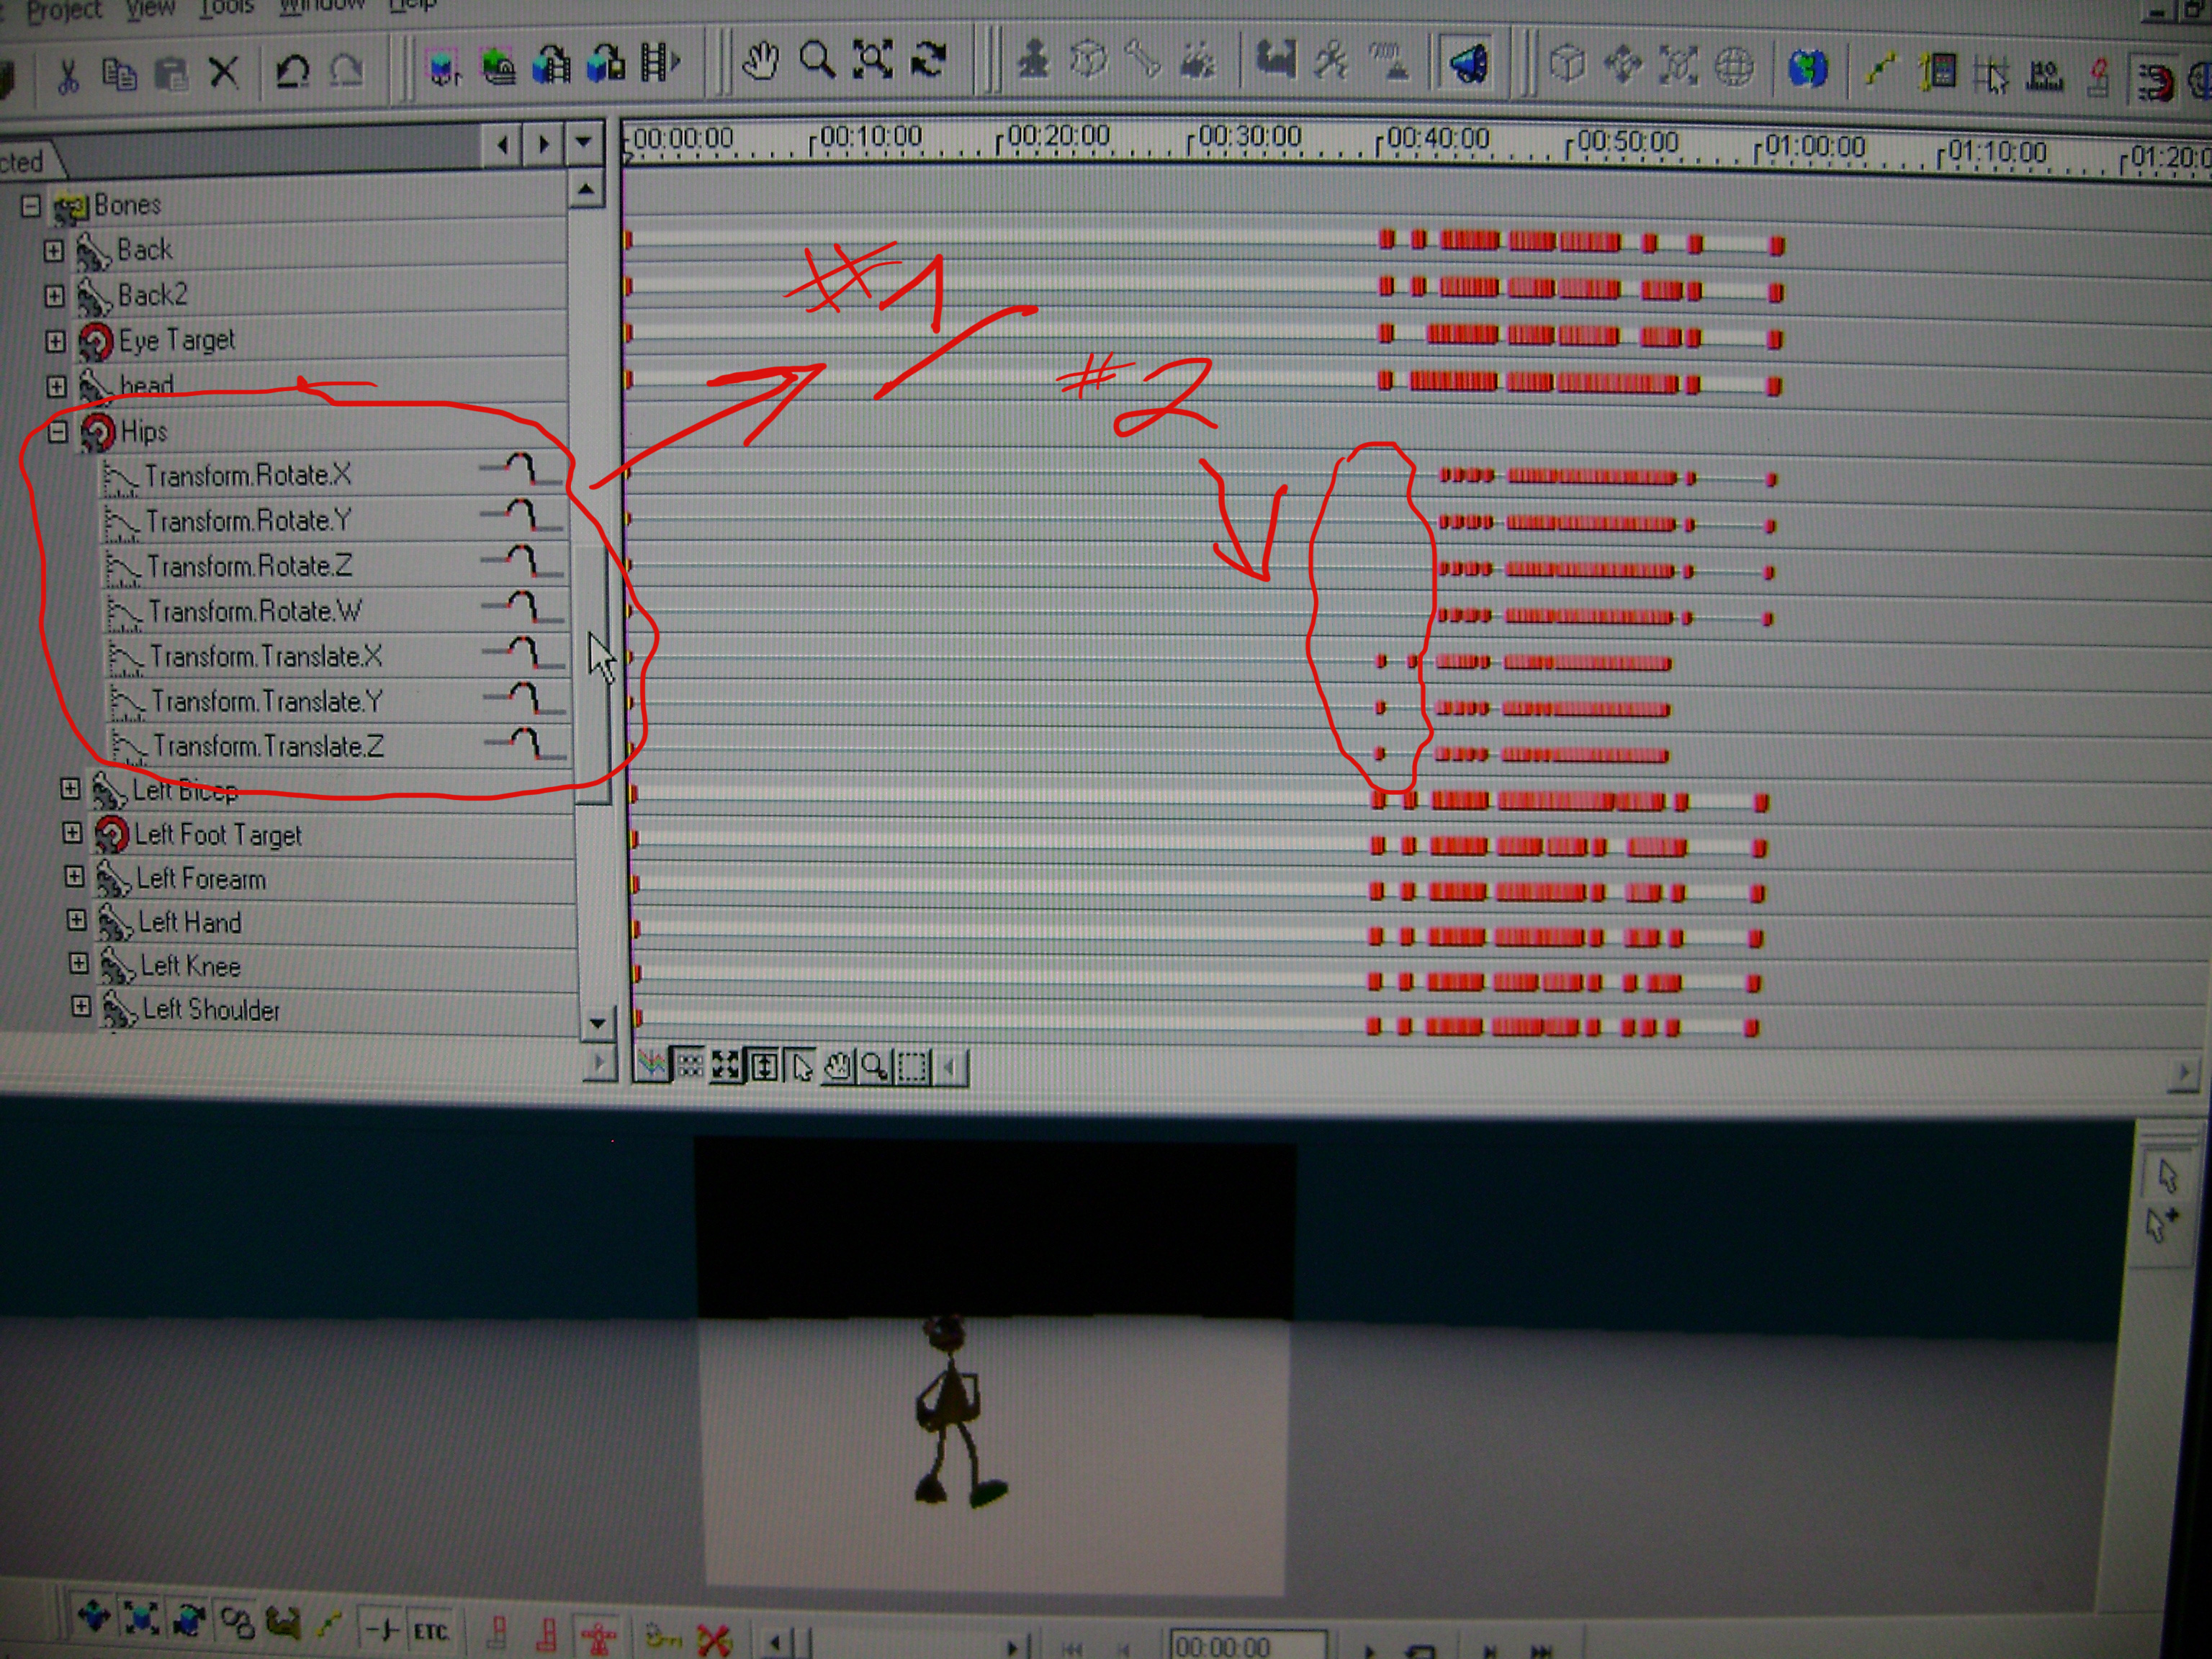
Ok, so if you check out the photo you can see the issue I had with control points. As I mentioned before, I never had an issue with regular bones. Just hips and ankles and I think the head and eye target but I'm not positive about those last two.
As you can see in the picture marked #1 there are seven different channels (thank you now I know what to call them, with all my experience with Sonar and Premier I was tempted to call them tracks or clips but neither fit) under the hips. When the model loads at the beginning it usually has 4. Even if you select the bones like you did in your tutorial for keyframing there is still just four channels. The problems I had arose when I moved the model in such a way as it activated those three other channels.
Now, if I understand you correctly, since these channels have not been keyframed, (they have in the picture I'm showing you so you will have to imagine you are with me when I had the problem I'm describing and we've just moved the hips for the first time in this animation in such a way that the three hidden channels appear, but as you can see from what is marked #2 these channels had no keyframe before this time period in the animation and this was a point in which I experienced this issue) they are not pre-existing and since selecting the hips and pressing shift+keyframe DOES NOT force a keyframe on them (believe me I tried, it only keyframes the first four channels despite having key translations, scale, rotations, and constraints clicked on) then they are, essentially, just one of what, a thousand or more filtered channels? Like you said, things that you would never want to move or keyframe.
And since they were never keyframed in the beginning they would slowly move and screw up the entire animation. If I "undid" the movement/pose that caused them to "activate" they would disappear and I could not keyframe those channels where I wanted the model to be, even though it was back where I wanted it because I "undid" the pose and as I mentioned before, if I tried to keyframe all the filtered channels my models merged and the whole project got pooched and I had to start from my latest save (just tried it again with my completed project... keyframing all filtered channels I mean, and although it didn't merge the door and shaggy like it did last time, this time around I only had one bone selected instead of all of them and it still did some very strange things to the animation... for example it turned the model 180 degrees from where it was facing before I attempted to keyframe it, and moved it 10-15 virtual feel to the right of where it was standing when I tried to keyframe it and no amount of "Undo" fixed the problem, fortunately I didin't save it that way and the lesson is done so it isn't an issue).
So I'm getting all of this now, kinda. I understand that the buttons on the lower left control what is and what is not filtered, that if it has a keyframe already then it is pre-existing and I get the single bone, branch and model buttons and roughly how they work.
But, and this is what I'm still trying to figure out, how would you go about keyframing those hidden channels before they are activated. Because nothing in this process, tutorial or explanation seems to resolve that. Because even if I keyframed all the bones in the beginning of the animation as you suggest in the tutorial, these channels simply don't appear until you move them. Selecting the bone and forcing a keyframe on it won't do it. And since they don't "exist" until you move them the only way to keyframe them is to choose all filtered channels (and as I've said that never worked out well for me).
The one and only solution that I found for this issue, as I said, was by posing the model as close to where I wanted it to be as I could. Noting the numbers for the attributes in the properties window. Undoing the new pose, move the scrubber however many frames back to where I wanted the movement of the hidden channels to begin, and entering the numbers for the attributes into the properties windows to force new keyframes in those hidden channels BEFORE the movement that activated them begins.
As you can see in #2 in the photo, there are four keyframes.
2 in Transform Translate X
1 in Transform Translate Y
1 in Transform Translate Z
The SECOND keyframe in Transform Translate X is what caused these hidden channels to activate. By going back several frames (after posing the hips where I wanted them and noting the attributes from the properties window) and entering the attributes for where I wanted the hips to begin animating towards the keyframe that activated the hidden channels I forced keyframes into the channels and achieved the result I wanted. Since the attributes were usually at or near zero it wasn't too hard.
It was a real bitch to figure out though. It occurs to me now (and it would have done me no good during this animation as I was already too far into it to try it as it would probably adversely affect the walk cycle in the beginning) that I could have moved those attributes in the very first frame, activated the hidden channels manually and then returned thier values to zero. Then at least they would have some kind of keyframe on them. Then I could just skip the first frame when I rendered the project. But this also begs the question "how would having those hidden channels keyframed affect the walk cycle I added to the beginning of the animation?" Could the very existance of these channels with keyframes mess up the walk cycle if these channels were not keyframed when the action walk cycle was created?" I don't know the answer to that. Perhaps some day I'll have occasion to experiement and find out.
All of that said, if anyone knows a better/faster way to force keyframes on those hidden channels in the control points than my property window process I am eager to know as it really made life difficult for me on this lesson.
At least, figuring it out, with your help, has led me to a point where I understand enough that I can at least, I hope, somewhat accurately describe the issue.
Thanks again for all the help.
EDIT: Now that I think about it, those hidden Channels aren't even filtered channels because they technically aren't channels until you move the model and they appear. They are nothing. Neither filtered nor unfiltered channels. They are simply an element (I don't know if that's the right word) of the model, waiting to be activated (by movement) before becoming a channel and then; possibly, depending on which buttons are selected, becoming a filtered or unfiltered channel.
Man this is a hard problem to wrap your (read my) head around.
-
There's like a 3 "axis" matrix of possibilities.
one axis is the filters that decide whether any of translation, scale, rotation... etc. are eligible to be keyed by the Keyframe button
Yeah, I'm not sure where the controls for that option are; but one of the biggest issues I had was trying to keyframe a big bone like the hips or ankle control points (I never had this issue with the regular bones only ones with more complex controls) only to discover the next time I pose them that the keyframe didn't entirely take because now I've moved them in a direction or a way that I hadn't before and now instead of three sub keyframes (that''s the only way I can think to describe it) it has six and those three new sub keyframes were never keyframed so they are slowly moving through the entire animation and the only way to get them to stick is to try and determine where you want them before you made that last pose and make a keyframe there but you can't simply undo it because then those three new sub keyframes disappear. So you have to move the bone to where you wanted it before the newest pose, take note of the values in the property window, then undo that movement and then go back one frame before your latest pose and enter those values into the the sub keyframe properties.
a second axis is the filters that decide if a single bone, bone branch, or whole skeleton gets keyed.This I understand a bit better. I won't claim to have it all down but I know where these buttons are and I'm pretty sure I know what they do. The constraints part of Lesson 6 helped with that.
the third axis is the choice of "only in filtered channels that pre-exist" or "all filtered channels"Yeah this is the one I find most confusing. What is and what is not a filtered channel? For that matter; what's a filtered channel? For that matter; what's a channel? And what determines if it pre-exists or not? And what determines if it is filtered or not? And finally, what are the ramifications of choosing one over the other?
Yeah, much confusion over that one.
I'll try to think of a clearer way to demonstrate how these interact.I'm sure any and all newbies would be grateful. I know I've been enormously grateful for all the help I've gotten.
I'm going to guess that you somehow had the "modeling mode" (Thom button) on while in the chor. That's the only way i can imagine copying and pasting two models together, while animating. Modeling in the chor is a feature of A:M, although rarely used.I don't know what the "Thom" button is but I suppose anything is possible. The only button I used regularly to view the model that wasn't by default on for me in the choreography tools is the one that looks like an arm with a flexing muscle (which I assumed was called muscle mode but honestly I have no idea). I used it because it hid the rig and made it easier for me to see the results of my poses. But when I was trying to force keyframes through the process you descibed in your tutorial I was in the middle of posing so I doubt I had that view selected... but as I said, anything is possible.
Thanks again Robcat. This lesson was a biggie for me.
-
Thanks for the kind words guys. The video made my niece and nephew laugh (followed by 10 minutes of "why couldn't he go through the door?" and "why did he want to go through the door?" and so on, etc, etc, ad nauseum, in terra pax [they are 2 and almost 5]) so big bonus there.
Robcat, I have watched your keyframing videos several times and I do understand how to use the shift keyframe button but what I don't understand, and this is the reason I've been making them all manually, is exactly what each option applies to.
I know you go into detail about the different options in the video but before I feel comfortable using it I think I'm going to need a clearer explanation of what the different options mean and what specifically they apply to when you select them.
And for that I might need a better understanding of rigging for that, I don't know. I just know that the few times I've tried to use it I ended up with huge problems that I didn't understand. Plus the number of things it is going to apply keyframes to (depending on which option you select) seems arbitrary and confusing to me.
So I'm letting my ignorance shine through here. All I can say is the one time I tried to use it it didn't work for me the way I needed it to (or the way I thought it would from the video tut), so I tried each option with the intention of "undoing" the result if it was undesirable and at one point it slammed Shaggy into the door and merged them together. When I tried to undo it, all the color left the models and I had a greyscale Shaggy/Door merged model and no amount of "Undo" would fix it. This was one of those times when I hadn't saved very judiciously and I lost a lot of work.
So yeah, I've been making my keyframes manually and probably will continue to until I understand more thoroughly how those options work and what they apply to.
Also, I looked for the "Show Fingers" on/off switch in with Shaggy's pose slider property menu. I knew it should be there because that's where it was with Rabbit. I couldn't find it and I spend about 16 hours with Shaggy. Maybe I missed it but I don't think so. I'll look again next time I get a chance.
Rodney; as tired as I am from the immersion that resulted once the workflow "clicked" for me I am eager to move on. I might take a glance at #7 tonight and possibly get to prepping for it. Probably start it tomorrow.
As for thinking about how new things may aply to past and future projects... man that's about all I've been thinking about for the last few days.
Thanks again guys. As Robcat said, "onward and upward."
-
There were only two things from this lesson that I never "got" and both had to do with the model.
Shaggy has rotate handles on his bicep bones and the properties for rotate appear in the property values window when the bone is selected; but no matter what I tried I could not get those biceps to rotate. When posing the inability to rotate the bicep often caused his arm to "twist" in funky ways and I would have to wrestle with the forearm and shoulder and hand rotate elements to iron out the wrinkles.
Also, Shaggy has individually manipulatable fingers on one hand but not the other. I wasn't sure if this was an error or what but unlike the Rabbit model the ability to hide those finger controls did not appear to be an option so it can make posing that hand significantly more challenging.
-
Well it's done. I feel like I gave birth on this one. I don't think I'll be starting lesson 7 right away.
I have to say... I'm really happy with the way it came out. Not because the animation is great... it isn't. There are probably a hundred little things you grizzled veterans of A:M can pick out. Even with my limited experience there are a number of things I would polish and finesse if it were important to me.
The fantastic thing about this lesson isn't that it's done or (in my humble opinion) looks pretty great, but that I learned enough about the program that if I really wanted to go back in and fix all those pesky little details; I could!
When I posted my last post I was really just so delighted that the workflow had finally clicked for me. I'm sure there's a hundred things I did wrong and probably even more things I did the hard way but I get it. It works for me now and I can make animation. I understand how to adjust the interpolation when my feet go below the floor for no apparent reason. I understand how to make a keyframe from choreography action to choreography action just by watching the properties of the bone and transferring and nudging those settings in the newer choreography action. I understand that when a bone starts going bonkers because I moved it in a way it had never been moved before I know I need to look for the hidden elements of said bone because they weren't keyframed when the choreography action began (no matter how hard you try) and force keyframes on them manually so my model doesn't go bonkers. I understand that making keyframes for bones you aren't really using at regular intervals is smart workflow because when you do go to use them if you haven't keyframed them it can cause more trouble to fix than the thirty seconds it takes to just go ahead and keyframe all the bones every once in awhile.
I learned so much in this lesson. And I learned it by completing my goal, my mission, my tilting at windmills obsession, to complete the entire animation in one shot with no camera changes. Watch the movie and you will see. This entire 1 minute 28 second animation (it's closer to two minutes all told but the animation itself is 1:28 or so) is all done in one choreography. Two models, one extra light, two cameras (I put in camera 2 for the actual movie as I didn't want to move camera 1 around... I never actually used camera 1 for any filming... I assume the movie used camera 2 because it was on camera 2's view when I rendered the animation... I never chose camera 2 and I'm kinda glad it was on camera 2 because it would have sucked to have to take another 3 hours to render a new film) and more keyframes than I ever thought I would ever make... ever.
I thought about adding foley (sound effects) and music; I even thought about doing some voice acting and so on. But the truth is I can justify going wild with an A:M lesson because I'm learning new things while going overboard. The voice acting, audio recording and video editing... I've been doing that for years. I already know how to do that and since this is just a lesson it really doesn't seem like a good use of time.
So I threw in a little BNL and some credits while I was eating breakfast. It allowed me to rerender the file into wmv format (the orignial avi was 50 mb the wmv is less than 9; I didn't zip the file because the file difference from zipped to unzipped was tiny and I figured to save folks that want to watch it a step) anyway and allows me to show off a little. It literally took me less than 25 minutes. So not much time wasted.
You couldn't possibly enjoy it more than I did making it but I hope you like it anyway.
Big thanks to Rodney and Robcat for putting up with my insane level of impatience with this lesson. Thanks guys.
-
That's good to hear... about the rigging I mean. I'm going to need all the help I can get until I gather all the assets I need to just animate.
And speaking of animation; I think I have the tiger by the tail on this lesson 6. It isn't perfect, but I have an animation that's just over a minute right now, all in the same animation and I'm really starting to get a feel for the workflow.
Mostly it's just keyframing, keyframing, keyframing and did I mention KEYFRAMING!
Oh, and posing.
But mostly keyframing.
I'm on my fifth choreography action and I figure I have one more and I'll be done. I've had Shaggy wrestle with the door at this point and now I just have to get him through it.
This lesson was supposed to be five seconds long. LOL. Mine will probably be a minute and a half when it's done. I would say it was a waste of time if I hadn't made so many breakthroughs with the program. I'll probably have it done on Sunday night.
I cannot emphasize enough how handy the properties window is to have open while you are posing. Thank the Lord I have a computer that runs two computer monitors at the same time. If I wasn't able to see the project workspace, properties, slide posers and a good sized view of the animation itself I think I'd still be having a lot more problems. You keep all those elements open in your workspace and you really start to get a feel for how everything works together. And when it does things you don't want it to do (the program, the animation, whatever) it's so much easier to do your detective work with all those elements open and at your fingertips.
Also, I'd probably be four hours closer to being done if I had saved more responsibly. I'm getting used to saving every time I make a major change and I'm not just saving I'm saving multiple versions so I can go back and make changes if I have a major screwup and go on without fixing it (only to notice it later and curse my existance). I'm telling you; saves, lots of them and multiple versions of the same project. It will save your sanity.
Thanks for all the help with this one. Hopefully you will enjoy the result.
-
Later, horrifying task if you decide to invent your own rigs. TAoA:M shows you how to install a preinvented one, AM2001. AM2001 is mostly obsolete now so use it just for that one exercise to see the concept of rigging.
there are other better preinvented rigs in the rigging forum.
Are these rigs available for commercial use (hilariously I'm asking questions about rigs while not knowing what a rig is)? Once I get to the point where I am creating animations with my characters I intend to sell hi res versions to sponsors and DVD's to everyone. So I have to be careful what I take from others.
-
This gives me an idea. Perhaps if I repeat the steps from your tutorial, Robcat, each time I want to initiate new action, it will resolve the issue. This gives me a place to start; or at least a direction to try.
Thanks, I'll let you know how it goes.
BTW... is what I'm doing called rigging or were you referring to some other horrifying task that awaits me (LOL)? Just curious.
-
The walk action I had issues with was the Rabbit in lesson 5. This is a completely different walk action and when I ran the animation in the choreography window it looked fine to me. Still does. I don't notice any significant slippage. I realize the lesson in 5 called for the stride points to be closer to the heel but you yourself said you have to play with it to get it right. I did, and I thought I had.
Maybe I'm wrong; I'll have to look at it again.
The walk cycle isn't really the issue though, even if it is off I'm happy with it at the moment. What's driving me crazy are these disappearing/reappearing bone properties that affect previous choreography actions.
I have years of experience editing video and so I know I could easily just cut to another camera angle, start the animation over with a new project and it would look fine. Just like all the actions are melded together; but that wasn't what I wanted to do when I started the lesson and it isn't what I hoped to accomplished.
I wanted to have Shaggy walk up to the door and knock on it and look around it and then reach out and pull on it and struggle with it and then open and walk through it and I wanted to do it all in one render/shot. And I wanted to do it that way just to see if I could.
The first script I want to shoot (once I make models for my characters as well as all the background scenery and lighting elements etc. etc) involves a chase of sorts; a woman who my hero is trying to save runs away blindly in fear and the hero gives chase to protect her from running into traffic or something like that. The chase scene lasts a good distance and I had pictured using an action cycle for it. That was of course before I had finished even the 1st of the TAO lessons.
My main issue here is that the posing actions that I'm trying to implement after the walk cycle are effecting the walk cycle because I'm moving bones in directions that didn't have properties or keyframes at all until I I moved them and once I moved them the keyframes connected all the way back to the begining of the animation, corrupting it.
I was able to resolve the issue by doubling up on keyframes and forcing the bones to start where I wanted them to start before I began manually posing them. While this fixed one problem it created another by causing the walk cycle to slow to a crawl just as it finished and then snap back into the posed animation.
Yes, I'm trying to do a lot in one scene. No I don't need to; the lesson certainly doesn't call for it. And if you tell me that I should use shorter scenes and cut to different camera angles because what I'm trying to do is too complicated for me at this level or too difficult and beyond what the program is usually used for I'll go back and finish the lesson as it is supposed to be done and cut the other render in through my editing software.
I can be pretty impatient when I'm trying to learn new things and they aren't working the way I think they should. Thanks for bearing with me.
-
You know what's worse than having things figured out and not sharing? Thinking you have things figured out and finding out through painful, burning failure that you in fact do not.
This is going to be a bit of a long message. Please forgive me, I am frustrated and love the sound of my own voice.
First off. I need to come clean. I have OBVIOUSLY taken this lesson a lot further than I need to. I fully realize that I am asking to learn things above my pay grade as far as the TAO lessons go.
I've attached a .zip of the project file as it is right now. I got a lot further before the wheels came off the bus last night but the result was so bad it damaged everything that came before it and so I had to go back to this point and try again. So far I've been at Lesson 6 for over double the alotted 6 hour time frame; and not happy about it either.
I watched Robcat's tutorial on transitioning from a preset action to posed movement. I'm a little disappointed. Not in the tutorial, I'll talk about my issues with that in a minute, but with the program itself. I cannot believe there isn't an easier way to transition a model from an action preset to posed action. The steps you have to go through to continue the action are; considering the ease of use in much of the rest of the program, shockingly counter intuitive. You should just be able to select a keyframe, select the action in the project workspace and just hit a button called transition to pose or something.
Ok, now my issues with the tutorial. And I should emphasize these are my issues. Robcat I'm very grateful for your guidance. There is a better than good chance that I'm the one with the problem here and the tutorial is just fine. Here is where I ran into problems.
1) One of the things Robcat said in the tutorial: "the path action is always setting itself to the length of the choreography and the choreography is always setting itself to the length of the last keyframe." Somehow I broke this. I've been having to manually increase the size of the newly added choreography and even have to manually increase the area not "grayed out" in the timecode at the top of the timeline view. I think it has something to do with number 2.
2) When I added a new choreography action like Robcat did in the tutorial it didn't appear as this nice short little bar like his did in the tutorial. It appeared as a huge long bar the entire length of the already existing animation. when I slid it over to measure up with the point in which I wanted the walk action to end and begin posing manually it increased the blue choreagraphy bar and available animation time by double. So every time I sampled the animation it would continue to play 20 seconds or so past the point where shaggy freezes and I'm trying to pose. This became frustrating for me so I shortened the blue bar and new choreography action (red bar) until the only time it took up was the area in which I was currently working. That didn't work because in the area at the top of the timeline view that "time" had already been exposed and was white instead of gray. I selected that area where the animation stopped (a good twenty seconds passed where I was working) and dragged it back to the time where I was working so when I played the animation it would stop in the area in which I was working. Ever since then I have had to manually adjust the choreography and timeline to add more time when I add more animation. If I do not the scrubber reaches the end of the time/choreography and just stops without playing the additional frames.
3) What was described in the tutorial with adding a new choreography action didn't work exactly as described in the tutorial. When I married up the new choreography action to the exact time that I wanted the old choreography action (with the walk action applied) to end all the new poses affected the walk action despite the new choreography action being in place and the old one ending. I discovered if I seperate them by one frame it worked as described in the tutorial. But I had so many other issues down the road (that bled back into the walk action despite the fact that at this point it was working and transitioned to the posed action just fine) that I cannot be sure this is not part of a bigger issue.
4) I watched Robcat's tutorials on key frames (both of them) several times and no matter what I tried it didn't help me here. I used the project workspace to control/select all the bones (that wasn't in the tutorial but it seemed to work); I tried control selecting the bones themselves; I tried nudging them to force keyframes, I tried shift/click on the keyframe button once I had the bones selected and I even tried edit/make keyframe with the bones selected. No matter what I tried there were certain elements of certain bones (most notably the hips, back, back 2 and ankle manipulation points) that had no keyframes and didn't even appear under the bone itself until after I manipulated it.
The project that I've zipped shows Shaggy walking up to the door and it transitions pretty seamlessly to him stopping, canting his head and then knocking on the door. He waits a bit and then cants his head again. That's where this project stops. Last night I moved forward. From there I had him sort of crane his neck to the right and lean back like he was trying to look around the edge of the door to see if anyone was coming. I then had him lean to the left in the same manner and then back to the center at which point I was going to have him grab the doorknob and start the lesson proper from there.
After struggling with these hidden areas of the bones that popped up (they would just appear after I manipulated them; they would say translate instead of transform and before I moved them they didn't even exist in the project workspace. Heck, back 2 doesn't even show up in the project workspace. So as soon as I move them they gain a keyframe that starts a movement waaaaay back at the beginning of the animation and slowly moves into place until the keyfram is reached. It usually ends with Shaggy canted over on his side knocking on the door sideways instead of standing straight up. And if I undo it so Shaggy is standing back up again and get rid of the keyframe, the bone disappears so I can't keframe it where it is, where I want it to be, before I make the cant to the right pose (with Shaggy standing straight in front of the door).
I played with the different areas of the shift/make keyframe menu. I even tried to force keyframes on everything just to try and solidify Shaggy's position where I wanted him. This resulted in Shaggy being turned around backwards and slammed into the door as if the two models had been merged into one. When I tried to undo it it turned everything white (complete loss of color and shading) and essentially did nothing else. Shaggy and the door became one and that was that.
So I tried to find ways to manipulate all those hidden bones and then put them back where I wanted them so they would have keyframes and although it took forever I thought I finally had it. As I scrubbed through Shaggy knocked on the door. Canted his head, leaned right, leaned left and then straightened up. It seemed like everything was working and I was ready to have Shaggy grab the doorknob and begin the lesson proper. Until I started the animation back at the beginning to watch it all over. As Shaggy neared the end of his walk cycle action his feet slowed at the very end and the last step took five times longer than its should until finally the scrubber passed into the area where the walk cycle ended and the posed animation took over at which point Shaggy snapped back into the proper movements and continued until he reached the end of the animation I had posed for him.
So essentially, I had broken down the animation into four parts. The walk to the door, the knock/check of the door, the pull on the door and the end walk through the door. I had all kinds of trouble transitioning from part one to part two but I got it. Then I had all kinds of trouble completing part two but I got it. The only problem was it ruined part one; and no matter what I tried I couldn't get part one to work right again.
So I came to the forums to write all this stuff and ask for help... but as you all know the forums were fubar last night. So I gave up. I didn't want to save the project as screwed as it was (and I was so wiped and frustrated I stupidly didn't think to save it as another file name) so I just shut it down without saving because I knew the last save point, what I have given you here in the zip file, was as close to working as I've been able to get this nightmare.
So there it is. HELP!
I've included the walk action in the zip file because I made it myself, therefore you probably don't have it. If you need anything else from me to analyze this problem please let me know. I'm basically stuck and don't know what to do to go on from here. I'm afraid if I invest tons of time in part two again I'll just ruin part one again. Thanks for reading this massive wall o' text and big thanks to anyone who can help.

I realize I'm asking for help with things that according to the lessons I don't need to know yet but despite that these are things that I intuitively feel I need to know, that I should know about how the program animates.
-
Hmmm. No video tutorial for this lesson. Guess I'll have to stick with the book and some of the examples here. I liked yours Spleen.
Wish me luck.... off I go.
Yeah, this is the one that's a real bitch. It really is a big leap from the previous exercises.
Make sure you've watched my vid on keyframing options. And if you're planning to have the character walk up to the door with a walk cycle, watch my vid on adding animation after an action.
Can I just say how much of a God you are Robcat. I decided to redo lesson 5 with a walk cycle up to the door and I've spent the last half hour banging my head against trying to end the action and move back into posing. I couldn't find info on it anywhere. I was coming here to ask the question only to find you had the answer waiting. Awesome. And I've already watched both your keyframing Tuts. Numerous times.
Thanks again and thanks Spleen for the vote of confidence.
EDIT: Holy crap you were not kidding. Wow that's complicated. I would have never ever figured that out without your Tut. Thanks.


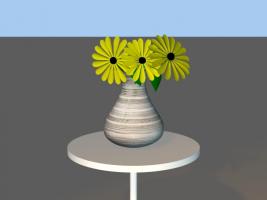
Exercises 9: Flower Power
in TaoA:M and the A:M Technical Reference
Posted
Nancy, thank you so much for the help. Let me see if I understand what it is you are saying. With this project, I put all my poses and camera angles that I wanted on frame 1. Then I rendered to file, as a Jpeg, the range of frame 1 to frame 1 and named it Lesson 9 Flower Power. Jpeg.
Then I moved the camera to another angle and moved the model a bit to fix some pass through's with the leaves (all done still on frame 1 essentially altering the keyframes I made with the initial poses). Then I tried to re render to file the range of frame 1 to frame 1 again only this time changing the file save name to Lesson 9 Flower Power2.jpeg.
We know the result. What you are saying is that A:M doesn't work that way. That once I render part of the file with a file name, regardless of what part of the animation I try and render in the future, regardless of what I change in that animation, it will still always render to that same file name? Did I get that right?
So advancing the timeline to frame 2, making my pose changes and camera angle changes on frame 2 and then rendering to file with a different file name and a range of frame 2 to frame 2 would not work and would yield the same results I got already? Is that right?
So my next question of course is how do you get two seperate files with seperate file names out of A:M? Do I render to file and then go into explorer and change the file name of the original file and then just render to file again once I make my new poses and camera angles?
Thanks so much for your help.
Rodney,
I followed the heirarchy of bones in the lesson strictly. I even named them exactly as they are named in the lesson. As always I watched the vid once (twice in this lesson) and then did the lesson with the vid and manual open.
The video did say a couple things that I didn't understand exactly.
First, right around 12:20 he is making the "Root" bone and says that he wants it to be the most parent bone, but he doesn't want to click directly onto the base of stem one as he does not want the two to attach to each other. I guess I'm confusing the terms "parent", "heirarchy" and "attach" because I thought the heirarchy decided what was parent and therefore what attached to what. A glossary on these three terms as they apply to rigging would be very helpful.
The second was when he talked about "Attached Parent Property" at around 17:28 into part two of the Lesson Vid. He said the only time a bone will appear next to the bone you associated it with is if you click directly on the circle (what circle? If he's talking about the little circle at the tip of the "Bud" bone it sure looked to me like he was clicking directly on that circle when he made all those petal bones... was this a trick of 3d in a 2d presentation?) and we really don't want that because it would create an attached parent (or attached to parent I'm not sure exactly which he said) properties which he says would be difficult to create and would give strange results. What? And why?
Now I can tell you when I made my petals they did not appear at the base like his did. They appeared at about the mid point of the model and I moved them up from there. I don't know if that makes a difference but I'm still not sure exactly what he means by clicking on the circle and the results of doing it/not doing it and under what circumstances either choice would be preferable.
As always Rodney your presence is greatly appreciated.
Robcat,
I think between you and Nancy I know what I'm doing wrong here. Now I just need to know the workaround to get multiple images out of a choreography if I need to.
Where would I turn them on/off by default and what benefit is there to having them on? They aren't mentioned in the lesson; what are they used for (or should I not concern my empty little head with that now until I become more acquanted with the program as they are something I neither need nor will use at this juncture)?
Thanks. I'll dig around and see if I can find out how to select it and change its' properties. I don't know why it's so big. I didn't even know it was there.
"FK"? No comprehndo. What does "FK" mean? In the video the guy just grabs his flowers bones and starts posing them. The bones always stay inside the stem. The first time I got to that point in the lesson I moved my bones and they immediately popped out of the stem tearing the leaved off the stem and sticking out and twisting the stem in all manner of unnatural ways. I was able to put them back together with a great deal of effort but anything more than the slightest posing (which is why I stuck to moving the bud bone for the most part as it was the one that caused the least ripples through the rest of the rig) would cause the flower to essentially fall apart on me again. I do not believe I tried to translate these bones but I cannot be sure. How would I know? All I did was highlight the bone and (just like I did with Rabbit and Shaggy) bend it by grabbing the top or bottom point of the bone and/or the rotate handle.
Sadly no. I'm not being intentionally stupid here. Sorry. I just learn by doing something and asking questions while I do it. I've never been great at learning from a book and learning by doing without being able to ask questions (while I'm doing) leads me to this... a whole lot of unanswered questions.
If bones are attached to bones then why did the guy in the lesson say he didn't want the root bone to attach to the stem one bone? If bones are attached to bones then I don't understand why mine are coming detached? And if mesh (which I assume is the stuff made up of splines and control points) is attached to bones why isn't my mesh following the bones; instead letting the bones bust out of the mesh? And lastly if mesh is attached to bones then bones wouldn't really need to be attached to mesh... because the mesh is already attached to them. But logically that doesn't make any sense to me because my brain tells me they are either attached to each other or not; you cannot have one thing attached to another and have that other thing unattached to that one thing. Attached is attached. But I'm guessing I don't understand the context.
Yeah, when I couldn't keep my leaves from popping off and my bones from jutting out, and the smart skin kept locking up and launching the flower off into eternity I went back to the model, copy and pasted the control points in my stem and put the new control points near the leaves in hopes that with additional control points associated with certain bones in the stem and leaves they would stay better married together. It didn't work but I was getting desperate.
In hindsight I made an error there. I copied and pasted the control points but they never really were part of the stem even though they looked like they were because I never attached them to the splines in the stem. Durrr.
I wonder if that would have helped mitigate my bone popping problem if I had done it right.
I'm "Lost" on your TV show references guys. I don't watch much TV. My sister talked me into watching an episode of that show awhile back and it prompted me to informing her that I "hated it with fire." Too contrived and convoluted. Not to mention preposterous. LOL.
It reminded me of the third season (the last one I watched) of "Alias" where the wheels just came completely off the story and everything became just absolutely silly. Heroes is like that now too. Motivations and allegiances constantly changing. I usually end up sitting there and saying "just shoot him in the head and you won't have to worry about his motivations."
Robcat, thanks for all your help. I know I'm a lot more "needy" than many other newbies and I really appreciate the extra attention.