


Rob_T
-
Posts
261 -
Joined
-
Last visited
Content Type
Profiles
Forums
Events
Posts posted by Rob_T
-
-
Rob, show us an example.
I can't really show an example because I fixed them all already with 5 points.
I will post a picture of what I'm making though to give you all a better idea.
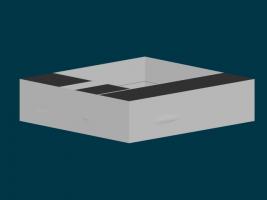
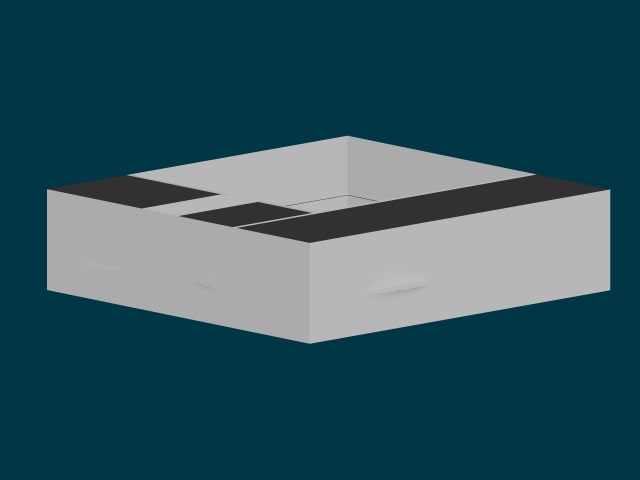
It's an apartment. And the middle rring of splines throughout the living room, kitchen and bathroom are there to support the modeling of chair rails it in the case of the bathroom, whatever you would call the divider that seperated the top half of the bathroom from the bottom half.
Because these CP's exist in the walls they are connecting with each other and horizontally dissecting the rooms. It's hard to see because the one room without a floor or ceiling doesn't have the problem I'm talking about. And, as I said, I've already eliminated them by adding cp's and usinf 5 points. But as you can see from the render the 5 points don't exactly make the walls look nice and smooth.
Anyway, I hope this helps explain what I'm struggling with. Thanks for the help.

-
John, the patches would "kinda" disappear when I did the render lock. They were still there they just looked really screwy. I assumed they would disappear altogether if I actually rendered to file. Either way though that doesn't resolve my issue since I need them gone so I can better see what I'm doing as I continue to model in shaded and wireframe view.
That said, the five point patch thing I thought of right after I posted this and it does work but the patches look like crap even when rendering to file so I'm probably going to have to come up with something else in the end but for now it works.
Robcat, unfortunately most of the model is almost done, bad planning on my part I guess, live and learn. Going back and redoing all those splines would be a real chore. I can see I'm going to have to get creative.
Would porcelin help with the 5 pointers? I'm making walls and the 5 point patches are bulging slighlty when rendered.
-
I'm trying to model something with a lot of square shapes in it and I'm having problems with patches forming where I don't want patches (places I need to see through). I realize in the short term I can hide the CP's that make those patches but that doesn't resolve the issue that I simply don't want those patches there.
They are completely valid patches but I need them gone. I've tried transparancy of the group of CP's that make the patches but that doesn't even work in render lock (I assume it is done in final render) as the patches still remain despite being changed to transparent.
Also, I'd rather not add additional CP's as this causes a domino effect requiring me to add bunches of other CP's and splines to keep the patches I do want.
Any suggestions would be appreciated.
-
Yeah it seems like Simple Scatter will work for what I want to do. Just have to go back in and make some minor model changes and add a good group for the plug in to work off of and I'll be all set.
Thanks guys.
-
Is there a way to constrain a crowd in the flocking engine so that it does not intersect with other models (it's fine, and perhaps even somewhat of a benefit ift hey intersect with each other a bit)?
I'm trying to add a shitload of trees to my choreography and I figured I could put them in one at a time but it would be great if I could just do a crowd or a couple crowds and have all my trees added.
This of course leads to another question. If one can add them without them popping into existing models in the choreography is there a way to randomize the scale on all three axis a bit? So I get different sized and shaped trees?
And lastly is there a way to randomize the rotation around the Y axis so that the trees appear at different degrees, thus further changing thier appearance from varying perspectives?
The only flocking I did in Tao was with the birds setting and the lesson mostly concentrated on the action of the flight so I'm a little in the dark about the Crowd settings.
Any help would be appreciated.

-
considering your scene, I think a good question should be how would you configure your camera so that it will not render the whole scene each time you render a camera view, that is rendering only the area in the camera view. Any help on this
Actually, that's a great point. It never occurred to me that the program would render things that cannot be seen by the camera. I wonder how that works. <_>
-
It depends on your visual style and how close the camera gets to the windows. In most cases, you can just slap bump and color maps on the buildings for windows. If the camera gets close to any of the buildings, you can model a few detailed "foreground buildings" with the window geometry as part of the building model. Even in the "foreground buildings", you only have to add window geometry to parts of the building the camera gets pretty close to.
I love how you say stuff like that like it would be so simple. I hope that stuff gets so easy for me that I can be blase about it myself someday... sooner the better.
But just slapping maps, of any kind, I don't even know what that means. I've never mapped anything, bumped, slapped or what have you, to my knowledge. Was that even part of Tao?
I do understand what you mean about geometry though. I'm not making windows on any of my buildings right now. My intention is to either decal them with a window picture if they are far away or insert a window model into the building in strategic places if the camera gets close.
My question was, as far as rendering goes, if it is better for me to repeat those window models in the choreography as many instances of the same model, or if I should insert them into the building model in the modeling window and then import the building into the choreography (with the windows already in place). If one was better for rendering over the other.
My thought process was that perhaps the program may have an easier time rendering the same window model over and over again rather than having to consider each window as part of a larger model and therefore distinct on its own from every other model.
I think Robcat is probably right I would have to test to find out. Unfortuntely I haven't a lot of time for testing right now. I'm going to have to make a choice and stick with it. For better or worse.
Rodney, your info about altering the models in muscle mode has already been a huge help. Thanks a ton for that. Sometimes when I load the project the geomentry on the buildings I altered already is wacky and all over the place but as soon as I select them and click into modeling mode they snap back. Wierd but I can live with it.
Thanks for the help.
-
From a rendering perspective, is it better to use many instances of the same model or is it better to individually model each instance with it's own name and file?
For example, in my current project I have lots of buildings. Buildings have lots of windows. Would I be better off modeling the buildings with the windows built into the building as part of the model. Or would I be better off making several types of windows and then importing the building and window models into my choreography and then inserting the windows into the buildings by creating many instances of the same windows until the buildings are complete?
I ask because this is occurring a lot on my set. I have a bunch of balconies on my buildings as well as trees.
-
Wow. Nice assets. Funny.

-
Soooo jealous....

-
Thanks man. I've been looking for a girl to fool around with. LOL.
Appreciate the offering.
-
Thanks. I won't be able to use exactly what you are giving but they definitely make great starting points. And that will help tremendously. Very nice.
-
Happy birthday man.
Atrayoooooooooooo!
-
Yeah I was going to say, they want to add a significant charge to sell you a hard copy of the manual at the conventions so I (like most people I imagine) don't buy it since they let you know right away that it is on the disc already in PDF form.
Welcome Aquaryon. Definitely do the TOA lessons first or you will be so frustrated and lost you won't get anywhere and come back and ask your questios often. The community here is amazing and goes out of thier way to help newbies.
Good luck.
-
Hi,
I'm pretty new here myself but I might actually know something that MIGHT help in this instance so I guess I'll pass it on. I'm sure one of the more experienced members will be along shortly to point out why I'm wrong and direct you to the correct solution.
Here is a link I found awhile ago and have been saving for when I need to do such things. I haven't used it, I haven't even read it. But I think it applies to what you are trying to do.
Good luck!
http://www.hash.com/forums/index.php?showt...p;hl=Installing
-
Can anyone tell me the difference between these two books and if either is worth getting?
http://www.amazon.com/Animation-Master-Com...ntt_at_ep_dpi_1
http://search.barnesandnoble.com/Animation...84504757/?itm=2
They both seem to have been published in May of 2006. They have similar product descriptions. The same author. But a difference title, a different cover and a different page count.
One is available at B&N online the other at Amazon. Neither book is available at both sites.
Also, is either book worth the money? I completed TAO. Is this going to walk me through the same stuff or is it more advanced and worth the investment? The reviews (what few there are) are good.
I also find myself baffled by the wild pricing variations on these books. I can get one used, probably without the CD for $20; from Amazon new (I assume with the cd) for $32 but there are places selling it used for over $80 and new for over $200.
I R confuzled.

-
How in the hell is that not a real truck? It certainly looks like a real truck to me. Wow. Amazing.
-
I had the same problem when I was at your lesson. I really liked using the arrow keys. That has become part of my workflow.
I just click on the model and the arrow keys let me move the model up, right, left or down. Depending on what view you are in it can easily help you position your models.
As for picking your model with multiple models in your choreography I have to go with MJL. The project workspace is by far the easiest way to do that. You will find you will need the project work space open at most times for almost all the lessons so you should try and get used to it as fast as you can.
Good luck.
-
Thanks Rodney. Everyone shares the credit for this job well done. I had a lot... a LOT of help. My situation with the artist on my web comic, wanting off the project, has me in a place where I have to focus on my own stuff for awhile. But I hope, through that process I learn enough that I can come back here and offer some help and insight to those who come after me. I'd love to rewrite a few of these tuts with a little more clarity and detail.... once I understand what to clear up and what details I should add.
I also hope you guys don't disappear on me now that I'm graduated. I want to have something substantial to show for Connecticon (starts the last Friday in July so I have about 7 weeks) and I'm probably going to need more help and guidance than ever before.
Where is the best place for me to post questions regarding my projects? Newbies forum? I have 2 scripts that I'm hoping to complete for Connecticon. The first is related to my Webcomic "Remedy" and the second is related to someone else's webcomic who did me a big favor. The first is longer and much more important. The second will only get done if the first is well in hand.
Yes, I'm ambitious. We'll see how that works out for me.
Fortunately, I'm out of work so I have loads of time when I'm not sending out resumes.
Big shout out to my A:M Force Jedi Master Robcat. Couldn't have done it without you man. Thanks.

-
Well that's it.
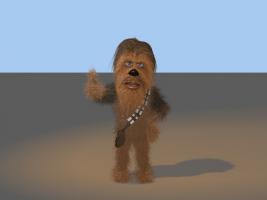
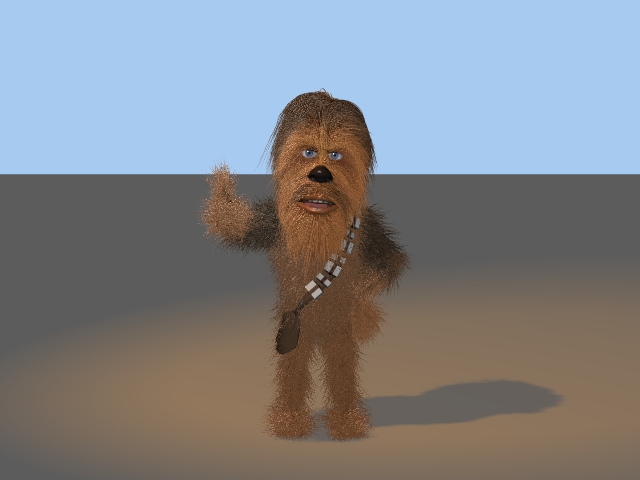
It isn't the best fur I've seen here (not by a longshot) but it looks as the lesson intended. I had some funny issues with the images assigning to the emitters. Sometimes when I added the new images to the image folder to color the hair it would change the color of the hair. Other times, actually most times, I had to go down to the emitter itself and the image would be unassigned and I had to click on it and select the image for the color to actually change.
It was random and wierd as it only automatically changed the hair color on the face, head and two other groups. The rest of the groups had to be manually assigned for both emitters.
Also, no matter what I tried I could not get the Hair Length Maps for the hands and feet to work. I did them several times over thinking I must have missed something. Each time there was a wierd jumble of links where the property selection should have said "Length." I followed the directions each time but nothing resolved the matter.
I had to shut the hair off towards the end. I magine having a hairy wookie in your model window is like having a cat and five people (with full heads of hair) in it. The last few changes to the particle emitters were taking about 15 seconds for the computer to accept so I just shut them off.
One thing that does concern me. How do you animate with fur and hair without being able to see it properly? The render preview was a joke in this exercise as it didn't come close to representing the way the final image looks. It makes me wonder how Nancy does those wonderful, feathery, furry, flowing, multicolored animals of her's without a NASA supercomputer.
I guess the trick is to get your model set the way you want it before you try and animate it and then render and pray.
Chewy gives me the thumbs up for completing TAO. It feels both like I just started and like it has taken forever.
Now on to Remedy!
-
So I had a little fun with this one. Just a little. The lesson seemed so simple I had to complicate it a bit.
But I'm not going to tell you what I did to complicate matters. You have to watch the movie to find out (no spoiling!).
I felt the need to go back to some animation brushup so I created a custom action.
Thank goodness I read the threads for each lesson because I totally missed the particles thing on the first go round and couldn't figure out why my models weren't showing up until I came back for a quick reread.
The music is a little... obvious.
A couple things I noticed... This really REALLY bogs A:M down. Scrubbing doesn't work... at all. Even reducing the flock size to 12 didn't help all that much. My computer is pretty good so I don't think it's that. Just too much info coursing through the CPU I guess.
Also, some of the "flock" members get waayyyyyy too close to each other and there are a lot of pass throughs. Any way to avoid that? Actually I'm sure there are many ways to avoid that; I guess I'm asking for the best way?
Also there was a problem with the rotoscope turning itself off randomly. It would also turn itself off for the rendor but appear in the Choreography as if it were on. I've noticed this happening in other lessons as well and the solution is to just select the Rotoscope in the project workspace and turn it invisible and then visible again. If you do this just before you render your chances of actually getting your rotoscope into the final render improve as well. Buggy. And turning the alpha channel on sis not resolve this as I tried that and still had the movie start rendering with no rotoscope. Fortunately I caught it before I wasted 15 minutes, aborted, turned the rotoscope invisible and then visible again in the project workspace and it rendered properly.
Oh and Robcat and Rodney... I tried that rotoscope trick to the camera thing you guys suggested in the giraffe lesson and it worked like a charm.

Anyway. On to lesson 20. No Tut for 20.

Last lesson then I get my Morterboard on and Rodney knights me or something right? You have the power to knight people don't you Rodney?

-
BowlH264.mov
Basically, on frame 0 i moved the alley up to meet the bottom of the pins.
That made the ball look like it was sunk into the floor so I went to a frame where the ball had landed and was rolling, turned off the "A" button (so that any change I made would affect ALL keyframes. You need to be really careful you never switch this off accidentally), turned on the WorldSpace button (so that the translate manip would be level), and raised the ball until it was just touching the floor.
then I rendered. the pins now look like they are contacting the floor properly. This sort of cheat won't work in all situations but in this one it does, so there it is.
I didn't even know there was an "A" button. I'll have to check that out. Thanks. Have any idea what was wrong? I mean why they were raising up like that to begin with?
Also, I see the fix did away with the little bounce the ball takes in the first few frames (which is fine really because I don't recall bowling balls bouncing like that when thrown properly). Could you animate that back in with the "A" button off and have it work or is this trick basically a very delicate path correction and animating the bounce would send the wheels flying off the bus?
-
Does the book version make the pole a "deflector" but not the video version?
Yeah the video doesn't do anything to the pole at all. In fact the video way of doing it was so fast I basically just followed along doing what the tut said as it did it. I only had to pause it a couple times.
-
Yay! I had an idea that other people already had and it came to fruition with no effort on my part... yay!
Thanks Rodney. And thanks to all you generous spliners and riggers and ... whatever else there is (I don't know yet I'm new) out there.
Can I shut a patch off?
in New Users
Posted
Oh right. Yeah I do that. But that's not what I meant. I can show you, in fact here are two renders from an older version before I fixed it. I can't "show" you because as soon as I render it the patches hide the problem.
This, I think is the best I can do.
In image one the entire model is visible. In image two I've hidden the ceiling CP's so the render is just from the "Chair Rail" CP's down to the floor rail. As you can see though, the two bedrooms, the kitchen and the bathroom all still seem to have a floor. They in fact have 2 floors and two ceilings in this instance because every time I made a bloody square to outline the walls of the room the program made a horizontal patch to go along with it that sliced the room in halves or quarters or whatever fractions you want to use.
As I said, the extra CP's I inserted resolved the issue and got rid of the extra patches. As I also said, the creation of the 5 points, the only way to make it work, make the walls bulge a bit and look kind of crappy. You can see that in the last image I uploaded.
So I'm still looking for a better solution if anyone has one. I'll attach the older project fle too so you can look at the model itself it you want.
I'm sure this is an easy problem to fix I'm probably just not explaining it right. <_>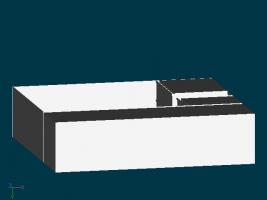
Apartment3.prj