


Rob_T
-
Posts
261 -
Joined
-
Last visited
Content Type
Profiles
Forums
Events
Posts posted by Rob_T
-
-
Yes, it was fun for a while... then the novelty wore off. I am prone to being frightened by simple things when I am deeply engrossed in work like this. It could be a tiny breeze causing a small scrap of paper to flutter on the desk and I will jump like a gun shot went off. One time I freaked out when the change in my pocket shifted slightly against my leg while I was in my "creative trance". My headphone wires are the worst. They will shift and fall funny and brush up against my neck, shoulder or arms and scare the bejesus out of me (I really need to get a wireless headphone). I had to turn the AM community thingy off. Too much stress.

-vern
ooh! You sound like fun!
BOOOGA BOOGA BOOOGA!

-
Well, I tend to stay logged into it. And as evidenced by Fuchur popping in today and scaring the crap out of me (I asked him if he was the Matrix) you can start a conversation with anyone logged in... even if they have the community window closed.
I can see how that cold be really distracting if it happened while I was working intensely and focused on important stuff.
Still, as a newbert I think it's pretty cool.

-
Thanks guys, a little encouragement goes a long way here.
Especially now since I'm banging my head against this face in 11.5. Like I was telling Fuchur in chat earlier... I don't feel like I'm modeling anymore... I feel like I'm sculpting and I'm a lousy excuse for an artist.
Rodney,
I saved your decaling tip in my tips folder for next time I have some time to play with decaling. I was also reading through the post you guys have up discussing "Porcelin" which sounds really intrueging considering how sloppy this (face) model is going to end up being. The chat is fascinating even without understanding most of it. I want to be largento.
The wall, as an object could be moved as well. But as far as adding a rotoscope to the camera view I think I would need to see some sort of tutorial on that. I have no idea how that would work.
Thanks again guys.
-
That looks well done!Is there any way to make your points extrude in the opposite direction they extrude as a default?
Also, If you have done several extrusions and you realize you want to add another ring at the top where you started can you select the first ring and make it extrude again but from the opposite direction that it already extruded?
You can drag any extrude to a new location if it didn't go in the direction you wanted. A"M will try to use the new direction for the next extrude.
Cool. When the CP's popped out on the left I thought dragging them to the right would cause all kinds of problems. Glad to find out I'm wrong.
Well, this was completely unnecessary, but I did it anyway. I wanted to sharpen some of the skills I've learned. I was concerned that as I plowed ahead and learned new things the stuff I had already learned would become rusty as I used it less.
I was right.
I had to go back through several of the lessons to make this film and it still didn't come out exactly like I wanted it.
I think one of the biggest problems I had was the rig. Making a walk cycle with a skeletal structure as undefined as I make it (which, from the flower lesson is the only way I know how to make it) means animating is damn hard. When I made the walk cycle I had all sorts of problems (pasting mirrored for example gave me no usable pose because the legs did not move where they were supposed to and even more disturbing the joints spun around 270 degrees or so making the ankles and knees look like Tootsie Rolls). I had to animate both steps by hand instead of just one.
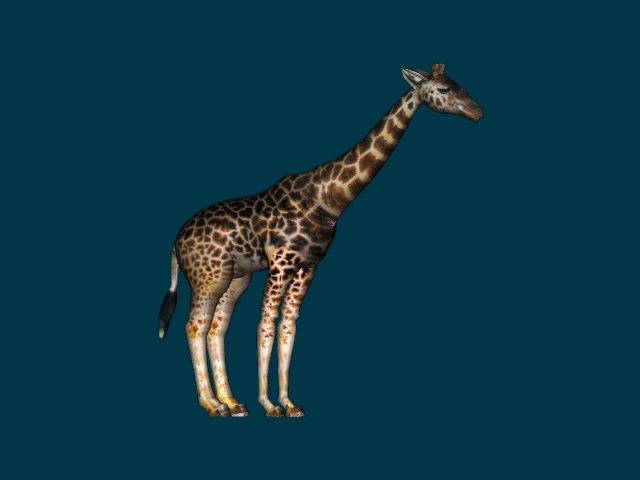
I think one of the biggest mistakes I made was when I was having problems with the feet going through the floor. When I had that problem with Rabbit or Shaggy it was usually one of those special ankle or hip joints and I just had to set the interpolation to zero slope and it stopped. But I don't know how to rig those special joints. So when my feel started dipping into the floor I set everything I could find to zeros slope to try and stop it and it made the Giraffe walk kind of jerky. In the end I had to add some extra keyframes to keep the feet from going through the floor and by the time I was done I was so unhappy with my walk cycle that I shot the movie from the thighs up. You can still tell it's jerky though.
I was surprised that the decals held up so well. I was expecting problems with tearing or artifacts but it far exceeded my expectations.
I made myself a giant 3D wall (30 feet high and 40 feet wide), found myself a Google image of the African Savannah and then used Robcat's tutorial to make a gigantic background for my giraffe to stroll through.
I think it came out pretty well for someone who barely knows what he's doing.
Enjoy. 6 hours = 5 seconds.
-
Ok, the model is finished. There was a whole bunch of settings for the model properties at the end but mine looks fine.
The decals sure are cranky. There is a purple spot on the chest I couldn't get rid of no matter what I tried. I noticed it's in the manual too but it's way worse on my model.
Considering some of the creative spline stitching I had to do and crankyness of the decals I'm curious to see what this model will do in an animation. I'm going to stick it in a walk cycle tomorrow and see if it rips the decal to shreds when it renders.
I'll post it once I'm done.
Now I'm going to go pass out.
4 AM! Good Lord what have I done!


-
Is there any way to make your points extrude in the opposite direction they extrude as a default?
Also, If you have done several extrusions and you realize you want to add another ring at the top where you started can you select the first ring and make it extrude again but from the opposite direction that it already extruded?
-
but the last one I Shift+click to connect the circle
AHA! just click.
Yep. That was it.

-
that window doesn't work in my version.
Post a message telling everyone to come to the A:M forum (www.hash.com/forums) to ask their questions.
Ok. I'll do that. Frankly I'm shocked with all the help that you provide the company doesn't keep your versions updated. You are a true A:M Ambassador.
-
On the cross section:
I'm wondering how you managed to make that CP "peaked" without the peak/smooth buttons recognizing it as peaked.
I haven't been able to duplicate that mishap. I'm impressed.
I'm presuming that CP is the first/last CP you drew.
Notice that when you click on the CP only one side of the bias handle shows up at a time, unlike the other CPs. Notice that each side is pointing at a different angle, unlike a regular smooth CP.
It's like two unrelated splines coming together at the corner of a cube, sharing a CP but not truly connecting to each other.
I can't figure out how you did that when drawing the cross section from scratch.
My first suggestion is to remake the cross section and check it for hidden peakedness.
Plan B: use the detach button to remove one side and use left+right mousebutton to reattach it. You'll have to do that to each ring.
Yeah I see that... the bias handles for all the CP's but the last one I Shift+click to connect the circle (like you said the first and last CP drawn) are all rounded with bias handles that appear for both sides of the spline at the same time. That one CP has individual handles for both sides of the spline. Even pressing the smooth button doesn't fix it. I tried.
I also recreated a brand new 4 CP circle spline and it happened again. The first/final CP was peaked with no indication it was and smooth won't fix it. No matter what I do that CP has 2 seperate bias handles.
This is a real bother. If every spline I make does this I'm going to either have to jump through those hoops you described above every time I model or live with the seam. Any ideas? The only solution I've found so far is to delete the offending CP and then draw a new 3 CP line and then marry the 2 remaining ends of the circle to the ends of the 3 CP line to close the circle. When I did that it gave me all smoothed CP's. So far it's the fastest solution I've found. Although it's too late for this lesson because no way I'm redrawing this whole damn Giraffe.
It's funny that when I choose "peaked" it clearly changes the bias settings and when I choose "smooth" it changes them back but still the 2 seperate bias handles remain. Wierd.
On a side note is there any better diagrams for attaching the legs? I keep ending up with 2 x 5 point patches next to each other (which is a no no and doesn't skin) no matter what I do and the manual is almost useless. The manual has excellent images of how to attach the first few CP's but the underside isn't well illustrated at all and it clearly has two five point patches next to each other. Something I have been unable to make work.
I did find a work around by adding a spline and kicking one of the 5 pointers over a row and it looks fine but I want to do it correctly and I cannot figure out how the lesson got that many 5 point patches next to each other.
Project file attached.
-
I just got around to checking out the chat room for the first time and there was no one home. The last few messages were from some dude plaintively mewling for help with rigging and a bit of a troll correcting his spelling. LOL.
But those were days old.
I'm surprised such a neat feature gets so little use.
Does anyone know if the Hash, Inc. reps still do a once a week chat in there or not... and if so when?
-
Ok I think I get that attached/unattached stuff now. It's the bones and control points that matter not the connecticity of certain areas of mesh to other areas of mesh.
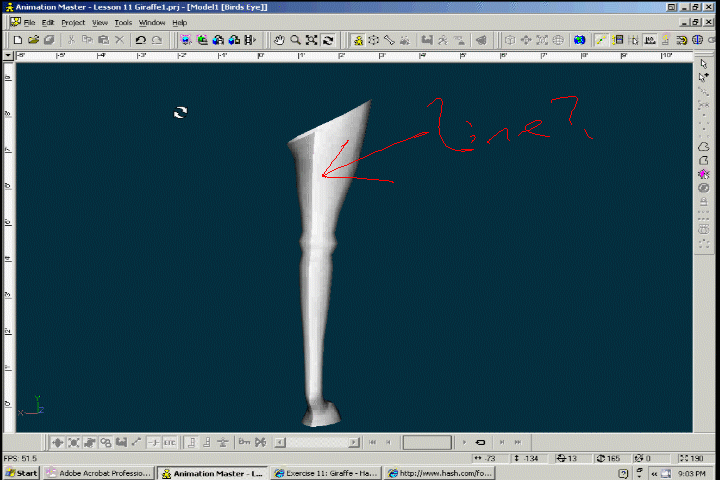
As for the line on the Giraffe... I saw the same thing on my fighter model. I just figured it was common.
Project file attached. If you have the time. Thanks again. Let me know if I start taking you for granted.
-
A nose cone that spins freely would have no need to be spline attached to the fuselage.
and
Generally, you attach things that would be part of a continuous surface, like an ear is part of the skin of a giraffe. A physically separate mechanical part, like a wheel, would not be attached with any splines to another part.Ok, but when my leaves mesh wasn't attached to my stem properly they seperated from my flower when I moved it. If, for example, a car has wheels with no mesh connection to the rest of the car how do you keep the wheels from flying off when you animate the car? Would you rig them seperately as well? Do you have to position the car and then the wheels as if they were seperate models? Would that be the case for an airplane prop?
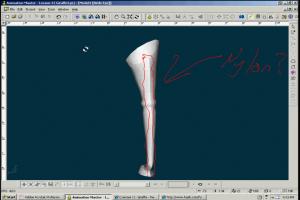
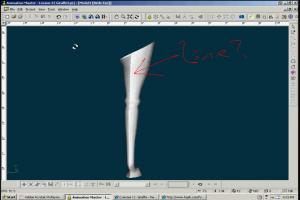
Also, is my Giraffe wearing Nylons?
I noticed this in the fighter lesson and although it mostly goes away in the final render it still appears in render lock mode. Whenever I've made any kind of oval spline the system always seems to choose the most narrow peak as the point to add this "seam" looking thing. I tried adding more control points to the area where the seam was showing but that didn't resolve it. I also tried adjusting the handles on the control points... that only mitigated it a bit. It was still obvioulsy there.
So is there a tried and true way to rid yourself of this seam?
EDIT: Also, the back leg and front are made the same way. According to the book, "Repeat this process for the rear leg."
So if it has the same number of splines and is roughly the same shape is there a reason I can't simple copy and paste the front leg and resize it for the back? Seems like a no brainer and the kind of thing TAO Lessons usually direct you to do so I'm wondering if there is a specific reason I should not?
And thanks again Robcat.
-
This is a big lesson so I'm going to ask questions as they occur to me. I've read through the lesson and I've watched Robcat's Tut on making the leg and at this point I just finished closing the mouth on the head. So pretty early in the game.
My question is about the ears and horns. The lesson says to simply make them and that's fine. I'm sure I'll figure it out with the knowledge I've gained so far. What I wondering; from an animation perspective, is it better to attach things like ears and horns or does it not matter?
When I did the last lesson I considered animating the plane but decided against it because of the time it would take.
But it occurs to me in this lesson, that in the fighter lesson, the instructions had us take things like the nose cone, wings and props and basically just jam them into the fusalage. My experience with rigging the flower in lesson 9 tells me that had I tried to rig the fighter and animated it, it would have flown apart on me (much like my leaves popping off before Robcat helped me figure outt hey weren't really attached).
But at the same time I wonder about things like the props which has a rapid 360 degree movement. If the props and nose cone were attached to the model wouldn't if cause problems with the mesh it's attached to?
So I'm wondering, from an animation perspective; is it better to actually attach mesh or do certain things like wheels and propellors (and Giraffe ears which I believe have a 360 range of motion but not repeatedly so while they need to be able to spin all the way around they do not need to spin more than once like wheels and propellors) work better if they are left apart from the main model mesh and rigged.... well actually I don't know how they would be rigged. Since every model I've seen has a skeleton in which every bone is attached to another at some point I wonder if you could have a completely unattached bone like a "propeller" bone all by its lonesome ready to spin when necessary.
Or is all of this handled in the rigging constraints that Robcat mentioned before?
-
I hope you guys didn't see any of that as criticism. Rodney you seemed to be lamenting that my questions would get lost or buried or whatnot. I was just making a suggestion. Personally I couldn't be happier with things the way they are. I get answers to almost all my questions faster than I have any right to expect.

As for moderating the TAO lessons myself, I believe I'm not qualified. And, as long as I'm plowing through the lessons myself I'm way too busy. I have a webcomic site that just lost its artist, a job to search for and at least ten more lessons to go.
Maybe once I've completed TAO I might take you up on it.
Rodney, poor Rodney... the only moderator? Thank goodnesss people here are so nice and civil (at least so far in the newbie area... I haven't ventured outside much). I ran a community for Rooster Teeth Productions that had thousands of teenagers in it. I was getting over a hundred e-mails a day from complainers. I only had to do it for one Grifball season... like 3-4 months and it nearly drove me insane. God bless you.
As for Robcat bringing up that you have almost 300k posts on the site, I think if you stuck to filtering through the TAO lessons area it would be better. Still a ton of posts for one guy though.
As for stickies being ignored... I never do. But maybe I'm the odd man out. Yes you probably would have to make a sticky explaining the knowledge bank contained in the first post. It might save time, it might just be another one of my hairbrained ideas. It was just a thought.
As for the search function... In my experience forum search functions have never been great. They either find too little or too much and when you are dealing with someone like me who doesn't necessarily know how to ask the question properly the search function becomes even more problematic.
So I'll stick to asking questions.
Robcat, as for the Giraffe lesson goes, I'm going to take this one nice and slow. It seems like one of the biggest if not the biggest apple in the Tao pie so I'm going to take it slow and try and do it right, especially since it has less instruction with the lack of a vid. I appreciate the advice though.
Thanks again for all the help guys.
-
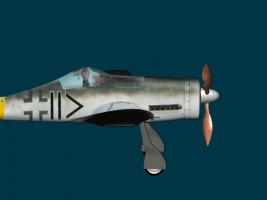
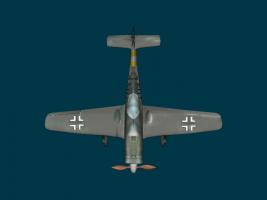
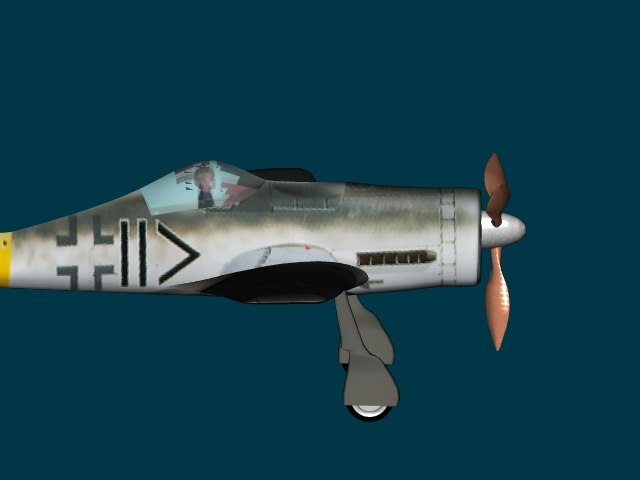
That turned out real well.
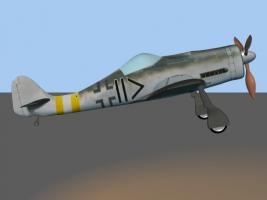
Off hand, I'm not sure what is causing the windshield to get colored.
I think something is wrong with the decal that looks like ||>
It has a white halo around it so maybe it lost its alpha channel.
I thought that white stroke (at least I thought it was a stroke) was supposed to be around that symbol. I don't know.
As for the stuff on the windshied... the only time I had any stuff show up on that windshield is in the image where I decaled my nephew to the cockpit (and I only did that in one image) so that leads me to believe that, that decal is the culprit since it didn't show up in any of the other images.
I didn't know something could lose its alpha channel. But considering that before I saw your tutorial I had no idea what an alpha channel was or how to use it I'm going to let it go. LOL.
EDIT: I almost forgot about this.
4) i'm not sure what he meant by "rough edges". I haven't watched the vid in a long time.He meant patches where the decal doesn't fold right or tears or the seam is really visible or something like that. Look at my car in the customized car lesson and the horrible state that decal is in and you will see what he meant. Other than reapplying the decal and splitting stuff open to hide the seams I don't really know how something like that can be fixed. I was wondering if there was an actual "paint" function in this program where you could whip out the proverbial spray gun and blend decals into the surface attributes like diffuse color better than simply leaving a seam? The way he talked in the video he alluded to it but I assume that's not a real thing. I must have misunderstood.
-
I understand I'm going to be working with decals again in the next lesson (Giraffe) so I should get some more hands on with that.
As far as my questions getting lost... I've gone to lengths to read through several pages of each thread for each lesson but usually there are a dozen pages or more... a lot of reading. There is definitely some benefit to what I've read but Robcat is the man. He's been Johnny on the spot with answers from day one with me and it's made a huge difference.
If I were a moderator here, I would probably sticky the lesson threads in order so that additional threads aren't started and the lesson gets fractured over multiple threads (which I've seen) and then, I'd edit the first post in each of those threads with questions that have arisin and links to the posts with the answers.... kind of a first post FAQ for each lesson. That way, newbies have a starting point if they run into trouble.
"Can't figure out how to adjust your walk cycle? Here's a link to the post where someone already asked that question and the answer follows."
That sort of thing.
But that would require someone sifting through hundreds if not thousands of posts.
I don't know how many moderators there are on this site... maybe if you split up the lessons.
Just a suggestion.
The biggest thing I've noticed is communication failure. As a newbie there are some terms, some questions I don't even know how to ask properly. That's why I went and got the screen cap software I needed. I noticed that folks who have used this program for a long time see some things as a "given" or obvious when they may in fact not be to the newbie (like me). And that was my biggest source of frustration. Even the video lessons occasionally gloss over a tiny detail as if it were "common" and it has led me to make mistakes.
For example, something really simple and silly. In this lesson, when I was loading the rotoscopes I loaded the side view from the view associated with number pad #6. The instructions in the book said to use the view associated with #4 (and so did the video... it said "Left view") but the file was called "Side" and I remembered that from the video more clearly than anything else.
I've been using the "Right" or #6 view for my side views a lot more than #4. I don't know why, it just worked out that way in the other lessons. So when I thought to myself "ok let's load the side view" I hit #6 and loaded the side view.
Everything seemed fine. I splined most of the fusalage. But when I went to check on the overhead view, and the front view, I found my splines were going in the wrong direction.
At no point in the lesson did it say "You must use the left #4 view to place this rotoscope or you will be modeling in the opposite direction of your other rotoscopes."
Once I figured it out it was something that I comprehended immediately (in that I understood why it needed to be the left view or flipped horizontally and moved if I really wanted to do it on the right) but BEFORE I figured it out I was looking for the "global rotation button."
No. Sadly I'm not kidding. I just assumed that I must have rotated my workspace 180 degrees somehow. In retrospect I feel dumb even saying it but it's true. I thought I needed to flip my virtual world around. It was such a small mistake but it caused me huge problems.
And you guys don't even see stuff like that because you are used to thinking in three dimensions. I went and got my screen cam open and documented the problem, copied the files to JPEGs and was all set to post them on the forums with yet another "help" message when a flash of inspiration came and the answer occurred to me.
But that is how you learn this program. I suppose if all the answers were in the manual it would be a bazillion pages long and quite boring. And someone (probably me) would go outside the lesson requirements and still find a way to have a problem.
The fact that you guys are here, this knowledge base, this brain trust, for when I'm really stumped makes all the difference.
If I knew for sure that a reference existed I would check it first but since nothing like that exists I just ask questions.
I don't think I'll be asking anything else without checking Rob's Brilliant Island page again (brillaint is right).
As for my decal with my nephew. I took the photo of him this afternoon and got some ghosting on the image. I used Photoshop to erase the background but I know from experience that no matter how much of the background you think you've erased there is always some stuff you miss. I should have used the block eraser. The wall color and my nephews hair were too close for the magic eraser and the background eraser so I just used the standard eraser and I know that always leaves some junk behind and that junk gets included in the alpha channel.
Then I applied it to the cockpit which has transparency and reflection attributes. I was not surprised when some funky stuff showed up.
In the future if I do anything like this I'll be more diligent in my Photoshopping. This was just a fun thing to make my nephew giggle (and it worked).
Thanks again for all the help and feedback. Onward to the Giraffe (no vid Tut but I see Robcat's got some stuff for it).
-
1) select the CPs you want to align. Then in the Properties window (better have it open already) you can scale them to 0% on any axis. Set the "pivot" to Y=0 if you want to squash them to Y=0
2) if you have named your groups in the PWS you can drag a material onto it (in the PWS) and ti will affect only that group.
3) anything you can paint in a paint app or shoot with a camera and save as a TGA or JPG can be used as a decal or rotoscope. Vid in the tuts link in my sig.
4) i'm not sure what he meant by "rough edges". I haven't watched the vid in a long time.
Thanks a load. Can you actually drag the material into the project workspace to apply it? What I was doing wrong... I was selecting my group and then I was hiding the rest of the model. When I did that it deselected my group (as they were the only active and visible control points on the screen anyway) and then I just dropped the material onto them. I figured out what I needed to do was select them again. Once they were green and selected the material stayed on them and didn't transfer to the rest of the model.
The tutorial was fantastic. I put my nephew in the plane. I assume that all the artifacts are due to the spectacularly crappy job I did erasing the background around him. Next time I'll put more into it. I've never been good at erasing backgrounds in Photoshop. Long, tedious work.
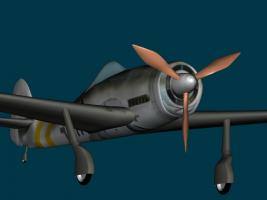
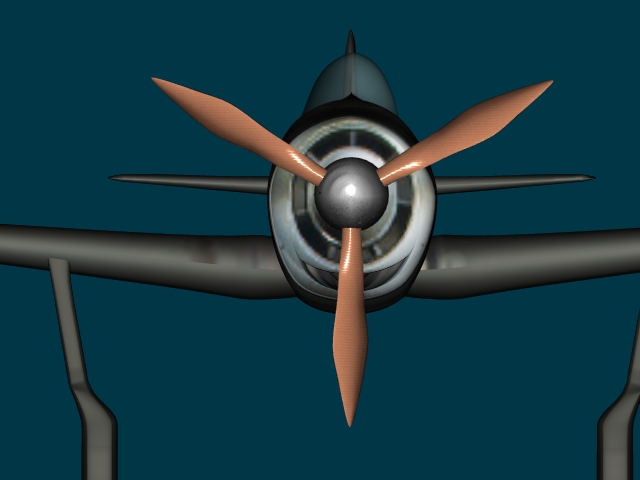
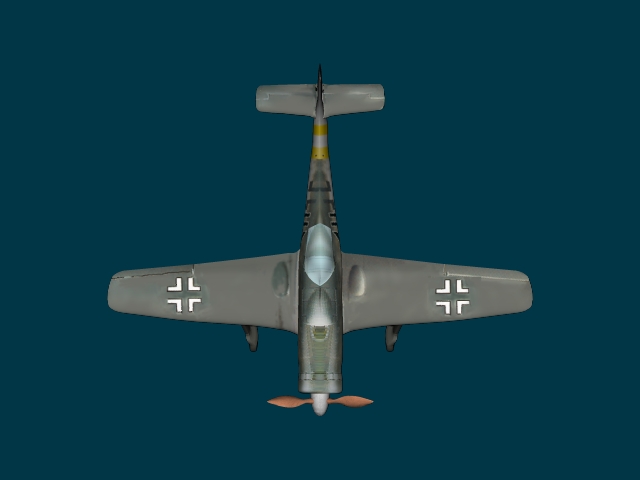
I took, WAAAAAaaaaayyyy too many pictures of my plane. I'm very proud of it. I'm only going to upload the few I think are best though. I'm especially proud of the engine plate and air intake I made for the front and the rims I made for the tires. I think my decaling job was pretty good too (although you can see the seams on the leading edge of the wings so I'm not delerious about it).
Now that I understand the materials stuff better I had fun with that. Wood props. Chrome on the nose cone and rims. I forgot to chrome the prop connectors into the nose cone but so what.
I enjoyed this one.
The lesson said 2 hours. I took about 12. LOL.

-
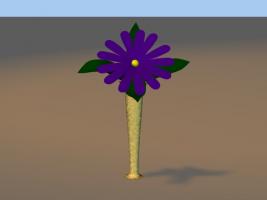
I think it came out nice... and now I have a vase and a flower in my stable of models.
Another successful TAo!
Wow I learned a ton on this lesson.
Thanks!
-
I'm enjoying this lesson. I do have a couple little questions that are outside the lessons scope but as I'm putting the finishing touches on my plane now I think I'll ask them now as mybe you guys will answer me before I'm done so I can make even more improvements.
1) I think this was mentioned in a previous lesson but I can't find it so I'm just going to ask. How so I snap control points to an axis? For example, when I was shaping my plane I definitely wiggled it here and there and now when I look at it from the front I can see all the control points at the top of the fusalage that are spread out ever so slightly to the left and right of of the "Y" axis. I can select them, sure; but how do I snap them all back onto the "Y" Axis (and I'd also like to know how to snap control points to "Z" and "X" if it is a different process)?
2) Is there any way to layer materials by using the project workspace heirarchy? For example, I'd like to make my Props wood (there is an "oak" material in the Hash library) the nose cone aluminum (yep, that's in the library as well), and I'd grouped the last two rings on my props as I was hoping to make them look like Chrome (there's something close to that in the Library). I can apply any one material to the model and the decals and group diffuse color isn't affected. But I cannot add more than one. I tried "hiding" the rest of the model and only applying the material to my "props" group but that didn't work. Any help with this would be appreciated as using multiple materials on a model is something I'm keen to learn.
3) This lesson shows how to use decaling and rotoscope. But it does not tell me how to create a decal (make an image a decal) or how to make an image a rotoscope. Also, I'm curious how rotoscopes work in animation (for combining live action and animation like I've seen done in the A:M preview with the dinosaur walking through the parking lot).
4) Also, the fellow who does the video lessons mentioned "Painting" the decals to fix rough edges and whatnot and that kind of confused me. I know I could easily grab a still and bring it into Phostoshop and fix any rough edges (or for that matter do all kind of things) to my plane... but that doesn't really help me with A:M functionality. The model would still have that flaw and it would certainly be much more difficult to fix that flaw with an outside program in an animation as opposed to a simple still image. Is there an ability in A:M that I don't know about that allows you to "paint" models and or decals for use in animation and stills? I had thought about painting my plane crimson red and making it look like the Red Baron or something and just using the German symbols from the decals to add authenticity but while I could easily apply the crimson color as the diffuse color for the model areas I want there are limits to how much of the model I can hide while applying the decals... and it isn't enough to just get those German plane symbols only.
I was having trouble with the underside of the plane wings. I didn't want to do what the video did and just use the top image on the underside of the wings as well so I made a new decal (not an actual new decal but just a new version of the top decal... if I knew how to make decals I wouldn't have asked above LOL) out of the top, (you have to do the underside of the wings first for this trick to work) then I sized the image so large that my wing fit into an area with no detial, just the color gray. Then I did the top of the wings but I used the lasso tool to hide all of the wing except the top surface (in essence cutting the wing in half lengthwise the same way the guy in the video lesson does with the fusalage only horizontally instead of vertically) area and applied the decal to that. Then any color inconsistancies or wierd tears in the decal got hidden inside the wing that way.
Anyway. I'm almost done. Just thought I would ask the questions that were on my mind.
Thanks for any help.
-
Wow I learned a ton on this lesson.
I'm calling it done with this though.
It went pretty smoothly once I had time to sit down and bang it out and even the spline workflow is getting familiar.
I did turn on Glow and then couldn't figure out how to turn the damn thing off. Then I remembered heirarchy (and assumed that group properties would be automatically assigned to the model) and found out where the culprit was.
I think it came out nice... and now I have a vase and a flower in my stable of models.
Thanks for the tons of help on this one everybody.
-
Remedial Comics launched in January and since then we have had some great times. We have done a guest comic for "Questionable Content" which garnered our site over 90 thousand hits in one weekend and we have published dozens of comics of our own gaining mention at other sites and a small (but devoted) regular audience.
Our site is set, our forums are set, even our advertising is set.
Unfortunately our artist doesn't feel he can make the commitment anymore.
Life gets hectic. That's the way it goes.
I'm the writer of the on line comic "Remedy" which is hosted at Remedial Comics and I'm looking for a new artist to take over for the fellow who's life has gotten too complicated.
The website is here - http://www.remedialcomics.com/
Please take a look at it.
There is currently no compensation for the art you will draw. NO COMPENSATION.
The money we recieve from advertising is used to advertise the site.
That said, our comic has done VERY well for the short time it has been on line. There are definite possibilities.
When we reach a year's worth of comics we will explore printing and selling books, attanding conventions and at that time there is a good chance that there will be money made and if you are a part of our team you will recieve a share of it. We have an agreement in place to split any funds made by the comic in much the same way music acts split album royalties.
We can discuss the financial arrangements later though. Right now the site has cost me far more than it has ever earned (and I have funded nearly all of the initial investment that got the site going and will continue to do so).
If you think you might be interested in drawing Remedy, can take direction from a script, can turn in three color comics a week in digital form and are in the United States (so you can attend comic conventions) then please contact me.
Send an e-mail to rob@remedialcomics.com
Please include links to samples of your work; please check out our site so you have some idea as to what you will be drawing and those that submit samples of our characters drawn by them will be highly preferred.
I have big plans for this company. If you want to go along for the ride be prepared to roll up your sleeves and work. But it's also a lot of fun.
-
Thanks for all the great answers everybody. I feel much more in touch with this lesson now and I'm redoing it.
Nancy, even after you explained the file naming thing I have to be honest... I didn't get it. I have to be honest. Since I have yet to have a lesson or tutorial that explains the saving in sequential images feature and what it does exactly I still don't.
But I do now understand what will happen if I add a numerical value to the end of my file name and I also understand how to get those multiple still images from a single frame if I need to. With your help and some fooling around you can watch the attached video to see what it took for me to figure it out.
Please forgive the video quality. I wanted to keep the file size small and this freeware screen capture program is all I can afford right now.
The quality of the actual AVI is fantastic and I was going to save it as a Quicktime video but none of my Quicktime codecs for Premier Pro 1.5 would behave (to be honest I've never had much use for Quicktime and I don't think I ever tried to encode in it before) so I went with what I know and stuck with WMV.
I've already got most of my flower built but some personal stuff has kept me hopping the last couple days. I'll post it as soon as I'm doine. Thanks again for all the help.
Everyone.

-
You know what... I do have one more quick question. When I was originally working on this lesson I thought to myself "nice... I'm starting my stable of models. Soon I'll have my very own library of things I can use in my own animations and it all starts with the flower and the vase I made."
But I could not for the life of me figure out how to save a model to my library (or hard drive) independent of the project so I could use it in other projects. If someone could tell me how to do that I'd appreciate it.
One of the things I wanted to do was to make different colored flowers. But since the model in the project defines the colors, and I was dragging multiple models from the project into the choreography I couldn't change the colors (at least I didn't know how) like I did with Rabbit when I dragged multiple models from the library into the choreography and altered thier individual surface properties in the project workspace.
I only made one halfhearted attempt at the color change so I might have missed something but it seemed to me that as long as the model was created in project there was only one set of model properties to alter and when I changed them, it changed the color of all three flowers.
-
Rodney,
Although writing is my biggest hobby I think if I was trying to write a book on anything as complicated as animation my head would explode. I'll stick to fiction thanks.
On the flipside though, "looking too far into some of this" which is code for making things more complicated than they need to be... Oh yeah. That's me all right, I've been hearing that all my life. It's part of how I learn. It's great for me, a real pain in the ass for my teachers. Thanks for hanging in there.
I understand what you are saying about the bones and the heirarchy. In theory I mean, because in practice it hasn't worked for me yet. I still don't understand why they physically seperated from each other but I suspect Robcat must be right and I must have translated them somehow instead of rotating them.
I really appreciate the kind words about the webcomic. Remedy has been the only thing keeping me sane during my last year of unemployment.
You've got that right. All you need to do to render to another file name however is to type in a different name. A:M will render to that filename until you tell it otherwise.I tried typing in a different file name, that didn't work. But I'm guessing you mean I type it somewhere other than the file properties portion of the render properties dialogue box. Where?
Animation:Master is designed first and foremostly to generate sequential images.When setting the range for the render its rare that you'll want to set the render to only one frame.
A:M excels at single renders too but usually this is where the artist sets up a Choreography designed to render out only one frame.
Having said this you can create whatever you want in a Choreography on each subsequent frame and then tell A:M what to do with it.
For instance, if you have what you think is ideal images set up on frames 1, 10, 12 and 23 you could set a Custom Range in A:M's renderer for 1,10,12,23 and render.
I'd really like a better understanding of how this works. Is there a tutorial on the Rendering functions and options that could clear this up a bit for me? For example I've heard you mention rendering in sequential images before and I'm not sure what the difference is between that and rendering a moving image file like an AVI. Or for that matter how you would tell A:M how to do such a thing.
I'd like to know more about how all that works... if it's in an upcoming lesson though just let me know that and that will suffice for now.
Robcat,
That movie you made me is just the best answer I've ever gotten for anything ever. Mostly because you answered almost all my questions in one shot but also partly because it looks like I almost accidentally figured it out on my own which; I just love it when that happens. I was so close.
For the movie and the subsequent posts. Thanks so much. I could have simply done the lesson exactly as is, and my image would have looked like the end lesson product. And I could have left it there; but that's just not my style. I can follow directions sure but I want to understand what I'm doing and while theses lessons are great at the how and some of the why you guys are just fantastic at filling in the rest of the why, when, and where (and a good deal of how that I need usually because I've gone beyond the instructions).
Thank you so much. I learned so much from that video. Any newbies reading this... you should download my project file, watch Robcat's movie and then fix what I did wrong... you will learn a lot.
AFAIK, you can't.AFAIK?
QUOTEand what benefit is there to having them on?
If you can't see them you can't adjust them.
QUOTE
They aren't mentioned in the lesson; what are they used for (or should I not concern my empty little head with that now until I become more acquanted with the program as they are something I neither need nor will use at this juncture)?
They are not needed for this lesson. they are an automated way of mixing CP weights between multiple bones. As the bones "fall off" they attract less CP weight to themselves.
I'm going to ignore these and just hope thier functionality is discussed later in the lessons or something. Although they appear in the video lesson (and the manual) they, for whatever reason are not turned on for me and neither lesson mentions what they are or do anything with them so I'm just going to let it go for now.
But remember the rotate manipulator I showed before? the R key. The red green and blue rings. Why aren't you using that to rotate bones? that's the most controlled way to pose a bone. And that means it's the easiest.The rotate manipulator is also mentioned and shown in the text. It also tells you there's a button for it.
I guess I didn't use the rotate manipulator because the guy in the video doesn't. He just grabs them and starts moving them. In the lesson in the book it just says to move the bones around a bit. In the future, I'll use it.
One question I do have though; I could grab any bone in the models like Rabbit or Shaggy and as long as I didn't go into the properties and enter values for translation (obviously I'm talking about regular bones and not control points like ankles or hips which are supposed to translate {translate being basically another word for movement or travel over a virtual plane}] the bones would stay attached to each other no matter how screwily I moved them.
But with my flower I grabbed one of the lower stem bones and gave it a yank and basically my entire skeleton toppled.
Is this the difference between an FK and IK rig that you were referring to... or should I say... one of the differences? I know I don't need to think about this. I'm just curious.
Lastly, since my print screen function doesn't work on my computer because of the duel monitor setup I've had a hard time explaining some things to you guys that should have been easier.
Robcat's wonderful video makes me think I need some screen capture software; but I've never used anything like it. I've done tons of capture off of TV's and video games but I've never tried to capture my own monitor before. Can you guys recommend a program that's free (or at least very cheap)? I'm sure I have all of the equipment needed. But I've had bad experiences with software before when I've bought it without getting reviews from people who have used it before.
I'm off to redo this lesson.
Thanks so much guys. I really appreciate it.


Exercise 11.5: Make A Face
in TaoA:M and the A:M Technical Reference
Posted
Two hours my ass.
This is by far the toughest lesson I've had to deal with... and it isn't because the instructions are hard... they are pretty much useless. I'm not an artist and getting this face right is giving me a hemorrhage.
Right now I'm trying to get the lips right and having a rather hard time. I wanted to "plump" the bottom lip a bit as my nephew has a bit of a pouty lip. So once I had the shape right I went to add a new row of control points in the center of the lip so I could pull them out a bit and plump it. The problem is that no matter what I do it keeps turning the last control point into a hook which gives me no control of that last spline and basically makes it a flat, straight line between the top and bottom control point.
So I thought to break the spline and add the cp's back in and got an error and a repeatable crash for my efforts.
Please watch the vid, the vid is of the fourth time I've crashed the program with the same error.
I'm wondering if the hook will become a control point once the two sides of the face are joined. If that's the case I may just have to wait to adjust that area of the lip.
Also, the manual isn't much use, any help/advice you guys can offer on the splines so far would be much appreciated.
Video and project file attached. I'll attach the images I'm using for rotoscope as well. They aren't perfect but I couldn't get him to stop squirming.
Thanks for any help.
EDIT: Had to zip the movie of the error because it was 98 MB. I should also probably mention that that hook on the lip was not made by me... the control point disappeared on its own.
Lesson_11.5_Make_a_Face5.prj