number
-
Posts
107 -
Joined
-
Last visited
Content Type
Profiles
Forums
Events
Everything posted by number
-
Video composition w/ 3d model and shadow
number replied to number's topic in Work In Progress / Sweatbox
I was able to match the saucer to the background video shake. Just took a couple tries. Final proof of concept included. saucertest_final.mov -
Video composition w/ 3d model and shadow
number replied to number's topic in Work In Progress / Sweatbox
Thanks spleen and bighop for reviewing and commenting. I think that I may be able to match the camera shake with my compositing tool (Combustion). So many layers and filters, just w/ a simple effects shot! -
Video composition w/ 3d model and shadow
number replied to number's topic in Work In Progress / Sweatbox
latest version attached. 1. Created a separate layer for the reflection and subdued it! 2. Used color curves in Vegas Pro on the sauce to lighten the shadow on the saucer image. Ideally, I would have had another ambient type light source in AM project. I'll call this complete for the purposes of my exercise. I can see that I'll need to spend more time on the setup so that I avoid fixing so much in post. saucertest_fixed_good_reflection_color_curves.mov -
Video composition w/ 3d model and shadow
number replied to number's topic in Work In Progress / Sweatbox
Feeling a lot better about integrating 3d w/ live video. I think that I solved a number of issues, but still more to master. latest version: 1. Fixed second shadow problem 2. change geometry to better match scene 3. stabilized video and fixed rotation 4. Rendered all TGA w/ alpha 5. composited in Combustion; keyed out ground; matted out ferry and beach; and added motion blur (probably not as good as AM). 6. Added some fine Gaussian blur to shadow and saucer 7. Added noise to the saucer and shadow to do: 1. fix reflection 2. clean up video saucertest_fixed.mov -
Video composition w/ 3d model and shadow
number replied to number's topic in Work In Progress / Sweatbox
I figured out my issue w/ targa and the alpha in my video editor. In Vegas Pro, you have to set the alpha channel manually for the media. The transparency for PNG is automatically detected. -
Video composition w/ 3d model and shadow
number replied to number's topic in Work In Progress / Sweatbox
OK, spent some time understanding how to tweak the render settings to get either: Saucer, Shadow, Both along with alpha or without alpha. The render settings are a little frustrating if you're going from file type to file type. It seems that some settings are set under Targa sequence, and are carried over to JPEG sequence and/or PNG sequence. I got to the point that the saucer model would not render until I changed Shadow=OFF under the Format=Targa sequence render! No settings under Format=JPEG allow you to unset the targa shadow setting. Bug or feature? I would want the settings to be more independent for the render settings. Repro: 1. Set the following; ground: Receive Shadows=ON; Shadow Only=ON; targa render: Buffer: Shadow=ON; 2. Render now in JPEG. Only the shadow renders. Cool. How do I get the saucer back? (try it w/ JPEG selected). Nothing I could find. Render a PNG sequence, same story. 3. Now, select Format=Targa sequence. Buffer:Shadow=OFF. Go back and render either a JPEG of a PNG. OK, got the Saucer back. 4. What do you do if you don't know this trick? You can really get wedged here and without a global reset. Am I missing something? Maybe this is an initialized versus uninitialized state. It behaves independently until I select targa? I hope the Hash dev can trouble through or explain this. In the end, I can now get what I need in two render passes (Saucer + Alpha) and (Shadow+Alpha). I'm going spend some time on the next experiments w/ the composite now that I've got the render under control. -
Video composition w/ 3d model and shadow
number replied to number's topic in Work In Progress / Sweatbox
Thanks John and bighop. The fog sounds like a good idea and I'll try the film grain tonight. I was toying w/ moving the saucer behind the ferry. We'll see. Hope to have another draft tomorrow. Thanks again, Tim -
I've been trying to combine a 3d model with some video footage. I was following the tutorial below, but think that it (tutorial) or I are missing some details. My latest test is attached. I was having a heck of a time getting just: 1. flying saucer 2. Shadow of saucer on the ground 3. everything else transparent What I got: 1. Render of the saucer only in PNG w/ transparency 2. Render the shadow only in PNG w/ transparency 3. Combined in vegas pro w/ the vide footage and explorted to mp4. I need to go back through my experiments and produce a matrix of settings so that I can produce model and shadow separately. Seems like I should be able to get my goal in one image file, but this escapes me. Anyone else have success w/ this recently? I haven't tried OpenEXR as an export type yet. It may not be all bad to have the model separate from the shadow, as I can separately control the transparency, add noise, etc. for the shadow. fix its: 1. Extra shadow to the far right. I would imagine that I can set the "Cast Shadows" to OFF for that light. I'll try that in the next round. 2. motion blur 3. tweak shadow 4. fix video that is too short (saucer shows over black) thanks, Tim tutorial http://www.hash.com/users/ed/tutorials/fpm/fpm.htm saucertest.mov
-
Impressive. When do you break out into the short film format? This certainly inspires me to get something together over the holidays. Keep up the good work.
-
Alright, this has been fun. I was able to follow the image sequence example outlined in Robcat's post and in this thread. I really like the results for creating this all in AM. It would be nice to get the TV image to project, but that is for another day. I set up a lamp in front of the tv to simulate the glow. I set the TV screen to have the glow attribute. animated_tv_try_1.mov
-
OK, got my experiment w/ chroma keying to work. I created a tv model and a green screen model and added to choreography. I set the screen to flat shaded and rendered. I imported the render and a test clip in Sony Vegas Pro. I chroma keyed the green screen (very easy w/ the flat shading) with test video as the next layer of video. Old fashioned green screen results! I can now easily replace the "TV Clip" with any other sequence of images or video files. See still image for the render: Final, composited and keyed results: green_screen_test.mov Model TV and Green Screen included. TV.mdl My_TV_Green_Screen.mdl I still need to work through the other referenced methods as these can be very powerful by being a decal on a 3d object.

-
Fair enough, Gerry. Intuition is based off of what you have experience in. I'm interested in the other methods outlined here that work internally to AM.
-
I have some more experience w/ video editing and compositing programs, so I'd offer an alternative method. If the shot is static and you have the TV in the background, then using a green screen for the tv screen could achieve what you want. 1. You could use a flat shaded green color for the screen. (if the screen is shaded, then you will have problems w/ the chromakeying). 2. Import the image sequence or movie into a video program that supports keying (even adobe premiere elements does this). 3. Import your video 4. use a chromakey to replace with your video feed. The nice thing about this method, is that this is independent of the rendering. If you move a character in front of the TV screen, then you create a natural mask. If you're shot is moving, you can still map the screen in the composite, but this is definitely more work. After Effects or Combustion could be used the shear the image and change the shape. I'll try this at home and post results for the simple test. I want to do this sort of effect, anyway. Sorry if this sounds way off base or overly complicated.
-
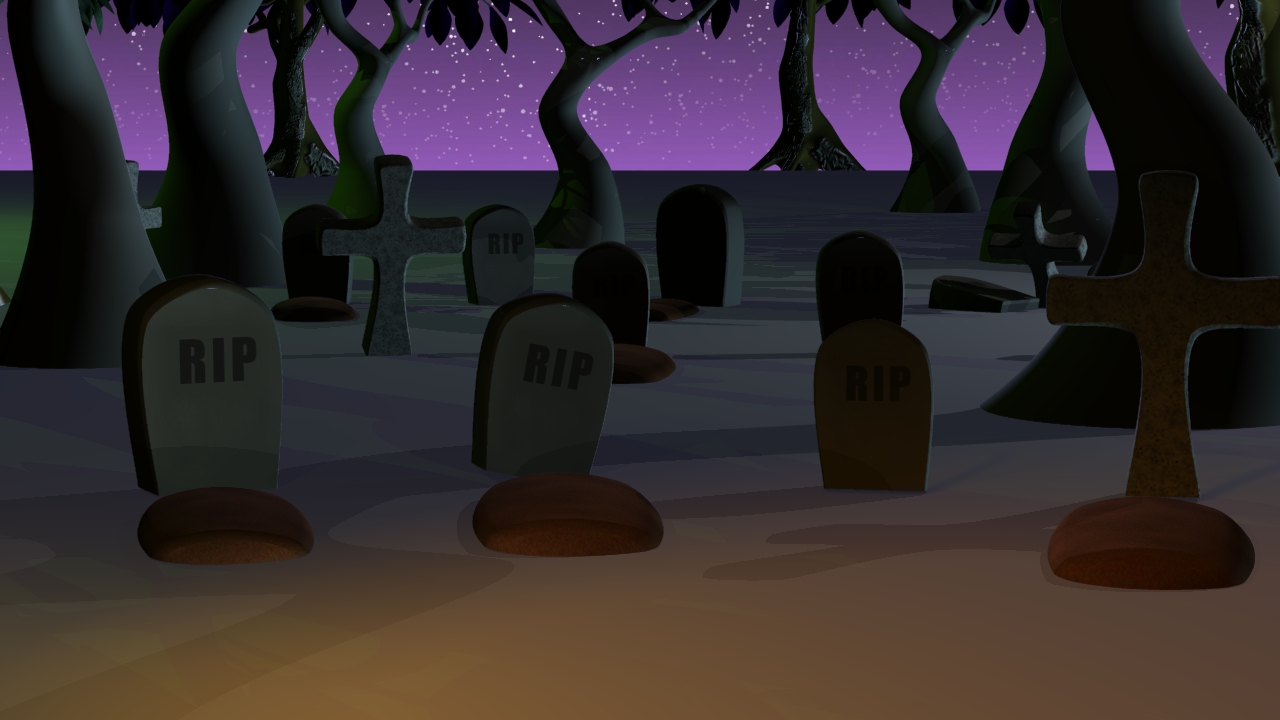
Graveyard set for potential zombie short
number replied to number's topic in Work In Progress / Sweatbox
I can tune down the renders. Here the latest screenshot w/ current version of Zombie Girl. Close to completing the model and moving onto texturing and rigging. I've been tweaking the IBL setting. I'm @ 25% for a blue white image. I like the detail, but still may want to go a little darker.
-
Graveyard set for potential zombie short
number replied to number's topic in Work In Progress / Sweatbox
I completed some more of the set. I'll need to look at the IBL and other suggestions for the next round! 1. removed shadows from green and purple side lights. Nice feature! 2. added more trees 3. add the moon 4. create a camera movement down I'm working on the Zombie Girl at the same time and will post progress this weekend. I really want to get to the animating! scary_fun_final_ver1_camerab.mov -
Graveyard set for potential zombie short
number replied to number's topic in Work In Progress / Sweatbox
Certainly need more set dressing. maybe a swamp in the background? mist in the distance? Add some moss on the trees and a grassy texture is currently in plan. I'll try the single light (moonlight) to see how this looks. I was going more theatrical and like the colored lights. thanks for all of the feedback. -
Graveyard set for potential zombie short
number replied to number's topic in Work In Progress / Sweatbox
Good suggestion about the shadows, but I don't know how to do this. Any ideas? -
Completed some tombstones, grave dirt, and a spooky tree and added to a set that I want to use for a zombie short (2 minutes?). I think that I've got OK lighting, but still need to place characters and complete some test animation. I wanted something simple, so that I can focus on the animation. Comments, as always, welcome.
-
Done, done, and done. Final animation shipped off to the contest. Many, many thanks to those who took the time to comment. My overall goals were to submit my work and to learn as much as I could about the animation workflow and mechanics. I've got more motivation to learn and work through the basics, but I still want to keep trying the hard stuff. I learn best with this kind of challenge. Funny enough, it was render 100 that was complete. Final video on youtube:
-
Rob, Thanks for the evaluation and the suggestions. I do like the lines in your pose. I still see too much straight up and down (more bounce than sway). I've been reducing the movement in the character and holding the key gestures. Latest work is on youtube (should be processed soon) http://www.youtube.com/watch?v=S0OK80yaZV8
-
Thanks Rob for the guidance. I'm certainly going to get back to the basics w/ my next animation projects. The video on pose-to-pose was great. I still need to watch the second video. I had spread out all of my animation across too many frames in the previous versions. I ended up removing more of the extraneous movements and focused around some key poses. I probably have too much motion left in this refinement, but I like the general direction. Easy to do too much, hard to do just enough. Good points about creating a unique animation for this contest. I've got my latest WIP on youtube: http://www.youtube.com/watch?v=fwshhEYiInw
-
Settled on a camera angle (thanks). I've removed my crazy "signing" by removing my extra keyframes. I had too many ideas added to the last animation. I've added the body motions and getting close to being done with the core motion. I see the point about the hips carrying the animation and everything else following. Still, learning a lot. I'm glad I've got 16 days to go! http://www.youtube.com/watch?v=1gWDDqmNZFY
-
Received and taken a lot of advice here. Thanks to everybody for the great feedback. I've replaced Shaggy w/ a TWO rig and worked on the key poses. I'm not settled on the camera angle, so this is only for review of the animation. Current WIP on youtube. http://www.youtube.com/watch?v=rs458dST7Cs Thanks, Tim R
-
I've got a rough WIP for the July 2008 11 Second Club animation contest. I thought that I'd play w/ getting lip synch in Animation Master and submit a Work In Progress. I got two quick responses. I just grabbed what was convenient, Shaggy, and simple enough for me to animate in two days. Any other of the models or rigs that would work better here? I'm just getting started w/ designing and creating the sequence, so the simpler the better. Here is the youtube link: http://www.youtube.com/watch?v=eIPw3GFV8z8 thanks, Tim R
-
I just tried to add a new rotoscope (.AVI), but received an error. "The file does not contain a video streaM" Any help appreciated.