number
-
Posts
107 -
Joined
-
Last visited
Content Type
Profiles
Forums
Events
Everything posted by number
-
That looks great. Thanks for doing this.
-
Shannon, I've sent you an email concerning a model. --Tim R
-
k. Please try this one. Looks like I trimmed up the URL somehow. Actually read the BB Code help. Looks better now. http://dl.dropbox.com/u/13988455/TimRobert...berts_Final.zip Thanks for the quick reply. --Tim R
-
Should be ready for download. JPEGS and soudtrack in the zip. Test download worked. http://dl.dropbox.com/u/13988455/TimRoberts_Final.zip --Tim R
-
Added some much needed sound effects. Again, thanks for folks reviewing and commenting. Calling this one done-done. Lots of fun. The tone is a Quindar tone as used in Apollo (so says the wiki). Movie_Final_Sound.mov Getting the zip together now.
-
Thanks for the feedback, Chris. I adjusted the hop action. I found that I had some hold keys on the hips that would pop out the left leg. Should be a little smoother. Thanks for pointing out. Now that I have a little more time, I've added the watch animation . Need to add to the model. Great ideas about the sounds. I'll try to record some effects this weekend. Latest WIP attached. YourName_0000.mov
-
Here is my contribution. I used an action for the hop cycle, but then couldn't figure out a way to go to pose in the choreography. I ended up using another action to turn the character around. Not ideal, but seemed to work. Feedback appreciated. Movie_Test1.mov --Tim
-
Correct. You will need to compsite the solid over the shadow. AM can do this, but I haven't tried this myself. I also haven't found a single pass solution. At least not for png. Good Luck.
-
Gene, Is that rigged or not?
-
I troubled through something similar last year. This is not an issue w/ the Toon Render. I have a method that works, although not as simple as it could be for PNG. It seems that what is needed in the PNG Buffer Options is the Shadow toggle (present in Targa). 1. Set the file type to targa 2. Set Buffers a. Alpha = on b. Shadow = on 3. Return file type to PNG 4. Render. You know have a layer with the shadow (and the toonlines) 5. Go back to targa and turn off buffer:shadow 6. Return to PNG and render to a new file name. This will be the object. Hope that helps. --Tim


-
I'd highly suggest an image sequence for you video output. You're not at risk of losing your work w/ a failed video render. At the very least, you'd pick up on the next image after the failure. You can choose a nice lossless format like .tga or .png. Also, many of the video editors will accept an image sequence.
-
Thanks much.
-
wow. Great work. Can you post a wireframe of the little devil? I'm always looking for ways to improve my splinemanship.
-
Just in time. Holiday animation of a Santa character that I modeled and rigged. santa_final_test_smaller.mov
-
OK, I watched about 10 times. Fantastic! Agreed, the tracking is superb. What programs is used for that? So, what elements were modeled? The man and switch. Lamp?
-
Can't wait to see. Good luck.
-
Got my vote. Good Luck! --Tim
-
Looking great. Maybe some smoke coming out of the cave?
-
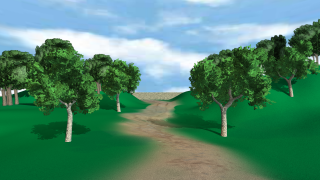
OK, no more floating trees! Latest version attached.
-
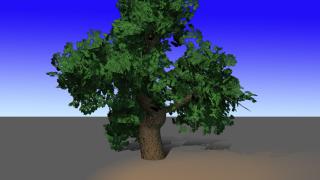
Thanks for the tip, Photoman, on how to create a forest w/ hair. I was able to create a hair material w/ a still image of my rendered tree. Only the two closest trees are full models. All others are hair. My trees were all angled until I realized that the Hair Emitter>Direction Variation needed to be set to 0%. Quick Proof of Concept attached.
-
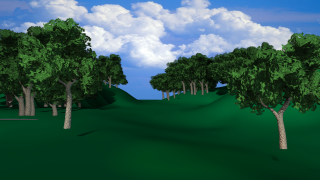
Ok, followed the fine instructions. I'll need to play around w/ the textures and tree settings next. Current render is included. 1 hour to render with shadows turned on for the keylight (standard choreography). Any high level guidance on building a bigger scene, say a forest, or am I looking at a day of rendering for a scene. --Tim R
-
Congratulations. That really looks nice and is good use of the technology. With only hours to render, you got to make some choices. I was on a team here in Seattle for the 48hr film festival and produced a few seconds of animation for our short. Good luck. Maybe our films will go head-to-head in the city competitions.
-
Confirmed and fixed. Thanks much! I can kind of see how this works. I added some more lights in the Bones Mode and then viewed in the Model Mode. It appears that the Shaded view is now using these lights. I wonder if there is an override here. Anyway, thanks again. ADDED: Here is the fixed screenshot. PS: I LOVE this forum and the AM community.

-
I'm working on a flying robot model for a friend's movie. I have a model that has been rendering in Shaded mode in the model window without issue. I see the colors assigned and decals applied. I was in Bones Mode and was picking points for a bone. I then exited to Modeling Mode and have lost the expected Shaded functionality. I mean, I see the object shaded, but no decals, but the render is very dark and the light for the rendered view appears to be from below. 1. Does not reproduce w/ another model that I created. 2. Appears to be localized to the actual model data! I reopend the .mdl into a new project and observed the problem. 3. Restarted AM, but to no avail. It appears that everything is inside out for the model. Looking into the back of the model and the interior, I see everything lit and rendered as expected. I checked normals, and they are all pointing out. laze_v3.mdl <-- sorry, not including materials and decals. Hope that this is not an issue. well, maybe that IS the isssue. Any help appreciated.


-
Video composition w/ 3d model and shadow
number replied to number's topic in Work In Progress / Sweatbox
hmmm...It would be fun to have the saucer stun them. --Tim R