ZPiDER
-
Posts
633 -
Joined
-
Last visited
Content Type
Profiles
Forums
Events
Everything posted by ZPiDER
-
wow! this is looking great! poolside looks very promising too. will the lady be animated or are you just going for stills?
-
ok, the decal stamp creation is now finished (i hope). as with any other decal in a:m, you can add or replace images in the decal and by that control more than one attribute with it (or control it differenly). also the groups dont need to be pre-existent. the groups in the screenshot were directly created by the plugin. i have also added another spline ring for each main segment. this creates more useful groups, but makes the main branch a bit bumpy .. i'll see if i can fix that, probably i'll lose the extra ring again.

-
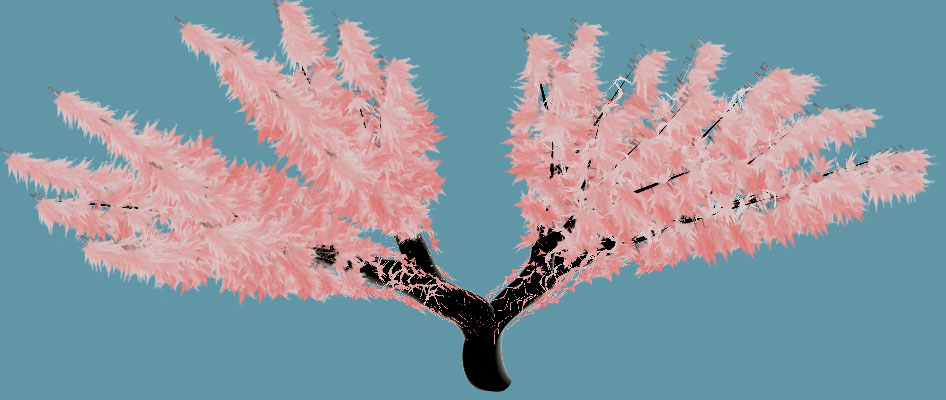
yeah! this is the first tree generated with a control decal. i've set it to control the hair length, because v11 doesnt seem to have all properties implemented yet (density would work best for this).
-
get working on salami fever!
-
i'd say you wait with the challenge til i 've included the automatic decaling, maybe also the target animation. trees will be even cooler then
-
neat way of doing this! i would have spent days modeling that and would probably have had to write a plugin along the way to do it http://www.kci-group.com/z/images/globespin2.swf
-
yes why not, everybody likes trees. oh yeah: be sure to save your target surfaces and curves somewhere (like in myproject_beforetreeez.prj). generating again with the next version of treeez will give you some nice additinal things. and probably even some restrictions may fall (e.g. groups wont need to be predefined and contain a cp to be filled properly anymore). cheers to dan!
-
no the groups are just used for grouping. no groups will give the same results. of course you could select the group AFTER growing the tree and delete it to get rid of a level. but keep in mind, that on unbalanced trees this might not work as expected, because: an extremely imbalanced tree: tree: 1 |/ 2 |/ 3 |/ 4 | in this case the whole tree (except the base group) will be part of level0 because all cps are somehow part of a level0 group and a:m can of course not distinguish which branch ins actually meant. the branches actually meant are these: 1 |/ 2 / 3 / 4 the others are just guilty by association. so applying a hair material will actually let it grow along the whole tree. a simple solution to this problem would be a modification of the plugin to add an additional spline ring for each main branch. that way unsuspecting intermediate branches wont be caught (if anyone would like this, it would be easy). the other way to work around it will soon be available: the tree will automatically have a decal applied that can e.g. control hair density along its lenghth.
-
One last stupid question: How do I get it to render so the targets (and patches) don't render? 1: dont use4 patches for the "target". splines are enough, you can just draw a freehand spiral object and get great results. this spline of course wont render 2: delete the target surface after tree generation (OR: copy only the tree object into a your desired project) 3: give the target surface transparency and/or a leaf texture if you are after that kind of look.
-
yes. but if you delete the old "base", the groups "level0" through "level20" will be empty. this means, that no new cps can be added by the plugin (this is being fixed in a:m - thanks dan!). so if you want the plugin to assign the cps to the levels (to be easily able to assign hair), you'll have to add cps of the base to each level you want filled. selecting one cp is sufficient (have a look at my example project to see how i did it .. difficult to explain (for me) but actually very simple ..) the model is actually created in the MODEL. the action is just used to get the curve controls (and soon the target surface animation). so you can just select your tree, copy it and insert it into a new model in your desired project.
-
double the character, but not the fun :(
ZPiDER replied to lazz's topic in Work In Progress / Sweatbox
a screenshot of your expanded pws would be helpful. i suspect that either you just have 2 characters there (delete one) or there is something wrong with either your action object or ........ screenshot please! -
yup, happens to me too .. i'll ask hash about it ..
-
of course i'm sticking to the lil rules for mac compatibility (like using TRUE and FALSE and NULL), but i also had to use the CMap template which i'm not sure, the 4.2 compiler supports. anyway, when i'm finished i'll surely pass it to randy and ask him to port it, but i suspect he might be busy at the moment with porting the standard plugins to osx ..
-
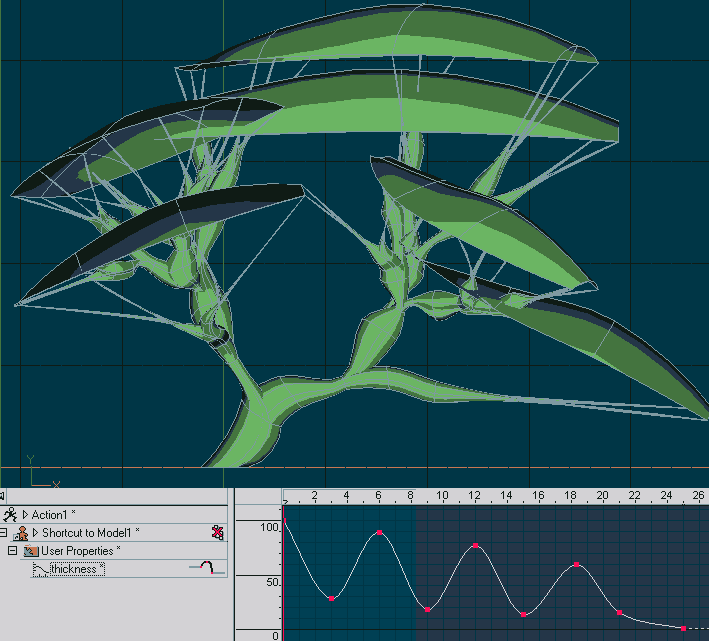
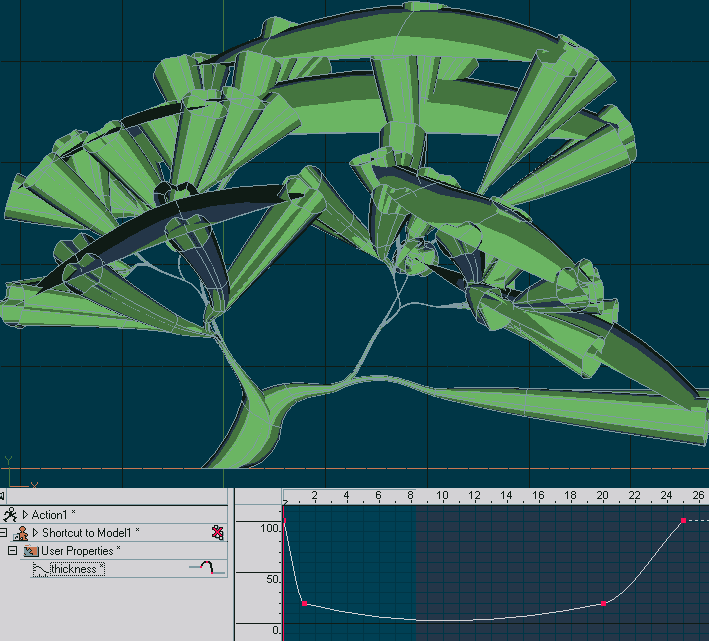
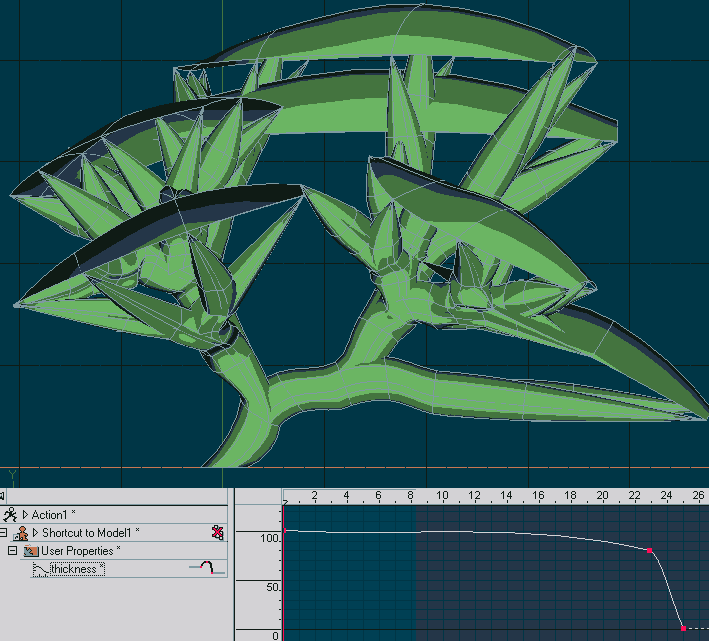
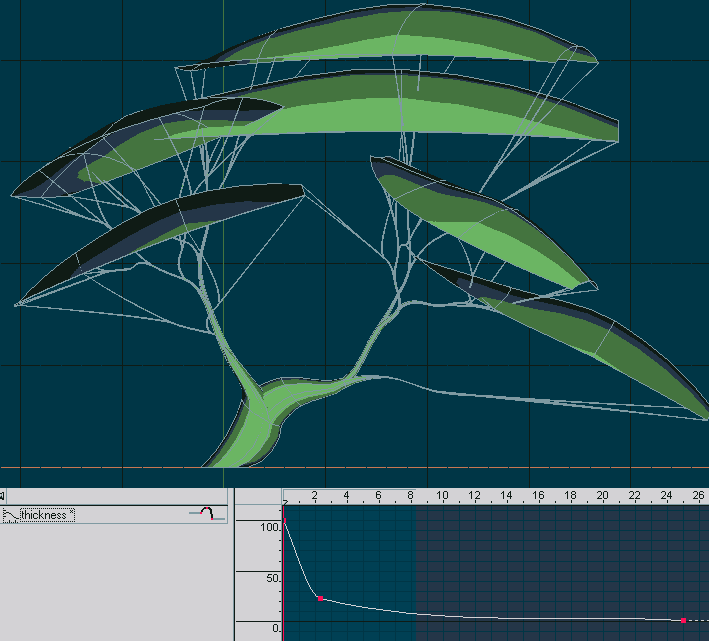
and finally another use for the thickness control: (keep in mind that along its height, the tree only has a certain number of segments, depending on your setings and target surface. any detail added to curves that are smaller than this "sampling rate" will be lost.)
-
one doesnt have to make the tips thin. for shots from far away it is advisable to make the tips thicker, so you dont have to oversample (multipass) so much to avoid scintilization in the render. this example is just proof that it works, not what you should do
-
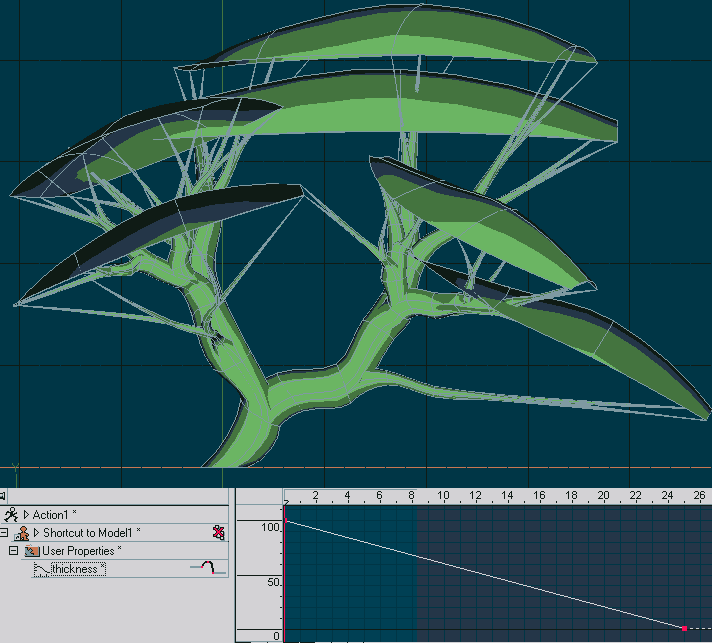
and one for thick trees:
-
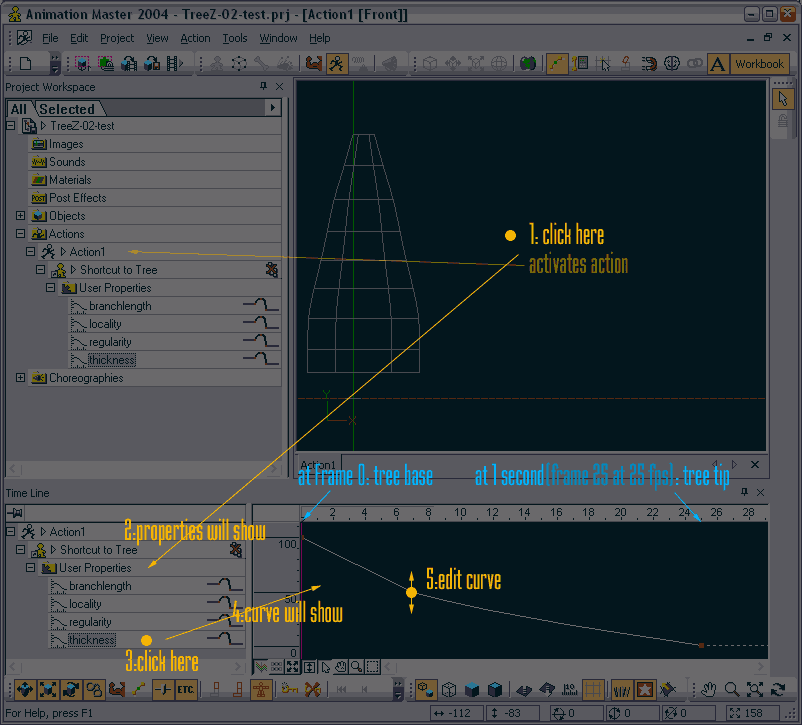
here a curve that produces thin trees:
-
ok, maybe some examples will clear up the use uf the control curves: first, the default curve for thickness: it goes from 100%(thick) to 0%(thin)
-
i will try. i suspect it probably has to do with the ids of the cps (of the base spline). since the example project has had some revisions, the cps might have mixed up numbering. you could try deleting the base and redrawing it in one go (so the cps get ascending ids). i think, this will probably align the patch images. if not, i might look into a generic solution that aligns all the patch images of a selected arbitrary mesh.
-
hmm .. how about going back "halfway" meaning not a flat pane, but only a part of a sphere some observations about this approach: - the real center of the spere would be farther back in his head - the eyes would better convey his original character - the conceived center would remain the same fot this kind of setup you could create a simple rig that works without surface constraints: - have a bone in the conceived center that aims at (constraint) the target null - this bone has a child called "tip" - have a bone in the real center this bone has the pupil cps assigned to it and aims at (constraint) "tip" (see attached project) eye_try.prj
-
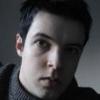
ok, here is a small tut on how to get to the curve (using the example file):
-
its easy to post a pic in the wip forum: when you are posting, there is a "File Attachments" section (right above the submit button. there you can choose a jpg file from your harddisk and it gets posted (posting may take a while since the file is being uploaded).
-
i'm still trying to figure out good parameters for the dragon.
-
where did you get this information from? (i'm asking since i think you have a:m for about a year) it doesnt do this anymore for quite some time now. the new implementation (introduced with 9.5 i think) is much more solid and does not pop anymore. so adjusting bias is great in any situation, since it keeps your spline density lower and your curves smoother.
-
and here is the new test project. TreeZ_02_test.prj