

Eric2575
-
Posts
2,615 -
Joined
-
Last visited
Content Type
Profiles
Forums
Events
Posts posted by Eric2575
-
-
Thanks again guys, both ideas will work and I will try them both to see which fits the bill better.
-
I've got a simple scene with a central object receiving reflections from a dome that has an HDRI image applied via a projection map. It renders very nicely, but I want to use an alpha channel to composite the object into another scene without the dome background. I tried tga output with the alpha channel enabled, but the resultant alpha is the whole tga, not just the central object. What am I missing here?
-
Well, that gives me quite a bit to play with, thanks guys.
-
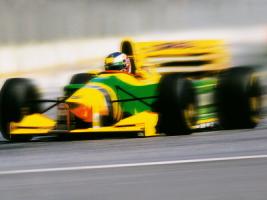
A long time ago I seem to remember a thread that talked about blurring an object in motion. The trick was to have the middle to back of the object blurred with a trail in it's wake, but the front of the object was not blurred. Imagine a car or plane or fist in motion with the leading edge in focus and blurring the image as it goes by. I hope I'm explaining this right? MUFOOF may have been used, but I don't recall. Does anyone remember how to do this? Here is a pic that shows what I mean: Front relatively in focus as the rear blurs out inot the blurry background.
-
Fake AO dome? I'd like to give that a try.
-
Wanted to add the tga.
-
Thank you both for looking into this with me. Off to work I go, but when I get back, I'll check out all of your suggestions.
-
To be honest, I forgot to turn multipass off this morning when I set the render. In any case, isn't it taking a bit too long for the hair to render?
-
No, the improvement isn't that drastic - initially 16 passes at one hour per pass, now 16 passes at 25 minutes per pass.
There must be something wrong somewhere - a render without hair averages about 6 minutes now, but the hair only render with an alpha channel just finished rendering after 7 hours and 35 minutes at 28:30 minutes per render for 16 passes. Here is the TGA of the vines that took so long.
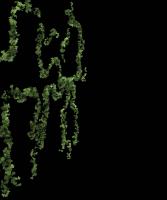
Is this normal? Btw, my computer is an Intel Core 2 Duo 6600 @ 2.40 GHz running Win XP SP2 with 2 GB of Ram running AM 15.0i.
Had to convert the TGA to a jpg for uploading.
-
Well, I exchanged the three sun lights with kliegs and made sure that only one of them cast z-buffered shadows. A 1000x750 render still took 20 minutes with hair enabled for a single frame. Without hair it took 6:24. That's quite an improvement for the hair render. I'll try rendering the hair out separately next. Also, maybe I should rethink my hair model?
-
Thanks guys, that will get me going again. First I'll change the suns to kliegs...
-
I'll have to check on that. I know I am using only three lights, all suns with only one casting shadows. It's an outdoor scene of an alley shot with IBL and the suns.
-
I have a scene with many objects in it that is taking about 7 minutes per frame to render without hair. When I enable hair to render, the time goes up to over an hour per frame. The density of the hair material isn't the problem, it's down to about 3%, it's the fact that there is a lot of hair in the scene. I created a vine running over most of one wall that is causing the slowdown. So now I'm thinking I could render the scene without hair and then render out the hair separately, then composite them together. I just don't know if this is possible, and if so, how to do it? I don't want to wait 16 passes at over an hour a piece to see that I will likely have to change something anyway. Thanks for any help on this.
Eric
-
I'm working on a scene that has quite a bit of hair in it. The hair is actually leaves, ivy that is hanging on a wall. Can I render that out separately, and what about the shadows the leaves cast on the wall?
Eric
-
Very nice, looks good.
-
Amiga 500, eh? Should have known you'd use a Big Boy computer

-
Nice progression, keep it up! Congratulations on your award. My first one was special too, no matter how many peeps entered


Eric
-
7 hours? Did you render that on a Commodore 64?
The Luminare is what I was curious about. How big was it and where did you place it?
Eric
-
Stian:
Your render and lighting is very nice. AO, right? How many passes and how long to render? Did you use an actual environment? Would you share a wire of your chor? I'd love to see the whole setup.
Eric
-
Well, at least we are all on the same page now
-
Hi Jason:
I'll render a couple of frames for you. Send the files to 3ddink at gmail dot com.
Eric
-
So the issue is still not resolved even with the cookie cut method. Darn.
-
I've read several post in which people were noticing that the emitters were not totally transparent when a scene was rendered. Well Nancy shared a little trick with me in one of my posts that I thought was good enough to share with everyone. Many of you may know this already, but some may not. If you want to make an emitter disappear, here's the trick: Make a small TGA image with a transparent background and an alpha channel for the whole image. When rendered in AM you should see nothing. Now take that TGA and apply it as an image to the emitter mesh you want to hide. Here is the kicker: in the image properties under the mesh shortcut, change the property from color to cookie cut. That's it. Now when you render the mesh, it will be completely invisible. Please note that I've only tried this with hair meshes, but I believe it should work on sprite emitters too.
Koodos go out to Nancy for this neat little trick.
Eric
-
Aha, cookie cut! Once again, you come through for me. That's a lot of splainin' Nancy. Thank you for that. Now it's all starting to make sense.
Eric


Model donation
in Off Topic
Posted
Hi Rodney:
This is basically a PM to you since I am not able to do it the normal way. I've been away from the forum for ... a long time, and thought that the models I spend so much time on are just wasting away on my hard drive. Maybe they can be used in creative ways by forum members? I can't believe Martin isn't back? Wow!
Anyway, if you would like them and if you are still accepting donations for the forum, you are welcome to them. As I recall, I have an almost completed Millennium Falcon, the Nautilus, the Batmobile, I believe an EVA pod, the original model I build with AM, a Saleen supercar, and maybe a couple of others I can't remember right now. Let me know, but only if AM is still going to continue, as well as the forum.
Sincerely
Eric
p.s. Let me know if you still have my email