

GAngus
-
Posts
260 -
Joined
-
Last visited
Content Type
Profiles
Forums
Events
Posts posted by GAngus
-
-
OK...
Firstly, I can't find that "back-facing" option location/selection....
where the heck is that ? I don't see it in prefs/options
Yes, perhaps the Camera was set a little too low, so I moved it up a pinch.
Then I just went and deleted all occurrences of "Ground".
I am pretty sure I had the visibility turned off for "shortcut to ground" and expected that to NOT be a problem, but perhaps it was ?
I also dumped the material, temporarily, to speed up the test render..
Thanks, for the helpful feedback.
I have much more of what I want now, and can proceed.
PS, John, yes, of course, in Cam View with the render attempt..
Thanks for that too. (BTW, Love your stuff)
I got it!Your camera is below the default ground plane model . All it is seeing is the underneath of the ground and all the ground has shining on it is a blue light.
the ground didn't show in your real-time view because you probably have "Show Back-facing patches" OFF in your options, and it would be backfacing to the camera if the camera was looking underneath it.
You had me going there. I thought I was crazy when the first render came out blue.
-
Just an experiment ... but
OK, I made a Dome model, and applied a material to it, I even applied a decal on to it and placed it in a Cho. with the camera positioned inside of it.
In the Cho., in Camera view, it seems like I have things set up all right but, when I do a render all I get is a blue color where the render should be.
I also tried setting the background color in the camera properties to other colors but that does not change anything either.
How can I get a rendered look of what the camera is pointing at ?
Just not obvious to me.
AM-14C
Thanks
-
Gerry I think there was 3 parts to it ,it must be in the tuts somewhere ,maybe a search will get it .I only have this part ,sorry
I was able to dig them out over here..
Seems to be 4 of them.. 1,2,3a, & 3b
-
Ahh, thanks a lot.
Kool looking dude.
The "Wav" didn't make it, probably make upload too big anyway.
-
Since the following were not available inside the "project" file you uploaded, A:M could not load the file for examination. I think they need to be "embedded" before, in order for the file to be useful.
solo.wav, simple skin.mat, rock2.mdl, ibanez.mdl, forum rock.act
Excellent.....Truly inspirational, especially when it comes to A:M animation projects that include sound.
Is there any possibility of sharing this project file with us ?
Even an abbreviated or short one, so we can perhaps learn something from it, as to how it is done ?
There seem to be very few examples in the forum that employ the use of sound (audio).
I know audio can create much larger file sizes but, those of us who like it, have to live with it but, probably will do just that.
Thanks
PS: doesn't hurt to ask. Right ?
Since you asked, here's the project.
-
Excellent.....
Truly inspirational, especially when it comes to A:M animation projects that include sound.
Is there any possibility of sharing this project file with us ?
Even an abbreviated or short one, so we can perhaps learn something from it, as to how it is done ?
There seem to be very few examples in the forum that employ the use of sound (audio).
I know audio can create much larger file sizes but, those of us who like it, have to live with it but, probably will do just that.
Thanks
PS: doesn't hurt to ask. Right ?
-
Well, I did it the hard way as perhaps "Master Chief" was trying to do it by, starting with the 32 patch sphere and using the delete key to eliminate 3/4 of of the original sphere first, then re-adjust the 1st Quad (peak 4 places and adjust the bias handles to get the proper proportions back) then copy/paste/rotate the new 3 quads (grouped them) and animated it in a Chor. in muscle mode, with each Quad.
Yes indeed, a little more tedious, but is able to be done that way.
Just one glitch, where some interior patches got created on each quad. (as you can see) but, with a more front camera angle view, they could be hidden from view.
A Fun challenge.
( did it in 14.0c)
-
Find a building you like and make a rotoscope of it.
draw out the shape then apply the rotoscope as a decal.
In the AM Libraries . . . in Models, there is a "buildings" folder.
In it are 4-5 sample building models, if you have not seen them.
They are good examples of how to get started with "mechanical" objects, as they are sometimes referred to as.
They are pretty plain, and not many decals there but, good basic structures.
Once you can understand the decal process, it's great to be able to just slap on pictures of say; bricks, wood, tiles... etc... or your own stuff
to create anything you want... onto the structure you have built.
It takes some fore-thought (planing) and will become a real project at first but, well worth the effort once you apply yourself to it.
-
I don't know if it will help any mac users here but...
I am running OSX 10.4.11 and A:M v13.0t still works fine.
I use it (13), once in a while, when I see a project or model file created in that version.
I have the 15.0d subscription also, and that's even better.
GAngus
I have V14 but haven't installed it yet as I've been dealing with all sorts of other problems. Does it and V15 run with OSX 10:46 as well or, does it need another upgrade from that ?
Thank you for your observations and help.
regards
simon
Yes, 14.0d and especially 15.0d (seems-faster, all around) runs just fine here with OSX 10.4.11.
C' mon up !
-
digitalnumbers.prjHere's an old project file by Vern (heyvern-here) that does the digital clock thing using a pose !!
Very unique solution, indeed.
It was done in vers. 10.5 and dates back to 2004 but loaded OK here in 13.0t
Just in case it may be helpful to you.
-
-
I would just like to add a small foot-note to this wonderful tutorial, for the MAC users out there.
Where Rob says use "Control-select" numerous bones to create key frames at the beginning of an animation, on a MAC this would translate to "Command-select" (key with the apple on it) on the Mac keyboard. Using the Control key on the mac essentially, only turns a left-mouse-click into a right-mouse-click. (Useful for single click mice users.)
I'm sure many Mac users know this already but for the newby types this can be a source of frustration.
I don't mean to up-stage here, I just recall stumbling over this a while ago on my Mac.
BTW, I think Rob's whole series of key-framing tut's have been absolutely phenomenal in helping new animators to get better at key framing.
Thanks, Rob for another biggie !!
-
Wow, what a great example of using constraints !
Absolutely masterful use in the control of so many things going on and
the timing is so convincing.
Really great animation short.
We want more !
What a great specimen for a nice juicy tutorial, wink, nudge.
Or at the least, some of the prj file ?
thanks, either way.
A real treat, seeing what can be done here.
-
IT's ALIVE ! ! ! ! ! ! !
This has come along Great !
Can't wait to give him a try.
-
OK, I held back for a while with this but perhaps it's time for (hopefully) a laugh or two.
I got this in a batch mailing and it does not necessarily represent any political views I hold and I don't intend any disrespect either.
I just thought it was a bit funny.

-
Just so we are all on the same page here, from the Tech manual,
"The control point that will form a hook is attached to the center of a spline just as it would be attached to another control point. Hold the control point to be hooked over the center of a spline, and with the left mouse button down, right-click (on a Mac, press the key on the keyboard, called a tilde)."
So, dragging a CP over to the middle of another spline and doing a right-click will produce a "Hook".
To change the bias of a spline, click this button at the top.
When you click on a spline near the control point, that will show the bias manipulators, which you can change.
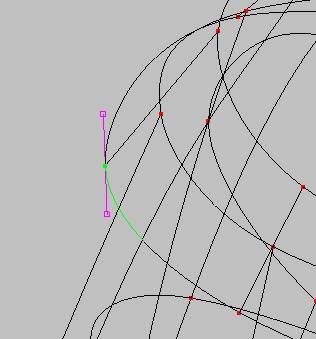
(I hope that was what you are after
 )
) -
Worked just fine here, Mac G4, Safari...
WOW !!!!!
Thanks to All.
Can't wait to dig into this...
-
Would just like to add this too.
There is So ! much really in the TaoA:M book.
Going through and doing each and every one of those exercises is so important.
Perhaps even do them over 2-3 times, you'll understand better each time.
Each one has a few more elements that will add up and guide you on the quest here.
Here's another idea which can help, if you are so inclined.
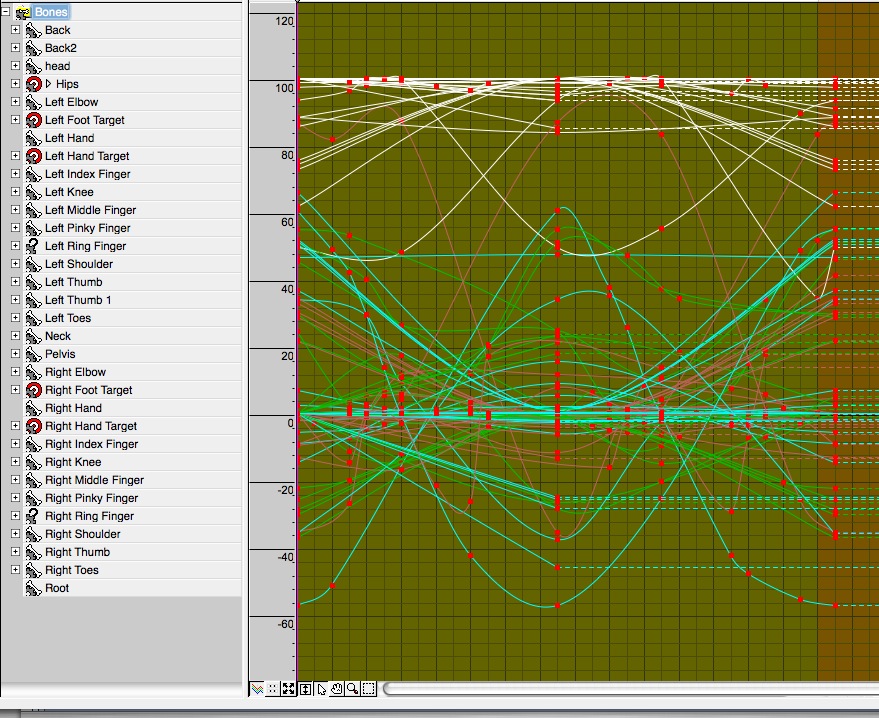
Get a model loaded up, and apply one of the many Action files to it and just SEE how the animation is done.
Follow each bones movement in time line, and actually SEE the key frames and how the smoothness happens.
Smooth curves create smooth animation.
I find myself often going in there and am actually able to move some of the points and correct things.
Here's a pic of the "Run" action. Experiment, analyze, it's free.

-
Hey, nice project, great "concept" here, very inspirational, thanks for sharing.
-
Hey Rob,
OK, here's what I did...
I slowed the whole thing down again, a little.
I did another pass and shifted his knees/feet forward as he presses into the hand stand and the balance looks a little better, I think.
I may even have the knees too scrunched up into his chest now, i'll probably work on it some more there.
I also introduced some side to side movement as his hands take the weight of each step.
What do you think ?
here's the proj. too
PS. Jeetman, MasterFunk, some how it reverted back to that On2 Codec again.
I changed it again, hope it plays OK now, sorry bout that.
-
A walk/hand cycle ??
That's a challenging motion to do. One thing I think would give more weight to it is to make sure his body mass is centered over his hands while he's pushing himself up. If he had rolled into that handstand quickly his momentum might plausibly be carrying him forward, but he's gone into it so carefully that that doesn't look the case.
I also think there's opportunity to bend his spine when he leans forward and when he is pushing his legs up. That woudl loosen him up and help show more effort in what he is doing.
good start though.
Yes, crits well taken, Rob
As seen in a side render, there's really lots of room for improvement.
Especially, concerning his Center of Gravity.
During the walk he even wavers a bit too in the Z.
It was a challenge indeed, for nooby me especially.
Actually, I had first tried doing it by blocking in the model bone 1st, and then doing the in-be-tweens, but what a disaster that was, so I re-did it all over, leaving the model bone alone.
Some re-editing is in progress. I Will post back soon when I can improve on this.
thanks
-
HA - HA - HA...
That's a Riot . . ..
I Love It
-
Thanks, I must have changed some lighting keys.
Now it's too dark.
Here's my latest WIP.
It's Barry Zundels "Will" model which was on his tutorial CD..
A walk/hand cycle ??
-
George, Bruce,
What great examples of how I could add that squash-stretch thing to the Rabbit as he comes out of the hat.. Thanks for taking the time there. I studied them well and was able to incorporate the concept into the clip as much as I could and it definitely adds some more interest to the gag.
I've continued going over all the frames/bones and smoothing things out again, and have made an attempt at the boing thing as the rabbit exits the hat as you will see.
As it turned out, I had to squeeze it in there (as much as I could) without having to re-key the Knights whole arm movement, so it's not as noticeable as it could have been. I'm surprised a little that I actually pulled it off as little as I did.
I hope I can just do a restart on the whole project soon and make it even better. Get some Bows in there (Re: Rodney), and dress up the scene a bit in general. Oh, and get the magic wand into the act also. Perhaps, have knight first tap the hat to produce the magic spell.
thanks again
Gerald
Onward !!! I'm on roll here....


CGI dollar bill
in Work In Progress / Sweatbox
Posted
Any way to make a "Quick Buck" is OK . . . . . I guess.....
Be Careful, Big brother may be be watching.....
Just kidding
Very cool creation.
Quite Incredible !!!!