


JavierP
-
Posts
191 -
Joined
-
Last visited
Content Type
Profiles
Forums
Events
Posts posted by JavierP
-
-
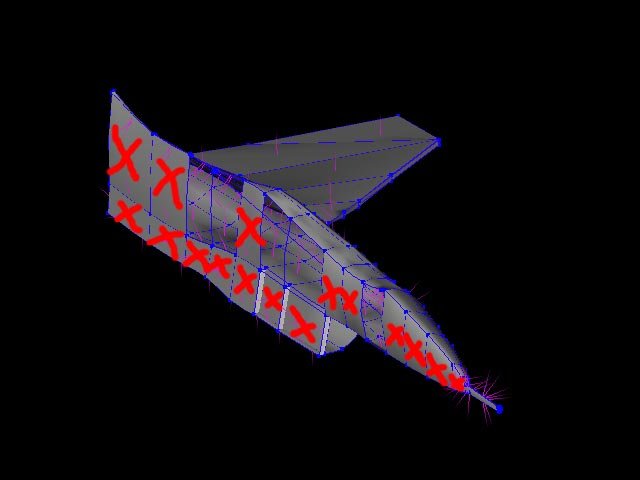
Somebody please post examples of models they'd like to Copy/Flip/Attach.
Simple ones... complex... the more the better.
I think we can kill this one dead if we run it through its paces and nail down the process.
Copy/Flip/Attach won't always work due to mesh layouts but it works a whole lot better than its being described here.
With some examples I think it'll be pretty easy to demonstrate.
Ok I dont understand what you are talking about with this mesh thing so, uhm, anyhow, here are a few views of what I am doing in addition to trying the setting the X to 0 thing. Ok what you see is the plane half then a front view and a left view. Next is changing the X to zero before and after pics.
Your problems stem from the fact that you have patches connecting the top and bottom of your center spline. Break the connecting splines, so that the center of the plane will be "hollow" when it is Copy/Flip/Attached. It should work correctly. Hope this idea helps.
Javier
-
Javier. I liked your painting, but achieving that dark background becomes hard with reflections. The darker the scene the darker Tinman gets. The only way to brighten him is to tone down reflection which makes him look less metallic. I did like the colors in the picture though and I'll try to put that in with lighting.
Here is how I would approach this:
Tin Woodman being reflective, will reflect whatever is in its environment. What is back to him will take less surface on his body than what is in front. In order to achieve Javier look, I would place blue lights to light the background but brighter and warmer light to light that part of the environment in front of him that we don't see in the shot but that will be reflected off Tin Woodman body. And then the chair, which is bright and warmly lit would produce a warm fringe of reflection on the outside silhouette of Tin Woodman.
Colin, really I just wanted to suggest injecting some more color in the shot, to make it more "juicy"

The idea Yves came up with would probably work. How are you lighting the scene? Are you using stage lighting, like a movie set? Or are you using the actual "lights" in the room to illuminate the scene?
Javier
-
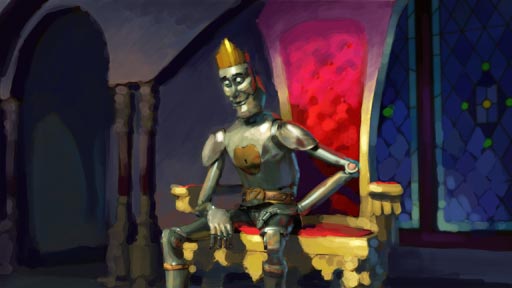
Heres the latest with the velvet fixed and the windows fixed. I'll end up adding modelled buttons on the chair back but for now this is good enough.
[attachmentid=22064]
Hi Colin,
Great work so far. However I think your compositon could use more color "depth" and contrasts (warm against cool). Right now everything looks warmish and evenly lit. Also right now your major accent is on the throne and not the tinman. Please excuse the overpaint, but its the best way I know to explain what I mean. I tried to push the idea of a nighttime setting also, I think it helps separate the background from the tinman a little better. Just a thought. Keep up the good work!
Javier
[attachmentid=22098]

-
lol. ya the neck is a bit long. reminds me of nefrititi.
Funny, that's the scupture I was thinking of when I made her. That bust really is a masterpiece.
Javier
-
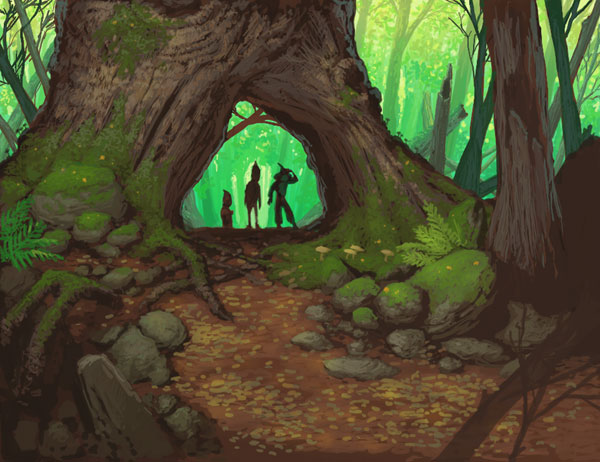
Hi,
I started this thread to collect conceptual images that explore the 'looks' of the various scenes in the TWO movie. I'll be using Bob's storyboard sketches as a starting point for the images. Hopefully they can serve some purpose as inspirations for set design and mood in the movie.
Javier
First up is the sketch: Landscape 4
[attachmentid=12957]
Next is the scene: Act 2 Big tree
[attachmentid=12978]

-
Hey Rodney,
Yeah I kinda had to duck out there for a minute to handle so things in the "real" world, but I'm getting back on track now. I'm tring to get back into the grove. I think I'll have to uprade finally to v12 or 13, or whatever the new one is now
. I'll send the model right over. Is there any particular e-mail address you prefer that I use?
Javier
Here are some wireframes, for anyone that's interested.
[attachmentid=12919][attachmentid=12920]

-
Hey Rodney
So I wonder if you even remember this little projet. You probably already have your own version done by now anyway, but I thought I'd throw mine out there. She's not finished, mind you, but I haven't had time to work on this kind of thing in a looong time. So here you go:
[attachmentid=12908][attachmentid=12909]
Maybe you can finish up the bits and pieces (armor, rocket boots etc.)Let me know what you think, and I'll mail the .mdl to you.
Javier
-
Hi Rodney,
Thanks! I think I have a model for you. She's not actually finished, but I hope what's done is of some use. I'll post some images in the wip section and send you the model.
Hi David,
I don't want to highjack
 Paul's thread here so, I'm sending you a private message. Thanks
Javier
-
-
Hi Paul,
I haven't posted in the forums in a long time, so I hope I'm not being too forward with this. I have just gotten a chance to start using AM again and I ran into this whole movie project right in the middle. There are great models everywhere and a lot of good work all over the place. So I thought I would try to give what help I could. I noticed, like you, that the sets weren't getting too much attention (at least I didn't see many clear examples on on the website). So I thought I'd try my hand at making some inspirational artwork for set designs. I just finished the sketch of landscape 4, hope it can be of some help. The sketch was somewhat fuzzy so I just took the idea and ran with it.
Javier

-
No luck getting there. The page supposedly is missing, so I tried to find in on the site...still no luck. Anywhere else we can catch it (no pun intended)?
I took that clip down already. If you reeeally want to see it I can put it back up, but otherwise, I don't think I'll put it back up.
Javier
-
Well I'm up late, so I decided to post this image. A while back I had posted a wip related to this image that looked like dark beer. I think I worked out some of the issues though
 Enjoy
Enjoy
Image info:
6 separate objects
Mostly procedural (except for text decal) using native combiners
blobby emitter for water droplets and bubbles
3 lights( with NO shadows!)
Javier
-
I'm trying to morph one character into another (kind of like a Hulk transformation). I'd like the character to move and change expressions while I do the morph and then animate the final "morphed"character. I would like to have the stages of the morph occur at different times (face morphs, arms morph, chest morphs, etc.) The problem I'm having is that the bones don't scale and move when the morphs occur, so it is difficult to control the character in one or the other setting. I've thought of building a second model of the morphed character, but this is easier said than done, since you can't copy and paste a "posed" version of your character as a new "base" model. Any ideas on how to deal with this?
You can morph characters in AM. Here is a little test I did a while back that shows what can be done.
MORPH: Quicktime mov, 139kb, sorenson
I can post an explanation as to how it was done later, if you are interested. What is important to remember here is that you need to know exactly what your shots are going to look like, as well as lighting, duration of scene, etc. Just having a nebulous idea of what you want to accomplish is not enough. This is where storyboards and animatics really come in helpful. Gotta get back to work now <_>
Javier
-
Hi Adam,
I believe the effect you want is illustrated in my example pic.

While Paul's answer is informative, it is a little to complicated. In my example, all I did was to make the camera background a medium blue color, then checked the glow background checkbox in the camera properties tab, that's it! You could also make a flat plane and assign a glowing material to it to get the color if you need the bg color to be something else. Hope this helps.
Javier
-
What does your alpha channel look like? I have a feeling that is what your problem is. Can you oost a pic of just the alpha?
Javier
-
Hi Pengy,
Just a couple quick suggestions before you move on to the other model; did you decal the labe directly onto the bottle? IF you did, then that is why it is becoming transparent in the render. After all it is an image applied to an already transparent model. To fix your problem, all you have to do is make some new patches and place them where the label would be and apply the decal to the new group with no transparency. The alpha channel will make sure that the label will be the right shape, and it will be opaque like a real label.
My second suggestion would be to get rid of that 'default' lighting. Even if it is just one kleig shining on the bottle it would be a good start. Complex lighting always starts with one light, and grows one light at a time
. Hope this helps.Javier
-
Hi Pengy,
I recieved your message, but I decided to reply here so that anyone else that is interested can read the answer also. You asked if the liquor image I made used AM native materials.
Actually, all the surfaces in that image are procedural, with the exception of the text on the label. The text is just an image with an alpha channel. It is important to note that at least 85% of the effect in that image is due to the lighting setup. For example I think that I had at least 4 lights shining on the liquid itself, controlled by light lists. I think that there are about 16 or so lights in the whole choreography altogether, with many lists. Intensities range from anywhere between 1500 and 10 depending on what I was using it for. It is really difficult to give you a short answer to your question, without writing a comprehensive tutorial, and unfortunately I don't have the time to do that. However, if you have any specific questions feel free to ask.
Javier
-
Alright,
Here's the first (hopefully of many) pics. This is a couple hours in, begining with the face.
Javier

-
Hi Rodney,
I haven't done much either, I did start on the face, but I'm not far enough along to show anything yet. I think by tomorrow I'll post a pic.
Are you planning to make a tutorial book/let based on this little experiment?
Javier
-
When you add a light to a model, and embed it in the model file, the light 'replaces' the default light. You see, when there are no lights in the model, AM basically puts an 'imaginary' light at the exact position of the 'camera' that you are looking through to see the model. By placing a new light in the model you are basically changing the source of the default illumination. I don't know if this is supposed to happen or not, but that is the way it has worked for me. As a side note: I wouldn't embed lights in a model, because it limits what can be done with the light in terms of light lists and having objects cast shadows or not.
I'm not sure what's going on in your chor situation.
Hope this helps.
Javier
-
Just model one cell, then copy and paste the rest into the modelling window, and there you have it. Unless you meant what is the best way to form the shape of the honeycomb itself.....
Javier
-
That's pretty good work! The only thing that doesn't seem to 'fit' is that initial gesture when he says "no one would have known". I tried to act that out myself and it felt very un-natural. Somehow having the hands outstretched like that doesn't convey the feeling I'm getting from the words. Also, I think that the way he brings his hands down after the gesture, then brings one back up a little later for another gesture, adds to the 'awkwardness'. Perhaps you could do some more with his fingers to strengthen the poses; you know have them contort in a sinister fashion or something. In any event, it is very good after only a few passes.
Javier
-
Morph Targets are basically the same as poses in AM. In other packages, you have to define morph targets for something like facial expressions. Thinks like smile, frown, wide open mouth etc. are defined with morph targets. Morph targets are created and manipulated differently in the various other packages. So to sum it up: in AM you can do the same with poses.
Javier
-
I did notice they weren't on the exactly on the flip axis after. So I repositioned them and tried it again. Still no joy. I eventually got it to work by rotating the object and flipping on the XY axis. There doesn't seem to be any rhyme or reason to it.

Well, without being able to actually see what you are doing, I can't offer any more tips. It seems very strange to me though. CFA has worked for me every time as long as I set it up the right way, and I've only had problem with what axis it uses when I don't select the spline 'right'. Do you have 'show bais handles' turned ON? This will help you to see in which direction the selected spline 'runs' and lets you know how CFA will react.
Javier


Sprite Smoke- two questions?
in A:M Rendering
Posted
Hi,
I have not posted on this forum in a while, but your question reminded me of some tests I had done a long time ago.
The effect you want can be achieved, but it would take a bit of work to animate it properly. Nothing really fancy, just a model with materials controlling displacement, color and transparency. The addition of streak particle emitters and a little blurring finishes the effect. It would probably be better to render the smoke separately and then composite to really control the softness. Hope this helps.