Visping
-
Posts
46 -
Joined
-
Last visited
Content Type
Profiles
Forums
Events
Everything posted by Visping
-
Sure is. He's a busy man these days so go easy on him. I will wait and see if I need to Contact Steffen. I got good answers from Mark and Robert. This may be all the information I will need.
-
This sounds interresting... How do you change the pose values when rotating a bone?
-
Thank you for the clear explanation of the values :-) I changed to Euler and after that it was easy to grasp what was happening. I think this is actually going to work. Now I have got some programming and mechanical work to do.
-
I searched for him on the A:M forum and on the Internet but couldn´t find any Contact information. Is he still Active?
-
I´ll do that
-
Not really a robot, what I have in mind is more humanlike. Animatronics are often used in movies special effects. My Project is much more modest. My first goal is to make a proof of concept and if possible the go from there one step at a time. Yes I did open some action files and it depends on what I have animated how difficult it gets. A percentage pose slider is really easy but when it comes to rotating a bone it gets complicated, at least for me. This example is a simple pose slider with a value of 15% at frame 8 and a value of 97% at frame 12 MatchName=User Properties MatchName=Pose1 1 0 0 1 9.2700 15 1 14.1800 97 And this is a bone at different rotations (somewhat random in this example) in frames 0,1,2,3,6 (In frame 1 I changed the x rotation 90 degrees and in frame 2 the y rotation 90 degrees etc...) MatchName=Bone1 MatchName=Transform MatchName=Rotate ParentToBone=0 0 0 1 MatchName=X 1 0 0 1 1.900 70.7107 1 2.1800 50 1 3.2700 70.7107 1 6 66.1401 MatchName=Y 1 0 0 1 1.900 0 1 2.1800 50 1 3.2700 0 1 6 -73.8962 MatchName=Z 1 0 0 1 1.900 0 1 2.1800 50 1 3.2700 0 1 6 0 MatchName=W 1 0 100 1 1.900 70.7107 1 2.1800 50 1 3.2700 70.7107 1 6 12.8391 MatchName=Translate MatchName=X 1 0 0 1 9.2700 -9.24234 MatchName=Y 1 0 0 1 9.2700 0 MatchName=Z 1 0 0 1 9.2700 8.92522 What I really need to derive from the action file is the angle of the bones. The aim is to translate the bone angle into a RC servo angle. So for example when a bone is rotated 20 degrees in one axis it will make a servo rotate 20 degrees in the same axis. I will use individual servos for x, y and z rotations. As can be seen it is not just the angles (rotation values) for the bone that is presented. I guess I will be needing some kind of mathematical formula to figure out the angles of the bone. How do I interpret a line like this?: 1 1.900 70.7107 1: Seems like a fixed number...? 1.900: This should be the time in some format 70.7107: The actual value, but exactly what does it stand for?
-
I would like to test if it is possible to animate a model in Animation Master and then use the action file to control an animatronic version of the model in the real World. I wonder if there is any documentation about the contents of the Animation Master action files? It would be more efficient to read a specification instead of just guessing and testing... (The idea is to translate the pose values into commands to Control servos in an Arduino setup.)
-
OK, I learn something new everyday, thanks!
-
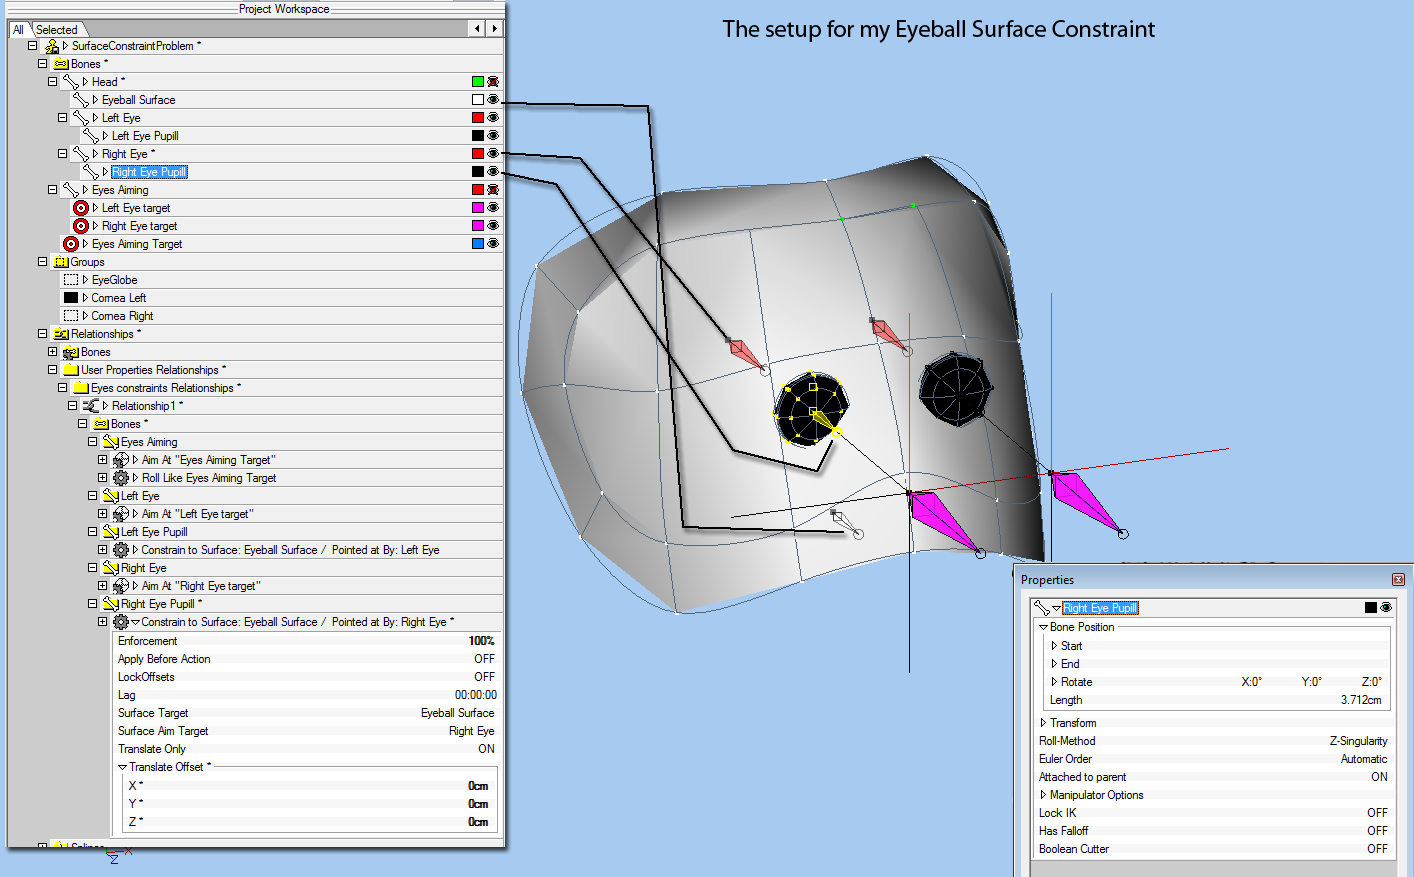
Yes after reading the reference guide again I understand that the Translate Only works exactly as I should. I missunderstood this. But since the offsets by some reason was automatically set to other than 0 the symptoms made me confused. The reference guide isn´t that easy to read as english is not my first language So it was my misstake mixing up the values for Translate only. But still it seems to be a problem with the offsets when creating the constraints. I wish it was described as you put it when I read about it in the reference guide... Well, my problem is solved, but if it can help anybody else with a similar problem I will post two models. One with the problem and one after the problem has been solved. SurfaceConstraintProblem.mdl SurfaceConstraintProblemSolved.mdl Thanks everybody who took your time to help me out!
-
YESSS! Now I got it working. I needed to do this: 1: I deleted the offsets that was automatically (wrongfully) created by setting them all to 0 exept for the x rotation offset that I had to set to -180 2: I set the Tanslate Only to OFF (Allthough it should be set to ON according to the documentation) Thank you very much for helping me solve this mystery. I will file a bug report so it can be fixed.
-
To make sure I didn´t miss the Compensate mode button I deleted the constraint to redo a new constraint. (When editing the relationship the Compensate mode button initially is OFF....) I select the bone to constraint. At the moment i get the Eyedropper to select the "Surface target" it is automatically turned ON. I then I clicked the Compensate mode button so it is OFF before selecting the "Surface target" with the eyedropper. So far so good. Next I want to select the "Surface aim target" from the properties combo box. Of all the bones I have to choose from, the only one that is not present is the one I need to select. --- I then tried to move the constrained bone so it was no longer a child of the "surface aim target bone". Now it was pickable in the combo box. But now the bone didn´t follow at all...... So I put the constrained bone back in the hierarchy and it worked again (minus the orientation to normals) --- So I really don´t know where I stand at this moment. Could it be a bug in AM?
-
Hello, My name is stefan Jönsson and I come from Sweden. I first started using Animation Master in 2000. Just a few months after that I got a new work and moved with my family. I worked as a fire officer and now I started working at the fire services agency. At the agency I started working with software development as a project manager and interaction designer. As I always have been interested in drawing, illustrations and film I usually was asked to help out when someone in my division needed some artwork. I did posters, icons, animations etc. Time was in short supply and Animation Master fell into oblivion. The software I use at work is mostly Xara, Photoshop, Macromedia director, Corel draw, 3Ds max, Microsoft Visual Studio and Blend. I was on my way to take up another old interest, stop motion animation, when I rediscovered Animation Master. When I got version 17.0 about a month ago I was a bit stunned. The software hadn´t changed as much as I had expected. I actually could use my old pocket-reference guide to find my way again. Don´t get me wrong; I think it is a good thing that the software is so recognizable after 13 years. Why change a winning concept? I had a good start watching William Suttons Patchmodeling tutorial on U-tube and I also realized what a good asset the forum is. I have allready posted a few questions and I am impressed by the good quality and fast feedback. This time I am here to stay using AM! My aim for the nearest future is to get a better understanding for Relationships and constraints. In the future I want to learn more about expression, which seems powerful.
-
Thank you for the tip. I will have that as a backup plan. However, I am so close to a solution that I'm not ready to give up yet. It says in the reference guide that it is possible to do what I want. I just need to find out what little detail I am missing. From the AM reference guide page 162: "Translate Only Default: OFF. Normally the surface constraint positions the object to be on the surface and aligns it in the direction of the surface normal as well. To simply translate it to the surface, but not orient it on the surface, turn this property ON."
-
You were right, the tutorial Tutorials\Bootcamp\Eyetut.htm do not cover the Surface constraints problem. The tutorial covers how to make one eye sqashed. In my case both eyes share the same eyeball and I need the pupils t slide on the surface thus enabeling me to slide both pupils to same side and squinting etc... However on the ExtrasDVD I found the model Mikkemusse (ExtrasData\Models\Actors\Cartoon\MikkeMusse) that seem to use the tecnique I am going for. I.E. a separate pupil sliding along an eyeglobe. The rig for Mikkemusse is quite advanced and the names of most bones is in macedonian (!) witch is hard for a swede like me to understand. I have tried to dissect the Mikkemusses Relationships to see if I could get some clarity in this. But I have failed to find any relationship using Surface constraint. Maybe it is a completeley different tecnique used... Still my problem remains, how to get the constrained bone to orient like the surface normals?
-
Thank you for the tips. I have the Extras DVD so I will see if I can see how it is done there
-
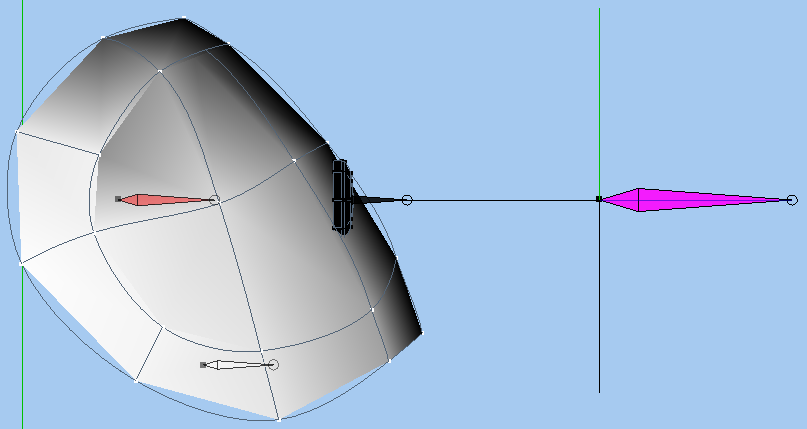
I am trying to use the Surface constraint to make pupils move on an irregular eye. I have got everything working exept for one detail: I can´t make the pupils align in the direction of the surface normals. As I understand it, the Property Translate only is the one controlling this. I have set it to ON but it still does´t behave as I want. I have tried to change all of the properties I could find, both for the constraints and for the bones I use. I also made sure that the normals were pointing outwards. I have run out of ideas... what am I missing here? This is the current alignment of the bone that controls the pupil mesh. Note that it is pointing in the same direction as the aiming bone. This is the desired alignment of the bone that controls the pupil mesh. Note that it is pointing in the same direction as the surface mesh normals. This is my setup for the surface constraint.

-
Aah, found it
-
in the model window and do New>Pose>On/Off in this Pose you can create new constraints and the Pose is saved as part of the model. First... after you select the Aim at Constraint turn OFF the Compensate Mode Button See if that solves your problem. 1. Now I understand that all constraints in a model must be contained in poses 2. I couldn't find any button for Compensate mode.... But when looking for a property that is controlled by that button, I found out that the LockOffsets must be turned ON. It was OFF in my case and that made it not work... Both my problems are solved! Thank you very much. These advises are gold woth for a rookie like me Stefan
-
I am struggling to learn about constraints. I want to make eye bones aim at a null target, but I have two problems: 1. How should I do to add a constraint to a bone? I can only add a constraint in choreography. But as I want the constraint to be saved with the model I don't think this is the way to go. The reference guide explains features of different constraints but don't say how to add a constraint... So the question is: How do I add a constraint to a bone that will be saved with my model? 2. When adding an Aim at-constraint to the eye bone in choreography mode it will not work unless I move the Eye bone from the head in the bone hierarchy. The bone wouldn't Aim at my target but the scale to reach worked....
-
Thank you Rodney, this was very educational. Now I understand what I am doing when lathing /Stefan
-
Now I finally found out what the problem was: I pressed , (comma) to select the whole spline before lathe and the got the unexpected result. If I instead just click once anywhere on the spline I can lathe with the expected result Thank you for your reply! Best regards Stefan
-
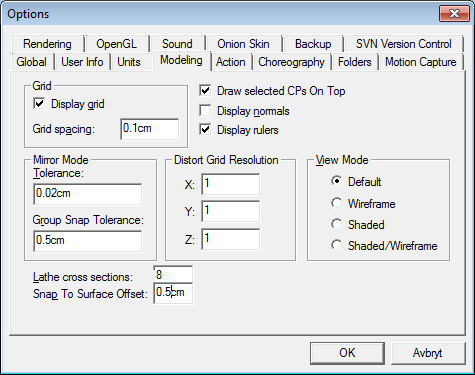
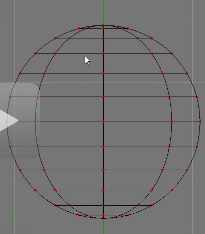
I am following a tutorial how to model an eye. When it comes to the Lathe-tool I run into trouble as it does not behave as i expect. It does not lathe with the end-CPs in center. It seems to lathe round the spline-center instead.... I have tried to alter properties, SHIFT-clicking on different CPs before lathing etc. I can see three reasons: 1: I am a bit stupid not understanding the obvious... 2: The Lathe-tool is not intuitive enough 3: There is a bug in Animation Master 17.0d I am hoping for the first and that someone can tell me what I am doing wrong. This is my spline before lathe: This is after doing lathing. Why will it not produce a perfect sphere? These are my properties: This is the result I expected: