


StormedFX
-
Posts
190 -
Joined
-
Last visited
Content Type
Profiles
Forums
Events
Posts posted by StormedFX
-
-
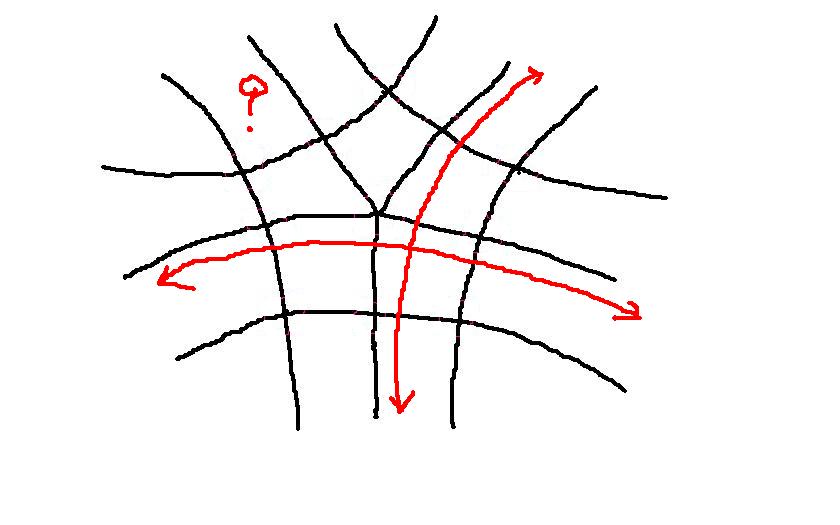
If you need to preserve the number of splines you could use hooks further down.
-vern
This will do the trick where I still have ways to control detail inside. Thank you and cheers!
-
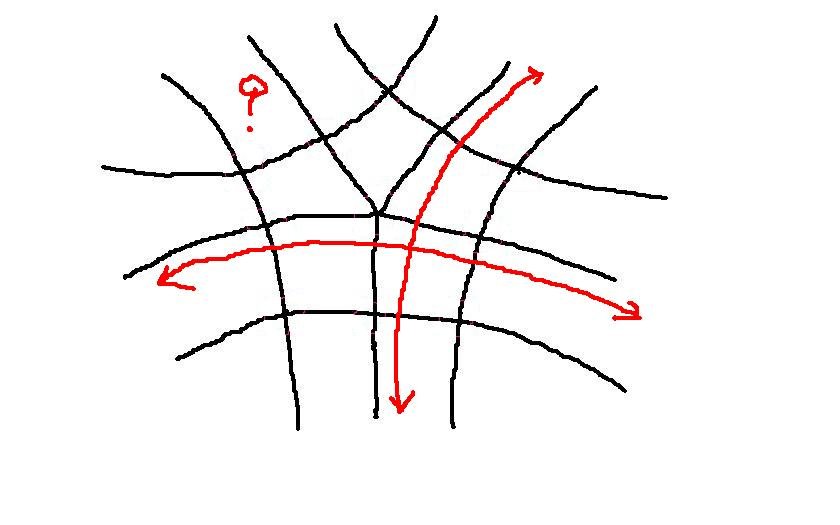
Technically, you can connect them like that, but the "?" spline really needs to be taken out and terminated somewhere else.
That works pretty well. Thank you and cheers!
-
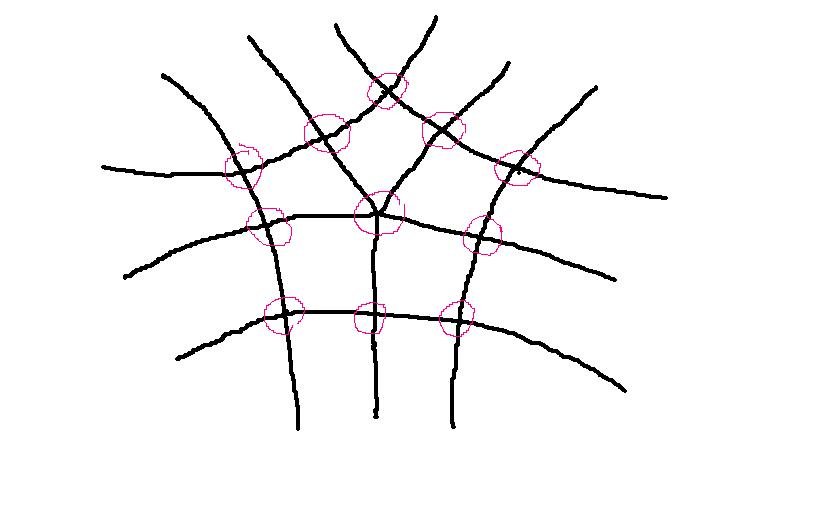
All the patches will render but you will get a nasty point where the 5 come together.
YEP! I tried it, and it looks nasty. Thank you and cheers!
-
she is beautiful! the model you made looks pretty good too.... but it is still too many splines for what the model is.
Might be a pain if you plan to animate.
Mike Fitz
www.3dartz.com
YESSSSS!!!! She is beautiful...
 I am still planning to reduce her splines to 60% which I think it can be done... Her face contour and shape will be lost If I have to reduce more than that... but will try my best... I will rig her face by following Caroline's rig thread... I learn a lot by just reading her rig thread... thank you again for all comments. Will keep update to the final...
CHEERS!
-
How many models have you done with Animation Master? I am truely impressed with what you are doing with this model. Your sculpting experience is really paying off. You can render with wires in the advanced render options. Instead of "final", choose "shaded/wireframe."
Thank you! I need to see those splines in the render so I can see which splines can be removed without affecting the contour and the shape of her face too much. Also, I can see which CPs to fine tune. This is my second spline model which I have work with AM. The first one is just something simple for me to learn how splines and CPs work together. Thank you for your comment.
CHEERS!
-
That's looking really good.
Thank you, Caroline. I will leave her texture the last and will work on reducing her splines to 60%, and I will work on the rest of her head. I have been reading your rig thread and that will help me a lot to rig her face. Thank you for your comment. Will keep update.
CHEERS!
-
Here is my WIP update... there are still some areas need to be tuned. Just one quick question.
How can I render with lines so I can see at which CPs exactly to be tuned?
CHEERS!
Still quite many Splines... but you handled them well.

*Fuchur*
YES! Still too many splines, and I am still planning to reduce to about 60% which I think the best I can do to keep her face contour and shape... Thank you for comment.
CHEERS!
-
Here is my WIP update... there are still some areas need to be tuned. Just one quick question.
How can I render with lines so I can see at which CPs exactly to be tuned?
CHEERS!

-
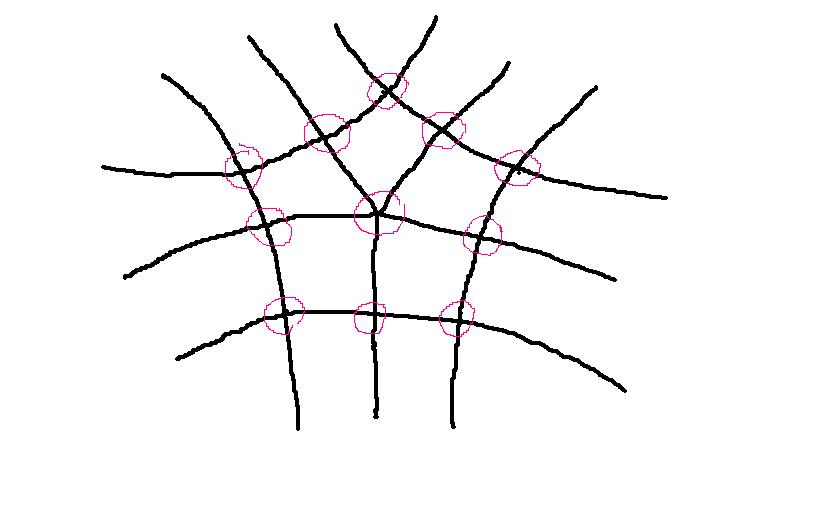
One thing for sure after a quick thought about it...
One of the splines will be discontinued.
-
I have a question about this splines whether or not it will work, and if there will be any issue during an animatiion.
CHEERS!
-
Looks good! Is the boat supposed to react to the wave? It looks to me like the boat is running on a flat surface at the same time the wave is going U&D... I think it would look best if the boat does react to the wave form.
CHEERS!
-
Porceilan will work without any settings on your site. Just drag and drop the material on the model or group you want to be smoothed out.
The *.lib-file containts the informations you are asking for. It will NOT read a folder but will only show what was activly added to the lib.
In that way you can control by yourself what is shown and what is not.
The newer materials may not be in the library, because they where added recently.
To get them all into your lib you can either add them by the way ken told you, or you can create a liberary-file yourself with a texteditor.
Go to your hash-install-folder and into "libraries". There you will find a file called "Hash Installed Librarys".
Open it with Notepad or another text-editor (i wouldnt use word! It should be one dedicated to programming).
As you can see there, a library-file is only containing of the type and a filepath relativ to your hash-install-folder.
For example:
"[TUTORIAL]
FileName=../Html Tutorials/Hello.tut
[ENDTUTORIAL]"
So if you want to, you can write it yourself. Or someone who knows vb-script or something like that could write a small programm which could include whole folders.
*Fuchur*
That all makes sense. I remember when I first installed AM, I download the "data.zip", unziped it, d&d all folders from the unzip in the "data" folder where AM is installed, and all folders were there without any issue. BTW, thank you all for the response. I think I will do what Ken has suggested for the now, so I can move on.
CHEEERS!
-
Still not too late for Eric to change his mind...

-
I can get those shorcuts to show in my "Geometry" folder, but they just dont look right to me when I open them comparing to those in the "Fabric" folder as you can see from the picture.
CHEERS!

-
I know a slow way.....
If you right click in the material library and select New>shortcut, then you can browse to your missing materials to make a shortcut to them in your library. Also, you can make a new folder first and do it in there.
I'm not sure why it doesn't just see all the files it's directed to.
YESSSSSS!!!! It works.... Thank you, Ken...
 One quick question.
Does the porcelain have preset values or I have to tweak them myself?
The reason I asked because I dont see anything get set when I opened it.
CHEERS!
-
Maybe I'm just tired but I am not catching on to what you are asking. Still I'll take a stab... if you are somehow comparing your Windows File Explorer window to the AM library, they are not the same thing; Windows File Explorer looks at what's on your disk while the AM library gets its information from a .lib file and not directly from what's on your disk drive (make sense?).
Hope that helps.
Rusty
YES! It does make sense. I have tried so many different ways trying to get all folders shown up in the Materials folder but no luck. I did not have this problem in the previous version of AM but this latest update. I even tried in the option and pointed it to where my data folder is but still not work. All I need is to get the porcelain material so I can apply it to my WIP to fine tune. Are all these material preset or I still have to tweak those values myself? I even tried to import the porcelain material from the geometry folder, and I didnt see any preset values, so I asked. Thank you for your response tho.
CHEERS!
-
Sorry! I am stucked with my WIP... mat be next time... Here is one of creatures from Thai's novel calls Hanuman which I would like make it look as sci-fi character if I have enough time... It is half-human half-monkey but with only two arms. Hard to say who is going to win...

CHEERS!

-
Looking great! I wonder what Eric would say about this... LOLLLLL
-
HMMMMMMMMMMMM!!!!!

How come all sub-folders in the Materials folder do show where AM is installed but not when AM is running?
CHEERS!

-
Just curiosity! What kind of contest is this?
-
This is goning to be a great animation. Keep us posted.
-
Sorry! Forgot to tell you how to save it. In the PWS,
expand the "Objects" tab, then RIGHT CLICK on the "Model1" (which you can rename it to whatever you want) and select either "Save As" or "Create Shortcut in Library".

-
Well! How abot the pictures that DarkLimit have posted? Can you use those as the reference? You are making progress, but it will be much better for you if you follow the Cooper but use different picture as I mentioned above.
CHEERS!
-
thank you for the tips.

which splines on the nose do i need to pullback though?

How about the "Cooper Face" exercise? Try to follow it, and you will learn a lot from it. I will keep my word for it.
No!!! The push-and-pull is just what I call for fine tunning the contour of certain vertices, and someone else might call it differently. That reason I call it push-pull, so you can get the same feeling as working with sculpting but not just pushing-and-pulling those vertices.
You start with a spline that contour the shape from the side view, you then extrude and move it either in or out using LEFT or Right arrow as show in the picture.


Athena Parthenos
in Work In Progress / Sweatbox
Posted
Excellent works! I love the way you add those details.
CHEERS!