thefreshestever
-
Posts
821 -
Joined
-
Last visited
-
Days Won
2
Content Type
Profiles
Forums
Events
Everything posted by thefreshestever
-
thanks, but i already did that... i also copied the whole body-cps into a new model, deleted all the groups, defined them new, copied it back to the other model etc... still the same... tried it with mac and windows version... once i did that all seemed to be fine, i could drop the deflector material on the group and my skin was still colored... but when i closed the document and opened it another time my body was white again... kind of random here... i don´t have the deflector and the cloth on one group, otherwise my cloth simulation wouldn´t work at all... the simulation works fine, exactly as i want it to be finally... the only thing left is the skinolor on my deflectorroup....
-
hello again... why does my deflector material deactivate other materials on the group? i have a group, the body of my character, it has a skin-material on it... then i created a group for the deflector material, containing large parts of cps of my body group... when i drag the deflectormaterial on my deflectorgroup this part turns white, its no longer skin-colored.... please help, it´s drivin me nuts....
-
ok... i found the problem.... i almost lost my mind the last 2 days... the 2001 skeleton of my am:15 mac version is defect!!!!! i tried the one from my old v12 cd and all worked fine!!! i´m interested if someone had this problem too...
-
sorry for bothering you all again, i wanted to start an experiment with cloth simulations, i have a character with shorts on that should be cloth simulated. i created two materials, one cloth and one deflector... i put the cloth to a group of the pants except the belt-area, the whole body of the character except the head is the deflectorgroup... the whole pants-group is attached to the pelvis-bone. when i start the simclothsimulation in my choreography, all cps of my pants exept the beltsection and the one splinering of the clothmaterialgroup snap to one position!!! i attached some screenshots, maybe someone can figure out what did wrong... thanks agan...

-
i just upgraded to v15, and now i have 2 problems: i was rigging a character, done that a 100 times before... when i switch on my ik-arms setup in the action the right arm of my character stands curiously out to the right (bild14), when i turn it off and on another time the arm is in the right position, but the elbow-bones are now placed at the shoulders (bild15 & 16)!!!??? something like that never happened before... has anyone an idea whats up there? my second problem is that when i use the skin-shader it affects the white of the eyes of the character, they go hyper-white, no shadows on it at all!
-
thanks, but where do i find the "jitter option"?
-
An hour and a half for one image? I have a theory on speeding up your render...seems to work for me. Try this: (Always good advice to 'Save As' before trying something new...) As you noticed, there are two places where you can set your hair emitter's density- one in the main material hair property window and one each in the individual emitter's property windows. I've recently had great speed in renders by reducing the individual emitters density to the lowest value possible- which I believe is .01 (if you set both to .01 you will have a 50-50 ratio of the 2 emitters, but if you set one to .01 and the other to .02,.03,.04 etc you will have a primary emitter and a secondary emitter.) Now this will make your hair quite sparse, so in the main hair property window you will compensate- set that value to 400% or 500% or 900% (experiment) Now- try a render frame and see if you notice an improvement in render time. I hope you do! ALSO= How can you make it look more natural? Have you set the surface attribute to Muhair yet? Muhair gives the overall hair a 'pantene-sheen' that is quite natural. To do this- In the individual emitters 'Surface' property window scroll down to 'Diffuse Render Shader' and click the setting for MuHair, and do the same to the setting below which is called 'Specular Render Shader' (Set to Muhair) There are lots of new settings to dink with but for starts leave the default settings be and see if you like the hairs new look upon render. (Don't forget to specify in the render properties window to turn Render Shaders to 'ON'...under 'options') This will cause a little extra render time but the visual is worth it. Good luck! I like your character! thanx, i´ll try that out with the percentage settings... i don´t have a shader called muhair to choose in the render shaders menue, is that a new feature? i´m working with a:m 12, maybe i should upgrade..
-
thanks... it looks a bit more realistic if you make it a bit transparent at the tips additional to make them thinner... sure, that may be a reason for the long render time... i´ll check that and compare.
-
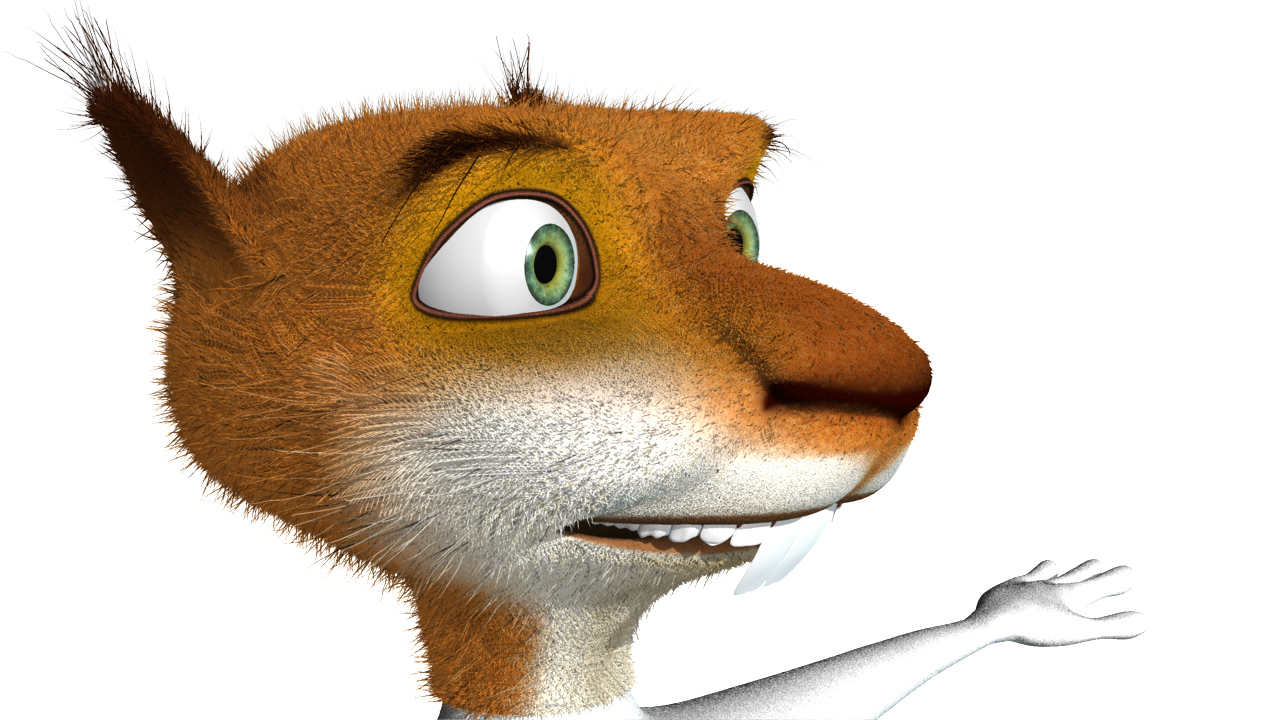
i´m workin on a hammy-like squirrel-character to learn more about hair. i figured out how to work with decals on hair, in this case i´ve decals for the color, the length and the density of the hair... first i had only one hair system, and it looked totally like a stuffed plush toy... then i added a second one, so that i now have a short one with a high density (375) and a long one with low density (25).. looks way better now, but i´m still not satisfied. i still get this kind of pattern, it looks not really natural... i thought about adding a third system, but i doubt my computer can take any more. the image i added took about 1 and a half hours to render (multipass 9, 1280x720 px), has anyone got an idea how i can speed this up? how can i make the hair look more natural? what i did so far to make it look better was: - added a little kinkyness - made it thinner, brighter and 70% transparent to the tip - selected high values for direction and length variation thanks ahead
-

drive hair color and length with decal
thefreshestever replied to thefreshestever's topic in New Users
sorry, solved the problem all by myself for those who are interested... my hair system earlier had two emitters, then i erased one. thing is that a:m didn´t seem to recognize that and mixed things up that weren´t any longer there. i just deleted my hair system completely and created a new one, and tataaaaaa: works!!! -
another hair problem: i want to drive the color and the length of my hair system by 2 different decals, or one decal with 2 different images in it, seems to be no difference. driving the color is no problem, works fine. but when i add the second image for the length, it affects the color of the hair too!!!?? i´ve done it all like in talbots hair-tutorial-video, but it won´t work... first i thought it might be a windows-version problem (sometimes i´ve some problems with images there, won´t be displayed etc...), so i tried it in the osx-version too, but same thing. all i do is select "other" in the decal-images "type"-menue, then add a property and select length for my hair system... it doesn´t loose the color of the image that drives the color completely, but it get´s much brighter and a bit mixed up, and it doesnt drive the length!!! couldn´t find any information about that special problem in the forum, searched for hours, would be nice if someone had an advice.... thanx...
-
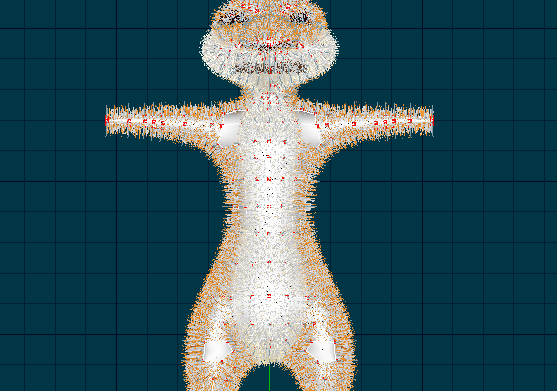
Problem with hair - Five point patches are bald
thefreshestever replied to thefreshestever's topic in New Users
thaaaaaaannnx to all!!! i didn´t know that i can flip normals for single patches, now i know better -
do hairemitter simply not apply on five-point-patches? how can i solve this problem? help please!!!!! i attatched a screenshot of the rendering an one of the a:m window, that might help to understand. short sytem info: i´m working with a:m 12.0 on a macbook pro 2,33 ghz dual with 4 gig ram, a:m is used on parallesls desktop under windows xp (runs smoother than in osx)!