gaetan Posted September 14, 2004 Share Posted September 14, 2004 I put up for comment my first character model. External validation always appreciated :-) I don't know how to put up a spline version of the image yet, so please bear with me. I'm still having difficulties with the hands. and the model is not boned yet. That's my next step. Gaetan Quote Link to comment Share on other sites More sharing options...
ypoissant Posted September 15, 2004 Share Posted September 15, 2004 Looking good so far. I find it difficult to give detailed comments with toon shaded renders though. for spline renders, you can either capture the screem or render to file and set the quality to "shaded & wireframe" Quote Link to comment Share on other sites More sharing options...
Admin Rodney Posted September 15, 2004 Admin Share Posted September 15, 2004 Gaetan, Glad to see you posting. For a first model I think you are off to a great start. As I've says toon rendering can make it harder to critique if that is what you are looking for. Hope you post some more shots and wireframes as you figure that part out. Best, Rodney Quote Link to comment Share on other sites More sharing options...
entity Posted September 15, 2004 Share Posted September 15, 2004 That looks GREAT!! And the hands look fine to me from what I can see... glad your up and running... are you having to overcome that obstacle with the saving files? Quote Link to comment Share on other sites More sharing options...
KenH Posted September 15, 2004 Share Posted September 15, 2004 Gaetan: Soon to be Master Modeller! Quote Link to comment Share on other sites More sharing options...
Heiner Posted September 15, 2004 Share Posted September 15, 2004 Nice, good feeling for anatomy. If this is your first model, you are going to have abright future :-) Quote Link to comment Share on other sites More sharing options...
gaetan Posted September 15, 2004 Author Share Posted September 15, 2004 Thanks for all of the comments!!!!! The reason the model is rendered in toon is because the splinemanship is really not up to par with the other WIP I've seen on this site. When I post the spline you'll see that the model still needs a huge amount of work. As for the "saving issue" it's not fixed but I've learned to live with it, along with a few new quirks with ver11 verP As for the having a "good feel for anatomy" I've spent years and years looking at anatomy I've done a few renders "shaded and wireframe". How do you stop the CPs from displaying? I cannot seem to get just a capture of the lines. gaetan Quote Link to comment Share on other sites More sharing options...
KenH Posted September 15, 2004 Share Posted September 15, 2004 To get just the lines, you need to go to the customise menu and set the cp size to 0. For wireframe images, I just do a print screen. Quote Link to comment Share on other sites More sharing options...
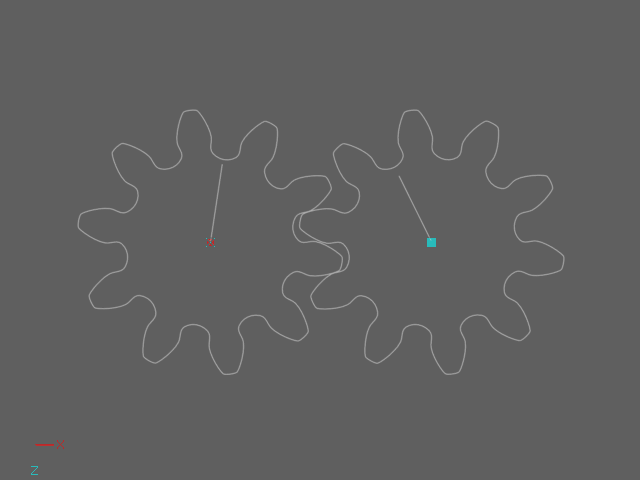
gaetan Posted September 15, 2004 Author Share Posted September 15, 2004 Here are the spline pics. The mouth area, for one, is proving to be difficult. Along with the armpit/shoulder point. The hands are close but they're going to require a lot of playing around with to get the points in their proper place. "Learn and study / do and redo / someday your work will be more than just goo!" Gaetan Quote Link to comment Share on other sites More sharing options...
-TC- Posted September 15, 2004 Share Posted September 15, 2004 That model looks really great ! What do you have planned for her ? Quote Link to comment Share on other sites More sharing options...
jon Posted September 15, 2004 Share Posted September 15, 2004 great anime look, and conservative splinage! one warning: those three point patches and dead-end splines near the mouth might cause you some trouble when you animate. try to build your splines as closed loops wherever you can, if you want to keep the surface smooth. overall, a stellar first model! let's see more! -jon Quote Link to comment Share on other sites More sharing options...
gaetan Posted September 16, 2004 Author Share Posted September 16, 2004 I do have a lot of dead-end splines as you call them. I figure that they are the "dues I have to pay" in learning how to build good spline connections. The areas I've marked out for re-working are the mouth, the armpits, the hands - which you can't see very well but are truly a spaghetti of splines. My first goal was to a model built to resemble a human being. Now that I've done and made a lot of mistakes in the design, the hours spent correcting these errors will teach me where to be especially careful when creating my next model. As for the model, she is one of my character's from a long, long time ago. She's the one in the helmet as my avatar. Over the next couple of months, I hope to be creating the rest of cast and vehicles and buidings and... not get any sleep as I try to cram it all into 24hrs. Thank you for all the comments, they are truly appreciated as creating and inventing tends to be a mostly solitary occupation. Gaetan Quote Link to comment Share on other sites More sharing options...
gaetan Posted September 16, 2004 Author Share Posted September 16, 2004 I've just redone the mouth area - I've increased the amount of splines and I put in a three-point corner at the very end of the lips. Hopefully this will give me a better mouth opening. Quote Link to comment Share on other sites More sharing options...
jon Posted September 16, 2004 Share Posted September 16, 2004 the mouth looks much improved! i had my first full figure done within 6 months... four years later, i'm still searchnig for unnecessary splines and tweaking cps. when you stop making mistakes, you stop learning. -jon Quote Link to comment Share on other sites More sharing options...
ypoissant Posted September 16, 2004 Share Posted September 16, 2004 As Jon wrote, dead-end splines are going to give you creases and they are not going to go away with porcelain either. Use hooks instead. Absolutely avoid dead-end splines and CPs with more than 2 crossing splines or splines joining like ")(". This said, I have the impression that you imported the model from a low polygon one which is why you get tons of triangles everywhere especially in the hair. That's OK. Just be warned that hand converting a polygon model into a spline one is usually not a trivial task. As you will get experience, you will spline your model following the natural contour of the face. When importing a polygon model, you endup with a bunch of triangles and splines going in all directions and it is very difficult to select which splines to keep and which ones to delete. But as you wrote, it is a damn good way to learn the mistakes first. May I suggest an alternative approach: Spline an independent face mesh following a good spline layout as given in Shaun Freeman tutorial for example. Then hand-conform this mesh to your model. To do that, you select the face mesh and click on "lock". Now, you can push and pull the spline mesh to conform your model's morphology. Remove the triangle at the mouth corner. This will only get you problems. If you need more resolutions, then extend the splines into the cheek. Another tips: To try to evenly space your splines as much as possible. Avoid peaked CPs as they will be visually OFF from the rest of the model. Instead, you can either set the CPs magnitude to some small value or use two nearby splines to create the join. Your model looks nice, I'm sure you will have fun animating her. Quote Link to comment Share on other sites More sharing options...
KenH Posted September 16, 2004 Share Posted September 16, 2004 Remove the triangle at the mouth corner. This will only get you problems. If you need more resolutions, then extend the splines into the cheek. I saw that as a nifty way to create the natural crease at the mouth corners. Maybe not.....there may still be a crease without it. Quote Link to comment Share on other sites More sharing options...
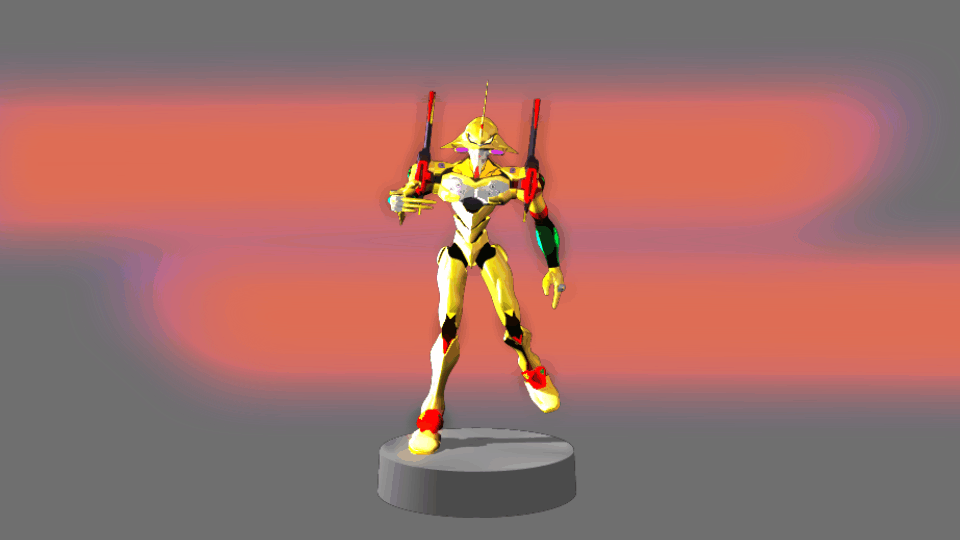
gaetan Posted September 17, 2004 Author Share Posted September 17, 2004 Yes I did import some of the parts like the hair, which was done in Metasequoia. I haven't figured out how I am going to create the volume in splines yet. I used a rotoscope of my own model to build most of the body. and get the basic shape of the head. The lips were imported and then joined. For future reference, this model is one of over 150 I designed over the last three years using Meta, Hexagreat and a few other wonderful free Japanese programs. These include buildings, cityscapes, vehicles, characters, weapons, furniture and so on. These were animated in DogaCGA along with original orchestral compositions and sound effects, as I've studied music for 20+ years. So if any body needs original music in any genre let me know. Making the mouths open and close and the eyes move etc. involved making 10 different face models for each character, and then reshoot each scene with the various faces and composite them in Premiere to give the impression of facial expressions and movement. So A:M is definetly an improvement. Here is an example of what I have done with some low-level free programs. Once I get used to building with splines, I will be able to build "100% true"A:M models that do not require any assistance of imports. Quote Link to comment Share on other sites More sharing options...
KenH Posted September 17, 2004 Share Posted September 17, 2004 What did you use those models in? Quote Link to comment Share on other sites More sharing options...
gaetan Posted September 17, 2004 Author Share Posted September 17, 2004 These characters were used in little films I made for my nieces and nephews. Sort of a hobby to use up the extra creative urges. It was all done in DOGA. Trying to design models to get as smooth a motion as possible involved some serious exploration of the programs limitations. Since this has nothign to do with A:M, I'll put up a link to a temp site, if you want to see some old clips as soon as I upload them. Really old clips and images Some old clips and images are up. They were used for a story line of putting the Mounties in space." Royal Canadian Space Police " Just another crime fighting story line. Gaetan Quote Link to comment Share on other sites More sharing options...


Recommended Posts
Join the conversation
You can post now and register later. If you have an account, sign in now to post with your account.
Note: Your post will require moderator approval before it will be visible.