Search the Community
Showing results for 'snap to surface'.
-
Hi nerrazzi. Im' very impressed by your car models and really liked seeing the WIP shots of the Subaru. If you ever had the inclination to put a tutorial together, I would love to see it. I have a lot of trouble keeping the surface smoothe. As for the Lamborghini rotos, if you could find a model kit , the instructions might have the ortho images you need. You could also make the model, then scan it. Also, some of the images on the sites listed above are very close to what you need, could you not alter them in PhotoShop to get them close enough? Keep up the great work.
-
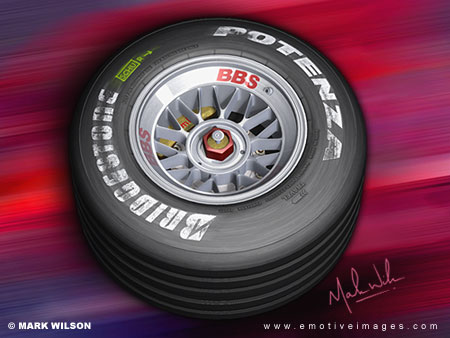
Here is an example of the Surface Toolkit in action on one of my images. The Bridgstone and Potenza logos were broken up using the images in the toolkit. The wear and rubbing on the tyre is done using it also. It just allows you to add that extra level of realism more easily. The tutorials were the really valuable part for me and clued me in to techniques and a way of approcahing texturing that I hadn't previously even considered.
-
Hey there, that surface dirty-it-up software looks pretty cool. So basically, it just creates hi-end images for use as decals in your software 'eh? I'm going to have to look in to this. thanks for the tip!
-
My compliments on a fine example of spline wrangling. Some comments & questions with reference to the attached image: Exhibit A - Dead end splines usually cause creases. Any reason for this arrangement? Exhibit B - It appears to me that this spline can be deleted without seriously affecting the surface shape. Any reason for its presence? Exhibit C - In my v8.5 models, 5 pointers such as this tend to cause problems. Is the version you're using more tolerant or have you applied porcelain.mat? Exhibit D - Is this prime candidate for bias tweaking a 4 or 5 pointer?

-
For those of you who remember, I've been working on a personal project involving a clock - a clock which I'd ideally like to have fully animated inner workings. Following the honed wisdom of Vernon "I make paper clocks" Zehr I've bought a working cardboard kit clock and have begun constructing it with the intention of duplicating the mechanics in A:M. Now in the mean time, whilst waiting for glue to dry, I've build a very simple facade for the clock in A:M. This has also given me the opportunity to play with some of the new render features of 10.5 - namely mulitpass ray width shadows and multipass DOF. Here's a 32 pass test - There are no materials yet and just one decal for the clock face. Everything else is just standard surface settings, and a small amount of noise added in photoshop.
-
That's gorgeous William! I even hear the ET music in my head as I watch it - it's probably beyond the brief, but it would be particularly cute if at the very end the ship streaked from right to left across the screen... perhaps something to consider for the showreal. I especially like the work on the light "chases" - action or pose, light or surface?
-
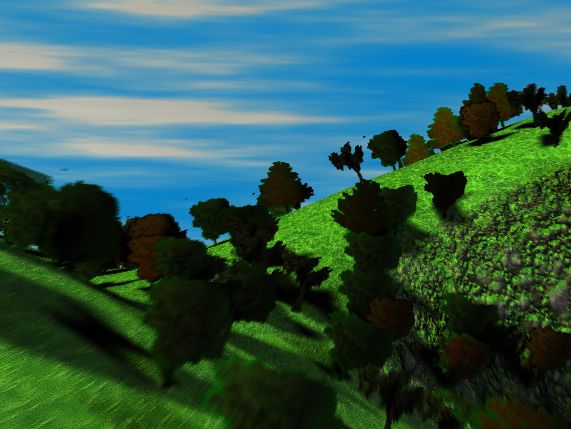
Extending on from the tree making threads this is a test project , with only two planes and three materials. The sky is skytracer, the landscape is a darktree landscape texture which shades surfaces facing up with a grass like texture and vertical surfaces with a rocky surface. The forest is an AM11 fur material with tree images mapped onto the fur "strands". The animation render is a single pass multipass so there are quite a few artifacts. With some fine tuning of fur emmitters I think the trees can be considerably improved and the lighting is only test lighting. Still I thought it was worth showing
-
This is interesting. Is there a way to get the trees on the slopes to stand upright? It looks odd with all the trees perpendicular to the surface.
-
Yeah it looks too perfect don't it? I may have to spend a day just trying to get those glass jars to look normal. BTW, I love your refrigerator picture. Nice objects and placements. I may have to eyeball that again to get some more prop ideas. I don't want my counters to be bare at all. It needs to be cluttered. Lance Thanks. I took a lot of inspiration from my own fridge. I found a really hard part was carefully placing objects so that they looked like they were resting on top of a surface -- say, the wire rack or the shelves in the fridge door. The french fries were particularly tough to decide upon -- how to get them to look like they just 'fell' there, even though you know it took me at least an hour of nudging them here, nudging them there, and trying to decide if it looked 'natural' enough. Oh, and I also modeled more than I needed, because I was making this as a set for someone else's animation -- and I couldn't be sure that he wouldn't change his plans and show it from a different angle, etc. So I put labels on everything, and all the items in the fridge except the coffee can [top shelf] can be viewed from different angles, not just the angles shown in this pic. I didn't model the outside of the fridge or its door, though.
-
Hey List, I'm modeling a character in 10.5k+ and I'd like to get some advice as to how I can close some patches and avoid the artifacts visible in the attached picture. I've made sure that none of the intersections are peaked but I can't seem to get a smooth surface Thanks for any help. Gary

-
Lance - My only suggestion would be to add more beveling, especially to the work surface and the cupboards above. This'll help give the scene more depth. Strong work so far though.
-
Once I get far enough to set up the materials and lighting for that shot I'll be sure to post it for you james 95% of glass is in the environment. you pretty much have to have it all in place with a color for the camera background that won't jump out since any areas that refract might show camera color. the other 5% is all lighting. as far as materials go I like a combiner which varies the refraction on a noise pattern that makes the glass look cheaper (like the jars in my fridge) only very good glass has the same transparency and refractive properties all through its surface. -David Rogers
-
Nice work so far. You've certainly done a lot. I like the lumpy, curvy surface of your mayonnaise -- here's a link to a fridge interior I made for a friend. Notice that I didn't get too ambitious with my mayo ... also, I never quite figured out what to do with the glass, but I knew he'd know what he wanted done with the glass anyway. I only regret that I still don't know what to do to get these jars and bottles looking more like realistic glass. My fridge's interior, modeled from life [it was pretty darn cold, hunched in there by the eggs and the baking soda].
-
The new version can be found here: Update Page AM2003 Files Page ---Fixes--- Fixed problem with bone manipulator not going away when deselecting {MagnusC} Fixed Path tangents on load { Stephen Bruce } Fade when behind objects lensflare when light is volumetric now work { Firestine Family } Fixed Render Shader rendering. Should now work as documented. (Yves Poissant) Fixed crash on render with render shaders on combined material (Victor Navone, Simon Jenson). Note: You cannot blend render shader surface properties like you can with textures. You will get either one shader or the other, but not a combination of both. It would be possible to write a plugin that combines two or more render shading algorithms.