


mfortunato
-
Posts
232 -
Joined
-
Last visited
Content Type
Profiles
Forums
Events
Posts posted by mfortunato
-
-
The title of the modeling section is "Modeling Takes Talent". What it should be called is "Modeling Takes Patience"!
 .
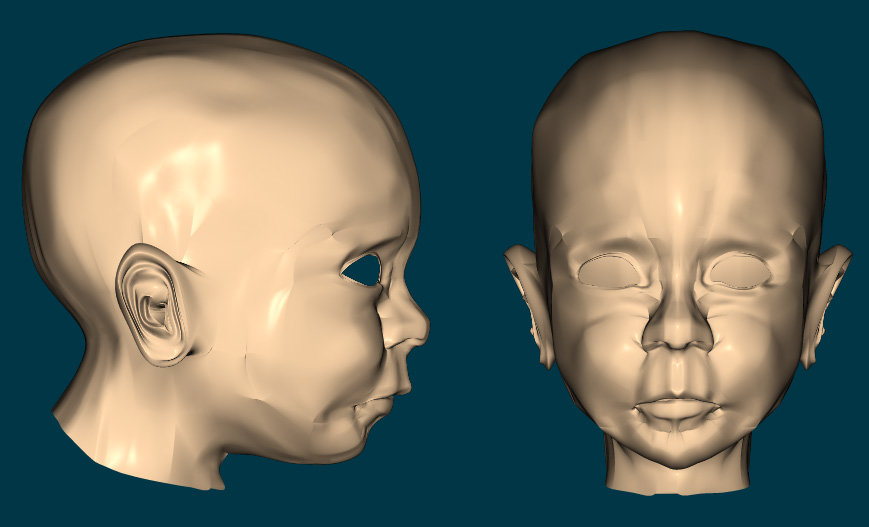
.Anyway, Coop is looking a bit smoother. I have broken so many connected splines and reconnected them it's making my head spin! While this model needs more work, I feel it's time for me to move on to other exercises. Thank you so much for your (and Cooper's) help. I learned quite a lot about modeling with A:M doing this tutorial.
Here is my final version (for now
 .
.- Michael
-
Don't worry, I'm obsessed with my son to.. he has that effect on people.
Usually the )( spline connections happen when you try to join a spline that has two possible inputs. ie..
connecting this — to ┌ or this ┐ to └
if you try to connect the spline to the crook of the bend it could connect to the down spline or the cross spline. Depending on which way you are trying to come in from that could be a bad thing. when I join splines like this.. I'll give them a little tweek to see which spline they joined. If its the wrong one then I'll extend that spline like this ├ and connect the spline I want up to the center like this ┼
Hope that helps. Keep at it.. it'll only get better.
You just made my night. I have started detaching those splines with the issue and realized they had connected in an "S" shape, not a " ┼". Sometimes I have to detach or break quite a few, but then what I do is create a straight spline and connect it a few patches down, it's final destination if you will. Then I draw the cross section lines and finally I connect the two and for the most part, it's working and they are connecting correctly. You have put me on the right path. Thanks so much!
Here's an update to the work in progress.
- Michael
-
You better keep working on that, Mike, or Colin's gonna come to your house and beat you up.
Nah.. my first shot at modelling Coop wasn't to far off from what Mike's got. I just perservered, and kept at it. In fact I think I actually modelled that head twice before I got it right. Even then, looking back.. there's probably lots of things I'd do differently, now. The basic principle still would be the same, but just things I've learned in terms of connecting ears and areas the around the mouth.
I'm just flattered anyone else would want to make a model of my son.
I came up with a great idea for a movie the other day and it will probably end up with me having to model Cooper 2.0. so I'll get another go at him eventually, of course with another kid and one on the way, I'd better get cracken on their models soon or they'll end up being jealous ;-)
Please don't take this the wrong way....but I've become obsessed with your son (well, his head
! I have been working on this head for three or four days now. As soon as I get home, I fire up the computer and continue to tweak points. This is my first foray into modeling a human head so I have really been trying to understand it. I've learned a lot about modeling in A:M with this tutorial. Thank you for putting this tutorial together. It's tough, but I have been having a really great time with it. Truth be told, I think I may have to restart it from scratch. I've got lots of splines that meet like )( - I haven't quite figured out why some of them do that. I think a tutorial on making clean connections would be great! I've read and gone through a few, but they didn't detail why a spline connects the way it does. I've tried to keep to 4 point connections with the exception of some 5 point where needed. I have some 3 point in the nose and around the ear. But I don't believe I have any more of those elsewhere. I'll keep tweaking and repost
 .
.I recommend that everyone working through the Art of Hash Animation Master work on this exercise. This will really test your modeling skills!
- Michael
-
Exercise 12: Lip Poses
Name Michael Fortunato
Date Completed: 1/17/2006
Observations: None.
- Michael


-
Hi All -
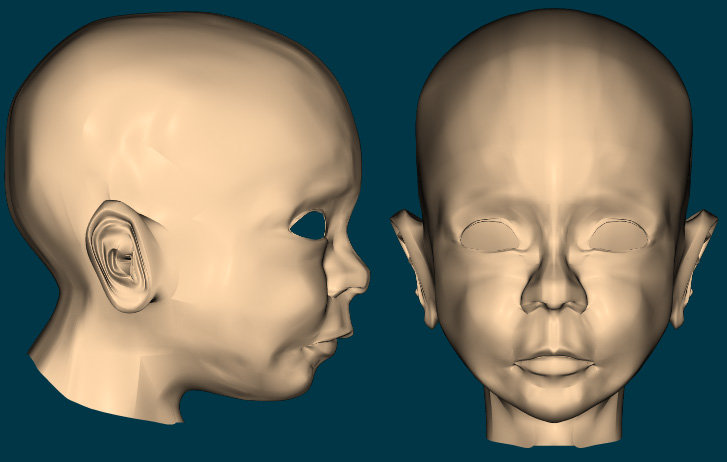
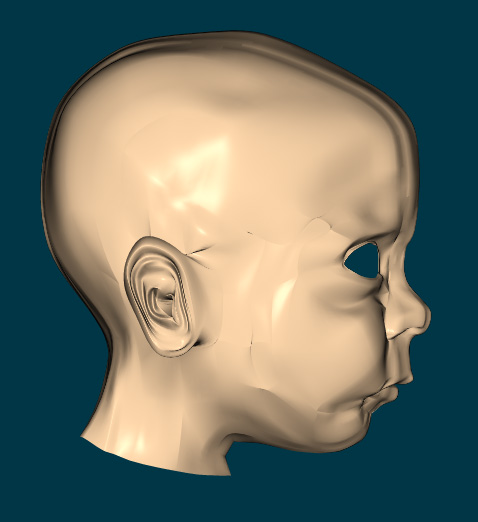
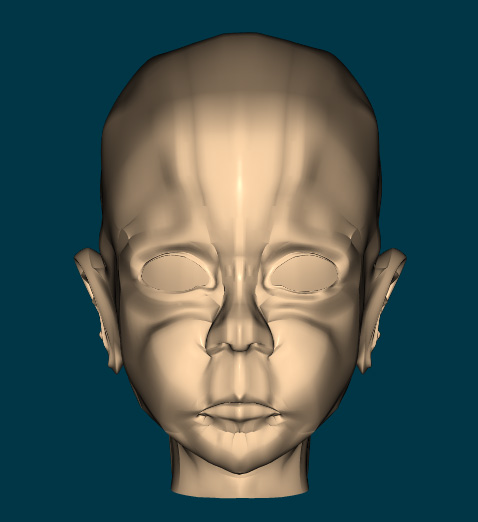
I decided to try and tackle 11.5. The giraffe was a piece of cake next to Cooper. That kid has me licked thus far! I have some really naughty splines going on. I tried to follow using the book and the online tutorial and I just couldn't get it perfect. I modeled his face three times. Each time I improved a bit more. Finally I got it to a point where I felt I could try and complete the head. So here he is - the whole head, sans teeth and eyes - there comes a time where you say - ENOUGH! But I'm not done with Cooper - I want to apply what I learned while trying to model his whole head.
As you can see in the screenshots - it looks like a human head, but there are lots of strange wrinkles that I need to "iron" out.
Anyway, I noticed no one had posted a Cooper attempt, so I figured I'd give it a shot.
Name: Michael Fortunato
Assignment: 11.5 Making a Face (or in my case, a head)
Instructor: Das Book and Web tutorial
Comments: See above.
Thanks.
- Michael
-
Name: Jeremiah M. Faries
Exercise Completed: #6: The Door's Stuck
Date Completed: Jan 15, 2007
Remarks: 2 versions: A) a 5 second sequence as requested (although the action is a little frantic... I guess he wants to get in very badly?) and
 a longer sequence for fun.
(cool... my "B-right paren" turned into a smiley... I think I'll leave him there...)
Great googily moogily! That second one is a hoot! What a brilliant idea. And it was animated very well. Excellent job, Jeremiah!
- Michael
-
lol, Dhar - www.sxc.hu - fab site with royalty free photos. Great for rotoscopes and ideas too. But not so good for backdrops.
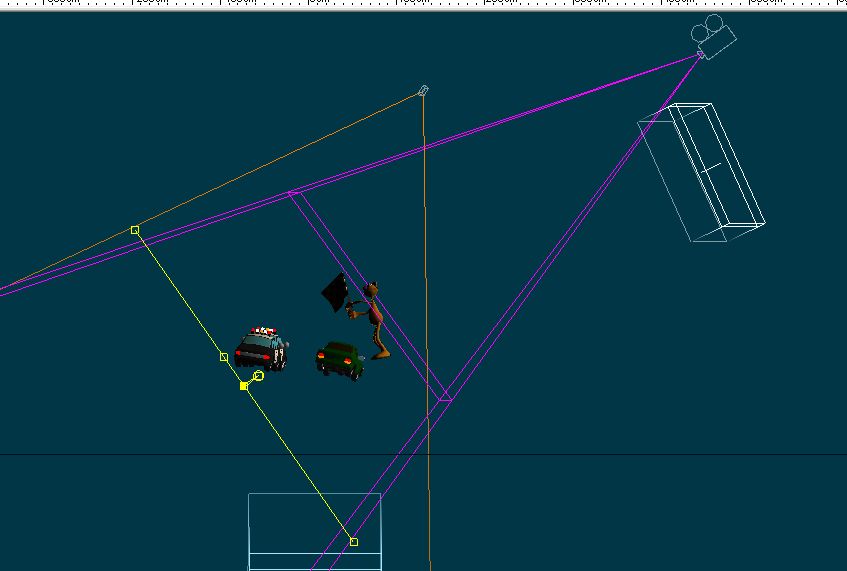
Actually, I wanted to post a screen grab, to see if anyone else would approach this in a different way. The problem is when you have a photo, you have to deal with camera angle and sky. This was the only way that I could work out, to put everything on angles, which was very clumsy.
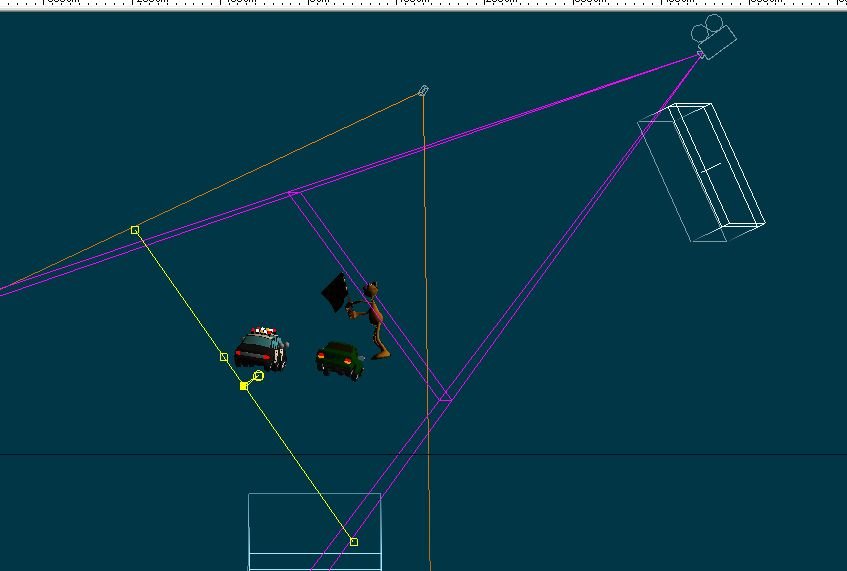
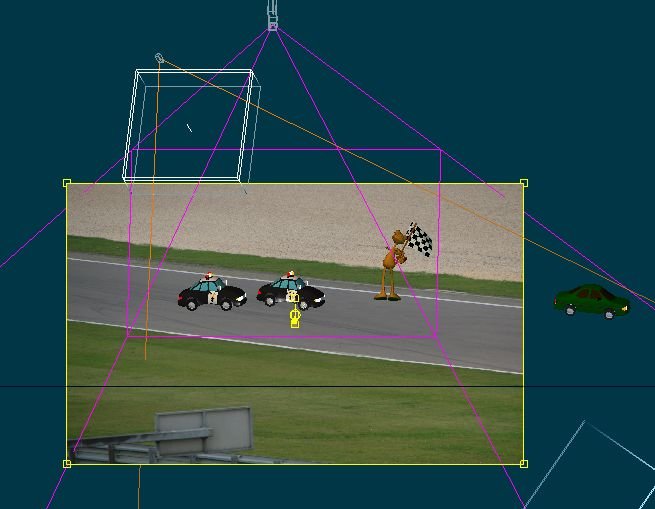
First is side view, and second is front of the exact frame. The yellow is the photo of the track, and everything else goes at an angle across it. (That's why I was lazy on Shaggy's size, but thank you for being kind, Rodney
)Of course I'm still working my way through the tutorials myself and I'm still coming to grips with the camera. I think the solution you created for the camera angle is brilliant. Anyone know of a simpler way she could have approached this (so we can all learn?
 ).
).Scaling issues aside, this is absolutely fantastic, Caroline! I really enjoyed this. The flag looked fantastic. Perhaps it was made of muslin or burlap - yeah - stiffness, schmiffness
. It's great .- Michael
-
Name Al Jolly
Excercise completed: Ex 6
Date Completed: Jan 12, 2006
This one was fun ... Caroline ... thanks for the render info...
here is update
This looks great, Al. The only change you could make would be to remove the constraint from the hands earlier so that his arms do not bend behind him as he walks through the door. Otherwise - great job. I had such a hard time with this tutorial. I should go back and do it again
.- Michael
-
Name: Michael Fortunato
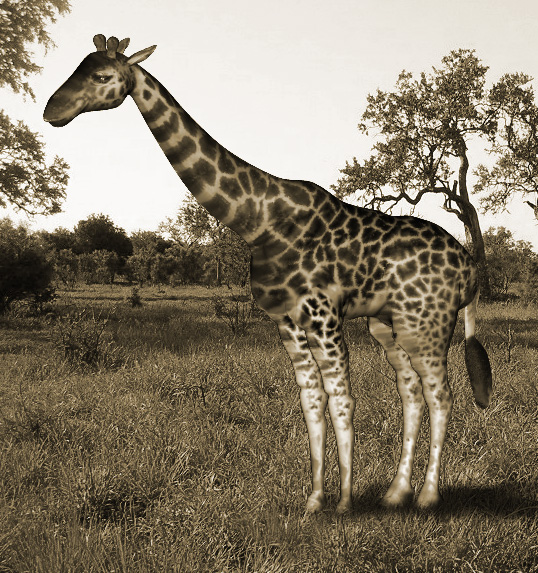
Exercises Completed: Eleven-Giraffe
Date Completed: Monday, January 16, 2007
Instructor: Das Book
Remarks/Suggestions for Improvement: I had to step away from this for a day or two and then come back to it. Attaching the legs, at first, was really difficult. But forcing myself to do it, really helped me to see in "3D". So that I could see when and where I needed to connect points. Switching back and forth between wireframe and shaded/wireframe was instrumental to finishing this project.
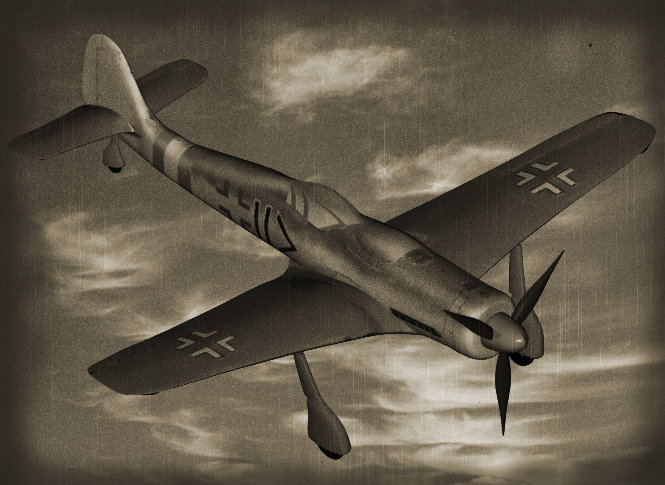
NOTE: I'm apparently on a sepia tone kick. First the fighter plane and now the giraffe. I didn't "age" this photo, though.
This program really is a joy to work with. I can't wait to finish these exercises and begin working on my own project.
- Michael

-
Name: Michael Fortunato
Exercises Completed: Fourteen - Marble
Date Completed: January 13th, 2007
Instructor: Das Book.
Remarks/Suggestions for Improvement: None. Very nice and easy tutorial.
Comments: Took a break from modeling to try a bit of procedural texturing. I completed it as written, however, I did a bit more experimenting. Made Thom look more like granite than marble, but I liked it so what the heck
!Thanks!
- Michael
-
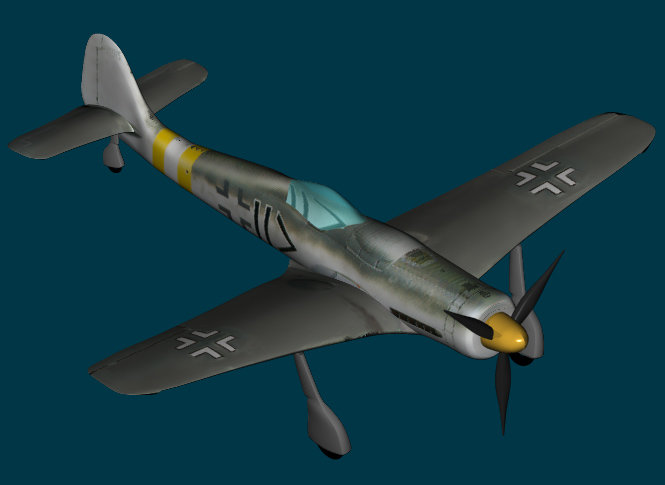
Name: Michael Fortunato
Exercise Completed: Ex 10 - Fighter
Date Completed Jan 13, 2006
Instructor: Das Book. Looked at video tutorial for the propellers.
Comments: Flew through this until I got to the propellers. Had a hell of a time with those. Perhaps because it was 1am and I was tired, don't know why.
I have two images. The basic render to show the model and a pshopped version I thought looked cool.
- Michael
-
Great to have you back Michael!
I don't think I have any of your exercise images. Sorry.
Thats another good reason to post here in the forum as I should have backups of most images that have been posted here.
(I should back up to a CDrom or two though)
Hope this computer keeps you happy and animating for a long long time!
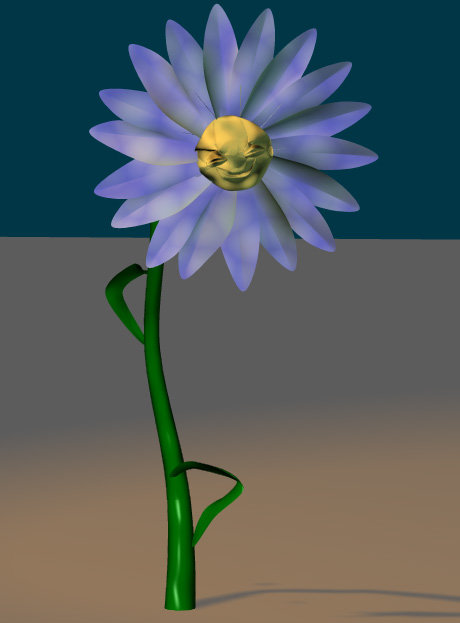
Thanks, Rodney. I do believe the old images/movies are still on the forums, as I have posted them all. I haven't checked for them, though. Thus far I have gone through Exercise 9 (well, 10, but I didn't post that so I'm redoing it now
). Redoing the flower this time I definitely have a better understanding of A:M's spline-based modeling - and learned a lot about my friends "break" and "detach" - they were instrumental in getting something that resembled an "alien" face on the flower.- Michael
-
Name: Michael Fortunato
Exercerise Completed: Flower Power EX #9
Instructor: The Manual
Comments/Suggestions: It's been almost a year since I posted my original flower. I went on to Exercise 10 and then my PC crashed (not related to A:M) and I lost all of my exercise files. Haven't really worked with A:M since - not sure why. Just getting back into it and decided to try and model a face on my flower - perhaps next time I should try going through the face modeling tutorial first - it looks more like an alien is growing out of the flower!.
Happy New Year, All!
- Michael
-
Name: Michael Fortunato
Exercise Completed: Ex. 9 Flower Power
Date Completed: 03-24-06
Instructor: Art of A:M
Remarks: This was a fun project. I look forward to doing more modeling.
- Michael

-
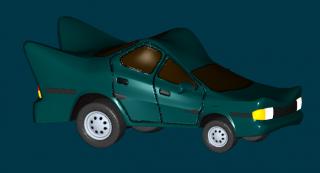
Hi All -
Ex. completed.
Name: Michael Fortunato
Ex. Compl8eted: ex.8 - Customized Car
Date Completed: 03-24-06
Instructor: Art of A:M
Remarks: Looking like a funky, green batmobile.
- Michael
-
Michael,
First off, great job in taking it to the next level with using your own voice. There are a few things that kinda stick out though. The feel of the voice gives me the impression of a mechanical creature almost. Also the mouth movements seem to move faster than the actual sound. The last thing I can say(and I was guilty of this and still am at times) is when your animating, you want to try not to leave your character static for too long. Even subtle movements in the tail and hips can go a long way to adding more realism to him. These are just my opinions though.
Over all nice job, good luck with the rest of the exercises
Leo
Thanks for the comments, Leo! Listening to it, you're right, it's a little mechanical. I could give the voice more life. Whisper it more, perhaps. And, yeah, something weird happened with the dope sheet link to the actual voice file and Keykat. When I move the words on the dope sheet around, they do not affect keykat anymore. I figured I must have moved something to the wrong group, so I'll keep playing with that until I can fix it.
Lastly, you are so right about the subtle movements. I felt his lower body was too stiff as well. I think I'll go back to this one tonight and see if I can make those corrections.
Thanks again!
- Michael
-
Hi All -
I have completed ex. 7 and thus finished the animation section of the tutorials - WOO HOO! Of course I have a LONG way to go before I've mastered (heck, before I'm even proficient) with animating using A:M. But it's a start. I'm excited to move on to modeling so that I can begin creating my own creations and learn how to animate them.
Name: Michael Fortunato
Exercise Completed: Ex. 7, Can you say that? (completed ex. 1 - 7)
Date Completed: 03-24-2006
Instructor: Art of A:M
Remarks: Keykat is adorable. And as such, I felt he needed a "cuter" voice to be telling us about a secret. So I recorded the voiceover with my own voice (digitally modified). This made my wife laugh every time she saw Keykat animated. So I hope you enjoy it too.
Thanks.
- Michael
-
Hello to All!
I thought since I had started doing the exercises, I should introduce myself to the forum. My name is Michael Fortunato. I am currently the lead texture artist for Phoenix Online Studios upcoming "The Silver Lining", an unofficial sequel to King's Quest (www.silverliningthegame.com). Some of you may have seen postings about our project and articles in some PC and video game magazines. I've been working on the project with the team for 3 or 4 years now (I've lost count) and we are really nearing completion (I cannot wait!).
I had seen A:M years ago (I probably first saw it about 10 or 15 years ago) and was very intrigued by it but really afraid to take the plunge. At that time, I was just getting started in 3D artwork using Ray Dream Studio and POV-Ray. I was afraid to approach 3D Studio, SoftImage and A:M (I likened it to the big boys, so to speak). But last year, I decided to purchase it. I have been working with Maya on "The Silver Lining" and figured if I can learn Maya, I can learn A:M. I have gone through the first six exercises and I find the interface very easy to use. However, there are a TON of things I still don't know how to do (just look at my exercises and you'll see the struggles I'm having). But I'm having fun. Ultimately, my goal is to learn modeling and animation and combine that with my knowledge of lighting and texturing to make my own animated shorts and films. It's something I've wanted to do for a very long time.
I'm an actor and singer and relish the idea of mixing those talents with animation. I love doing cartoon and character voice overs and will be in heaven as I learn to combine all these elements together.
I'm still a LONG ways off but I'll keep slowly plugging away at it. I must say that I think animation is the hardest thing to do. It's much more difficult than my past experience with modeling, texturing and lighting. But it's amazing how much life you can bring to a model with just a little "nudge".
I have been truly enjoying my experience with A:M thus far and hope to continue to do so into the FAR future. These forums are fantastic and everyone on here is wonderful. I love the community spirit and hope I am able to contribute to it as I gain mastery at this program.
Thank you to all who have posted your work, your tutorials, your feedback.....these have all been a help and inspiration for me to keep pushing forward. I'm excited to begin the next phase of the tutorials....MODELING!
- Michael
-
Hello All -
While I have just "completed" Exercise 6, I wouldn't say it is a complete animation. I have had a lot of problems with this which I will describe in the remarks below. But here's the basic details:
Name: Michael Fortunato
Exercise Completed: Exercise 6 - The Door Is Stuck (completed exercises 1 - 6 at this point)
Date: 03-22-2006
Instructor: Das Book
Link to animation file: http://www.geocities.com/m_fortunato/Ex6-t...elFortunato.avi
Remarks:
I don't feel the book delves deep enough into the program to successfully complete this exercise. I had to take it upon myself to "play" with the program. Mainly, to learn how to use the timeline tools to move, delete and recreate keyframes to correct a TON of mistakes I made. I'm not saying it hasn't been fun to play with. I did a LOT of tweaking of the timeline to get this animation where it is. As I watch it, I see where I can delete more and tweak some more to fix some weird shaking of shaggy's arms and to fix where his arm and leg intersect each other. The nice thing, is I know how to do this now. But I wish the book had a tutorial to aid me.
Another thing I think is lacking in the book is how to link actions and choreography actions. I wanted to originally have Shaggy sit on the ground in frustration and sadness at not being able to open the door and as he sat there, rabbit walks on by, opens the door correctly and walks on through. I created my path, set the rabbit on it, set my walk cycle on the rabbit but couldn't get the walk cycle to repeat enough to complete his trip to the path. Then I couldn't get another action to smoothly happen after he got to the end of the path. I went through the forums to look for help and found a couple of threads on this but after reading them I had no clearer picture on how to accomplish this and unfortunately the A:M Matrix has a beginners section with a tutorial on this, but the link doesn't work anymore. So finally I decided just to have Shaggy figure out that he was trying to open the door incorrectly. This way, I didn't string actions together, I just keyframed every movement, kind of like stop-motion-animation (I felt like Ray Harryhausen
). I wish I could figure out how to string actions together because I really feel that is the bread and butter of computer animation. Creating the repeatable actions and using them in your scene, interspersed with hand or rotoscoped keyframing for non-repeatable actions and just building up in layers, so-to-speak.Last - what the heck is up with his eyes? They want to point in one direction. So I just let them go where they wanted. I felt I had learned enough for now and needed to move on to another exercise because it was becoming obvious that what started out as a lot of fun was quickly turning into tedium and I know it's because I'm so new to the program.
So I'm going to move on to the lip sync exercise and then move on to modeling. I will definitely come back to this project because I'd like to fully realize my idea of rabbit walking through the door.
Please feel free to comment on the animation and my post. Thanks.
- Michael
-
Michael,
Great job on both walks. The emotion really comes through. The only problems I see is your having some slipping issues with the feet. It just feels like they are slipping a little when he is taking steps in both of your walks. Also, the feet tend to go into the floor. That's an easy enough fix, you should just be able to move the path up a little and then his feet won't go through the floor.
Just my .02 though,
Leo
Thanks, Leo! Yeah, I noticed especially on the 2nd walk that the feet slide. I'll definitely go back and see if I can correct that. Thanks, too, for noticing the feet going into the floor. I didn't even notice that! Actually, I'll go back to the walk cycle and see if I can fix it from there. This way it's fixed for whenever I use it again (and I think I just might have to
).Thanks again!
- Michael
-
Hello All -
Name: Michael Fortunato
Exercise completed - Ex5 - Take A Walk
Date Completed - 03-16-2006
Instructor: Das Book!
Remarks: I had some difficulty with Exercise 5. The bunny kept jumping the last keyframe which made him seem to twitch everytime it got to 1:05:00. And I realized, whoops! I forgot to copy and paste the 1st keyframe at the end to complete the cycle.
With that done, I finally rendered it. Here's the happy-go-lucky-rabbit:
http://www.geocities.com/m_fortunato/Ex5-T...elFortunato.mov
And just because I've had a very hard week, here's a rabbit that's closer to how I feel:
http://www.geocities.com/m_fortunato/Ex5-T...elFortunato.mov
- Michael
P.S. - I have to say this forum is fantastic! Everyone is incredibly nice and I've been nosing around the exercises I've completed to see everyone's work - there's so much wonderful and creative stuff! I can't wait to continue on my journey through A:M!
-
Hello Again!
I was able to take a lunch break today and decided to try and tackle the 4th exercise. So here it is! I added a bit to him because I felt it needed a little bit more anticipation before the actual throw. Oh and you may notice that I accidentally moved the camera out a bit too. I meant to do it on the 1st keyframe so he didn't walk out of the frame when he moved closer to the camera, however, I actually moved it on the last keyframe forgetting that this would actually animate the camera. Eh - at least I know how to animate a camera now
.Name: Michael Fortunato
Exercise Completed: Ex.4 - It's a Pitch! (Isn't it though?)
Date Completed: 3-14-06
Instructor: Just the Art of AM book. I have downloaded the video tutorials but haven't watched them yet.
Remarks: What is up with the knight's knees????? I had to really struggle to get them not to bend out of control. I'm sure it's just because I'm new and was pulling a bone the wrong way. So the knight's knees wiggle a bit in the beginning...eh - no biggie! It's my first time.
http://www.geocities.com/m_fortunato/Ex4-I...elFortunato.mov
Now it's time to learn how to walk!
- Michael
-
Good job with exercise 3. Keep it up, your really moving through these. Exercise 13 deals with rigging. There is also a program out there called The Setup Machine. I think alot of people here might use it, but I haven't got it yet. Here's a link just in case you want to check it out. http://www.rafhashvideotapes.com/setupmachine10.html
Once again keep up the good work,
Leo
Thank you again for the quick feedback, Leo. I checked out the Setup Machine. Looks really cool. I'll hold off on it, though, until I've learned how to rig a model myself. I'm the type that likes to learn everything. Actually, I'm the lead texture artist for an upcoming King's Quest fan game called "The Silver Lining" (http://www.silverliningthegame.com) and want to get my hands dirty in modeling and animation as well. Texturing and lighting I'm pretty good at...the rest...not so much
.Tonight - it's back to exercise 4! ("DUNH, DUNH, DDDDUUUUNNNNHHHH!!!!!")
- Michael
-
Wow. Your right, that Knight does have some serious knee problems. Having recently had knee surgery, I can feel his pain.

I hope your knee surgery went well and everything is a-ok.
.Now that I've started on exercise 4, I'm discovering some serious issues with the knights knees. Each keyframe I work on, I have to rotate and adjust his knees. It's as if the contraints are off on his rig or something (I didn't have this problem with the rabbit). But, it's good practice. It's helping me really learn how to correct mistakes as I go along. And boy have I been making plenty. I hope to have this animation completed by the weekend to upload. Did I mention how much fun this program is?
And thank you for your quick feedback. It really helps us n00bs. This is a wonderful community.
- Michael


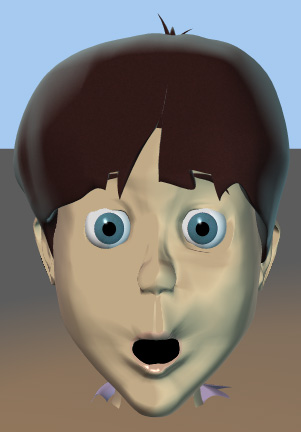


11.5 - Making a Face
in TaoA:M and the A:M Technical Reference
Posted
Thanks Colin and David!
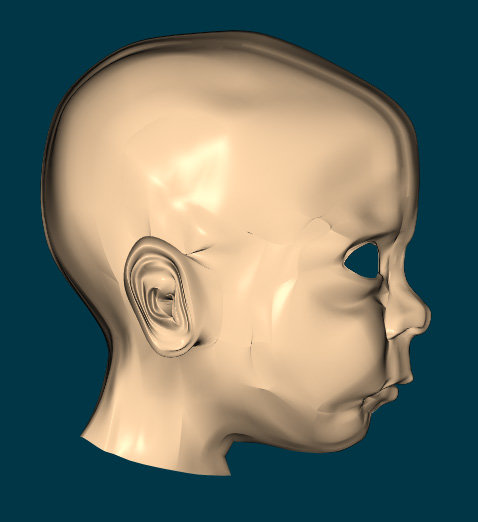
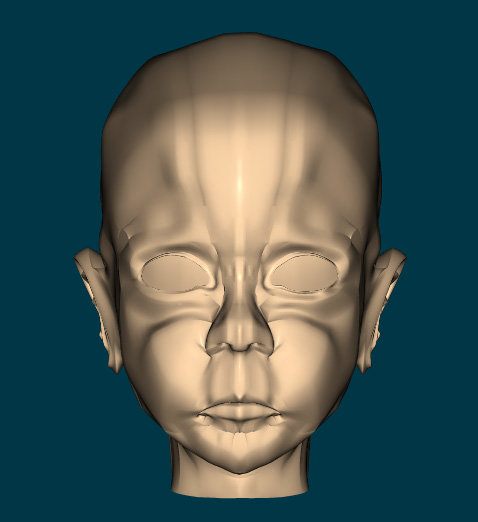
I've uploaded a shot with the render lines option turned on. I changed the color of Coop's face so that you could see the lines better - they didn't show up very well with the flesh color I was using.
First comment should be - you don't need so many splines! I have a sneaky suspicion this is common for people who are new to modeling with A:M. Your comments are most welcome. Thank you both for taking the time to help me through this.
EDIT: After I wrote this, I deleted the spline going down the center of Coop's face. This got rid of the peaking in the center of his face. It's now nice and smooth. I think that's what I'm going to start doing with the entire model. Evaluate where I do not need the splines and simplify the model .
.
- Michael