


mfortunato
-
Posts
232 -
Joined
-
Last visited
Content Type
Profiles
Forums
Events
Posts posted by mfortunato
-
-
Wow, Daniel! That is really cool. I love fiber optic lights - I have a few of them from various tech expos
 . I second a tutorial
  (when you have time).
- Michael
-
OMG, it's beautiful! WOW!! My only comment is I really like the thicker tubing on the actual image. Otherwise - SPOT ON!
- Michael
-
Hi Drusen -
As Hash A:M is a 3D modeling/rendering/animation program, you cannot draw characters into the program. You essentially "model" them by clicking and creating points and splines (curved and straight lines). You can use a program like Photoshop, Painter, Paint Shop, Pro, etc. to first draw your character(s) so you know what it is you want to model. You then place that drawing into A:M and use it as a reference to model from. If you have already purchased the program, take a look at the tutorials in the Art of Animation Master book - it will better explain this.
- Michael
-
This is extremely impressive work. And a great lesson to all of us about judicial use of control points. Less is definitely more!
- Michael
-
The fur definitely appears to be reacting correctly! Nicely done. I'm still wistfully imaging that adorable scene......

- Michael
-
Holy UFO, Batman! That's an excellent use of flocking. Hmmm.....I wonder how I can apply this to the Lost World image I'm cooking up?
-
Hey Chris -
If you have the 2007 CD version, you can download v.14 from this Forum post link:
http://www.hash.com/forums/index.php?showtopic=26455
- Michael
-
Wow, Daniel - Peanut Butter looks fantastic! And the model with that much hair rendered in 11 minutes? Hmmmm...I may indeed have to upgrade to v.14. I remember doing the Wookie tut and it took FOREVER to render that bloody Wookie fur (but it looked great when it was done
). I really dig PB - beautiful job. I'd love to see him in a room, sitting on a bed or a chair, perhaps with some diffused sunlight coming in through a window.....marvelous.- Michael
-
Hey Jesse -
The model and textures look excellent. Something I still haven't quite come to grips with A:M - texturing. The bump map used on his skin for pores and specular highlights is fantastic!
Anyway, I also wanted to ask, how did the job interview go?
- Michael
-
George - thank you for this. This technique is just what I needed! I have been having that same problem, going from a cycling path animation to a choreography action. What a great idea! Thanks.
And the Super-Bunny is a hoot!
- Michael
-
Hi Chris -
Your computer will work fine with the dual core processor and A:M 13, however, it will only work with a single processor. I believe multi-processor support is included in v.14, but not v.13. You will still be able to use v.13 without a problem.
Anyone else out there, please correct me if I'm wrong.
Thanks.
- Michael
-
If you don't want to pay for an audio editing program, you can download Audacity. It is free and it has some good filters to help you when creating and editing your sound effects.
Also, if you are looking for a relatively low-cost microphone to record sfx from, you could look into a Philips, Samson or Logitech USB mic. They have a nice, clean sound and low noise in general. They usually run between $30 - $50 dollars.
- Michael
-
These all look brilliant. Thanks everyone! I am in the process of storyboarding an animation of Animation Boot Camp - to use for a level 1 final - probably going overboard with it, but I'm having fun. These will definitely come in handy!
- Michael
-
The characters and backgrounds in Tak and the Power of JuJu were created using A:M. I don't know what game engine they used. They modeled, textured, and animated the characters in A:M and exported them to some game engine (perhaps one they created?).
Right now we are using Maya to model and animate for a game I am a part of (The Silver Lining). We use an exporter to export the Maya files to use with the Torque game engine (low-cost 3D game engine made by GarageGames). I am trying to get our team to us A:M for future games because I find working with it much easier - I think they would too - and it's MUCH more affordable
 .
.- Michael
-
Sweet Mary and Joseph, that's beautiful! I'm being nitpicky, but I think you can tweak it even more. It's still a tad bit "muddy" - Perhaps having the volumetric lighting coming in from another angle? I don't know if it's practical because of where the branch shadows fall.
But I'm REALLY nitpicking! It's really stunning! Very nice job.
- Michael
-
John -
That looks fantastic. Once you get the volumetric lighting figured out, it will be brilliant!!! Really great idea to use gobos on the lights. I definitely will have to try that next
. Perhaps with my spooky, red, Sin City-esque version!- Michael
-
Thanks, Lee.
Thanks Colin. i'll lighten it up a bit. it could be my monitor settings because the i can see the entire building and details on my laptop screen. i'll add a bit of ambient light to help it and re-upload. the image was originally going to be black and white and i started playing with the red and really liked it.
- Michael
-
Awesome looking images, Colin! I really like the texture mapping on the entire image and the hair (I'm assuming you used the hair particles) on the cactus
. Beautiful, warm lighting too.Chrury - really nice job matching the camera angle and lighting of the image of your desk with the model. You still have a bit of white around the model from where you cut and pasted it. But that can be cleaned up with a bit of masking work.
Beautiful, both of you.
I've attached a new image very different than my first one.
I used six lights for this, 3 whites and 3 reds. The reds cast z-buffered shadows, the whites were set to not cast shadows. I added a bloom effect and then I did some Levels adjusting in Photoshop (I basically just gave it a bit more contrast).
Comments are always welcome
.- Michael

-
One thing you can do to keep the arms where they are supposed to is use a bone for each arm rather then one bone for the whole upper rig. Then create an on/off relationship (set it to on) and have one of the bones orient like the other at all times.
To get the area where the arms connect to the lamp aiming right should be fairly simple also. Attach the "neck" bone to the upper arm, put a null at the end of the lower arm bone, and in the relationship tell that "neck" bone to aim at the null.
You can also add various constraints in that relationship to keep the bones from moving in ways they shouldn't.
Hi Nekosei -
Thanks for the reply. Pardon my n00bness, but I actually do not know how to do any of the steps you mentioned. I created the separate arm bones like you mentioned, but I do not know how to set up the on/off relationship. Also, I'm not sure how to add the null to the lower arm bone.
I'm assuming I do the things you mentioned in the Action window and not the Modeling window. If you wouldn't mind, could you please break the steps down for me?
Thanks.
- Michael
-
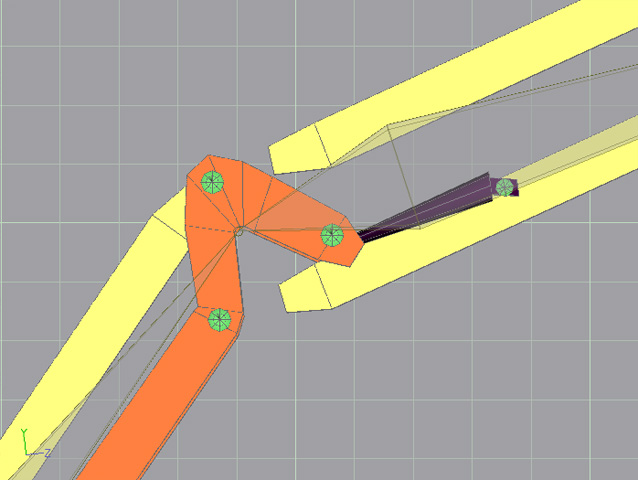
Hi All -
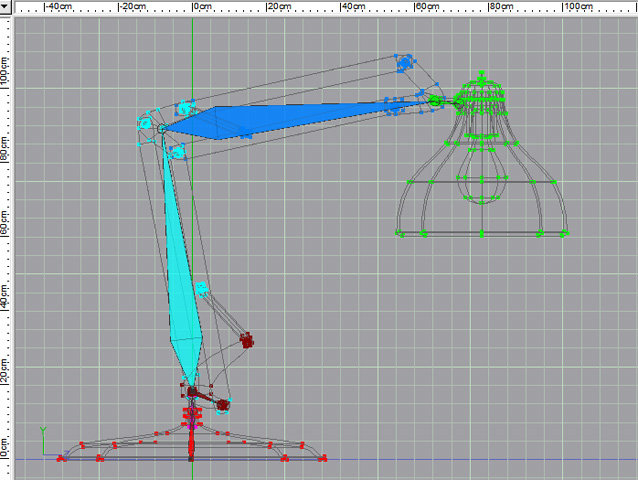
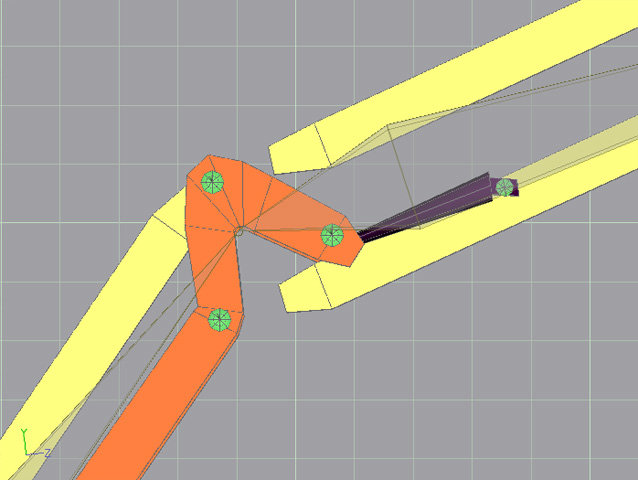
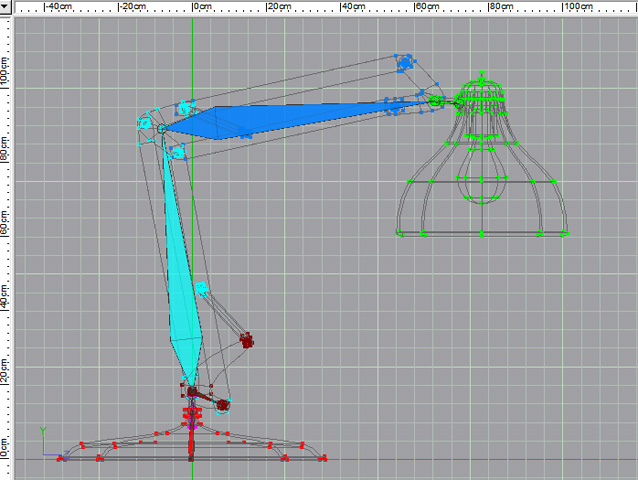
I've started rigging the Luxo lamp and I could really use some help. I've gotten as far as I can on my own, but I'm not sure how to properly rig this.
As you can see from the images, when I straighten the arms of the lamp, they actually separate from their pivot points where they would naturally be attached. I'm not sure how to constrain this.
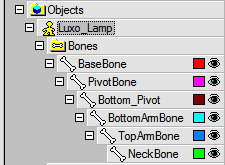
I have attached an image of the bones, the model pulling apart, and the hierarchy list in the workspace window.
If anyone has any help to give, I would greatly appreciate it.
Thanks!
- Michael
-
Here's my first attempt (only 10 lights )
Cheers
Hi David -
Great job establishing mood with your lighting - with only 10 lights!
.- Michael
-
dink around with the Glow amount and the spread in the Choreography settings. That'll get the glow tighter.
Thanks Colin. You know, the word that helped me the most was "tighter", And WHAM, my brain clicked on!
I think I'm pretty much satisfied with this version. I might have to pull a Matt and try some crazy things too


Oh yeah, here's Mr. Calavera himself. If anyone is interested I could put him up for download too
Lee
Hey Jimmy -
Nice job cleaning up your lights. The scene looks fantastic!!! They look like modeled bulbs
. I agree that you could soften your shadows due to the amount of light in the scene (I have no idea how to soften shadows in A:M - I still haven't gone through the lighting tutorials yet ). -
Thanks, Jimmy and Matt! Like I said, this is the first time doing lighting in A:M. I have lit scenes in Maya before. It's pretty similar, although there are only 3 light types in A:M where there are six, I believe in Maya. But for the most part, they behave the same way. I'm going to start going through Yves' tutorials to improve the lighting quality and overall realism.
- Michael
-
Hi All -
Here's my first attempt at lighting the scene.
NOTE: This is my first time placing lights in A:M. I have been using the default 3-light setup for all the exercises I have been doing. So this was a very exciting and challenging undertaking.
I used over 30 lights in the scene to create the effect. I'm using glow for the windows and neon lights. There is no Radiosity used as it was taking WAY too long to render just for testing. I decided that I would start with something simpler to test Radiosity
(perhaps Yves turkey dinner scene).Comments and suggestions for improvements are always welcome.
Thanks!
- Michael


Crazy products
in Work In Progress / Sweatbox
Posted
My roommate mentioned these to me just last week. I'd never heard of them till then. This is really fantastic, so far. Nice job on you labels (and on the models too!). Hmmmm.....What can be added to your basket:
Soup cans...brands....Progresso, Campbell's, Healthy Choice
Frozen meals - Swanson, Lean Cuisine, Stoffers, D'Giarno (not sure what spoof you'd do on that one).
Ice Cream - Haagen Daz, Ben & Jerry's (I can see a Bush and Cheney joke in there somewhere), Dreyers, Edy's
Green Giant
Lay's potato chips (perhaps that one is too obvious?), Ruffles, Doritos, Tostitos, Fritos, etc.
Have fun spoofing. I can't wait to see what else you come up with .
.
- Michael