

williamgaylord
-
Posts
907 -
Joined
-
Last visited
Content Type
Profiles
Forums
Events
Posts posted by williamgaylord
-
-
Equiangular should be equirectangular in my post. Two formats are the most popular in VR: equirectangular (the most widely supported) is a mapping of a spherical view...360 degrees horizontal by 180 degrees vertical mapped to a rectangle...very easy to store as a normal rectangular picture frame; and cubic which matches 6 element camera views directly, but is not quite so straightforward to store as a file, but not terribly difficult. The fisheye and dual-fisheye are not so popular. In VR there are also plenty of proprietary mappings.
I figure a render straight to one of these formats could potentially be more efficient to render...one pass, albeit with more rays, versus rendering multiple views separately, then reformatting the resulting images to construct the VR version.
However, rendering multiple views and transforming them outside of A:M is still clearly an option.
-
There may already be such a rendering option, but it would be really cool to have an equiangular or fish-eye, or dual-fish-eye "360 degree" rendering option. Has there been any interest in adding this in A:M?
I'm working on binaural 3D audio rendering of whale songs. What is binaural 3D? If you listen to a normal stereo recording with headphones, it will sound like the sound is inside your head. Binaural rendering (if you synthesize the mix) or binaural dummy head recording (live recording with an anatomically realistic dummy head) pops the sound out into space outside your head where it belongs, even though you are listening with headphones. The sophistication with which such recordings can be rendered has improved quite a bit in recent years.
Back to whale songs...I can place the whale sounds anywhere in (virtual) space, so you will hear the songs not just around you in the horizontal plane but above...AND below you. With headphones (or virtual reality headgear) that track your head movement, this can also be adapted for virtual reality so you can turn or tilt your head without the sound field turning with your head. It would be so cool to be able to animate whales and render for VR to match the whale songs. Rendering to an equiangular or fisheye video format would allow this to be "prerendered" in a relatively straightforward manner. Playback would be "interactive", but only in the sense of the user being able to control what direction they look. (Same applies to the way I'll render the audio.)
Bill Gaylord
-
When I first tried my Wacom stylus pad with A:M on my Windows 10 Surface Pro 4, I got some pretty wacky, annoying behavior (not caused by A:M, BTW). The following tricks cleared up these problems.
How to get nice performance from a Wacom stylus pad on Windows 10:
A few things to disable:
In the search window on the Windows Settings page type "flicks" and select "turn flicks on and off". This opens the "Pen and Touch" configuration window. (For some reason typing "Pen and Touch" only provides you "pen and touch information", which is not the window you want.)
On the "Flicks" tab, uncheck "Use flicks to perform common actions quickly and easily"--hope you don't really prefer these gestures to a good Wacom tablet performance.
On the Pen Options tab, highlight "Press and hold", and click "Settings". In the "Press and Hold Settings" window, uncheck "Enable press and hold for right-clicking" at the top of the window.
Wacom Tablet settings:
Now we need to change a setting in the Wacom Tablet Properties. Open the Wacom Tablet Properties window. On the "Mapping" tab, uncheck "Use Windows Ink".
You can set the particular pen configuration to your liking. I set the pen touch to "Click", the rocker switch end closest to the tip to "Right Click", and the other end to "Middle Click" (for apps that use a middle button).
Note: Pressure sensitivity will need to be enabled and tweaked in the particular application that might use it. Not used by A:M as far as I know.
...and for Adobe Photoshop in particular...in case you use is in support of A:M for textures, etc...
Note: If you use a reasonably current version of Adobe Photoshop (and perhaps Illustrator) you will also have to create a text configuration file named "PSUserConfig.txt" and place it in the "Adobe Photoshop CC 2015 Settings" folder under "/AppData/Roaming/" (where is the username folder path designation and where "CC 2015" may be replaced by the designation for your version--essentially find the "Settings" folder). The content of the file should be:
# Use WinTab
UseSystemStylus 0Note, that is a zero on the second line. The first line is just a comment (optional).Hope this is helpful! Made my Wacom stylus tablet a dream to work with in Animation:Master on my Surface Pro 4. I suppose someone can pin this, if it proves sufficiently helpful. -
Thanks! These are all very helpful. What I did in the mean time was add spline rings using the extrude tool. Then I scaled the top surface boundaries to create a bevel...scaling, plus translation to align the contours. Then I just tweaked the control point bias handles for splines perpendicular to the main contours to flatten the surfaces. Probably not the most efficient, but it works nicely when you want to preserve the curvature of the corners of hole and outside corners and produces very precisely flat/straight sides.
I was aiming for nice slender (and rounded) bevels, which this produced nicely. Yves Poissant had a nice tutorial on bevels on his website (no longer available)...BTW looks like his last post was some time ago--any news on Yves lately?
-
 1
1
-
-
Looks like you resolved the issue. Thanks!
It's good to be myself again!

-
Anybody have any advice on screen capture software for constructing tutorials, etc? I've seen some wonderful tutorials produced by members of the Animation Master forum done with Camtasia, and I think the price tag is fairly reasonable, considering that I may be able to recoup the cost with some projects I have in mind.
Any alternatives of such a caliber worth considering?
Thanks!
-
It's been a while since I've visited the forum. I'd be glad to help with audio since that is a big part of my professional expertise. I'd like to help put together some resources presenting the principles, practices, and equipment options for achieving good sound on a budget.
Bill Gaylord
-
Man! Wish you a fine recovery! And a reduction of your trials and tribulations!
Saw the post from your iPad while visiting the forum with my new iPhone. Haven't figured out to upload a picture, so I'll post a picture of what I was using before a bit later.
Wishing you well!
OK, here is a picture of what I was using before the iPhone...

-
Quite cool, indeed! Very clever!
I kind of miss some of the contests that used to go on. Or just the exercises like the "Pass the Ball". What about one in honor of Rube Goldberg, where each participant adds a new part to the overall mechanism? State a resulting action, like "flip the burger on the grill" or "deposit our dear departed Auntie Agatha's coffin into the grave---gracefully!" and start it with a simple mechanism and each participant adds a new mechanism that responds to the previous one. Each mechanism should be easy to add to a choreography as a working model that uses any A:M feature other than direct frame by frame manipulation: Use relationships, constraints, dynamics, etc., in the cleverest way you can work out so the control is very simple.
-
It has been quite a while. Last I saw of anybody from the users group that Colin Freeman used to host in Atlanta was a couple of years ago at Dragon Con. Haven't even seen the Hash crew there for at least a couple of years. I'd be interested. My wife is hoping for an excuse to spend a couple of days in Chattanooga.
-
I found a little Java applet demo that is a 2D version of what I want to do in 3D animation. What I would do would be more like a ripple that would look like a knot traced out by a constriction of bubbles or an expansion of bubbles in the 3D bubble foam. This knot pattern would keep its shape and would propagate in a straight path as a knot shaped ripple through the bubbles.
-
One idea I have is much like George Pal's "Puppetoon" type replacement part animation. I would build the "bubble" animation steps as sort of slices of bubbles that fit together. Most of the replaceable parts would be the same part replicated. The section with the "particle", and the transitional steps nearby, would replace the other "undisturbed" segments, in discrete steps, so it would simulate the propagation of the "particle" through the bubble foam. This way I can build a relatively small number of building blocks that would look random enough, but would be discrete blocks I can re-use easily.
Any comments? Any better suggestions? I'm all for saving as much work as possible to get the end result.
I think it will work if I build the matching faces of each block, then add bubbles in between to build a complete block. Then I just replicate these and fit them together. Then I would build a series of replacement blocks to simulate the propagating particle.
-
My one suggestion would have been to create a myriad of cloth balls, drop them into a container and let them deform against each other, then export that as a model.
Tell me more about this idea. Can you perhaps do a demo? Would not have to be a whole "myriad"...

-
OOOO! Yes! And that gives me an idea of how to do propagating knots! Cool!
-
I will probably make the "network" the star of the show, though the foam make for a beautiful image.
Any suggestions on how to make tubes glow like neon lights?
-
I'm working on an illustration of spin networks in Loop Quantum Gravity, a theory of quantum gravity that seems to be making substantially better progress than String Theory lately. (It is still in the realm of speculation so far, though, just as String Theory is...).
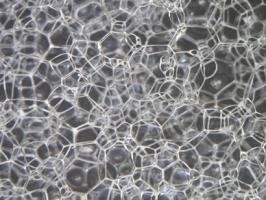
The basic idea is to quantize space-time. The result is very much like a "foam" in certain respects (as John Archibald Wheeler first imagined it might be). So...I'm working on a visual model of the foam to help illustrate the basic ideas and principles developed so far.
The quantized space is essentially like grains of space packed together like bubbles in a foam. It turns out the two most important quantized aspects are the volume of each "grain", and the area of each "facet" of area shared between two adjacent grains. This is the "low energy" model corresponding to the microscopic (quantum) character of space that leads to the macroscopic character of space-time we experience. (The "high energy" states (pre and barely post "Big Bang") are really--I mean REALLY--bizarre in that every grain becomes adjacent to every other grain, which means the whole idea of "space" breaks down, and only a very abstract "relational" concept survives.)
So I will be building a model something like the foam shown in the photo, with little spheres inside each "bubble" to represent each "node", and thin tubes interconnecting each node through each common bubble "facet" of area. One thing I plan to do by lighting sets of these links, is to illustrate how knots and braids that form by connecting chains of these links, lead to patterns that correspond to fundamental particles (photons, electrons, etc.). These continuous strings of links are the "loops" of Loop Quantum Gravity". So...I need to figure out how to make the links glow and how to turn each one off or on in the animation. "Particles" (knots or braids) of "on" links, can propagate as links change state--much like individual LED lights in an LED display can make a pattern scroll across the screen as the individual LED lights turn on or off.
A bit ambitious, but I think well within the wonderful capability of A:M!
-
What about a woven cage something like in the photo? If the fairies are bound somehow before being chucked into the cage, then excape would be less of a problem and a simple lid or opening would make sense.

-
Given how important sound is in animation I'm surprised that the forum doesn't have it's own sound section!
Yeah! There should be one!
-
On another note. Not liking the Guerilla Home Recording book. Can't see much in there for voice/dialogue work - but maybe I'm just not getting it! I do like Rc Viers "The Sound Effects Bible" - thats going to be my bible for the audio on my movie project.
It is focused on music recording, which is actually more difficult in some respects than voice recording, and easier in other respects. The main advantage of voice recording is that your voice is localized basically to your head so you can really take a lot more advantage of proximity to the microphone, so you can get pretty good voice sound in relatively poor acoustic environments. In music recording, even if you only have one instrument, it typically radiates sound from a fairly wide area, especially if it is a large instrument like a grand piano or a drum set. It means the "sweet" spot is usually far enough away from the instrument that room acoustics are an unavoidable factor. If you have a whole band of instruments playing together, it is really tough to minimize the effects of room acoustics, and you usually need to mix multiple mics together, which gets into even more complicated issues.
I should check out "The Sound Effects Bible"!
There are some really good articles, FAQs, and videos on room acoustics (again, more focused on music recording) on the RealTraps web site: RealTraps Website
The "Acoustic Basics" is a great intoduction to the essentials of room acoustics. In voice recording you do have the advantage of being able to get up close to the microphone, but understanding room acoustics still helps. Check out the demos of the "Portable Vocal Booth": PVB
-
Brilliant! You're a genius!
I bet you could use this idea to get a "baloon" tire to bulge at the bottom, too! Can you sum two such effects--one for the tread and one for the bulge?
-
Oops! My bad! It was indeed a quote from Duke Ellington.

Yes, directional microphones will give bass a relative boost close up.
If you already know this, or just don't care, ignore the following:
The directional microphone responds to differences in sound pressure between the front side of the microphone diaphragm and the back side of it (accessed through holes or slots behind the diaphragm). There are two ways this happens. The directivity of the microphone is based on the "phase difference" between sound hitting the front of the microphone, and the same sound arriving slightly later via the ports at the back of the diaphragm. The "phase difference" is how the peaks and troughs of the waveforms line up. As the phase diff increases the peaks and troughs start to cancel each other. The smaller the wavelength (higher the frequency) the more pronounced this effect will be as the wavelength gets closer in size to the size of the microphone. So the mic will tend to be more directional as the frequency increases (and the pattern will change), and the sensitivity of the microphone will also vary in frequency because of phase related effects as well. The location of the "ports" and the orientation of the diaphram affect how the "phase" varies depending on the direction of the sound--hence the directionality.
The other effect is what gives you the "proximity" effect, and that is the dependency of the sound intensity with distance I described earler--the way the sound drops of by a factor of 4 (approximately) with each doubling of the distance from the sound source (the "Square Law effect"). If you get close enough to the mic, there is enough of an intesity drop over a short distance that the back side of the microphone diaphragm gets a lower intesity than the front side. Since this effect depends only on the sound intensity variation with distance, this affect is relatively frequency independent. ("Noise canceling" microphones exploit this proximity effect to reduce background noise.)
The phase relationship that depends on wavelength and direction of incidence causes the mic response to drop off at low frequencies. Since the effect of distance from the source is not frequency dependent, its flat response "peeks" out from under the phase related response at the low end giving the bass a relative boost (compared to the drop-off)--IF your source is close enough. If there is already electronic compensation for the drop off with frequency, then the proximity effect exagerates the bass, instead of just reducing the roll-off.
Probably way more information than you want to hear, so feel free to say so. I'm just fascinated by how this stuff works, but not everybody shares that fascination.
-
If your cubicles are made with pressed fiberglass sound panels, they can be pretty good at absorbing mid to high frequency sound. If it has a fabric cover, and has some "give" to it, but not like foam, it is probably pressed fiberglass. If it makes a slight "crispy-scratchy" sound when you press it, that's another giveaway. ;-)
How many square feet of relatively open floor space do you think there is in your " recording studio". And how high are the ceilings?
-
Actually it is exponential! Even for an omnidirectional mic. Think of a sphere expanding where the radius double each time. The area is four times the radius squared times Pi. Every time you multiply the radius by a factor or 2 the area increases by 2x2=4. So doubling the radius quadruples the area of the sphere. The intensity of the sound decreases as it spreads over a larger area, so it drop rapidly near the source and then ever more gradually as the distance from the source increases. So the sound is a factor of 4 (6dB) less intense at 1 inch than it was at 1/2 inch. At 2 inches it is another factor of 4 less intense. It has to expand another 2 inches for the next drop by a factor of 4, and then 4 inches and then 8 inches and then 16 inches. So already from 1/2 inch to 16 inches we've dropped by 30dB! At 32 inches 36dB. At 64 inches 42dB. And so on.
Reflected sound (of walls, tables, floors, ceilings, people, etc.) spoils this progression somewhat, but the basic sharp drop-off near the microphone smoothly changing to a very gradual drop of (at an already low level) is still a practical way to understand how the sound varies with distance.
The directional microphone still behaves according to this principle, but it also adds a dependance on the direction of the sensitivity of the microphone. So if a noise is inside the "beam" of the microphone, than distance is still your friend.
-
A bit of trivia: A healthy human being has a hearing range that has a 1,000,000,000,000:1 ratio from sound at the threshold of pain to the smallest perceivable sound vibration. The smallest sound vibrations that can be perceived are about the same size as the diameter of a hydrogen atom!


"360 degree" (or 4pi) camera for Animation:Master some day?
in Animation:Master
Posted
Probably separate renders matching the six planes of an equirectangular format would be the most straightforward, one camera for each. I could probably develop (or find) a utility to map the renders to an equirectangular file format to allow it to be played on a 3D player.
Is there an anamorphic lens option on the camera? It will be interesting to work out how to match the borders seamlessly, if possible. I suppose post processing in a compositing app can be used to correct mismatches in brightness, color, etc., to make the border seamless.
In the meantime I can do a normal static camera view and add the 3D audio track rendered as a binaural (two channel) track as an initial demo. I'll likely post the audio on it's own within the next few weeks. I've found a particular humpback whale recording with a distinct echo off the floor of the ocean. I can separate the whale song from it's echo. I'll render the whale calls in specific locations (and varying distances) around the listener and render the echo as bouncing from below and over a wider expanse of directions--should send chills up your spine if it renders well!
Stay tuned!