


jpappas
-
Posts
476 -
Joined
-
Last visited
Content Type
Profiles
Forums
Events
Posts posted by jpappas
-
-
If you want to avoid decalling at this stage, I think the easiest way would be go get a good texture map of a weathered material, you probably can find one for old bone in fact, and import it in your Images folder. Then create a New Material, change it to BitMapPlus, then in the options for BitMapPlus, select your old bone texture map as the image. Then just drag and drop this new Material onto your model. BitMapPlus will wrap this texture map around your model.
To add bumps or displacement effects, make a grayscale version of your texture map (keeping in mind that darker areas will look pushed in and lighter areas will look bumped out), then create another new Material, change it to BitMapPlus again, but this time select your grayscale map as the image. Then in the Properties of the new Material, give the Bump Percent a value for a bump map effect or Displace Percent for a displacement map (start at 100% then adjust it based on what you want). Just drag and drop this Material on the model too. The first one will handle the color, and this second one will handle the bump.
Hope this helps!
-Jim
-
If you are using a Klieg light (and probably sun light) - you can increase the width of the light and it will sorta soften the raytraced shadows
Also, using MultiPass makes this even more apparent, when you use multipass A:M jitters the light in each pass based on the light width, if light width=0, there will be no jitter.
PS. and yes, jitter is the funny word for today!

-Jim
-
When you get the page not found error, edit the website to look like this:
http://www.hash.com/ftp/VM/EX8CustomCar/
Notice I just changed the s1.hashmirror part to just www.hash.com. I think this was when they were changing servers.
-Jim
-
All the library data including Thom is on each A:M CD - you can either copy it back to your hard drive or just use it from the CD. On the CD, look in the Data folder.
-Jim
-
Hi,
My guess is that the CPs for each part of the flower were not attached to the corresponding bones. In Bones mode, just select a bone, then select the CPs you want attached to it. Those CPs will have the same color as the bone once you do this, and each bone will have it's own color - making it easier to see what's going on. When done, exit Bones mode and go into an Action or a Pose, make sure you are in Skeleton mode, then try moving the bones -- the CPs associated with them should move with them.
-Jim
-
Hi,
When you're in the CHOR and create a Path Constraint and get the eye-dropper, then you shift-select and this will allow you to select existing splines from models in the CHOR as the path.

-Jim
-
Hi Julian,
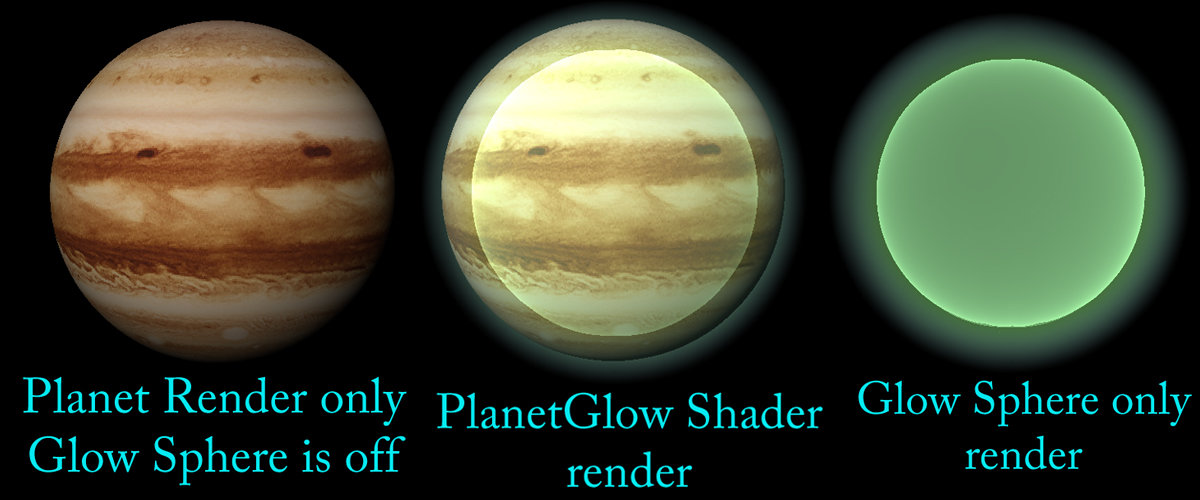
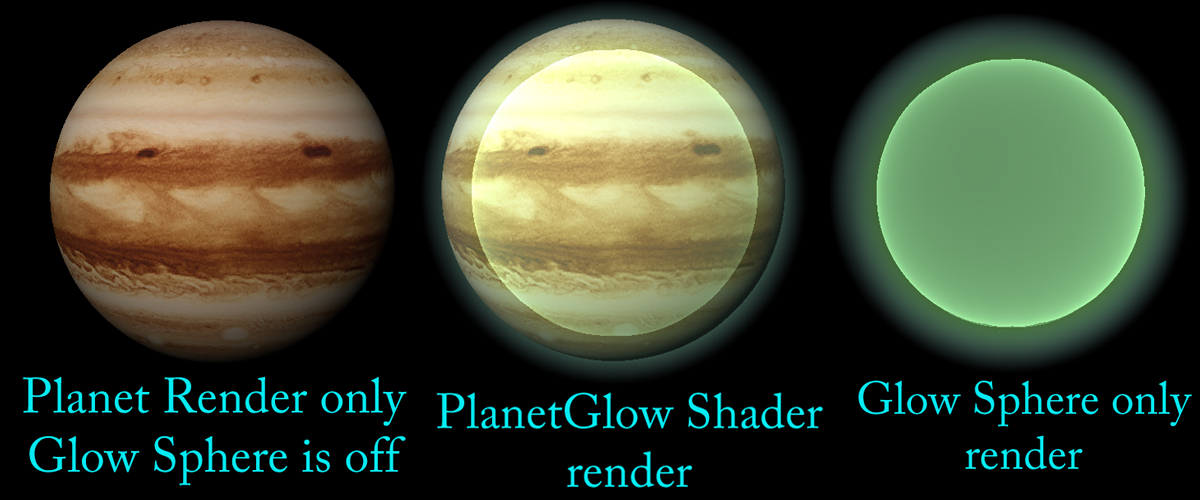
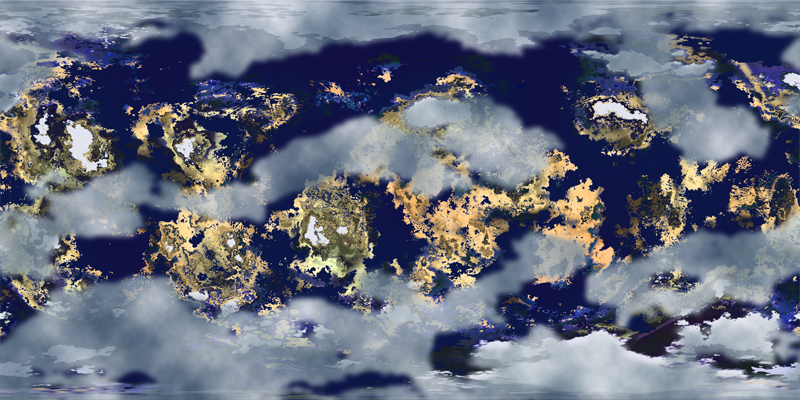
I've tried using the PlanetGlow Shader on a basic planet. I just want to learn how to start using it. I'm actually seeing a glow so I'm doing better than when I first tried.
It looks like there's an inner glow that's really bright and seems to be showing up over the planet model, even though the Glow model is larger than the planet.

You get such great results with it, I was hoping you could perhaps look over my steps and make suggestions?
Here's how I tried to use it:
1. create a 16 cross-section sphere for the planet, and give it a texture
2. create another 16 cross-section sphere for the Glow
3. create a new Material, called it Glow, gave it a Diffuse Color and set it's Diffuse Render Shader to Planet Glow
4. choose colors for the Lower and Higher Altitude Color of Planet Glow in the Glow Material
5. dropped the Glow Material on my Glow model
6. on Glow Model, turned off the Cast Reflections, Cast Shadows, Receive Shadows and Cast Occlusion
7. on Glow Model, set Transparency to 92%
8. put Planet model in CHOR, then put Glow model in CHOR and size it to cover the Planet model (how much larger should the glow model be?)
9. set up Key Light as Sun pointing at Planet
10. in Render Options, turned on Plugin Shaders
Well, here's a few pictures to show the results. Again, that inner glow sphere seems to be the problem. These renders were in V14 using MultiPass 1 Pass. I see in Yves' sample project he uses a Spherical Combiner Material with Planet Glow set on two of the Attributes. Do you also use a Combiner with multiple Attributes that use the Shader? I assume this gives a better look?
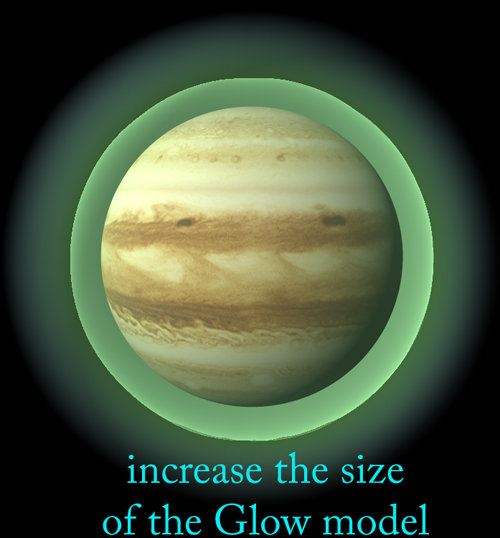
In the second picture I increased the size of the Glow Model.
Any help is appreciated!
-Jim
-
I also don't see the need for the Key Model button. When would you ever use that - it creates way more keyframes than is needed. If you really need all those keyframes, use Key Branch with nothing selected.
I'm new to rigging, but I just read that the Key Model button is useful for resetting bones in an Action from Mechadelphia's new rigging tutorial, here's the section:
...first reset your bones in the Action window to make things as neat as they were when we first started. The easiest way to do this is to enable the Key Model button in your Frame toolbar and then click the Delete Keyframe button
  which is also in the Frames toolbar.
 -
Here is some information from it's creator, Yves Poissant. Note the warning about antialiasing, I think this means MultiPass should be used when trying this. The one time I tried this I was using A-buffer and indeed, the glow rendered as a solid.
http://www.ypoart.com/Downloads/Planet-Glow.htm
-Jim
-
If you have Photoshop, an easy and fun way to generate planet textures is with Flaming Pear's "Lunar Cell" plugin, only $20. The default setting makes a picture of a planet, but change the output to Image Map and it generates Spherical Maps for use in A:M, including color, bump and cloud mask maps.
-Jim

-
Hey Rob,
Just a quick step you probably forget to mention, when you extrude the two cross sections for a shape like the box, the inner shape will then have it's normals pointing in the wrong direction. After the extrude, turn on Show Normals to take a look-see, and select all the patches for the surface of the inner box, and Flip them to point in (or to say it another way, always point Normals to face out so the camera sees them).
I picked up a new technique after watching this, thanks!
-Jim
-
Hi,
This is great! I've seen many of these nice A:M cars but this will be the first car modelling tutorial I can recall. I can't wait to see it.
I got confused by your Poll, I was trying to pick a car from the pictures you showed -- but then realized you're showing examples of cars you already made. Can you post photos of the cars you'd like us to choose from in the Poll?
thx!
-Jim
-
Eric,
I made a Bug Report for this on V13.0r in March, where this scenario was causing an exception. That bug was fixed quickly but in the report Noel indicates while they fixed the crash it still renders incorrectly (this is the render anomaly you are seeing).
http://www.hash.com/reports/view.php?id=4324
A new bug was created for the render problem, it's not yet resolved. I guess your bug report is a duplicate of this one. I just tested again in the latest V14 to verify and I still see it. I'm not sure why my bug is still open and yours is listed as Resolved.
BTW, John's recommendation is a pretty good workaround if all you want to do is apply a bump or displacement map. He's suggesting to use Patch images as opposed to manually decalling, and this is also a quick, one-step way of covering an object. With Patch Images there also is no positioning, flattening, poses, etc...
If anyone wants the steps, you need a Group for your object, then you right-click the Group, select Add Image, select your grayscale image, then change the new Decal that appears to Bump or Displacement. This is working fine and doesn't have the issues we see right now with BitMapPlus.
Using Patch Images, the image is applied to each and every Patch in the Group automatically, saving you the work of applying decals. There are a few drawbacks. One is you don't get all the advanced mixing options of BitMapPlus. The second is that Patch images resize the decal to perfectly fit each Patch, so if you have large and small patches in the same Group, your decals will be all different sizes, and the result will look very non-uniform.
Here's that open report about BitMapPlus:
http://www.hash.com/reports/view.php?id=4333
-Jim
-
Hey Stian,
Thanks for the info! I have to investigate using these HDR images.
But I'm pretty sure I see the reflection of the wing on the plane too, did you use both an Env. map and also standard Reflection? If so I've never seen that done before either!
-Jim
-
Hi Stian,
Very nice job! There's so much to look at, your attention to detail is incredible. I'm really impressed by the chrome look.
The key is Environment mapWhat image type do you use for this Environment map, a regular 24-bit TGA or a hi-dynamic range OpenEXR (of which I'm still learning)? Any advice for using Env. maps?

-Jim
-
Found it!
http://www.hash.com/forums/index.php?s=&am...st&p=224419
This simple example worked so well, I launched into more complex examples, like having one propellor WAV panned hard right, another panned hard left, and having an A:M expression handle the stereo effect as well as the volume. (and then I started thinking, wow! we could use expressions to 'attach' sounds to objects and have distance and panning handled automatically!)
But alas, once I had two sound files being controlled by expressions at the same time, the sounds were constantly breaking up as they played, even in the rendered animation. I couldn't seem to solve that one!
-Jim
-
Hey guys,
Actually I was playing around with Expressions a little while ago and I was able to manipulate the volume of a WAV using an Expression. This may be a little different than what you are looking to do, because I guess you want to keyframe volume levels, but I wanted to bring it up as another option for what it's worth.
The WAV file was a constant sound of a propellor and the Expression made the volume ramp up or down depending on how close the plane was to the camera, thus it was an automatic way of making something sound near or far, all handled by A:M. Let me see if I can track down that post.
-Jim
-
Paul,
Nice work! Looking at the animations, I think "B" looks the best.
A: looks a bit too springy when she twists in the beginning
B: looks very natural overall
C: fans out in the back too much as she walks, like something's holding the back up
D: also fans out in the back like C
E: unlike C or D, it seems to wrap around the back of her legs as she walks
F: fans out a bit too much in the back like C and D
Thank you for posting your settings. I've never used cloth but I appreciate your hard work and I'm eager to give it a first try now.
-Jim
-
Even if I had not read your post, I would never have thought the animatic was the final version. If visitors to this site are not knowledgable about the computer animation workflow, you could overlay a banner in the top left of the whole animatic that says "preproduction" or "storyboard" or even "animatic" to make it obvious.
That said, I think you shoud not show the whole story in animatic form. Although I really enjoyed it, I think part of the fun of viewing your project is the mystery about what it will finally be. Instead, you could show a few clips of the animatic to whet everyone's appetite.
I personally think the subtitles are fine, but I bet if you took a poll, my guess is most people prefer a direct english translation so they can keep their eyes on the beautiful renders.
-Jim
-
I love it! That's not the type of character model you see everyday.
When rigging something made of separate stones like this, do you plan to keep the shape of the stones intact around the bendy parts, or will you make it so the stones themselves bend and flex? I faced the same question when I wanted to rig my voltron model, which still sits un-rigged.
-Jim
-
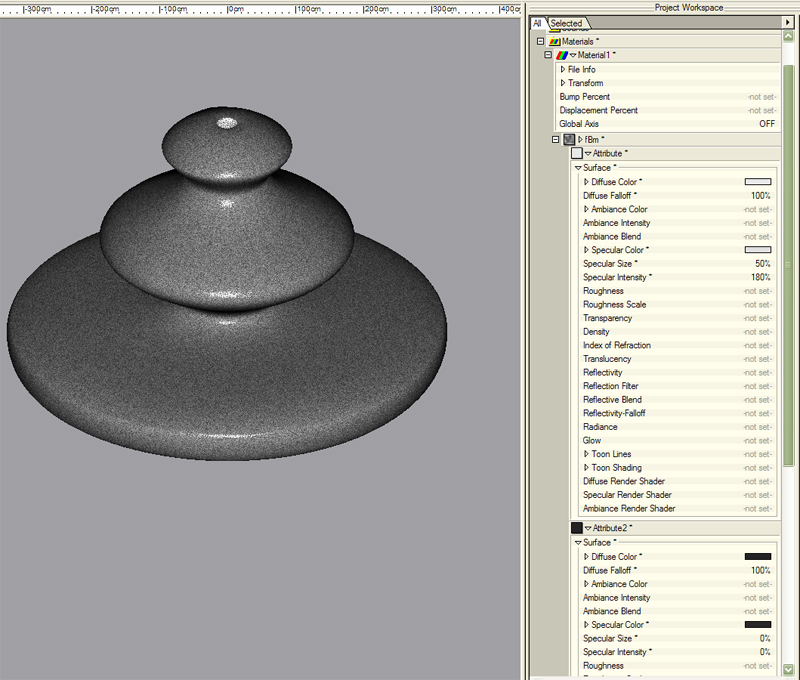
Vern,
Thanks for the explanation, I really need to play with materials more! Once that sunk into my head I made a very simple example using fBM Turbulence to drive both Diffuse and Specular, notice how the specular is broken up.
-Jim

-
2.Materials as other maps:
Is it possible to apply a material to an attribute other than Colour or Bump, such as Diffuse/Transparency/Specular such as you can when using Decals?
I think what Rob is asking is if we use a Material and change it's type to Turbulence with Perlin, or fBM, etc... which can be used to create a complex grayscale for the Diffuse Color (if one attribute is white, the other black), we then have the options to use this to drive Bump or Displacement in the Material properties, but can we use this Turbulence grayscale for other map types like Specular Size, Intensity?
I know more about Decals than Materials so I'm not sure, but I think I remember Marcel Bricman in the BitMapPlus thread saying his GradientZ plugin could do this, take any Material as input and output it to any other type. Can anyone verify?
-Jim
-
Hi,
Another option is customizing Snap to Grid spacing. In the Tools menu, select Options, then the Modelling tab. Here you can change your Grid spacing to whatever suits your needs. If you want each Grid to be 13.5 cm, you've got it!
-Jim
-
Dhar,
I'm not asking that Martin have to choose between the original and the new scene, that would not be a good way to work! Plus, why would he need to do such a thing when we're supposed to be polishing scenes, not doing brand new first takes?
But it's OK, I'm cool. I want to say, in the spirit of working together, let's attempt to respect the original work when polishing a scene, and not summarily decide to throw it in the trash.
-Jim


squetch rigg
in New Users
Posted
bighop,
Think of Rigs like food at a buffet table, there are many choices and you can use whichever you like and whichever works for you. The Squetch rig is like a new tasty entre that many top chefs have worked on and lot's of folks love it, but there's still some who like the 2001, or the TSM and still many who make their own rig from scratch (like bringing their own food to the table, Ok, enough with the food analogy, I think you probably get the idea!)
Any time spent on any rig is time well spent, the basic concepts are used from rig to rig. There's plenty of information about Squetch in the Rig subforum including what versions of A:M it can be used on.
Hope this makes some sense!
-Jim