


Malo
-
Posts
314 -
Joined
-
Last visited
-
Days Won
7
Content Type
Profiles
Forums
Events
Posts posted by Malo
-
-
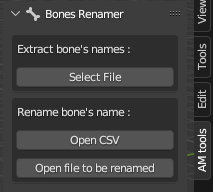
Hello, here is another addon that allows you to rename bones in .act, .mdl, or .bvh files.
The addon consists of three buttons. The first one lets you choose a .act, .mdl, or .bvh file to create a .csv file that contains a table with the names of the bones from the chosen file in the 'old names' column. You just need to provide the new names in the 'new names' column.
To rename the .mdl, .act, or .bvh files, you will use the second button to load the .csv file (with the new names in the second column). Then, with the third button, you can choose the .mdl, .act, or .bvh file that you want to rename.
-
Hi Furchur,
For example, if you download the matcap images from this topic: https://forums.hash.com/topic/38022-36-matcap-images-from-pixologic/#comment-330368, you will have only the images. In Animation Master, you will need to create a matcap material, choose one of the images, and name the material to save it. You have to repeat these steps 30 times to create all 30 materials. This addon allows you to select the folder of images and choose the type of materials you want to link to the images. In just a few seconds, you will have all 30 materials created and ready to be used in AM. Is it clearer now? -
Hi Furchur, unfortunately, you have to use Blender because it utilizes Python libraries and Blender's interface.
-
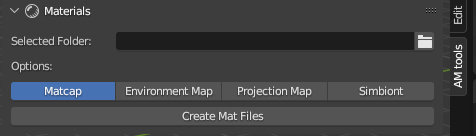
Hello, I found myself wanting to create material image matcaps for AM using images I found on the web.
However, I found it time-consuming to create a .act file, integrate the image, and save it.
So, I developed this small addon that parses a folder of images and creates materials alongside them.
It works with four types of materials (Matcaps, Environment map, Projection Map, and Simbiont).To use it, select the folder where the images are located, choose the type of material you want to create, and click on 'Create Map Files'.
-
Hello, at the beginning of my experience with AM, I didn't use libraries because I didn't have many files to organize.
Now, I find them useful. As a result, I've created a small Python addon to run in Blender that generates .lbr files for AM by parsing a folder (and its subfolders).
The .lbr file will be located at the root of this parsing folder, allowing you to move the folder without losing its links.
To use it, simply name the file (if there's no name specified, it will take the name of the selected folder), then check the file types you want to include in the library. Select the folder, and voilà, the .lbr file is created in the folder.
I hope this may be helpful to someone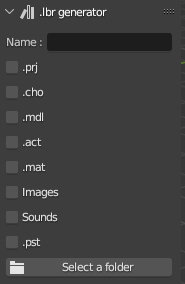
-
 1
1
-
-
It is possible that the topic is not well placed in the forum, do not hesitate to place it where it is necessary. (THANKS)
I remember when I started with AM, I used to search the web for rotoscope images to use in AM, which wasn't easy to find.
Sometimes I had to render for each sides 3D objects, but it took a lot of time. Recently, I thought about creating a small Addon to simplify all of this,
and that's where this little addon for Blender comes into play :
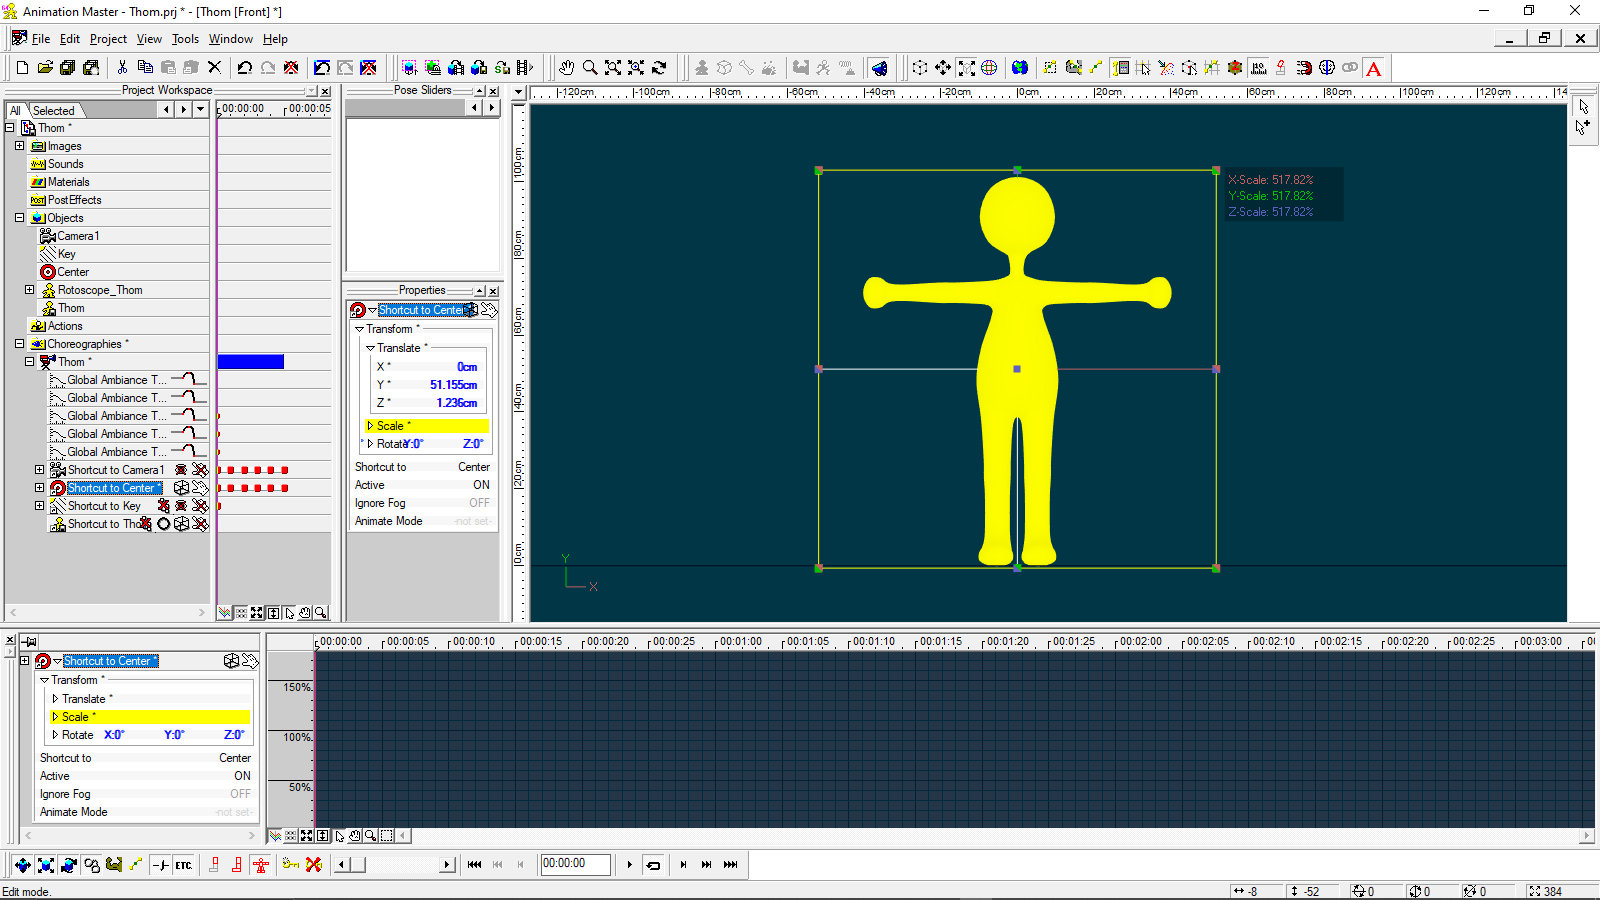
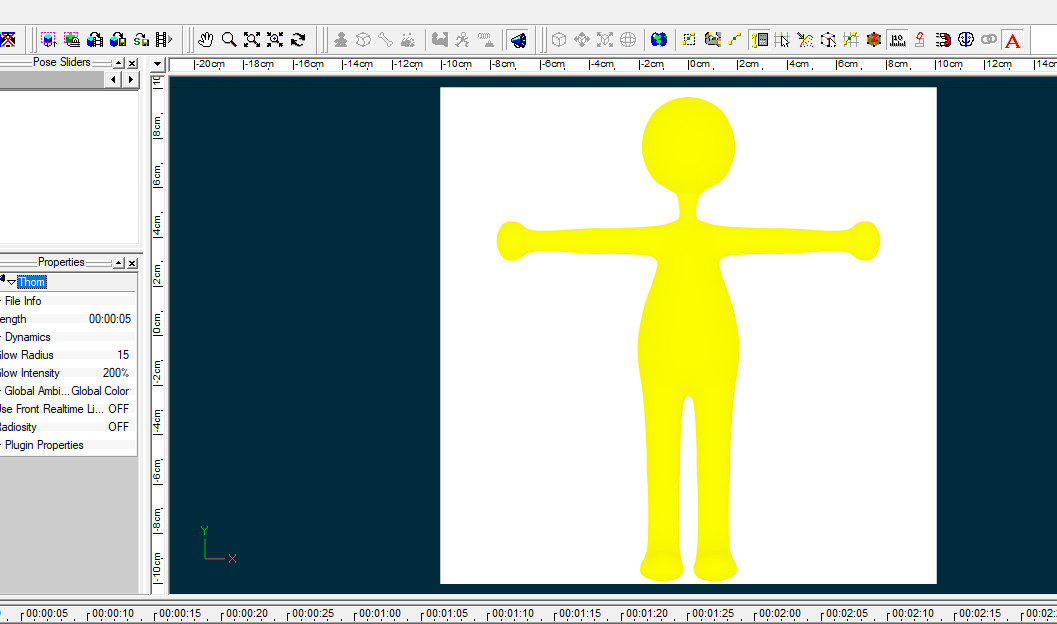
The addon creates a folder where the files for AM rendering will be located. This folder will contain a .prj file, a model file, a preset file (.pre), and a subfolder with the rotoscope images.
In the addon, there are two buttons (rotoscope1.jpg):- The first button allows you to select a file from your hard drive to create a rotoscope from. You can choose a file with extensions such as .mdl, .obj, .stl, .lwo, .plh, .dxf, or .3ds. (I recommend placing this file in a folder as the created files will be placed alongside it.)
-
The second button allows you to select the model in Blender for which you want to create the rotoscopes. You can choose the location where the files will be created.
In AM, open the .prj file and adjust (N and S key) (view : 4, 5, 6, 2, 5 and 0 key) the "Shortcut to Center" Null on your model by scaling it.(rotoscope2.jpg)
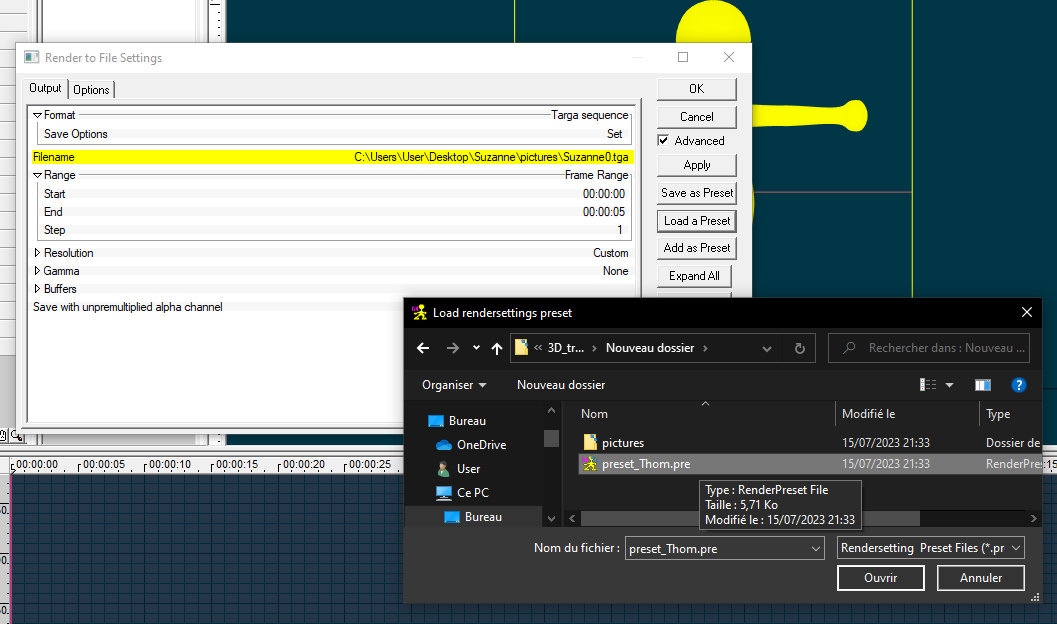
Switch to the camera view (press the "1" key)(rotoscope3.jpg) and then select "Render to file."
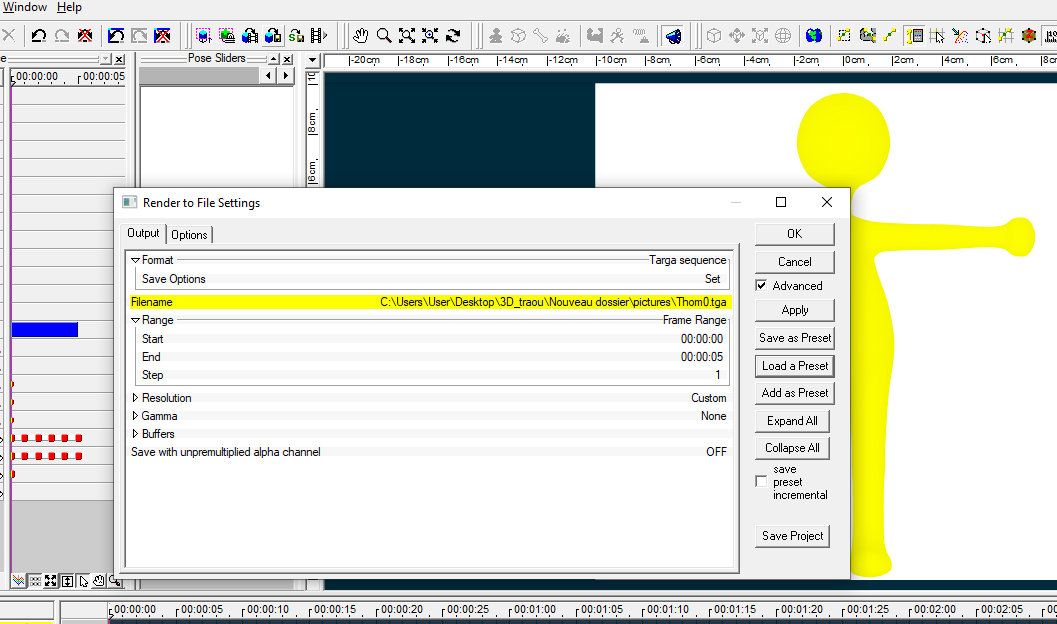
Choose a preset file by selecting "Load a preset file"(rotoscope4.jpg) and click the "OK" button to render.(rotoscope5.jpg)
The 6 pictures will be rendered and linked with the rotoscope_(name of the model).mdl file. Save it, then close the .prj file.
Open the rotoscope_(name of the model).mdl file, and your rotoscope will be ready.
I tried to explain, if it's not clear, feel free to ask questions. The Blender addon is attached. Those who are familiar with Python can modify and improve it if they want to.

-
 2
2
-
Hello,
The addon from version 2.7 is no longer valid for the latest Blender versions.
Nemyax has updated them on this page, which can be found in the 'code' tab : https://sourceforge.net/p/blendamajigs/code/ci/master/tree/-
 1
1
-
-
Hello, perhaps to look also on the influences of the weights of its CPs?
-
Good evening everyone, 🙂
It is possible to create UVs, in a program external to AM, to re-import them into AM.
I haven't used AM for a long time. But from memory I used several steps:
I save my model in mdl file.
I import it into Blender via the Nemyax plugin (Blender 2.79)
https://forums.hash.com/topic/47778-am-importer-for-blender/?tab=comments#comment-409549
I create my UVs in Blender.
At the same time I convert the MDL file into a "special" Obj file via my little program without subdivisions.
https://forums.hash.com/topic/48836-some-tools-for-am/?tab=comments#comment-418077
I import the Obj file into AM while keeping the order of the vertices. I transfer the Uvs of the other model to him.
I export my Obj file keeping the order of the vertices.
I am using my little program for this time converting and transferring UVs to Mdl files.Note : when we use polygonal UV tools, we loose the richness of the splines. For example for a circle with 4CPs, the UV will be a polygon with 4 sides.
We lose too the possible to use the same patch on several UVs.
Aside from its peculiarity at AM, it works well.To paint UVs, this is another method.
In AM I export the mdl with its UV in OBj with subdivision (to have the shapes) in Blender.
I paint the model. The uv painte picture can be used after in AM. -
Great animation!
-
Hello, There is better than Troer (more complete), There is the plugin of Nemyax for Blender, which converts any format that can be imported in Blender, to mdl :
-
1
-
 1
1
-
-
 On the picture what is in yellow are the CPs not included in the selection, the green ones that have been selected.
Here is the modified file with the selected Cps.
A patch to be selected needs at least one CP from each spline that makes it up.
On the picture what is in yellow are the CPs not included in the selection, the green ones that have been selected.
Here is the modified file with the selected Cps.
A patch to be selected needs at least one CP from each spline that makes it up. -
The problem comes from your selection "Rear Glass" ... You have selected the CPs of the spline which circumvents the outside, and those of the center. But you did not select CPs common to both parties.
-
thanks Robert for your proposition. I will study that.

-
Thanks for your return.
Paths are saved ... but strange thing they are only visible when the "Relationship1" window is open. If I close the "Relationship1" window then the path links disappear. It is not possible for me to use the pipette to select a bones or a path (v.19). My problem can come from there? -
Thank you Serg for your reply.
Unfortunately that does not change.
So I rethink the rigging without path. -
Hello,
I found that the export of a model containing constraints of path, once animated and exported like a model, loses its constraints and the bones are not in their positions.
Here is an image illustrating the problem, and the model to test the problem.
Are there some things I did wrong? -
Than you again!
-
Thank you very mutch David!
-
Thanks for the answers!
David, that would be great, if that's possible.
Thank you in advance. -
Good evening,
I'm looking for tutorials on expressions ... do you know links?
I am also trying to understand the logic of the number of ".. |" before an expression.
Thanks in advance! -
Thank you!
-
Among the strange patches, there is this case in yellow. the subdivision is not done in x16 in AM, it is different from its mirror patch, and there is a bug to the export of this patch, but its subdivision is done.

-
Hello Robert,
Yes, the ideal for exporting triangular patches into polygons would be this topology. Now I doubt that we will not rewrite a polygonal subdivision express for export. But I thought it would be possible to filter its triangles-quads to rewrite them into triangles.Hello Rodney,
The proposal (left back foot) is good to avoid the problem of hooks, only does not solve the problem of triangles-quads. The best solution in this case would be to turn the hook into a CPs for export (see the front left foot). There I had to think about it before, because I have to redo the UVs.
Hooks and triangles are two differents problems.
What is strange to me is that this bad topology in AM is not seen, whereas when we push the creation of weird patches with the hooks, it is seen in general as for the following image.
Test this PRJ, please
in Animation:Master
Posted
Hi,
Using v19.5a, win10, nvidia 940M
For "DialogFreeze004 external JPG MAT MDL ACT CHO.prj" that freeze without panel.
For "Delete.prj" it open, but without "vase" model.
For "VaseSlide.cho", it's ok, a panel ask for the "vase.mdl". So I choose "vaseX.mdl", it dont' freeze, and open the scene with the vase.
After If you close the project (not AM). You can open "DialogFreeze004 external JPG MAT MDL ACT CHO.prj" witout problem. (as if it had remembered the path of the folder where the files are located)
On v15, not this problem, a panel dialog ask for the "vase.mdl"
This is a problem that I have already encountered, when a file searches for an image for which it cannot find the correct path, it freezes.
Hope this can help