


cribbidaj
-
Posts
317 -
Joined
-
Last visited
-
Days Won
4
Content Type
Profiles
Forums
Events
Posts posted by cribbidaj
-
-
I don't see a dynamics flag in the PWS. The Terrain (which carries a shortcut to the Shag emitter) shows that Dynamics are 'ON' in the Properties Panel, but there are no keys on the terrain except for 'frame 0', when I manipulated it into position.
-
Thanks, Daniel. This helps.
I have not viewed your scene - where do I find it? Your models in your other posts are awesome.
-Chris
-
I do have the Extras CD, but can't find the compositing turorial you mentioned - mostly filled with models and projects. Where do I look for it?
Also, there is camera movement in my scene - does this really mean I can't composite? Is there a way to render the scene with the camera pan over just the models I want in the background (ie. the sky and the grass), then render same scene with camera pan but just the foreground characters (tree and accordian creature) present and layer that render over the other?
In answer to Piano Man's reply, MultiPass rendering is turned off, so I don't know if my problem is related to this. Honestly, MultiPass rendering is one of the subjects I don't have a grasp on. If MultiPass is selected, won't my rendering times be even longer?
-
I have attached a file of a short scene rendered in 'Final' output. The 'shag emitter' used to simulate grass displays unwanted changes in the background during the animation (beginning on 2nd frame, and then again at about 2 1/2 seconds in). This anamoly does not appear when rendering in 'shaded' mode. Could the problem be that 'dynamics' is defaulted to "on" in the 'shag emitter'? I'd like some advice before rendering again - this 3 second shot took 17 hours to render at HDTV 1080 resolution. Which brings me to my next question. What is the recommended rendering resolution to bring my targa files into Adobe Premiere 2 for compiling. My intended output will be DVD and web. I am under the assumption that rendering at HDTV resolution would give me a high aspect ratio that I could then compress to other formats. I burned a DVD of this scene at HD resolution and played it on my widescreen TV (which is HD compatible). My DVD media is not HD. The animation on the TV was not at all as nice as the output on my VGA monitor. I have read and re-read Adobe's Video Primer, but digital video jargon is still pretty lost on me. Can anyone direct me to a simple explanation?
Also, I'd like to render the background of my scene separately than my main characters, then create a composite. I know this is possible, but I'm still unsure how to do this in A:M. Because rendering times can become tiresome, I need more information before I proceed.
Thanks,
Chris
-
Are you meaning Copy/Flip/Attach when you are typing "copy/paste mirrored" ? I don't have a "copy/paste mirrored" (at least if I do, I don't know where it is).
If you are talking "snap to mirrored points", you may need to change the tolerance setting under Tools>Modeling>Mirror Mode>Group Snap Tolerance.
Glenn
Under the Edit menu, when in a pose or an action window, there is a "paste mirrored keyframe" command. "Copy keyframe" is a previous command that obviously you must do before you "paste mirrored keyframe" either to the cp's on the opposite side, or to the opposite side's bones.
I spoke with Heath today and he says this is possibly an instance of a broken command within this rebuild of A:M that hopefully will be fixed in the next version. I've posted this issue in the A:M reports just in case.
-Chris
-
I'm following up this post to add that now "copy/paste mirrored" does not work properly with any of my models. Anyone know what's going on? Am I missing an obvious flaw in my method or has something become corrupted with my install. I just upgraded to 13r, but the problem persists.
Thanks,
Chris
-
I've had a problem with the attached model for quite some time. I've "copy/flip/attached" one side of the model several times with the same result. After making sure the middle spline is zeroed on the x-axis and cleaning up the mirrored side (completing 5-point patches, etc.) I've brought the model into an action window to flatten and paint the face. After flattening, I've manipulated the cp's on one side to get the desired results, but when I "copy/paste mirrored" to the other side, only a few of the other side's cp's are affected. I've actually completed decaling the model and rigged the face only to get the same type of "copy/paste mirrored" problems in poses. The model I've attached is not the rigged (or even painted) version. I figured I'd try to clear this up before getting too deep into the process again.
Thanks,
Chris
-
I would delete the constraints and make new ones, just to make sure you don't have something fighting you, Chris. As for the CP Weighting...I would check to make sure that some of the percentages on the CP's didn't default to the entire model, that can happen when renaming things.
Hope that helps.
After deleting the constraints and creating new ones I still ran into some problems, so I've deleted the entire bone structure, created anew, re-rigged, and everything works fine. Thanks for the help - I'm glad I ran into this problem on a simple rig.
Thank you,
Chris
-
I haven't actually tried doing a copy/paste/mirror with your model, Chris....but, in order for it to work you have to be consistent in your naming convention and the bones have to have some form of "left" and "right" in the name. I don't mean "r" and "l", I mean, "left", "right" or "LEFT", "RIGHT" or "Left", "Right". Have you tried that?
Hi Niels and David -
As a follow up - I've renamed my bones conventionally, but some weirdness is still happening. Naturally, I've had to delete my constraints and re-constrain the bones now that they are named correctly. However, the new constraints show the target bones as being named something different than the newly named targets. Such as, "Orient Like lR FootControl" as opposed to "Orient Like Right FootControl". So I then right-click and "select target" and everything seems named correctly once more, but then often (not always) when I select a constraint the target bone appears named wrong again. Lastly, the new constraints with the newly named bones now "copy/paste mirror" correctly in an action, but I get some cp weighting issues that are not apparent in the model window, only in the action window. Does this sound familiar or should I send this to A:M reports?
Thanks. I may just re-rig this model from the beginning since the rig is not that complex.
-Chris
-
I haven't actually tried doing a copy/paste/mirror with your model, Chris....but, in order for it to work you have to be consistent in your naming convention and the bones have to have some form of "left" and "right" in the name. I don't mean "r" and "l", I mean, "left", "right" or "LEFT", "RIGHT" or "Left", "Right". Have you tried that?
That's it, David! Thank you. Makes sense, but I was unaware of the need for consistency in naming. Strange that this is the one model I've been working on that I didn't stick to naming the bones correctly, but then, of course, there's no accounting for some of the things I do and don't do.
Thanks all for the help.
-Chris
-
Niels -
Thanks for your help, but unfortunately, I'm am getting no results with any of the methods you've succeeded with, and I've followed them to the letter countless times. I've sent in a report to Hash, so maybe it'll be resolved soon. In the meantime, I'm perplexed why you'd be able to get "copy/paste mirrored" to work within the project (albeit through convoluted steps) and I can't while following the same procedures. Also, why is it this particular model that's giving me trouble in this area? It's not that complex of a model, and other much more complex models are working fine, even within the same project. There must be something squirrelly within the model, but I can't figure it out.
Thanks,
Chris
-
I tried again to see when I didn't get it to work...
- When using key-bone and I forget to select R Calf, it doesn't work...
- When using key-branch and I forget to deselect any possible selected bones, it doesn't work...
Niels
I am a little confused about what you mean by R Calf. I have notice A:M refers to a right view of a model looking at the left side of the model. I have gone against this convention because it's somehow easier for me to think from the model's perspective, i.e. the Right Calf is the models right calf which is on the viewers left as he's looking at front view. In this model, I have noticed I named the model's R calf "Right Calf" and the model's L Calf "L Calf" (As if I could make this any less clear). So by R Calf, do you mean the bone I've named "Right Calf"?
I just tried both of your suggests again, but again, to no avail.
-
I see in your project-file that you drive with 13q..., I also tested with v13q...
Were any of the steps unclear to you...that you might have done it slightly different...
Niels
No . . . you're steps were clear enough, and like I said, this works with other models on my end, just not this one. I'm pretty familiar with the [copy/paste mirrored] process and understand the pitfalls of modelling incorrectly, so if it works on your end I don't know what else to do. I've literally brought other models into the workspace of this very project, opened a new action with them, and achieved desired results with the command, so . . . I guess I'll file a report.
Any other suggestions are welcome.
Thanks.
-
A second method with key-bone instead of key-branch:
I'm not getting any results - sorry. Everything you've suggested works on other models, but something is buggy on my end with this model. If you're getting satisfactory results with this process on my project, maybe something is wrong with my computer or something got corrupted in the software installed on my end. This doesn't follow since "paste mirrored" works with other models. Is my bone-naming heirarchy incorrect? Do the bone names on either side make a difference? Please advise.
-
Set the bones-key mode to key-branch, set the timeline > select bone > copy key-frame > then 'select' no-bone > set the timeline and paste mirrored.
Niels
Still no luck on my end. Were you able to downloaded my project and get this to work on your end?
-Chris
-
I've attached an embedded project with an accordion-type creature that I've modeled and rigged myself. I admit it's probably not the best modeling or rigging job, but, hey, this is work in progress, right?
Anyway, I have taken care to make sure my middle spline was at "0" on the x-axis before copy/flip/attach, and I've flipped right-side bones to left-side using a bone at "0" on the x-axis, but while in an action, selecting a keyframe on one side, copying and pasting mirrored keyframe does nothing. I'm sure there is something I've done wrong, but for the life of me, can't figure it out. Please look at the attached .prj and hopefully you can enlighten me.
Thanks,
Chris
-
Yes, thanks to all those with the knowledge to impart to we mortals - I finally feel like I'm getting a grip on some of A:M's abilities and am thankful for these forums as well. I certainly am missing using the A.R.M. at this juncture though!
-Chris
-
Can anyone tell me what has happened to the links to the A.R.M? I have used that site as a resource for more A:M solutions than I can count and hope it's up and running soon.
Thanks.
-
Can anyone tell me what has happened to the links to the A.R.M? I have used that site as a resource for more A:M solutions than I can count and hope it's up and running soon.
Thanks.
-
Thanks for your input, all.
I think I remember an artist working on rigging the facial poses on the scarecrow in the T.W.O. project mentioning creating nulls that contained a number of poses that in total worked certain areas of facial movement. While I understand that I'm incapable of tackling that complex of a rig at this point, I thought I could at least incorporate some of the concept in my own rigging. If I remember correctly, the topic explained that earlier versions of A:M made this process difficult, but as of v. 12 (I think), it was easier.
Of course, frosteternal's suggestions of creating 1 or 2 hand poses and doing the rest on the fly seem logical.
I know I'm letting my enthusiasm run rampant, but it feels SO good to actually grasp and utilize some of the inate beauty in A:M.
-
The one thing that bugs me about the walk cycle is the foot slapping down as he takes a step - it looks a tad to fast and almost painful.
Please look at this and see if it's better. Admittedly, I have some work to do in timing and animating in A:M.
How do I place single poses into a larger pose (i.e. a single finger "open_close" pose into a "open_closed fist" pose) without creating an unruly list of poses in my user properties?
Thanks.
-
I'm so excited! - I know this is not much by many standards, but the clip below features a model completely created and rigged by me and is my best work so far in A:M. Using Mike Caputo's rigging tutorial from the A.R.M., I managed to accomplish a simple but working animateable rig. Alas, the links to these tutorials are currently dead, but hopefully will be up again soon. If anyone has info on his "FK to IK" arm tutorial, please forward. I've got it working pretty well, but I believe I'm missing a step when constraining the "IK Bicep to Elbow".
I am learning simCloth after purchasing the 2005 Siggraph DVD from Hash, Inc. Mark Weller's tutorial is very informative, but I believe it has some errors in the presentation that need to be addressed. After speaking with James at Hash, who cleared up some of the misinformation regarding which cloth material to use as the deflector, I have been experimenting and am totally immersed in the coolness of simCloth!
Please submit comments - any and all are welcome! I now believe Animation:Master to be the sweetest software ever created!
-
Do you have mirror mode on perhaps? Hard to say....probably need to see the model. I hope you saved in versions.
Bless you, Ken. Yes, I had mirror mode on - something I'd just learned about in a tutorial which also warned me to make sure I turned it off after making the adjustments I needed. I'm glad it was this simple! I did save in versions, but, of course, strange things were happening in all versions while in mirror mode.
Thanks,
Chris
-
Hello -
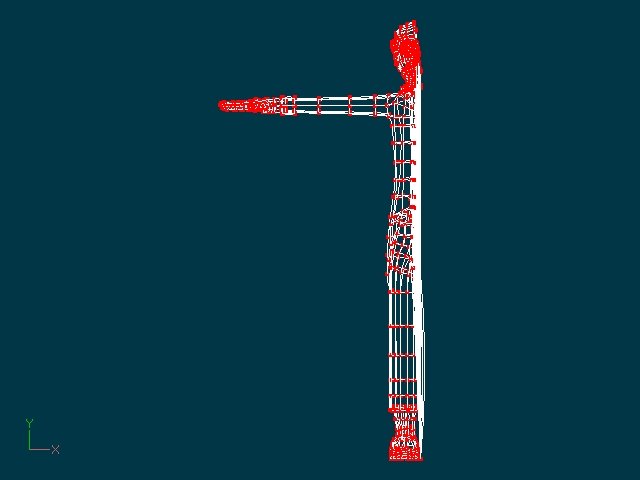
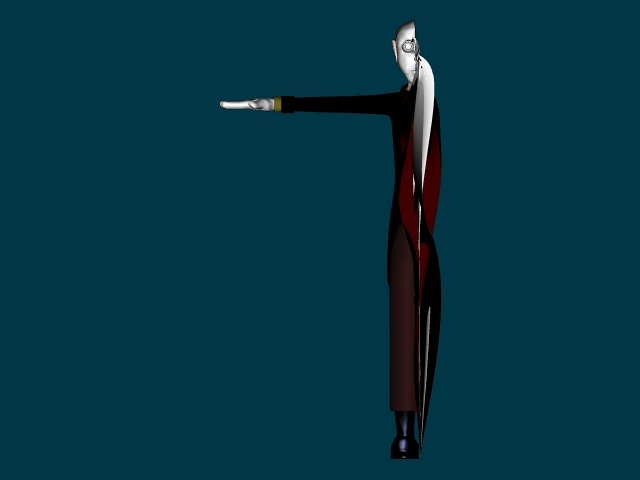
I've created a full model which I'm now trying to split in half at the center spline so that I can copy/flip/attach to rig properly. After deleting the left half, centering the middle spline at 0 along the x axis, at the copy/flip/attach stage a strange occurance happens. The model attaches at the feet. The foot is placed along the 0 y axis, but if I move the model down below the y axis, some of the control points end up at the bottom of the model (see attached jpeg). I've trid to backtrack my work to find the control points that are causing the problem, but when I try to delete them to replace them, they won't delete. Anyone know what's happening here?
Thanks,
Chris
[attachmentid=20012]


rendering questions
in Work In Progress / Sweatbox
Posted
Nice, Daniel - that's cool how the background's softness creates a workable animateable space for your main character(s).