kattkieru
-
Posts
118 -
Joined
-
Last visited
kattkieru's Achievements
Apprentice (3/10)
0
Reputation
-
I think the comment by 3DArtz says it all. I've seen some stuff that makes it on TV with lipsync that doesn't touch what you've got going in this clip. Not to mention the new Ninja Turtles movie (which you know I loved, and which was totally awesome) -- the lipsync in that shouldn't have made it to rendering. As always, I'm whipping a team of cheerleaders into a rooting frenzy for ya.
-
Heh. Six hours of cursing and almost tossing my computer out the window later, I've decided that I have no idea what's going on with this thing. I'm going to give it another go tomorrow. Poor Thom has had enough of a run through the Blades of Doom. Question: is there an easy way to expand the entire tree of bones in the model view? I tried all kinds of clicking on that plus to no avail.
-
Well I hope Luckbat doesn't mind me spilling a trade secret of his, but the umbrellas actually come from a tiny bodega on 54th Street in NYC. Which part of 54th is, I think, something I'll leave to you as an excercise in urban exploration. You already have all my comments man; I just wanted to chime in and shout Banzai, Banzai! here as well.
-
Here's an image of the new pelvis. I tried to keep hooks and five-points away from spots that'll get distorted a lot and from areas that need to be round (five point patch + bum = flat bum). [attachmentid=18598] Anyway, I won't be able to weight tonight but I'm gonna give it a go tomorrow. But I wanted to leave this up for feedback, just in case you see a spot on the model you think'll be bad for animating. My knowledge of flow comes mostly from polygons, wherein you can have five-pole points without smoothing problems, so I had to kind of hack around that loss. So lemme know what you think.

-
Whoa, you're totally right. I must have hit something while I was animating. Like I said above I'm still kind of a born-again newbie with the animation and the shortcut keys; I prolly hit the key for that without noticing. That'd explain some of the other weird behavior too. Lemme have a look at it tomorrow. The modeling part is no issue, but the re-assigning of CPs is something I'll have to relearn. The "geometry" bones are the only ones required for parenting of CPs, right? Or should I go through the whole installation process?
-
no, it's not herbie (vw beetle wip)
kattkieru replied to kattkieru's topic in Work In Progress / Sweatbox
Finished off the bottom. I'm trying to keep it simple, although depending on how crazy I decide to go with textures I might decal it with drive train parts or something. [attachmentid=18566] Still only up to 1816 patches. I think I'll aim for between 2500 and 3000 total in the end, which leaves me lots of breathing room. (I don't believe it'll actually weigh in that high in the end.) I've been bouncing around on stuff because I never stay in once place for long, but I think next up might be the exhaust and spoiler. I didn't think they actually put spoilers on these things, but I'll be damned if I didn't see one while I was walking around town earlier in the week. Wish I'd had my camera. I could use advice on the axle: what do you reckon it needs? I am trying to keep it simple (streamlined, if you will), but I'd also like something that doesn't look terrible. Any suggestions?
-
Also keep in mind I have bad tech karma. The friend of mine who got me to buy AM a while back never has crashes. Sometimes I feel like the non-virgins in a horror movie. ; Yes, this is the installation version. Since the 13th July one started working, I dropped the 17th july one into a new project for that test (from the above zip file for v12.) The action is yours; please find a project attached. (Are actions saveable as separate files?) I'm sure the butt thing is my fault; the only actual animating I've done in AM was posing KeeKat and doing the Door tutorial, and that was something like a year ago. Hope it helps you. He's dancing to Comfortably Numb by the Scissor Sisters, if you're curious. Hey, you're the master at this, and I bow to your judgement. On the other hand, I've found that the most important part of maintaining good deformations around the leg areas is to have the leg circles flow in an arc around the crotch, one that joins both legs together. Since I'm woefully unable to explain myself verbally lately, here's what I mean visually: [attachmentid=18557] Personally I find that a circle of CPs or verts or whatever at about a 45 degree angle as the main link between leg and pelvis to be the key. Thom's legs are attached in a manner which, in my mind, almost prohibits easy movement. I'm sure you know all that, but it surprised me when I looked at Thom the first time, considering he is kind of the AM mascot, that his spline flow was so bad. And that he has no bum. Lemme know if you need any more help, though. At the moment, I have nothing but time. dancing_thom.zip
-
Oh, I didn't submit it as a bug; I just posted the note above. Bugs in AM are so strange that I only submit the ones I can safely, easily reproduce every time with a set bunch of operations. (Just now, I loaded the 17 July version into AM and got Exception 1, then the program crashed; I loaded up again with the same steps and it's fine.) Anyway, I don't think it's gone; I just can't get it to happen again. Since I'm not even working on a humanoid character in AM at the moment I'm going to leave it for now and come back to it when I attempt a human as my next project. It should be noted again, David, that the error only occurred on the right hand fingers; if you do go through the rig again with a fine-toothed comb, I bet you'll find some discrepancy between the setup of the right and left fingers. As a complete aside, Thom freaks me out. He has no bum. (Ignore the fact that it pops halfway through in the anim; dunno why it did that, and that's not the lack of bum I'm speaking of anyway.) dancing_thom_h264.mov
-
Well, it's safe to say I have no idea what's going on. I sent the above message on my fifth or sixth try to get a consistant method for locking AM. (Each time it broke at a different moment when I was moving a different bone.) On the next try I was actually able to click through all the circularity messages and save a project. Different messages each mentioned different fingers on the right hand only, if you're curious. When I reloaded the project, the problem went away and now, even following the same methods, I can't break the rig again. So sorry for the "bug report." I guess you can ignore it?
-
Hey David, Before I say anything else, I want to thank you for all the work you do for the community. I think it's pretty awesome of you to spend so much of your time on stuff you basically give away to the community. Now that I'm back on AM I wanted to retry your rig. The first version I downloaded was the july 17 one, which broke my v12.0w. (I got six different errors, then it crashed when I tried to delete the chor and start again.) So I downloaded the July 13th version. Two minutes into playing with Thom I got this: [attachmentid=18515] I'd save and send you the project, but every time I dismiss the message box the same one pops up in its place; after I type this I'm going to have to kill the process tree and see if I can't replicate the error. However, I thought you might like a look at the error message. edit: Yep, seems the same message pops up if you play with the hand gizmos long enough. Sorry if this has come up in the past, but I did search the thread for "circularity" and it seems nobody else has mentioned it.
-
Now that's interesting... You know, I might be doing that too. I have a habit of holding down keys that are connected to what I'm doing most, but I forget to let them up when I'm done. I bet I was holding down the shift key on some of the sopts I used, although I know I wasn't on the mouth. Good thing to keep in mind, though, so thanks!
-
Yeah... there should actually be an entire new chapter in the newbie manual about how alpha, gamma, and magnitude effect the spline look, and how you can manipulate them. I said in another section that I find it most beneficial to zero alpha and gamma and set mag to 100% before tweaking; I think that's a trick that'd help out a lot of people coming in from other programs as well. As for my modeling technique, I think that may be the problem. It usually seems to happen when I duplicate geometry, modify it, then reconnect it (although I had a few on the trunk of my car that were free-floating splines; turns out that I should have been hitting "Select Connected" instead of selecting spline loops before hiding). So what I was doing: I made a mouth from a 10-point lathed circle. I extruded the mouth out twice to form the lips. Now, instead of just extruding backwards, I copied the inner spline loop, pasted, and using extrusions I created the mouth bag. Lastly, I deleted that spline loop (leaving a bunch of free-floating ends sticking out) and tried to reconnect them to the mouth. Looking back, part of it may have been that I deleted a spline loop with hooks running *from* it *to* other patches... They kind of stayed attached anyway (even though they were rootless), then vanished afterwards with no warning. But the first time I came across this issue was when I mirrored my model by hand (Copy/Flip/Attach always borks geometry for me, so I reconnect everything manually). That time, though, using K to disconnect and then either reconnecting or drawing a new spline between the two CPs worked; those tricks didn't work this time. I fixed the model on my own and double-checked that there were no floating leftovers... But you're welcome to the mouth part. It looks pretty normal by my estimation. beetle_mouthparts.prj.zip
-
Wow those were some fast replies. Thanks! Near as I can tell they're not connected to anything else. I tried the Y trick first (was the first thing I thought of, actually) to no effect. Tried loading, reloading, reverting, to no effect. I'm actually done fixing the problems now; like I said, I ripped out the splines and rebuilt them from scratch, but I'd still like to know *how* the problem occurs so I can skip it next time. ; I didn't try the copy-and-paste; I generally stay away from it when patches are involved because it eats my five-point patches, and since I'm using porcelain that also means I have to go through and flip lots of normals again. But I suppose I can try that next time too. Oh, and I'm using v12.0w. Hmm... There were none with that issue here, but I found one on the back of my car that I wasn't able to solve before with that problem, so thanks on that!
-
Hey-ho. I have a problem that happens every so often: CPs that aren't attached to anything, ones that should only have one bias handle, have two. This makes it so that it's impossible to connect another spline to them and have the two merge into one spline. Anyway, a better explanation is the picture below. That CP has two handles. When I connect the spline to it, I get a spline and a patch that are just weird. What causes this? To fix it I'm having to rip out entire splines (at the moment this seems to be a catching problem, as deleting that one CP makes the one behind it have the same issue), and it's driving me nuts. Thanks in advance, ~ Charles
-
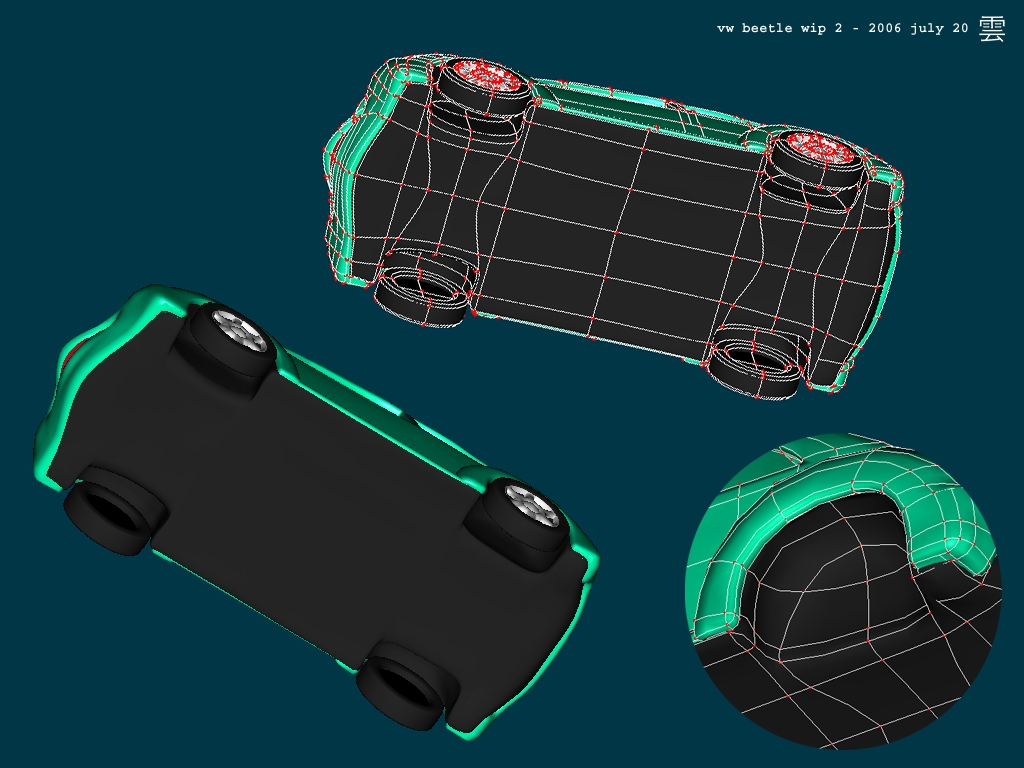
no, it's not herbie (vw beetle wip)
kattkieru replied to kattkieru's topic in Work In Progress / Sweatbox
New WIP image in the attachments for this post. Visually there aren't too many differences, but I spent all day yesterday slimming down the model; we're down to 1538 patches, which I think is not too bad. The wheels took the heaviest hit, and the logos have been completely done away with for the moment. (I'll add them back just as soon as I can find my AM manual for the bit on Decals.) Tried something with the bottom, failed; gonna try again later. I lied! First, I want to say thanks again for that help on editing CP handles. I've got a system going now thanks to that and the Zettle page, and I've discovered that the most useful thing in the world for me might be a one-key command to "normalize" CP handles. By normalize, I mean set alpha and gamma to 0, and both magnitudes to 100. I found that, on the whole, every spot that was unbecoming was due to alpha or gamma being screwy. 90% of those were fixed in my eyes by normalizing the CP handles in both directions at the junctures (you know what I mean, how each CP is actually two going in the different spline directions) and then doing basic tweaks. Ahh, thanks for that. I see what you mean. Now, in one of the technotes it said there's a weight setting to adjust that behavior? And is there a reason the porcelain setting is hidden? I've found that you can add vertex averaging by editing the material files on disk directly, but not in the properties editor? Yeah, well I don't get Lindsay Lohan being in a Herbie movie either, but then again I'm old-fashioned.