


strohbehn
-
Posts
542 -
Joined
-
Last visited
Content Type
Profiles
Forums
Events
Posts posted by strohbehn
-
-
Mark, seriously - I had dental surgery and my top lip is swollen up bigtime. If you're going to be posting things like this that make me smile, you should at least warn a guy first!
(Good to have you back, man.)
Hey Martin, hope you heal up fast. Glad I could bring some fun to your day. Thanks again for an awesome program!
That's a neat trick!Thanks. It's been fun to experiment with distortion boxes.
I think 3dartz used this technique to animate a face.Yeah, you're right. I'm curious to know if he's done anything more with it lately.
I do this, I even animate colour in the group and material properties inposes to change the character's look even more, unfortunately the poses zero out to pure white rather than the original colour so you can animate Bruce Banner turning into the hulk but then when Hulk calms down he becomes an albino
Could you post some of your examples where you used distortion boxes?
That worked well!Is the mouth rigged with smartskin poses or bones?
The idea was to use a perfectly spherical head so I could use bones to easily make the poses. Any rotation of a bone would leave its' CP on the sphere's surface, and supposedly look OK. This worked really well for all of the poses except the Open Mouth pose where I had to use some bone translation. The bone layout is very similar to the Squetch rig with each CP in the mouth area having its' own bone.
Right now the model is sort of duct taped together with lots of afterthought ideas put into action... lots of poor bone naming and disorganization of its' guts. When I clean it up more I plan on making it available to everyone to check out and use.
I wanted a generic model to use for lipsync practice and hopefully be able to follow through with some 11Second Club ideas in the future.
-
I've always liked the squash and stretch look of the Veggie Tales character's eyes and wondered how to do it in A:M. There were several posts on this forum showing how it was done with distortion boxes so I gave it a try. Very cool... then it made me wonder if the same technique on a generic round character head would make it easy to generate a bunch of unique characters very quickly without having to do any rerigging or remodeling (other than a new distortion box).
After a little experimentation I came up with a design that works pretty well in most deformations - except for really extreme stretches. The example video shows one model instanced three times in the choreography, each one having a unique distortion box for the eyes and the head. They are all linked to the same action to show how the heads and eyes hold up to different deformations. I didn't animate the distortion boxes in this example, but that's easy to do too.
Maybe this is old news, but I think it's pretty slick. The example is simple and I didn't spend a lot of time on it, but see what you all think.
WetMouse6.mov (7.16mb)
And here's the model file for you to check out:
-
Thanks very much, guys, for the great input.
I was intentionally vague in my description to see if people would know what was happening. The guy is supposed to be her coworker friend who doesn't want to see her quit, but I don't think anyone got that from what I drew. Frames 1-20 are supposed to show her writing the final exclamation point, then jabbing the pen into her boss's picture. Seems like I missed the mark a bit, huh?
Rodney:
Good point about trimming it back to meet the deadline. In this case it would help to be able to shift those seconds to other parts of the animation, too.
Your comment on pacing is good. To make it less frantic and more readable I may experiment with opening with a close shot of the pen sticking out of the picture and the girl out of focus in the background with that evil expression on her face, then shift focus in on her face before the guy starts talking. That could be really cool.
The staging needs a lot of help. I initially just started drawing to get some ideas down.
David:
I completely agree about needing more time to show the girl's satisfied expression. If the beginning is changed, I can steal some time and put it here. That would work well.
Rob:
I had the same thoughts about why she would have her boss's picture on the cube wall, but if she was psycho enough it might be plausible.
Thanks for the great drawing and ideas regarding camera angles and dynamic composition (I think that's what Rodney was saying too). Your suggestion of camera position B works really well, especially if I were to open with a closeup of the picture and possibly her hand jabbing the pen into it, then pull back or shift focus to see her sitting back in the chair. Nice! What do you think?
Your idea of having her stay turned away from him sounds good too. I was making her "throw" the words "an outline" at him because of her intonation. The same effect could be used without her actually facing him, though.
Good stuff! Now I'm off to rework some things. I'll try to get a modified version up in the next few days, if you guys wouldn't mind checking back again for another look.
Mark
-
Doubt I'll be able to finish this in time, but would still like to hear your thoughts... specifically related to:
1. Concept
2. Readability
3. Pacing
4. Staging
These are coworkers, and the picture on the wall behind the girl is her manager. It's rough, but should be enough for you "directors" to evaluate.
Thanks!
Mark
(1.6Mb, Sorenson 3 Mov.)
-
I'm still tinkering with it, but I figured I should show where I'm at with the gut rig. Here is a quick clip showing how it presently works...there are still a few things that I need to do further testing on and some CP Weighting needs fixing.
Hey David, that's really impressive! Excellent work.... as always.
-
No rush, Mark. Whenever you get the time.
-
Hey Mark,
Just wanted you to know I like the rigs you've been working on. Haven't been very active with A:M lately, but gave your rigs a spin and they are really nice. The face controls are simple and work great... good expression and control. Did you mention there's an install rig you've had a few people test? I've got a little time and would like to give it a whirl if there's something close to being finished.
-
There would also be a suction tube right next to the tooth to evacuate the water spray/tooth shavings. How about sucking the spray into an opaque white tube? That would look cleaner to the patient, also.
-
Hi Eric,
Did the dentist specifically ask to see the shavings flying off the tooth and the tooth preparation process? I wonder if it might be less intimidating/frightening for the patient if you showed a model of the tooth before preparation, then just fade the picture into the finally prepared tooth. The patient shouldn't have to see the drill to know how the reduction gets done. This would make your job easier and might be more effective at selling the procedure anyway. You could then just animate the veneer being fit to place and end on a perfectly modelled tooth/arch.
Mark
-
-
Hey Xtaz,
Here are some things you might want to consider....
There is almost constant motion throughout your animation, with a lot of unnecessary movement that doesn't help tell the story. This clip begs for some holds or pauses in the action. Also, the mechanics of the animation itself is "floaty" or spliney looking. Maybe if you turn off the sound and watch the clip over and over, you will see what I mean.
Step back from the small details and mechanics of the animation for a moment and look at the big picture. I think it would be helpful to break the clip down into "beats", or ideas. At most, there are about three beats to this clip:
1. "I thought.... that if I could help him in some way,
2. get him this, uh, this girl that he loves...
3. that maybe, you know..... *sniff* ....things would ch... change for me."
If I were animating this, I'd concentrate on getting one great pose or gesture per beat and really focus on making sure those poses sold the story, even without sound. After getting those main poses working you can add whatever movements you absolutely need to get from one pose to the next, as long as they relate to what the character would actually be doing while saying this line. This character's feet are planted to the floor, too. It would be appropriate for him to move toward the camera during the first two beats as he's trying to sell his point, then to settle back in beat three as he admits things didn't go as he'd planned.
What workflow are you using? Are you going from blocked to linear to splined so you are controlling the curves? I know there are many ways to clean up your animation, but this seems to be a good workflow to help avoid the floaty look.
Anyway, I just wanted to point out some things that I think you might be called-out on later. Take if for what it's worth.

Good luck with this piece!
Mark
-
I always wondered why, the eyes were not simply constrained to the EyeAimingBone with a simple Orient Like constraint.
The EyeAimerBone was an extra addition to the FACE rig to add "ease of use". It's sometimes easier to just grab a bone and move it instead of trying to grab a null, especially if the model isn't perpendicular to the camera. It's been a long time since I worked on it, but I think the reason for not using Orient Like constraints was that it somehow interfered with the ability to move each eye individually with their respective nulls, and I wanted the rig to be as flexible as possible.
The limits placed on the FACE rig were necessary to allow the majority of the people to use the rig without constantly breaking things, and they are easy to alter when necessary.
The FACE rig underwent a lot of changes during developement as people requested different capabilities, and in its' current state it's kind of like Frankenstein.... a patchwork of added-on parts, unlike the Squetch rig which is a masterfully refined and integrated engineering marvel.
-
OpenOffice is the answer to your problems, Dhar. It's free and works great. It has word processing, spreadsheets, and lots more.
-
Thank you, Rusty, for posting this great checklist. It should be a big help.
Mark
-
Outstanding modeling and texturing job, Stian.
I've flown both gas and electric R/C heli's and it's a blast. Please be sure to spend a lot of time on a good heli simulator before attempting anything other than tail-in hovering, unless you want to spend a lot of money and time in repairs. Heli's have no stable orientation like a plane, so it's easy to get disoriented and lose control quickly.... usually with very bad results!
Have a great time flying!
-
Hello Mark,
I'm quite content with how this one has turned out and it didn't feel like I was fighting against the rig at all in my animation test and I achieved the look I was after.
Hi Steven,
Sorry for the late reply. Thanks again for all of your hard work on this rig. Your excellent animation results speak for themselves as to the usefulness and ease of use of this rig.
I'm still scratching my head about how, exactly, your expressions do what they do. Maybe someday I'll get more time to go over it and figure it out. The way you've made each control work both sides of the face simultaneously or individually is really great, and I'd like to make FACE do the same if possible.... if you don't mind?
Thanks again,
Mark
-
Hi Steve,
Is it possible to make the lip and cheek guides follow the same arc? Here's what I'm seeing now... the lip guides and cheek corners follow different paths, which causes the lips to collapse inward. Please take a look at the screenshot:
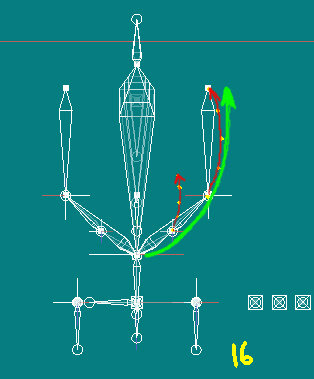
The red lines indicate the current paths of the lip guide and cheek corner's movements. Ideally, the lip and cheek guides should follow the same path. The green line indicates the path that they should both follow (for this character).
Sorry if I'm missing something here, like maybe a simple adjustment. My time is a bit short this weekend so it's kind of a hit-and-run analysis. What do you think, Steve?
-
You’ll notice another slider in the model properties under User Properties > Steves_Head_Gizmo which allows you to adjust how much of a curve the mouth does and it is size independent. The cheek retraction bones are now pointing straight ahead and can be moved to any angle just as long as the WCheek and WCheekScaler bones match what the GCheek bones.
Hi Steve,
Thanks for your continued tinkering with/perfecting the Head Gizmo. I won't have time to check out your new file until later this weekend, but look forward to trying to follow what you've done.
Just so I'm clear on something... is it OK to lengthen the cheek retraction bones (to make a wider arc) as well as change the angle? Or should they be kept the same length and only the angle changed?
Thanks,
Mark
-
Here's a quick example that uses a pose to force the CCheek Nulls to move in an arc, conforming to the shape of the head. If you view the CCheek nulls from the top view while moving the test slider you'll see what I mean. I don't know if it would be useful to you or not.
simple_simon_stretchyguides_jawdepth_TestArcs.mdl
I like the new position of the CJawDepth control.
-
I like the idea of stretchy guides, so I've given it a go in these new versions of Simple Simon and the Head Gizmo v2:
It would be interesting to know what people think about this method of visualisation. Would a combinatoin of the two different guide methods work, or would that clutter up the screen?
Oh, by-the-way, if you do make that example, make sure it's v11.1i, not v11i; v11 didn't handle expressions very well, if memory serves.
Those new stretchy guides are very cool! Simple and effective. That was a great idea.
I found a copy of v11.1h, so I'll make an example for you to check out with a pose for arcing lip control nulls. You can use it or scrap it if you like.
Mark
-
Hey Ken,
Lots of nice motion and emotion going on in this clip. A few things I noticed:
That axe must be really heavy... and he's very upset. If he's randomly throwing the axe (not specifically aiming), how about really torquing his pelvis and chest around clockwise, turn his left foot and really chuck that axe like a violent baseball throw. If he's actually aiming at something, then the pelvis twist still needs to be there but not quite as big. His left foot needs to pivot and move some too. A bigger followthrough with his upper body hunched farther forward would help convey the weight and violence of the throw, too.
It seems like the body rearing back should lead the throwing arm. Currently, his legs, body and throwing arm all move backward into the windup almost simultaneously. His power should appear to come from his legs and body more than his arm.
Overall it's really good, Ken.
-
I've put in two additions as suggested by Paul Forwood and Mark Strohbehn; they being the control guides and a jaw depth control null.
Thanks for doing this. The jaw works great. The stuff you're accomplishing with expressions is bordeline voodoo, man.
The only way to do this would be with expressions and implement them in the same way as my eyebrow forehead curvature calculation. That method is suited to the forehead as you won't need the eyebrows to be manually controllable in the Z axis.2. The ability to have the mouth controls (CCheek, CLipBot, etc.) move in an arc so that they conform to the shape of the head and face.The lips are different: they need to be controllable on all axis. When you put an expression on any aspect of a model, you lose direct control over it. Therefore it limits the range of movement and expression and is an automation too far. In order to achieve an arc of motion, you need to adjust the Z axis translation curve in the timeline.
Good enough. I may work up a V11i version of an idea for this for you to look at over the next day or so.
Are you talking about the head's Z axis or the lip segment's Z axis? As a matter of interest, what would the advantage of either be? Hold down the 3 key in order to move the nulls on their own Z axis and the angle changes in relation to the jaw's position.3. An easy way to move the mouth controls in the Z-axis.I was talking about the lip segments. Your idea of holding down the 3 key works well enough.... thought that was only for CP's. It seemed like I was having to turn the model to an angle to get ahold of the null and get her moving in the Z-axis. I'll practice more.
Thanks,
Mark
-
Hey Steve, there were a few things I wondered if you would consider adding to this rig.
1. A "Jaw forward/backward" control.
2. The ability to have the mouth controls (CCheek, CLipBot, etc.) move in an arc so that they conform to the shape of the head and face.
3. An easy way to move the mouth controls in the Z-axis.
I played around with the first two ideas and came up with ways to accomplish them using poses. You could probably do a better job using expressions, but I'm not up on that stuff yet. There is a sample file attached that has two new poses:
simple_simon_TestAdditions.zip
1. The "MouthCornerCurveOpen" pose works on the left CCheek, CLipBot, CLipTop controls and defines their positions to conform to the curvature of the head as the mouth goes to a wide (smile) position. This was just a quick test so it isn't activated when the CMouth control is moved, but that would be easy enough to fix.
2. The "JawForward/Backward" pose does just what it says and works on the XJaw bone. Again, this was just a test to see if it was easy to accomplish but you may have a better way of doing it that will be more stable with your existing rig.
As for the Z-axis controls for the mouth controls, this could be easily done with poses but that would clutter up the interface and make things more complicated so maybe it's not worth doing. Can you or someone else think of an easy way to do this?
See what you think. The setup is very nice and workable as you have it now. It's just fun to brainstorm.
Mark
-
Hey Steve, It's great to see you back "gizmo-ing" again. I'm sure you've been working on this rig for a long time. It's clear that a lot of thought went into it. I like the way you can do unilateral or bilateral controls easily. It's also great to see such a simple mesh layout and how nicely it deforms into some pretty great extremes. Your example shows off the potential really well. The fine lip controls are cool.
Do you think this rig would work on a character with a huge jaw, like a dog or similar beast, or is it limited to a humanoid shaped head? Have you tested it on any other mesh designs? It looks like it works best on a very spline-lite model.
I don't have any more time to play with him tonight, but I just wanted to congratulate you on another very cool invention! I look forward to playing with this more on the weekend.
Thanks for sharing this with us!
Mark

Using a distortion box to create different characters
in Work In Progress / Sweatbox
Posted
Thanks for posting your example. Nice demonstration of distortion box use.
Particle baking and hair are a couple of those features I've never looked into, but it looks like Martin's team has come through again with some great tools.