Wizaerd
-
Posts
61 -
Joined
-
Last visited
Content Type
Profiles
Forums
Events
Everything posted by Wizaerd
-
How very true... Ok, now decaling? For something dragging and dropping the image on my object still ends up with "patch mappings" (I think.?.?.?) Where each patch seems to interpret the image it's own peculiar way, thus not giving me a consistent brick texture... When I try to apply the image as a decal, of course it's too small to cover the entire surface, and if I stretch it, then the wall appears to be made of 3-4 giant sized bricks. I cannot see anywhere to tile decals, or I'm applying it incorrectly... You suggested some ways of decaling? I'm on a roll, light me up...
-
If you have the patience to help me out, I'm more than willing to give it a whirl. I did open your project, and look at it, and am completely baffled why my brick material doesn't cover the whole object. I have a suspicion though. Lets try the brick material first... I was trying out several different methods for extruding the wall that have been given me throughout this thread, methods to avoid internal patches. I'm finally getting the hang of that... SO far, I've had the most luck with, and am most comfortable with the double extrusion, selecting the middle row of CPs and eliminating the splines that make it a skinnable surface. I've created the brick material, and applied the same numbers/settings you had in yours, and applied it. I get the same results, only part of the object gets the bricks. Now for my suspicion. Does the direction I extrude my object make a difference? The reason I ask is in the first couple of tests, I extruded downwards. The bricks cover the front but not the back of the wall. In the attached project, I extruded upwards, and now the bricks cover the back, but not the front... I made sure all my normals were pointing outwards, but this is still the same result I get... For some reason, the forum won't let me upload my prj file, so I've renamed it to txt. Just rename, and take a look at it... [EDIT] OMG, I just got it... I didn't have anything set in the offset... I double checked yours, then mine and noticed the weren't the same. I re-set them, and now my entire object is indeed covered with bricks... thank you, thank you, thank you... Wall_Experiment.txt
-
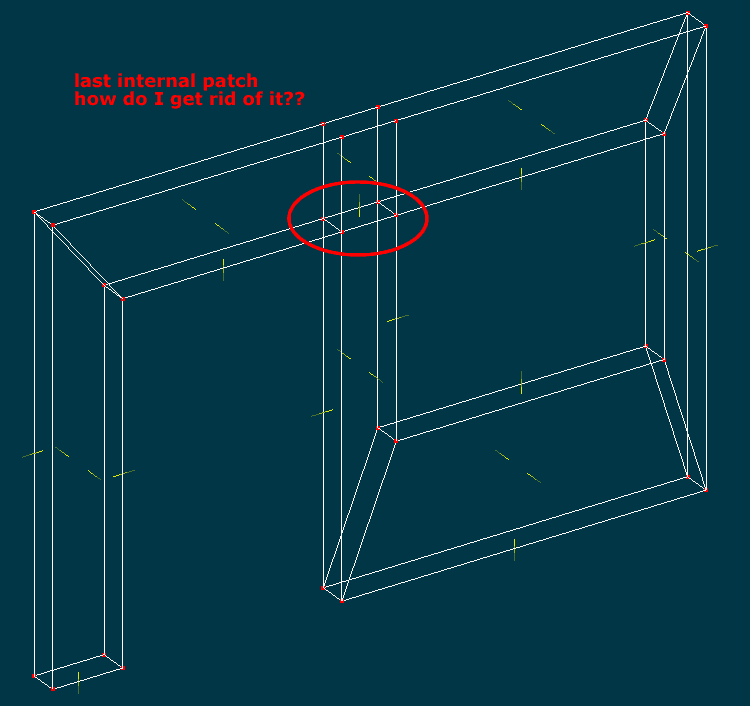
I did select all when applying the image, and what you see in the image is what I got. I have no idea how to adjust it in order to get it to do what I want. It really shouldn't be this difficult, right? I also selected all (and yes, it is a named group) when I applied the brick shader, but again, what you see in the image is what I got as a result. As far as using a decal, other people have suggested the same thing, but I'm not exactly sure how a decal would help me. I think of a decal as a sticker, a decal on something, a small portion of the over all surface. Like a bumper sticker on a bumper... I don't want a single small square with bricks in it, and the rest of my surface with nothing. If I take the "decal" and stretch it out so it covers my entire surface, then it's just plain too big. No wall is made up of 3-4 huge bricks... Thanks to everyone for their time and patience, perhaps I'm just too dumb to be using this app... -vern Actually, take another look at the image. There is an internal patch, I just couldn't figure out how to get rid of it because the four splines defining that internal patch was also being used on other skinnable surfaces. Eventually using 2 5 point patches, I was able to eliminate all the internal patches. Of course, now I have huge texturing problems...
-
I've gotten rid of my last internal patches by using 2 5 point patches on the back. All my normals are pointing outwards as expected. But I still have a problem with applying a texture... I've tried both a texture and a brick shader, and I can't seem to get it looking like a continuous brick wall...

-
Easiest way to get rid of unwanted splines (internal or otherwise) is to use either the K Key (Kill) or D Key (Delete) on your keyboard. Just make sure the spline you want to get rid of is selected. That's part of my problem. I don't know which spline to get rid off. the ones along the Z axis are the corners of the window and doorway. The splines running along the Y axis are for the surfaces along the Y, as is the X aligned spline. All for edges of this internal patch are edges for an outward visible edge...
-
Ok, here's what I've learned so far... Previously I was creating my wall with render-able surfaces, then extruding. This caused all the internal patches (I believe)... So what I've done instead is create the outlines of the wall and window, but did not make then surface patches. I extruded, then surfaced the front and back walls (because I will need both sides of the wall to be actual surfaces) This eliminated 99% of the internal patches I was getting before. However, I have one left and am not exactly sure how I can get rid of it...
-
For the bricks, it was a material because I still can't get the image to work. Not as a decal, because if I understand decals correct, it's not really a texture map, more of a sticker(aka decal) on the surface. Doesn't cover the whole surface, just a piece of it. Back to the internal patches... I certainly hope I don't come across as extremely dense, but I do not see any splines in the Z axis that can be deleted. Every one of them defines an edge to a visible outward patch... How would I have kept these internal patches from being there in the first place? I built the surface of the wall with the doorway and window cut where I wanted them to be, and then extruded. Seems to me to be a viable way, but if it builds internal patches, then why does anyone even use extrude?
-
I'm not doubting there's internal patches, but I'm not sure how to eliminate them. Every CP has it's purpose, and none can be eliminated. The all have legitimate patches on the outside of the walls. I've tried selecting every one of them, and breaking or deattaching, then eliminating the spline, and a face or path also disappears... Also, I tried applying the brick material, but I've a couple concerns... the first of which is it really slows rendering down, dramatically. Are textures quicker, so may be a better choice? Also, I've ensure all my patches normals are facing outwards, but the brick shader only covers a portion of my wall...
-
I created the outline, with the hole in place, then extruded it...
-
I've read through the manual, but it seems it's nothing more than a textual version of the video tutorials, and doesn't seem to explain materials and textures very well... So I have this model of a small simple building. I'm trying to get an image of bricks applied to it, but on a single object, the texture displays every which way, and doesn't appear consistent across a single surface. Here's a screen shot. The texture in question was applied, but even on a single wall it's quite wonky... SO what am I missing here? Why do I have this sneaky suspicion that the way the texture lies on the object depends heavily on how the object itself was built... Please tell me I'm wrong, and that it's something way simple I've overlooked...
-
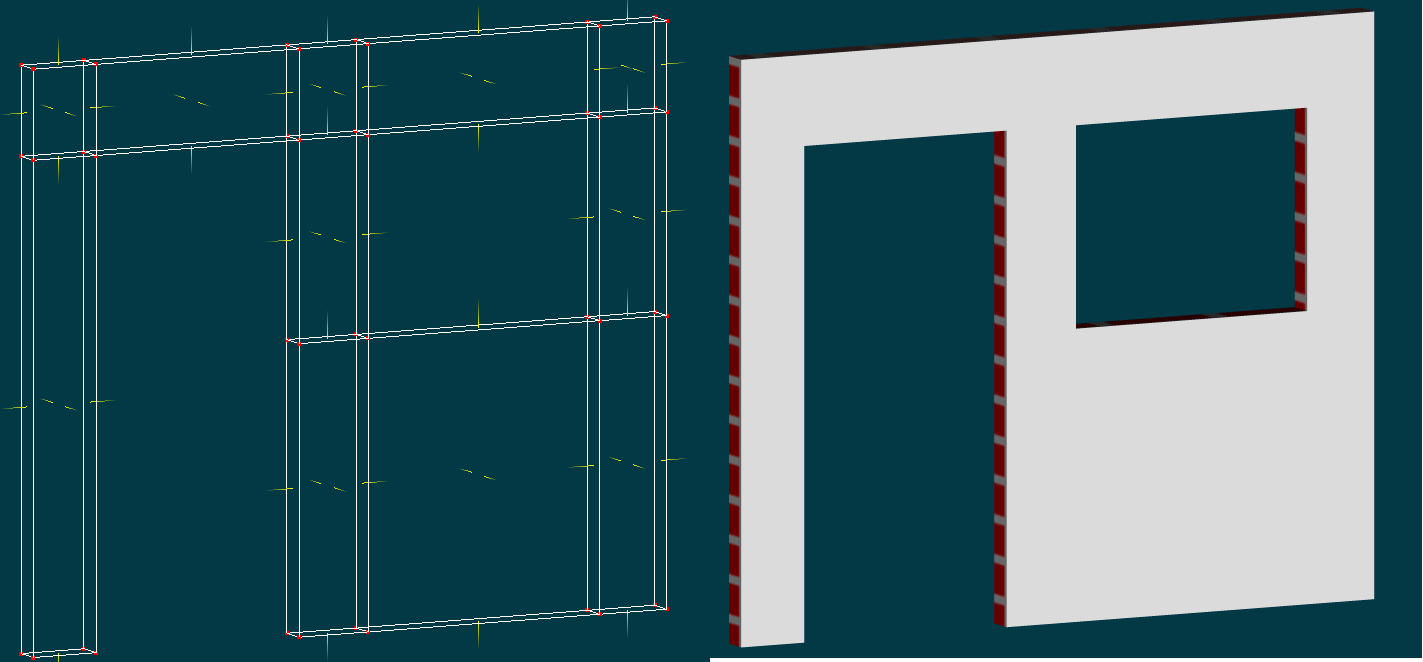
There are internal patches because the wall itself is not a single object, but 5 seperate ones... Was a shortcut method I was using to build my wall... but I'm going to attempt building it correctly... thanx...
-
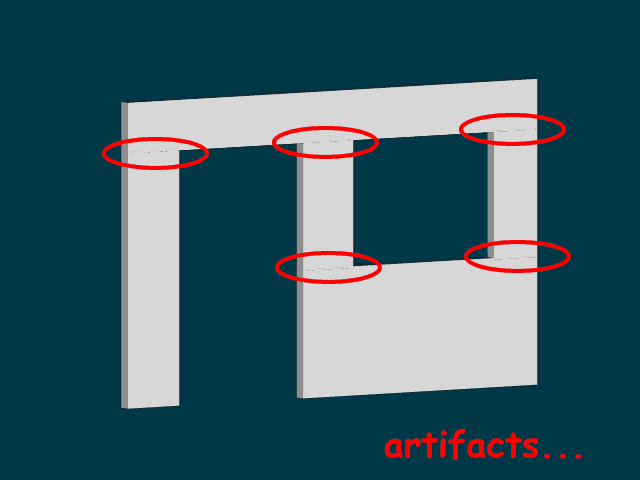
Bought it from Safe Harbor this last Saturday ($40 cheaper than from Hash directly). Just came in Priority Mail yesterday. I have experience with A:M 98 back in the day, but haven't done any 3D in quite a few years, so it's like starting all over again... BTW, I'm curious about something. You said without rounded corners, I would get artifacts in the render. But with building the wall from multiple objects, I'm still getting artifacts... I've aligned the CPs so they're all correctly aligned (went to top view, selected all the CPs from the front of the wall, and scaled down to 0% in the Z axis, then did the same with the CPs along the back of the wall)...
-
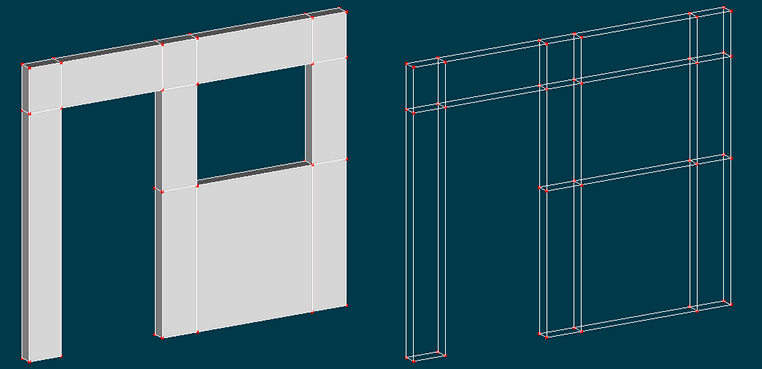
Ok, I was confused for a bit... I couldn't quite figure out how this wall was made... Then the bulb clicked on over my head, and I realized it wasn't a single object, but 4 of them.... (ok, I can be a bit slow sometimes...) very clever... Thanx I appreciate your time and patience...
-
Using pengwin's approach, I was able to build my front wall. I'm sure this is heard quite a bit, but spline modeling sure is a whole lot different than polygonal, but I'll get the hang of it... I had thought of using a cube and making a whole building at once with booleans, etc..., but making it wall by wall will work as well... ddustin, what you're saying about rounded corners, could you explain how I'd go about cutting holes for the door and window in your attached wall? And should those holes (door & window) also have rounded corners as well? Thanx everyone...
-
That's what I had in mind as well, but the cube is rounded, and there aren't too many buildings with rounded corners (although I can figure out a way to sharpen them up), and then cutting a hole for the door and the window is what's really eluding my I suppose. I know this is probably most basic, but I'm not sure where to begin, even using the primitive.
-
I know these are most likely going to be very basic questions, but we all gotta start somewhere right... I would know how to do these things in a polygon modeling app, but with splines are a bit different, so even the basics sometimes are a bit misleading. I want to build a very small, very cartoony building. Big enough for maybe two people to stand in. The front of the building needs to have a working door, that opens to show the inside of the cude, as well as a hole for a window. No glass in the window, just a hole that someone could lean through if they were inside. Something similiar to the GIF file attached... So how would I start this? Oddly enough, I've already built a character (albeit very very simply), but the simple things like a building is eluding me...
-
What's the purpose of having the MS Agent running? Can it be turned off in A:M?
-
Thanx Stuart...
-
I used to use A:M way back when, I think it was around 98 or so. In fact, in Dallas, I started a user group that met at my house from time to time. (Any of you guys still around? Larry? Ken? Jerry?) Since then, I've gotten out of experimenting and mucking around with 3D, but have lately been re-interested in it. Currently I'm waiting for my new A:M 2006 to arrive, and while waiting, I've been looking through the tutorials, reading the forums like crazy, all the while my anticipation building and building. I was curious about something, and I hope this doesn't come across as too stupid a question. But say I have a model, I've rigged it, created some actions/poses, and a choreography and have filmed a scene. For whatever reason, I feel that a different model I have would fit that role better than the one I originally selected. Is this a big deal to do in A:M? Is it possible, with little frustration, to swap actors in and out of roles in animations?