vnavone
-
Posts
106 -
Joined
-
Last visited
Content Type
Profiles
Forums
Events
Everything posted by vnavone
-
Here is a link to the updated facial animation: New Head Test I've made some subtle changes to the shape of the head and have improved the cheek mass when he smiles. Compare frame 50 of this animation with the original: Original Head Test I'm still working on attaching the horns, which is coming along pretty well thanks to the Conform plugin. I'm also trying to iron out some pesky smoothing issues. There's a crease in the head that's particularly frustrating me because it looks perfectly smooth when I render it in modeling and action windows. Perhaps it's a lighting artifact of some sort? I'm using biased normals and Porcelain to smooth the skin. An example is attached below. You can see from the wireframe at the beginning of this thread that the mesh is pretty normal there.

-
Yeah, I know. It wasn't intentional. Oh well, at least he resembles a GOOD character!
-
by George, you're right! I'll have to dig into my poses to see if I scaled the wrong bone. Thanks for doing that little bit of research.
-
Hi Dean, Correct. Correct. Correct again. I would always scale the LR bone because it is the parent bone, and I want both the UD and the LR bones to have the same scale so that they will both behave in the same way. Same for translations. The problem which prevented me from using a single bone for both UD and LR rotations is that the UD bones which actually move the mesh are not horizontally oriented. They angle down from the center of the head to the mouth. This is fine for up and down (X) rotation, but if I were to rotate them in Y they would arc up around the head making a smile, rather than moving lattitudinally (is that a word?). Therefore I decided to parent each of them to another bone (LR) that was oriented horizantally and would rotate along the sphere's lattitude. Does this make sense? It should adapt pretty well to non-spherical heads, but I imagine you may need to scale the bones as you rotate them to make them follow whatever curves your face has. I would create rotational relationships for each bone that makes them scale as they rotate. Set this up once for each bone and you shouldn't have to worry about it in later posing. Good luck!
-
I figured it out for myself. I think the Anzovins have used a similar approach, though. Perhaps they have a tutorial floating around somewhere.
-
Hi Takahiro, that's a pretty neat solution! I'll definitely give it a try. It will be more complicated on my model because the head is not perfectly spherical and I want some variation in the size of the spikes, but the dangling spline technique seems to work well for rendering.
-
Like I mentioned before, the bone rig gets me MOST of the way there. With complex areas like cheeks I think you're going to have to do some custom shaping no matter what.
-
Lots of both, I think. The head was formed primarily with a lathe, hence the radial splines. I probably used extrusions for some of the limbs and digits. Other parts, such as the shoulders, hips and mouth, are hand-stitched meshes.
-
Hi Parlo, In my mind, the advantage of using bone motion over nested muscle pose motion is that bones naturally make points move in arcs, whereas muscle motion wants to move points in a straight line (unless you put in some inbetweens). Because the Giant's head is spherical I wanted a rigging system that would move the points of his mouth in a way that followed the radius of the sphere. All the mouth bones start at the center of the sphere so the points naturally orbit from that location. I could have done this by hand with muscle motion, but again, I would have had to ad inbetweens to all the points to make sure that they move in arcs rather than straight lines. Otherwise you will get problems of inconsistent mass. One thing I did in all my mouth poses was set the pre- and post-extrapolation methods for the spline channels to "linear". This means that the animation continues to go in the direction of the last keyframe I set to infinity. That way if I ever decide that I need to push a mouth shape just a little further I need only increase the range of the pose slider. I don't have to go in and ad more keyframes to the pose because it naturally continues in the direction it was already heading. Make sense? Normally I try to build headroom into my poses to make them a little more extreme than I think I'll need, but it's good to have this method to fall back on as well. Don't give up, Rob! I hope you are more inspired than discouraged. The bone structure is complex, but that doesn't necessarily mean better animation. I'm just very anal about how I do things. I was hoping for a much simpler rig - I've been trying to keep this character very simple overall - but sometimes making things "look" simple can be very complex. As for the texture, he has decals for the nose, brows and horns, but that's all. The rest are basic materials. I think perhaps you're reacting to the lighting, which comprises of one warm key on the right, a few cool rim lights back on the left, and lots of reddish fill lights in between to give his flesh some warmth. Thanks, John. Again, I was going for a really simple design and dot eyes are about as simple as you can get. For me they also suggest a harmless animal, like rabbits or dear, whose eyes rarely show their whites. There's something innocent and mysterious about them. I'm sure I was probably influenced by Calvin of Calvin and Hobbes, who has dot eyes much of the time. I've been looking at some of Hank Ketchum's Dennis the Menace drawings for inspiration - he got a lot of character and directionality out of dot eyes.
-
Thanks! The animation itself probably only took 4 or 5 hours (spread out over a week). As I animated I would find problems with the rig so I would go back in and make changes. That ate up much more time.
-
I'll probably use the Conform plugin as mentioned above. That will at least get the bases of the horns to lie flush on the head; then I have to tweak the bias handles to make the tangents at the intersections smooth. That's going to be a pain. I'm wary of trying to actually model the horns into the head because I don't want to disturb that nice, smooth, even mesh. This would all be relatively easy if I were using Nurbs. Fillet tool, anyone?
-
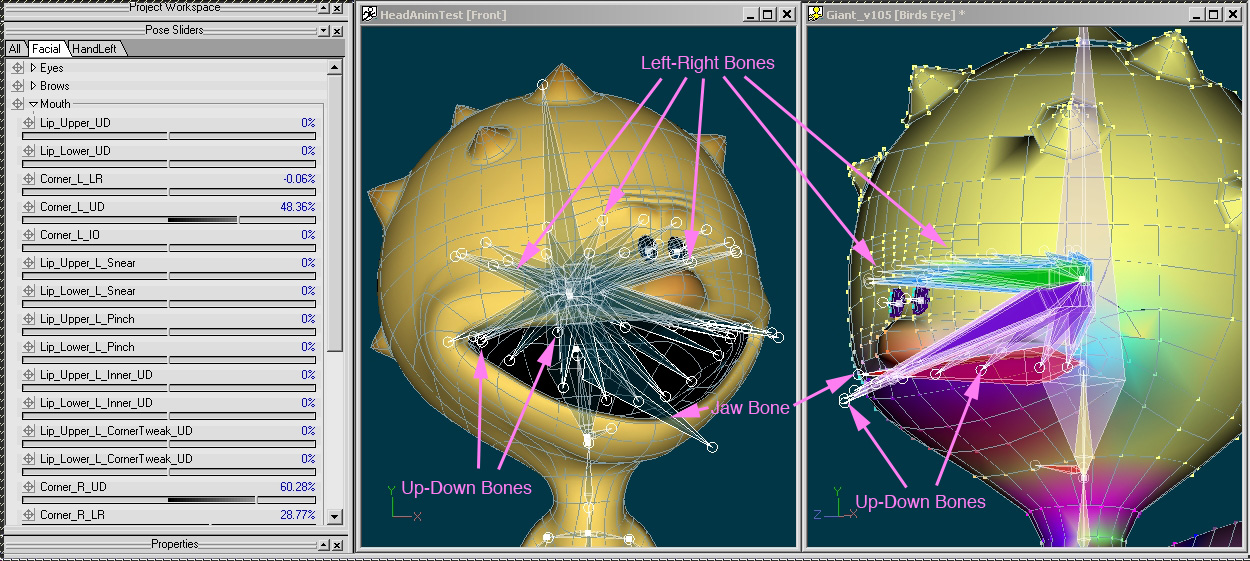
I'll try to briefly explain the rig. For every span of the mouth (splines running to and from the lips) I have one bone for the up and down motion and one for the left and right motion. Each UD bone is a child of the corresponding LR bone. It had to be two bones instead of one for a few reasons that I would have difficulty ariticulatng here. The points around the mouth are assigned to the UD bones and are weighted using AMweights to give them a nice falloff. This was a tedious process, and luckily version 11 will have the AMweights functionality built in. Next I set about creating a series of poses that moved the mouth bones in different combinations to create different shapes. For instance, the Corner_R_UD pose moves the UD bones on the right side of the mouth to form the curve of a smile or frown. The bone rotation alone gets me most of the way there, but for complex areas like the cheeks I do some custom muscle animation on top of the bone motion. The advantage of using this kind of modular bone setup in a face is more consistency of deformation between poses, since they're all driving the same underlying bone structure. Once you articulate one part of the mouth you can use it with multiple combinations of other controls and always get predictable results. I find there is too much room for variation and inconsistency when relying on straight muscle motion for facial articulation. Also, this character's mouth is such a dominant part of his image and this method allows me to control the shapes very precisely. If his mouth were tiny then I might get away with regular muscle motion, as I did in the brows. Currently the mouth has about 24 controls and I've still got some more to add. Below is a screen shot of all the mouth bones. It looks like a mess, I know, but I hide all the bones except for the jaw when animating. The jaw itself uses rotate relationships instead of poses, but the effect is the same. On the left you can see some of the Pose Sliders controling the mouth. As for they eyes, they are controlled with poses and some simple bone rotation, scaling and translation. The poses were created using deformer lattices. I can taper them, bend them in different directions and blink them with poses. The head bone has a volume-preservation expression on it for easy squash and stretch. Anytime I scale the Z value the X and Y change value accordingly. I've also made a pose to move the mouth up and down to help the squash and stretch (or "squetch" as we call it at Pixar). The rest of the squetch is achieved with good old-fashioned animation tricks. Many people have asked me to do a tutorial and I wouldn't mind but I just don't have the time. It's taken me years just to do this much on my spare time, and with a kid on the way I can't imagine I'll have more time soon!
-
This is a little animation I did to test the facial rig on my Giant character for my short film "Big Bang". The rig is a mishmash of fan-bones, weighted CPs and pose motion. The animation is rough and the model isn't done yet - still needs some smoothing in places and the horns aren't attached to the head yet. Mostly I was curious to see how the mouth would hold up and how much expression and directionality I could get out of the dot eyes. Here's the link: Giant Head Test Here's a picture of the mesh: Enjoy! I must sleep now.