


OdinsEye2k
-
Posts
724 -
Joined
-
Last visited
Content Type
Profiles
Forums
Events
Posts posted by OdinsEye2k
-
-
Yes. If you click on the "over life" part of the opacity, you will get that switch from frames to percentages in the timeline. These percentages represent the part of the lifetime that you want to keyframe. So if you have a life of the particle of 1:00, the 50% mark will correspond to what happens to that particle 15 frames after it is emitted.
It's a little confusing because sprites put a couple of tweaks on typical AM concepts. The amount of time in "over life" means the time *a single particle* sees, not the time that has evolved in the action or chor. Also, you have percentages on both the X and Y axes of the timeline when you go into over life. The percentage on the Y axis is the familiar attribute percentage, whereas the X is the percent of lifetime that has passed in the particle after emission.
Grab the square over the purple line (which usually indicates what frame you are on in a choreography or action) and drag it over to the right until you reach the percentage you want. When I do fade-outs, I usually go to 70 or 80% on the horizontal axis (dragging the purple line all the way there) and then set the keyframe to whatever the opacity is I want from 0-70% of the particle's life. Then I go to 100% and set opacity over life to 0. You may or may not want to set zero slope interploation to maintain constant opacity between 0-70%.
-
Um, pardon the ignorance, but isn't Victorian stuff old enough to be in public domain?
I think the cut-off is like in the early 1900's now. Used to be sooner, but the corporate shills have done good things for their masters.
-
There is also CorelPHOTOPAINT, which is a darned good Photoshop knock-off. I've learned a little texturing recently by researching the Corel and the Adobe names for the different filters, replacing "layer" with "object" and a few things like that.
Plus, Corel is a lot less expensive. You used to be able to walk into a Costco and pick up an out-dated version for < 100 bucks I do believe.
-
One small mistake I noticed (and corrected) that I want to make a clarification on here:
The driving Rotate channels (i.e., if Rotate.something is on the left hand side of the equation) all work in Euler degrees.
The functions like cos, sin, tan work in Euler radians.
The driven Rotate channels (i.e. Rotate.X, Y, Z and W) work in Quaternions by default or whatever else you choose to make them.
A little confusing, yes, but each of these formats has its own special purpose.
-
Yeah - that's a good one Ken. That's one of the secret sauce bits, but I'm trying to make it happen for a cart - still having trouble figuring out where to get information on the tire's travel, though. I've got it working in a straight line, but nothing happens when the cart is turning - still a couple of math tricks left that I can use on it, though.
For the ball (I guess this should be another general expression to use):
Arc length is 2*pi*angle, where the angle is in radians. The length the ball travels on the ground must be equal to the arc length it rolls along (assuming no slippage). So with a little algebra:
Angle = distance / (2*pi)
Of course, now all you have to do is figure out which axis of the model bone goes with which angle, which isn't always easy to do right away, let me tell ya

Edit: Sorry, I'm getting things messed up with this whole radian/degree duality that the expressions use. The real formula:
radius*angle (in radians) = distance
Converting to degrees and solving:
angle = distance / radius * (180 / pi)
-
Folks,
I've gotten the first version of my Expressions Tutorial put together. I am still working on some 'secret sauce' type formulas that do neat tricks.
I've tried to treat the math as generally as possible, while providing lots of examples that will hopefully get things cooking up.
http://www.prism.gatech.edu/~gtg724n/math.html
Enjoy and post questions, confusions or whatever comes to mind.
Bjorn
-
Trust me, I wouldn't do it unless absolutely necessary. The only reason I conjectured on such a thing was a query from another user where 5-pointers were absolutely outlawed.
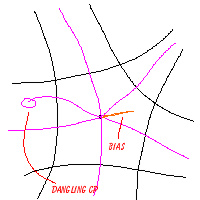
However, the reason for the dangling CP is to try and get the curvature of the "bad" 3rd spline to match up with the other two "good" splines running through the patch.
Note the second picture is actually how Hash internally does it's thing - but I think there is a little bit of extra black magic thrown in to keep things smooth nowadays.
I remember back in 8.5 - you could always tell a 5-point patch by the telltale triangle that the creasing spline would cause.
-
Bah! Can't believe I messed that one up. Well, if you go back to the link that I just posted, you'll see this solution added there as well.
http://www.hash.com/forums/index.php?showtopic=6228
I had remembered the first picture as the way the software did the breakdown, but I guess now you have a couple of options, depending on how/where you want to take your chances of artificating. My comments on using a dangling CP or bias to counter the arfifacts still stand.
-
Guess I pooched that one. Let's try again.
-
The more I think about it, the more I think I have the solution.
Follow the link, I kinda cheated to get an illustration up.
http://www.hash.com/forums/index.php?showtopic=6228
Anyways, you create a dangling CP at one of the corners. I think you can also mess with bias - the point is that you use the additional control this affords you to make the surface smooth and minimize artifacts. If you can alter bias without the dangling CP, go ahead and try to do that, the exporter may like it better.
So, that's what I dug out of my memory of history.
-
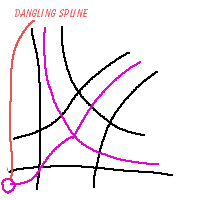
Here's my picture of how to deal with a 5-pointer. Note that the spline running through the corner terminates in a CP not attached to any others, the "dangling CP" that has left common memory:
Refer to http://www.hash.com/forums/index.php?showtopic=6213 for the rest of the discussion if you've ignored the 'ignore me' topic.
-
Actually, the play bar works just fine for me, although in a weird way.
You have to click on and drag the arrow to make it change places, and then whack the play button again to resume playing.
It's the first of these things I've watched because the play control works - I usually skip through these kinds of things at 10x speed to find or pick up on the one or two points I'm missing.
-
Usually, there is a Constraints pose that must be turned on in order to get the nulls working.
-
Fundamentally (at least I believe this is fundamental, but my experience has led to this conculsion without a complete proof), the 5-point patch comes into play when "stitching" two different patch flows together.
The clearest example I can think of is the shoulder joint. If you simplify the shapes, you are essentially trying to plug a cylinder into the side of the a cube. The spline layout of the cylinder is polar (in rings) whereas the cube is a set of square four-pointers. 5-pointers naturally play a role in flowing one spline topology into another (if you follow the rule that each point can only have two continuous splines running through it).
So, if you want a pure 4-point face, you will have to model the entire thing in either the round (not recommended) or cube-type topology. The cube is doable, but the spline loops will not be naturally laid out along the muscle lines of the face, which will make animating far more difficult/less natural. So, yes, making the 'pits' is realistically the way to go if you absolutely must do pure 4-pointers.
Now, the final option here that I have not mentioned is to manually transform the 5-pointer into four 4-point splines (which would either increase patch density all around or require termination in hooks). To show yourself how this would work, draw a pentagon and then draw four lines from the center-point. Three of those lines terminate in the middle of the sides of the pentagon, the fourth will end on a corner. This will make four four-pointers. Note that when put into practice this will violate the 2-splines through each CP rule. I think that is why 5-pointers had historically been hard to render well before the use of porcelain.
-
Holy cats, that's so simple it's brilliant! I never realized that the stamps were simply stored as being overlaid on the decal, just with the models translated and scaled to different places. My mind was so stuck on the 'decal' idea that I never thought of what UV transformation actually was.
Fantastic tutorial, Will. Solved something that I had been scratching my head over for a long time.
-
That just makes me all warm and fuzzy inside.Bob is moving on to cloth.Bj0rn-i wish it were possible to import coral's splines into am!Actually, you can in a way. If you export as an Adobe Illustrator file (*.AI) you can use the AI import wizard built into AM. I've found it works best if you try and think about how a spline surface would be built first when closing up (the auto-closing routine will go weird on you if you don't give it the correct number of points to work with, which makes sense 'cuz you're essentially starving it).
The Corel features I'd really like to see if be things like weld, intersect and trim (once you learn to use these, they are pretty helpful) - but honestly, trying to figure out how it would be done is a bit difficult. It's one of those things I'd really have to sit down and think about math-wise. There are a just a lot of potential cases that come to mind.
-
Once you peak a CP, you can alter biases separately. I think you may have to have both 'show manip properties' and 'show bias handles' at the same time to get things started, but once you get it going, you should be able to manipulate to your heart's delight.
There also used to be a group of plugins under the Katakata name, but I don't think they work anymore, that can be used to smooth surfaces uniformly.
-
Let them lie their heads off and spend a lot of money to cover themselves. I don't think you need to do that, and so the spline model will eventually win out - in spite of the coming 2nd great depression. In fact, because of the coming 2nd great depression. These bloated competitors simply spent way more money than they should have and, in the end, will pay for it.
I'm as loyal a Hasher as anyone, but let's be a little more intellectually honest. The marketers may lie, spin and whatnot, but I really doubt that the technologists and technical managers are cowering behind this wall of hype. A lot of us folk tend to have a little more self-respect than that.
Anyway, for Ken - have you ever used Corel Draw? There are some pretty wicked spline tools in that program for just plain hack and slash. And ZPiDER has some pretty slick little gadgets for AM for low prices. If he ever extends those to making keyframes (thinking of like ConformZ here for rapid smartskinning by 'forging' joints), it would be insane.
-
Not a bad idea, Rodney. How does the A:M Digest work again? Any formatting rules you particularly have in mind?
I think I'll try and do two parts:
1) Equations in nature and a function-by-function run-down of where the Hash expressions might be found in motion
and
2) Quaternions - what are they, how are they used in A:M and a few formulas for transitioning between Eulers and Quats.
The reason for part 2 is that there may be occasions to make rotations based on formula that aren't simple 1-axis Eulers.
Now I just need a catchy title... something like "Pushing Patches with Pocket Protector Power" or something....
-
Hey folks,
Just got a request on the Chat Night that I wanted to toss out for a check on the interest level.
Expressions are a pretty powerful tool in A:M but not too many people use them from what I've seen. So, I thought I'd do a little write-up on some basic equations of motion that people might be interested in looking at as well as a general how-to of hacking out the paths and the formulas. Maybe even go function by function with the natural motions that are often described here.
Any thoughts on what kinds of motion you'd like to see, math that puzzles you greatly? Or even just a 'heck, yeah' or two?
Bjorn
-
I think if you make the channel pre-exist before writing the expression, you can click and get the path.
Otherwise, I've done it by trial and error with various levels of ..|..| or ..| to back up the hiearchy properly.
-
Look at the online reference for "interpolation."
Default for AM is spline interpolation, which fits a normal spline through all keypoints, making fluid motion (with the side effect that your keyframes do not precisely control the motion).
Usually, if you want to hold the same position between two keyframes without drifting, you use "zero slope."
Either way, if you open up the timeline in your action and highlight the rotation property that you used for the animation, you can click on the jagged lines and switch to channel view mode. Once here, you can do things such as change the interpolation or the spline bias to get the smooth motion you desire.
Also note here that AM will use Quaternions by default, so you have four (XYZ and W) not three (XYZ) channels to tweak to make things look right.
-
1) With my limited experimentation in expressions, I've tossed them in a "constraints" type pose to make them easier to manage. Although, I think I've also thrown them into a SmartSkin relationship as well (when I was trying to emulate the natural motion of a shoulder with just a bicep bone by using relationships to account for pivot travel) and that has worked pretty well for an "always on" solution. The SmartSkin may be the better place to be on this one if you constantly want to maintain volume.
2) I'm not sure if this is a perfect way to maintain volume, but I'll switch over to Engineer Mode for this one. Poisson's ratio is typically the relationship used to relate strain on one axis to strain in the other two (assuming a uniform, elastic material like metal). This is typically a number like 0.3 to 0.35.
If the stress is applied one-dimensionally, like scaling on the Z, then X and Y will each scale in the opposite direction by the scale of the Z times Poisson's ratio. So, I would use something like scale.X and scale.Y = scale.Z * 0.3. This is not perfectly volume preserving but works for linear materials.
Or you could just use the formulas for volume for the basic shapes (square, circle and sphere) and set up the expressions so that X and Y equally take up the slack for volume lost by changing Z by a unit amount.
Edit: Whoops, there's a minus sign in that equation somewhere:
scale.X and scale.Y = - scale.Z * 0.3.
-
"Any tips for some young eight-year old out there?"
Wow. That's how old I was when this was done. (well, seven really) And dreaming both about making cartoons and going to space.
So I chose the rocket science, but I never thought at the time that I'd get to do both! Amazing times for us all.
Particle Opacity
in (2003-2004)
Posted
Sorry about that.
My best guess is to close out any action/chor windows (maybe even model windows) and then grab the "over life" attributes. I've had problems with interference between action/chor timeline and the percentage form of the sprites.