-
Posts
1,855 -
Joined
-
Last visited
-
Days Won
4
Content Type
Profiles
Forums
Events
Posts posted by jason1025
-
-
I live in LA and would join an LA based group
-
Hi Eric
I live in LA. How long are you visiting for? we could get together for lunch, I would like to pick your brain about AM.
Thanks for the reply
Jason@hdjibguy.com
-
Very nice work, some of the best I have seen. I just recently learned of to render my models with that realisitc Ambient Occlusion look. After someone gave me some simple settings it was easy. My question to you is, how did you combine Ambient Occlusion with lights? When I try that things always start to blow out to white. Can you help point me in the right direction? or pass on your specific setting for the render above? Or maybe pass along the steps plus the project with the chor minus your awsome model but with a primitive or something? You can see the model I am working on , on the cover page of my site.
Thanks
Best regards
Jason@hdjibguy.com
www.hdjibguy.com
-
Great work!
Is there anyway I can get a copy of this project? You can remove the model, I am having trouble getting a chor that is kind of a white render except for the model like the one you have above. You also seem to have good Ambient occlusion settings, my email is ordinarygothic@yahoo.com
thanks jason
Thank you.
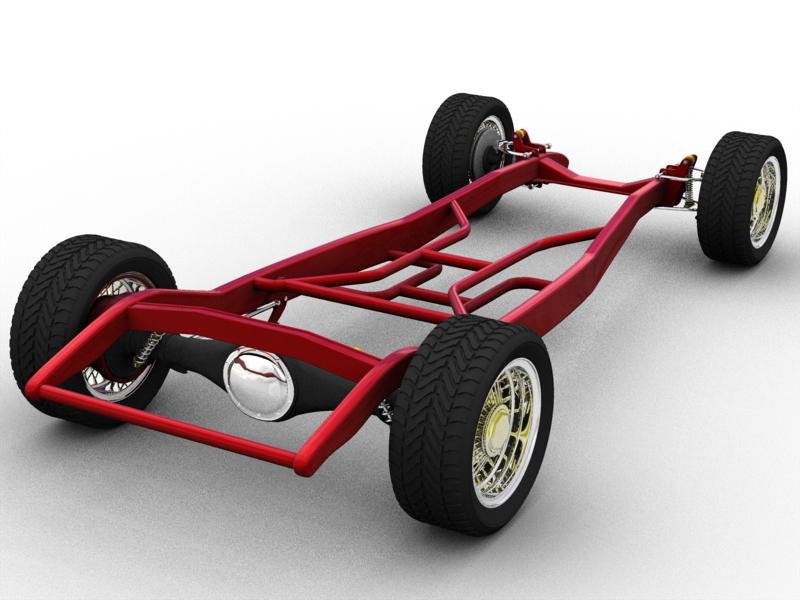
Doing this type of render is very easy to do. I am at work right now, and doing this from memory, but it is pretty straight forward. This is all based on the default chor that is created by A:M.
- In your chor, select the Chor (e.g. Choreogarphy 1) itself in the Project Work Space.
- Find the option for Global Ambiance Type in the Properties and change it to 'Global Color'.
- Once you have set the Type to Global Color, expand the Global Ambiance Type selection. You will find three more options, Ambiance Color, Ambiance Intensity and Ambiance Occlusion. Set both Intensity and Occlusion to 100%. Leave the Color to White.
- Now, make sure you turn off all lights in the chor. (e.g. Rim, Fill Light and Key Light).
- When you go to render your chor, go to the Options tab of the 'Render to File Settings'. Make sure you have Ambiance Occlusion turned On.
- I set Quality to Final, Multi-Pass to '16 Pass (4 x 4)', Motion Blur Off, Shadows On and Reflections On.
- Render away. Depending on how complex your chor is and the computer you have it may take a while to render. For instance, on my laptop (see specs in my signature), the 34 Ford Frame scene takes around 2 hours to render at 1280 x 1024. I am rendering the progression of the model and using it on my desktop at work. I have the 34 Ford on 1 monitor and the Lamborghini Gallardo on the 2nd monitor.
- If you leave all your model a matte gray, you can get really nice clay style renders.
That is all there is to it. Hope this helps and would be interested in seeing how your render turns out.
Al
Much appreciated
Best of luck to you
J
- In your chor, select the Chor (e.g. Choreogarphy 1) itself in the Project Work Space.
-
It is amazing how accurate references can help! Found a great blueprint for a 1934 Ford frame with measurements and top and side views. I had the side profile okay, but from the top, I had the frame rails way too wide and the shape was not accurate at all. Using the new blueprint as a rotoscope, things are looking much much better now. It is actually looking like it should. I am going to keep looking for more front, side and rear references for the body before I dig into that part of the model. You also seem to have good occlusion settings as well. My email is ordinarygothic@yahoo.com
C&C always welcome...
Al
Great work!
Is there anyway I can get a copy of this project? You can remove the model, I am having trouble getting a chor that is kind of a white render except for the model like the one you have above. You also seem to have good Ambient occlusion settings, my email is ordinarygothic@yahoo.com
thanks jason
-
I have the new 8 core Mac and would love to see all my procs rendering an AM project in less time then it currently takes.


General Grievous
in Work In Progress / Sweatbox
Posted
How is the model coming?
J