


ericsh6
-
Posts
273 -
Joined
-
Last visited
Content Type
Profiles
Forums
Events
Posts posted by ericsh6
-
-
Did you use the Phoneme feature?
I used the dopesheet with the dictionary. It is so fun to use I have a hard time resisting but I read that it is better to manually lipsync with phoneme poses. Or maybe not?
But they look like good clothes!Actually, the cloths are a separate model with their own bones. The cloths bones match the character's bones. In a choreography I constrain the cloths bones to translate and orient like the character's bones. This way I can have one character but many different wardrobes.
-
I have been reconstructing my great great grandfather, John Charles Hall, while waiting for some decal fixes so I can make some cool mountains. Critiques are welcome. I rendered with V13c netrender on three slaves. Looks like there is a bit-o-jitter in the hair on the left.
-
Here's a bit about photogrammetry.
Mark, it looks like this is how the USGS makes the DEM files. Speaking of that, I want to show what this new plugin can do on the Rockville terrain from the DEM file but I am having some problems with Decals in V13 but I reported it already yesterday. When I try to stamp the decal of the heightmap I got from the Rockville DEM on my mesh, there are a bunch of spots where the mesh doesn't decal. Then, when I use the new plugin, the mesh is deformed wrong because of the spots. This decal operation works fine in V12 v+ though. Anyway, I hope to show the fruits of this plugin soon.
-
I was thinking, this could be good for faces as well
Yes, that's right. If you had a generic flat spline mesh of a face and could get a heightmap of your face then you could quickly get a 3D model of your face. But how can you get a height map of the face with a cheap digital camera?
-
Sounds like you are using a version compiled for debugging , you must compile in release mode.
I see.
If it's needed I have a macSo it has to be compiled on a mac, OK.
In my version, the displacement takes place in the y directionI changed it to displace in the Y direction too. I am building the 2D mesh from a rotoscope of satallite image right now. It's nice that the plugin runs so fast, it lets me incrementally deform the mesh and see how things are looking. To go back to 2D all I have to do is scale the mesh to 0 in the Y direction. So far so good.
-
To fix the bug, always change the Head CP:
Thanks. I am trying to make this plugin available to others. When I run it on another machine than the one I compiled it on I get this message:
Unable to load plug-in [F:\Program Files\Hash Inc\V13.0\HXT\decalDeform.hxt], The specified module could not be found.
(run on Windows XP home edition service pack 2. AM Version 13.0a.)
Is there a guide somewhere on how to productionize a plugin? Do you have to have a Mac to compile the plugin for Mac users?
-
And now, to satisfy the artist in all of us:
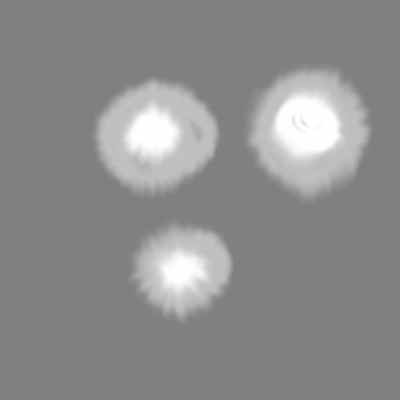
Image 1: This is the heightmap I created in paint shop pro.
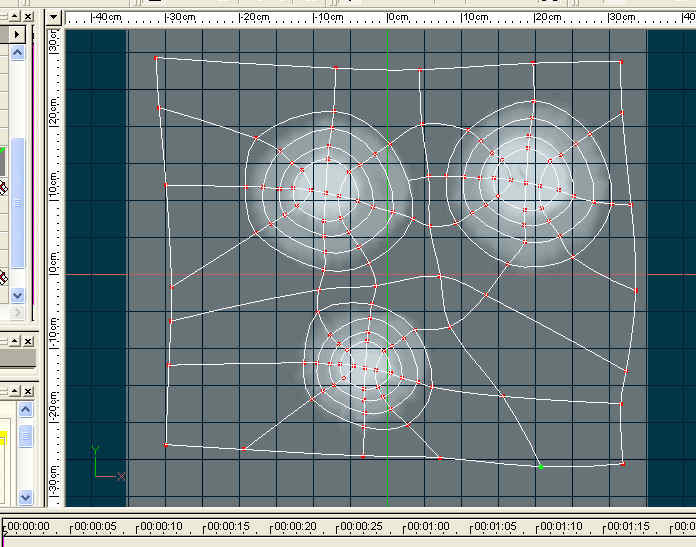
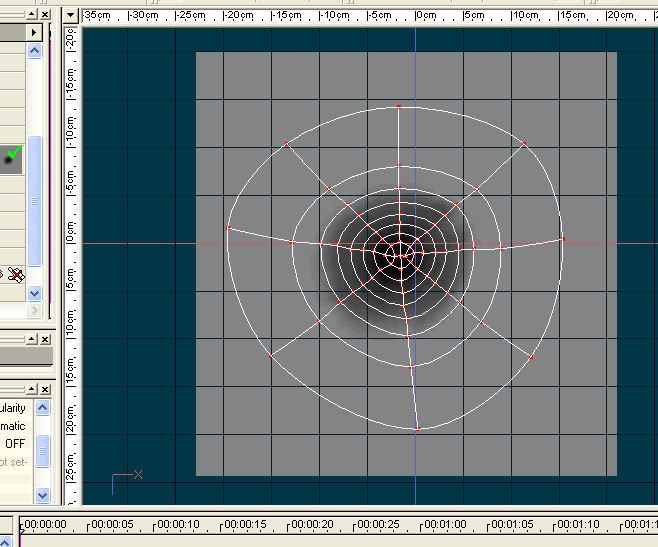
Image 2: I create a new model, GO TO FRONT VIEW (very important) and add a rotoscope of the heightmap and build a spline mesh that hugs its contours. I use a hook and 5 point patches to keep a continuous mesh between the 3 mountains
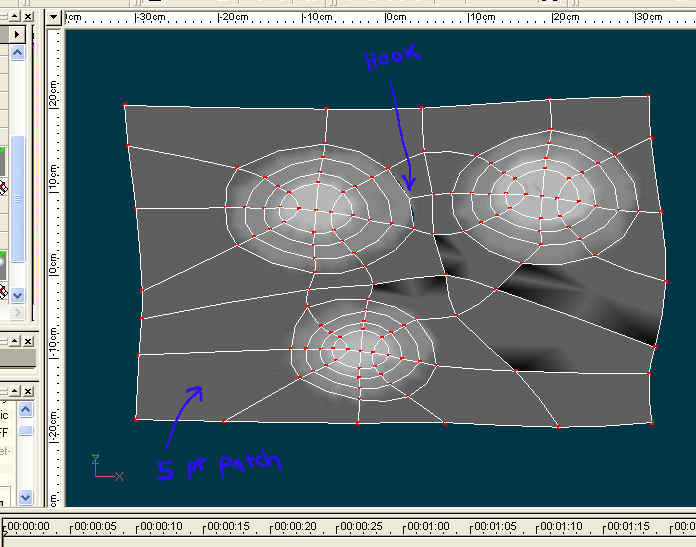
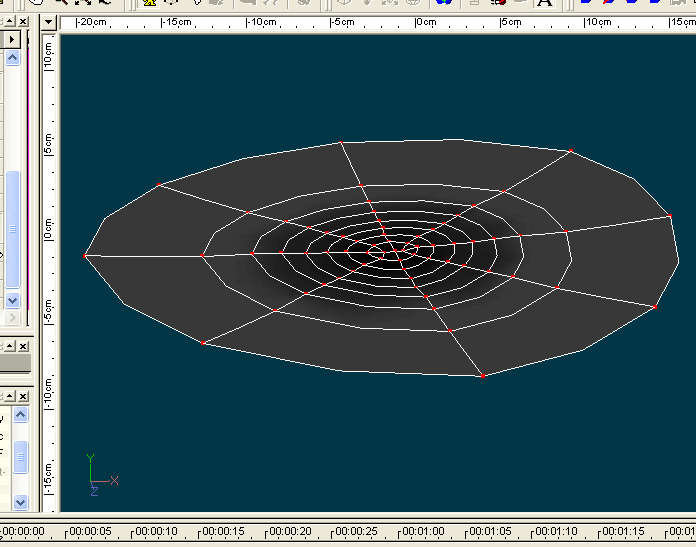
Image3: I turn off the rotoscope and apply the heightmap decal to the mesh. I make sure the new decal has the same X and Y origin and X and Y scale as the rotoscope.
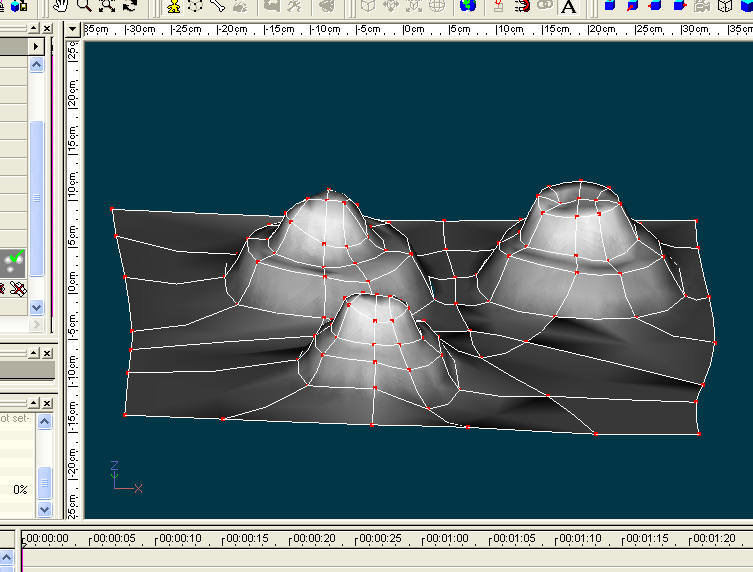
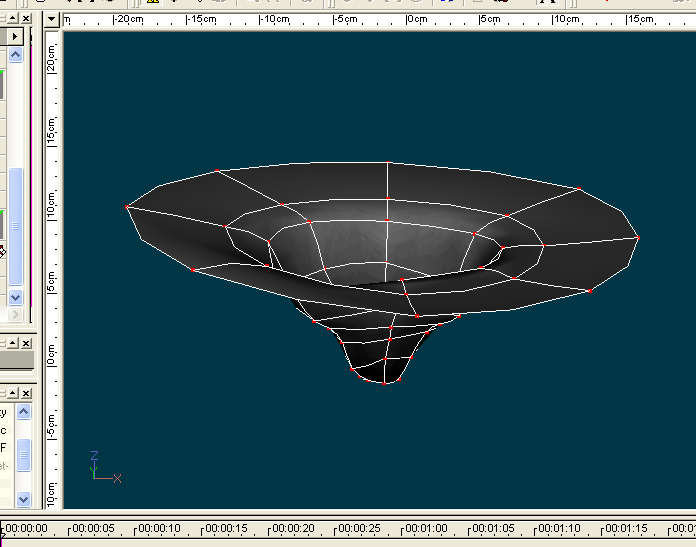
Image4: I right click on the decal and choose the new plugin and press the OK button on the plugin dialog box and presto - we have mountains!!!
Notes:
Now I really want to use this on satellite images of real mountains and I am going to do that next unless anyone sees a flaw with the code. Steffen's splitpatch plugin can be used to refine the mesh anywhere on the mountain needed. The mesh has to be built in the front view because I deform the Z coordinates.
-
OK, I fixed the repetitive CP problem with Steffen's code. Thanks again Steffen.
BOOL CSampleApp::DeformMesh(HDecal *hd) { CArray <_CP,_CP &> cplist; _CP tempcp; Vector2 uvs[15]; RGBFloat heightValue; float opacity; Vector pos; //HPatch5 *fivePoint; HCP *cp; //HDecal *hd = hmc->GetChildDecalContainer()->GetChildDecal(); HClipProperty *hcp = hd->GetChildDecalClipContainer()->GetChildDecalClip()->GetClip(); HDecalStamp *hds = hd->GetChildDecalStampContainer()->GetChildDecalStamp(); int dWidth = hcp->GetWidth(); int dHeight = hcp->GetHeight(); for ( HBasePatchUV *hbpuv = hds->GetFirstPatchUV(); hbpuv; hbpuv = hds->GetNextPatchUV( hbpuv ) ) { hbpuv->GetUVs( uvs ); cp = hbpuv->GetPatch()->GetCP1(); pos = *cp->GetPosition(); hcp->ReadBitmap(uvs[0].x*dWidth, uvs[0].y*dHeight, &heightValue, &opacity, 1); pos += Vector(0.0f, 0.0f, heightValue.Red()); tempcp.pos = pos; tempcp.cp = cp; cplist.Add(tempcp); cp = hbpuv->GetPatch()->GetCP2(); pos = *cp->GetPosition(); hcp->ReadBitmap(uvs[3].x*dWidth, uvs[3].y*dHeight, &heightValue, &opacity, 1); pos += Vector(0.0f, 0.0f, heightValue.Red()); tempcp.pos = pos; tempcp.cp = cp; cplist.Add(tempcp); cp = hbpuv->GetPatch()->GetCP3(); pos = *cp->GetPosition(); hcp->ReadBitmap(uvs[6].x*dWidth, uvs[6].y*dHeight, &heightValue, &opacity, 1); pos += Vector(0.0f, 0.0f, heightValue.Red()); tempcp.pos = pos; tempcp.cp = cp; cplist.Add(tempcp); cp = hbpuv->GetPatch()->GetCP4(); pos = *cp->GetPosition(); hcp->ReadBitmap(uvs[9].x*dWidth, uvs[9].y*dHeight, &heightValue, &opacity, 1); pos += Vector(0.0f, 0.0f, heightValue.Red()); tempcp.pos = pos; tempcp.cp = cp; cplist.Add(tempcp); if ( hbpuv->IsPatch5UV() ) { cp = ((HPatch5 *)hbpuv->GetPatch())->GetCP5(); pos = *cp->GetPosition(); hcp->ReadBitmap(uvs[12].x*dWidth, uvs[12].y*dHeight, &heightValue, &opacity, 1); pos += Vector(0.0f, 0.0f, heightValue.Red()); tempcp.pos = pos; tempcp.cp = cp; cplist.Add(tempcp); } } for (int i=0;i<cplist.GetSize();++i) { pos = cplist[i].pos; cplist[i].cp->SetPosition(&pos); } return TRUE; } -
Oh wait, I think I understand Steffen's code now.
-
Try this
Thanks!
Also, you have one more problem to solve before your plugin is ready. You displace most of the CPs more than once.Oh ouch!
This is the first thing that comes to my mind:
Get a pointer to the HDecalStamp
For each patch in the  HDecalStamp
{
For each CP in the patch
{
	 search through the CArray to see if the CP has already been added
	 if it hasn't been added then
	 {
		 update it's position with ReadBitmap
		 add the CP to the CArray
	  }
 }
}
My concern is that as I add CPs to the CArray, it takes longer and longer to search. If my mountain has over 40,000 patches then this plugin will run for a long time.
-
Oh yea,
this code still gives me trouble. What is the proper way to type cast this line? HPatch5 *fivePoint = hbpuv->GetPatch();
if ( hbpuv->IsPatch5UV() ) { HPatch5 *fivePoint = hbpuv->GetPatch(); cp = hbpuv->GetPatch()->GetCP5(); pos = *cp->GetPosition(); hcp->ReadBitmap(uvs[12].x*dWidth, uvs[12].y*dHeight, &heightValue, &opacity, 1); pos += Vector(0.0f, 0.0f, heightValue.Red()); cp->SetPosition( &pos ); } -
Aavers,
Are you superhuman? I added your correction for decal width and height and just as you said - the plugin works!!!
Here are some pictures of how it works:
1) In the first picture I use the height image as a rotoscope and build the mesh to conform to the contours.
2) In the second picture I apply the decal to the mesh.
3) In the third picture I right clicked on the decal and picked the new plugin and it deformed the mesh based on the decal.
-
Here is a thread that explains what I am trying to do, although I don't think I am explaining it too well.
http://www.hash.com/forums/index.php?showt...15entry182776
Hopefully the plugin will be done very soon and we can see better what it can do.
-
OK, this is getting good now. The plugin folder appears when I right click on the decal and my plugin is there in the wizzards folder. My dialog box comes up, I press OK and the member function below gets called. The mesh is deformed but not as I expect. The plugin is displacing the CPs on the perimeter of the mesh only.
Also, what is the proper syntax of this line?
fivePoint = hbpuv->GetPatch();
BOOL CSampleApp::DeformMesh(HDecal *hd) { Vector2 uvs[15]; RGBFloat heightValue; float opacity; Vector pos; //HPatch5 *fivePoint; HCP *cp; //HDecal *hd = hmc->GetChildDecalContainer()->GetChildDecal(); HClipProperty *hcp = hd->GetChildDecalClipContainer()->GetChildDecalClip()->GetClip(); HDecalStamp *hds = hd->GetChildDecalStampContainer()->GetChildDecalStamp(); for ( HBasePatchUV *hbpuv = hds->GetFirstPatchUV(); hbpuv; hbpuv = hds->GetNextPatchUV( hbpuv ) ) { hbpuv->GetUVs( uvs ); cp = hbpuv->GetPatch()->GetCP1(); pos = *cp->GetPosition(); hcp->ReadBitmap(uvs[0][0], uvs[0][1], &heightValue, &opacity, 1); pos += Vector(0.0f, 0.0f, heightValue.Red()); cp->SetPosition( &pos ); cp = hbpuv->GetPatch()->GetCP2(); pos = *cp->GetPosition(); hcp->ReadBitmap(uvs[3][0], uvs[3][1], &heightValue, &opacity, 1); pos += Vector(0.0f, 0.0f, heightValue.Red()); cp->SetPosition( &pos ); cp = hbpuv->GetPatch()->GetCP3(); pos = *cp->GetPosition(); hcp->ReadBitmap(uvs[6][0], uvs[6][1], &heightValue, &opacity, 1); pos += Vector(0.0f, 0.0f, heightValue.Red()); cp->SetPosition( &pos ); cp = hbpuv->GetPatch()->GetCP4(); pos = *cp->GetPosition(); hcp->ReadBitmap(uvs[9][0], uvs[9][1], &heightValue, &opacity, 1); pos += Vector(0.0f, 0.0f, heightValue.Red()); cp->SetPosition( &pos ); if ( hbpuv->IsPatch5UV() ) { /* fivePoint = hbpuv->GetPatch(); pos = fivePoint->GetCP5()->getPosition(); hcp->GetClip()->ReadBitmap(uvs[12][0], uvs[12][1], &heightValue, &opacity, 1, 0, &repeat, FALSE); pos[2] = pos[2] + heightValue->Red(); hbpuv->GetPatch()->GetCP1()->SetPosition(pos);*/ } } return TRUE; } -
Aavers,
Here is the code I plan to use. I changed the code to dark green that had compile errors:
cannot convert from 'const class Vector *' to 'class Vector *'
cannot convert parameter 3 from 'class RGBF1 **' to 'class RGBFloat *'
Am I using Vector correctly?
BOOL CSampleApp::meshDeform(HModelCache *hmc)
{
Vector2 *uvs, *repeat;
RGBFloat *heightValue;
float *opacity;
Vector *pos;
HPatch5 *fivePoint;
HDecal *hd = hmc->GetChildDecalContainer()->GetChildDecal();
HClipProperty *hcp = hd->GetChildDecalClipContainer()->GetChildDecalClip()->GetClip();
HDecalStamp *hds = hd->GetChildDecalStampContainer()->GetChildDecalStamp();
for ( HBasePatchUV *hbpuv = hds->GetFirstPatchUV(); hbpuv; hbpuv = hds->GetNextPatchUV( hbpuv ) )
{
hbpuv->GetUVs( uvs );
pos = hbpuv->GetPatch()->GetCP1()->GetPosition();
hcp->GetClip()->ReadBitmap(uvs[0][0], uvs[0][1], &heightValue, &opacity, 1, 0, &repeat, FALSE);
pos[2] = pos[2] + heightValue->Red();
hbpuv->GetPatch()->GetCP1()->SetPosition(pos);
pos = hbpuv->GetPatch()->GetCP2()->GetPosition();
hcp->GetClip()->ReadBitmap(uvs[3][0], uvs[3][1], &heightValue, &opacity, 1, 0, &repeat, FALSE);
pos[2] = pos[2] + heightValue->Red();
hbpuv->GetPatch()->GetCP1()->SetPosition(pos);
pos = hbpuv->GetPatch()->GetCP3()->GetPosition();
hcp->GetClip()->ReadBitmap(uvs[6][0], uvs[6][1], &heightValue, &opacity, 1, 0, &repeat, FALSE);
pos[2] = pos[2] + heightValue->Red();
hbpuv->GetPatch()->GetCP1()->SetPosition(pos);
pos = hbpuv->GetPatch()->GetCP4()->GetPosition();
hcp->GetClip()->ReadBitmap(uvs[9][0], uvs[9][1], &heightValue, &opacity, 1, 0, &repeat, FALSE);
pos[2] = pos[2] + heightValue->Red();
hbpuv->GetPatch()->GetCP1()->SetPosition(pos);
if ( hbpuv->IsPatch5UV() )
{
fivePoint = hbpuv->GetPatch();
pos = fivePoint->GetCP5()->getPosition();
hcp->GetClip()->ReadBitmap(uvs[12][0], uvs[12][1], &heightValue, &opacity, 1, 0, &repeat, FALSE);
pos[2] = pos[2] + heightValue->Red();
hbpuv->GetPatch()->GetCP1()->SetPosition(pos);
}
}
}
-
maybe you should consider calling the plugin directly from the HDecal.
You mean like right clicking on the decal and seeing a plugin option there? How do I get the plugin option to show up there?
In my Entry.cpp file I have:
extern "C" __declspec(dllexport) BOOL HxtOnCommand(TreeObject, UINT index)
{
switch(index)
{
case MODEL:
bla bla bla
case OBJECTCONTAINER:
bla bla lba
}
return FALSE;
)
Is this the member funtion that generates the "plugin" option when you right click on the model or decal or coreography?
Also, once I get the cp with this code:
HPatch *hp = hbpuv->GetPatch();
HCP *cp = hp->GetCP1();
Vector *pos = cp->getPosition();
???? how do I alter or modify the z coordinate of pos before calling setPosition in the next step ????
cp->SetPosition(pos)
How do you set
-
Is this right?
HDecal *hd = hmc->GetChildDecalContainer()->GetChildDecal();
Wow, I am realizing as I study your code Aavers, that you gave me the entire solution. So far it appears to be supported in V13 SDK.
-
Aavers,
In this line of code:
HClipProperty *hcp = hd->GetChildDecalClipContainer()->GetChildDecalClip()->GetClip();
Do you get *hd from HModelCache *hmc ? Is *hd an instance of HDecal?
-
However, this pseudo code might be helpful:
Thankyou, thankyou. I am now studying this code.
-
I'm still working on this as in thinking about it, but it isn'ta high priority anymore.
Aaver,
Do you happen to have any source code that extracts the greyscale RGB value from a decal at a CP location? I am making a large mountain terrain with rugged cliffs and geological formations. I use 5 point patches and hooks to put lots of patches where the details are high and transition out to large patches to save on model size. I want to apply a heightmap decal to the finished 2D mesh or maybe even use a rotoscope and alter the altitude of the CPs with the greyscale values. I apologize for putting this request on several threads of this form but I am anxious to complete this plugin so I can finish my mountain range in time.
-
Nice work and what is AO? How do u render in netrender?
Yes it is AO. I didn't render this in netrender because it wasn't available in v13 back then but now it is. I have rendered other animations with AO in netrender and they work great. Netrender should be available in the latest version of V13. You don't have to do anything different with your project file to render AO in netrender.
-
you can't move hair individualy...or can you
Of course you can. While in model window, click on the hair button (usually to the right of the bones button). Then you will see the hair guides. Some hair tool buttons appear on the right including a brush and others. just grab a control point on the hair and style the hair. By default there are many hairs associated with a hair guide so if you move the hair guide, you move a group of hairs. If you want more hair guides then make the mesh denser. In the hair material you can increase the number of control points on each hair guide so you can make more complex hairdoos. When done then go back into model mode.
-
didn't you render this with ao?it looks just like that picture you posted a while ago.
Yes, I did render this with AO. Now it would be a piece of cake to render since netrender is now in
beta 3 and above. I am reconstructing a small mountain village right now. I am finding that pixel displacement can be used with AO if done right. I will post some stills soon.
-
the guy that's ducking freezes un-naturally
I think I understand, at least I can see that there is something wong when he realizes the rocks are upon him. Those secondary actions are still mysterious to me. By the way, I used repeatable actions with transitions to the max here. I love repeatable actions.


Very old man
in Work In Progress / Sweatbox
Posted
Some of the mouth chatter is a bug. In the attached image you can see the chanels loop back in time and cause a sudden phonem transition. I saw this same bug back in v11 and reported it but it appears to be back. I think the dopesheet method would look at least 80% better if this bug were gone.