


Eric2575
-
Posts
2,615 -
Joined
-
Last visited
Content Type
Profiles
Forums
Events
Posts posted by Eric2575
-
-
I knew I could count on you Nancy, to recognize a piece of art when you see it

-
Haven't posted in a while and thought I'd start a new WIP. Here's the start

-
Nice job in figuring that out. I'm sure that will be helpful for other folks playing around with SSS
Eric
-
It's been a while, but if I remember correctly, in order to get solid cuts, both the target object and the cutter object need to be water tight, as in solid. I suspect your diamond shape may not be solid if your cutter works fine on other models. That's my first impression.
-
If John's advice doesn't help, put the project and the decal in a zip file and post it here. One or more of us will look at it and find the problem. Trust me, it will be something like - Oh yeah, that's it!!
-
Do a quick render from the outside of your sphere. If you get the sky texture on the outside, then you need to invert the material for it to show on the inside.
-
That reminds me of aaver's candle simulation from several years ago: http://www.hash.com/forums/index.php?showt...hl=aaver+candle
-
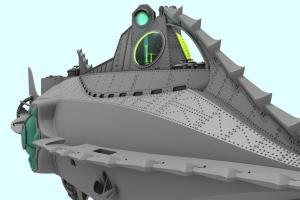
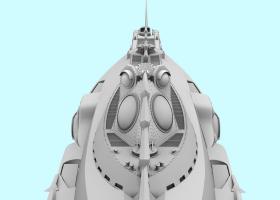
Finally got the first length of hull section riveted. I took a while since I was using reference pics from the original Nautilus prop used in the making of the movie. Npw that I have sort of a work flow, I hope to get the rest of the sections done a bit faster.
-
Although a bit spline heavy, most excellent modeling non the less. Getting the same results with fewer splines will come with practice. Soon you will learn how to model that way from the get go. Nicely done!
Eric
-
I like this rock better than the first, but the strata is still a bit too regular. Please, please lose that Ice cream cone tip
Also noticed you put green grass in the daytime version. I really like the scene better as a dusty and dry environment.
-
I really like your stuff, but this one needs attention to detail.
Let's start. The background is spinning too fast, almost obscuring the stars. The tree's shape is too unnatural, you can do better. Also, the bark is too fresh and even looking for a dead tree. The main boulder's shape needs work, still too even and smooth. The pointy triangular top doesn't fit with the rest of the smooth boulder. That wormy texture you've got all over the rock doesn't look right. Maybe if you invert the bump value so it looks like they are cracks instead of worms crawling on the surface. The material is also affecting the specular too much. Next focus your attention on the ground between the tree and the brush. The ground is too smooth and it has no other rocks, pebbles, or other debris you might find in nature. Give it something to break it up and make it more interesting and natural looking. I would loose the foreground brush completely and start over with that. It almost looks like razorwire. You need a lot more diversity here and different elements to make up realistic brush. You might consider using three or four reference pics of brush and tumbleweed and make decals out of them for several grass emitters. Definitely mix it up here. You might also want to tone down the orange light on the left of the rock. Unless there are some campers making a bonfire just off to the left, that intensity is way off the charts. Take a look at my desert scene for an idea of the foreground and the brush elements. All of the grasses and brush are created using decals on grass emitters. http://www.hash.com/stills/displayimage.ph...&fullsize=1
-
I agree with Mike. It looks as though only the lower body is disrupting the surface when in fact the larger upper body and fins should have caused quite a bit of stir in the water already. I did a web search using the terms "breaching Orcas" and came up with a ton of great reference pics.
-
Mark:
Could you be a bit more specific about achieving this water. You mentioned using Luuk's water material, but did not mention if you used any bump or displacement values on Luuk's material or the water rig? Is this done without bump or displacement? Sorry to be so persistent, but I've been wanting to get such an effect for the longest time. Thank you for being patient.
Eric
-
Mark:
Your work is awesome, I love the whole scene. Just downloaded your wave generator but for the life of me can't get same look you've got going here. Would you post the project file for this scene so I/we can see the settings for the various scales, bump, and displacement values? This would look great with my new Nautilus model.
-
Great creativety and nice modeling, but I would expect nothing less from you. Now I'll have this creepy feeling when I reach for my wallet and wonder if all my bills are alive and screaming at me not to let them go


-
Very nice modeling you've got going there. I love both the Captain and the Gingerbread house. Are you using bump maps? The chimney looks a bit too straight considering it's made out of choc covered raisins. Other than that, great stuff.
-
Beautiful work Stian! How many models comprise the Cathedral?
-
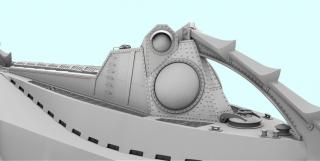
Wheelhouse and upper deck are about finished. Now on to the rest of the hull.
-
It's taking me a while since I am having trouble with the orientation of the sweeper object. When I have a path thats not on a direct x,y, or z axis, I can't figure out the angle of the target object to make it align with the path. So many times I have to select the completed swept objects and turn them so they are parallel to the plates I am workin on. Can anyone give me a quick insight into sweepers magical orientation properties?
-
One night???? Amazing!!!
Eric
-
Hoffendlich ganz toll!!! Bin in Muenchen aufgewachsen.
Here is a small update on the rivet progress. It's slow going because I am using old Disney photos and DVD footage for the most accurate rivet placement. Every rivet will be accounted for and there are over 30,808 of them. I should be done next year
-
Thank you for the compliment Al. I hope I never have to go up against Stian, because he is absolutely gifted, whereas I have to work hard as hell to even get close to what he does in his sleep

-
Thanks Nino
Well, I seem to have narrowed down the displacement problem to AO renders in V.13t. Displacement seems to work fine until I use AO. No matter.
For the Wheelhouse I will use a combination of bump maps and geometry to portray the rivets. It's taken me some time, but I've finally gotten the bump rivets to look like I want in great part to Matt's help. Thanks Matt. Here is the render of the partially riveted Wheelhouse.

-
Stian:
this must be a bug in V.13 because it took 12:14 minutes for the first pass to complete, and to top it off, the artifacts were as bad as ever. This is the project file you had no problems with in V.15. I know, I know, upgrade. Well, when it comes to making our house payment or upgrading, I pick the house payment and groceries.
Thanks for testing the file Stian
Eric


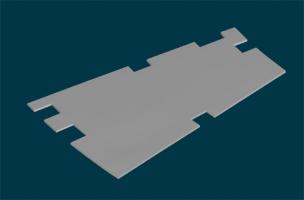
Bits and pieces till it's done
in Work In Progress / Sweatbox
Posted
After hours and hours of work...the second piece. There's a lot of these to go.