


rusty
-
Posts
1,851 -
Joined
-
Last visited
-
Days Won
1
Content Type
Profiles
Forums
Events
Posts posted by rusty
-
-
I need to create a sphere whose surface moves (or appears to move) something like boiling water. Looking at animated materials--color-wise it will be black with purple specular so the material will just be 'bump' (I think 'displacement' would be too much render time). I could probably find an animated clip but decaling a sphere and getting it even would be hard no matter how you work it (unfolding sphere, spherical mapping and placement, etc).
Think again.
Took John's last animated clip, decaled it onto a sphere with planar mapping ie.- no unwrapping, no unfolding, no complicated placement needed, but could have used spherical mapping. His animation was used to drive displacement as well as some coloring, but I also combined it with some other turquoise color image. Also added specularity and reflectivity
Rendered 3 pass and it took 4 secs/frame - ver16b
Cool!! Thanks!!
-
Darn... actually I can't open anything in A:M on my notebook--to my knowledge this started today. I get the following error:
The program can't start because MFC71.DLL is missing from your computer. Try reinstalling the program to fix this problem.
I reinstalled A:M but still get the error. I'm researching the problem.
Rusty
-
http://www.hash.com/forums/index.php?showtopic=41325
just posted this recently in Tinkering Gnome
or here is another version I just played with with the animated material changing speed and direction
Curses, I can't open the project file in V14. John, does this use any new AM features?
Rusty
-
similar to this http://www.hash.com/forums/index.php?act=a...st&id=58947 with different colors
I was trying to email you on this but can't find your address!! How are you? Still A:M&Ming it I see. Anyway, you got it!! Remember how you did it?
Thanks!
Rusty
-
Hi!
I need to create a sphere whose surface moves (or appears to move) something like boiling water. Looking at animated materials--color-wise it will be black with purple specular so the material will just be 'bump' (I think 'displacement' would be too much render time). I could probably find an animated clip but decaling a sphere and getting it even would be hard no matter how you work it (unfolding sphere, spherical mapping and placement, etc).
Any ideas, let me know!
Thanks,
Rusty
-
Did you get it turning right, Rusty?
Thanks for asking! Funny... I posted exactly what I was doing... with pictures and a video but... not there???? Anyway, no... but the expression suggested should fix it up. I'm about to self publish my book and while it's getting yet another proof I decided to put together a short trailer. That's what this is all about.
BTW, I totally planned to upgrade now that it seems Netrender is back (I'm still on V14 so I can use the unlimited Netrender we had back then with all the damn PCs I bought) but... my daughter's returned to college which means... we are suddenly like so broke until next year. :-(
Rusty
-
Hi Rusty ....
the simplest way is to use an expression.. I tried demonstrate this method in the tutorial below
Totally F'ing AWESOME!! Xtaz, thank you so much for the trouble you went to. If I new more about the random function (I'm sure such a fuction exists) I could get all the asteroids spinning at different speeds... even in a flock I think.
I have to check out all your tuts.
Cheers,
Rusty
-
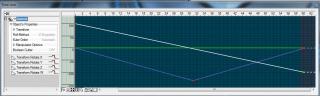
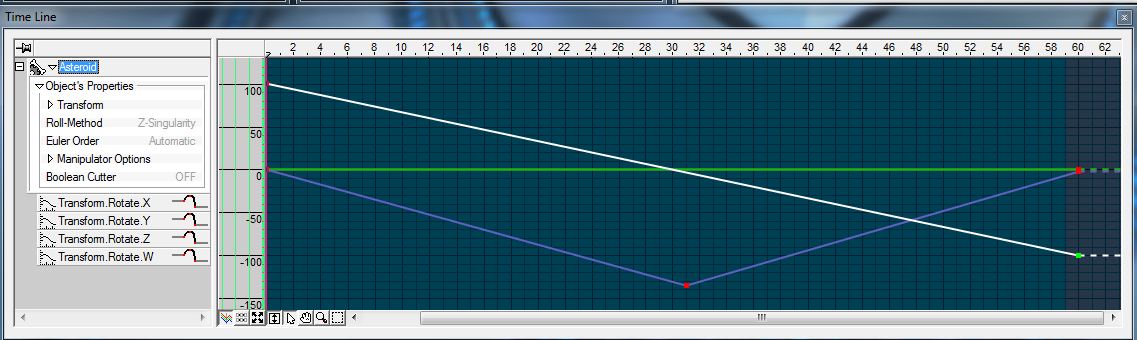
Look at the channel for that rotation value and make sure it's a straight line from beginning to end.
Select the keyframes and press 8 to make them "linear"
Rob,
I tried to do what you suggested but... well... check it out:
Here's my action:
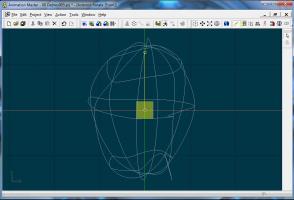
And here's what it looks like when applied in a chor:
Can't believe I'm stumbling on this!
Rusty
-
Look at the channel for that rotation value and make sure it's a straight line from beginning to end.
Select the keyframes and press 8 to make them "linear"
Thanks robcat! I'll give it a try when I have my animation PC setup again... moving it to another room, what a pain!
Rusty
-
Hi,
This is an easy one I've forgotten and searches are coming up empty. My rotating asteroids seem to accelerate during the rotation. This has something to do with the interpolation or something like that... I just can't remember what it is or, where or how to change it.
Thanks,
Rusty
-
BTW, I'm rotating 'asteroids'... my bad in saying a wheel (I don't need stride length).
Rusty
-
Try this Rusty
http://www.hash.com/forums/index.php?showt...mp;hl=propellor
Very interesting thread! Not what I'm looking for but wow, I can definitely use this stuff!
Rusty
-
Hi,
It's an old long lost AM'er... me again. I once saw how to rotate a wheel in an old SIGGRAPH video where all you did was enter the number of rotations (at least that's how I remember it... how fast... don't know??). Anyone remember something like this? It's very cool and if I find out again I'm going to document it so I don't forget it again!
Cheers,
Rusty
-
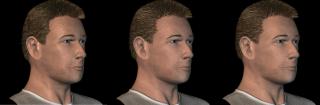
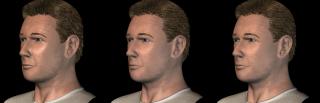
Hi Rusty,
The only difference I see from 1 and 2 is that 2 seems to a bit lighter, maybe more light in the highlights. I like it.
But very curious about the hair settings, I like the touches of gray mixed in and the grooming over the ears and in the front.
Nice job
Walter, et. al.
Thanks for the feedback and kind words! Looks like everyone likes Skin 2 better. I have not yet made adjustments to the specular maps (decals). Also, I have not incorporated the hair suggestions or many other suggestions from the OP on this model.
Re Hair Settings: Pretty basic (OP suggestions will make it much better) but here is the material (hair color) and the model (hair-do):
There is also an action which constrains the headcap model to the head model.
Walter, please note I do a lot of things differently to accommodate 'virtual actors' rather than 'character models' (virtual actors need wide ranges of wardrobe, ages, looks, hair dos and hair colors and these must be as 'snap on', interchangeable and as flexable as possible). With hair I do the following:
* Maintain separate hair-dos (no associated colors)
* Maintain separate hair colors (no associated hair-dos)
* I use separate 'skull caps' models which sit just below the head skin so that:
* Separate hair lines are possible
* Problems with 3 and 5 pt patches and hooks in the head mesh are avoided (most problems show up when the hair is animated)
If you are interested, I documented this process in the forum years ago and this can probley be found by searching the forum. Other questions, please ask.
Cheers,
Rusty
-
Hi,
I just tossed SSS skin 1 and skin 2 on the model and got the following results (this order: no SSS, skin 1 than skin 2). I think its a huge improvement, skin 1 more than skin 2 but perhaps the bump maps percentage should be upped a bit.
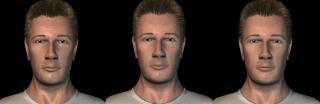
What do you think?
Thanks,
Rusty
Edit: Actually, looking at them here I see no difference between 1 and 2!?
-
They're there in v16. I know I used them to realign some viewpoints when i was doing screen cams.
It must be a v14 bug, never reported. I've reported some status line bugs since then that have been fixed, maybe that fixed your bug too.
I'd upgrade in a second if I could figure out how I could still use my 8 pc render farm. Well, depending on the cost... between college costs for my daughter and my son's wedding next month we're broke!
r
-
Anyway to save custom shortcut keys and/or settings?
they are in the .MAC file in the dir your master.exe is in.
Thanks! That helped but not with the controls... if I open A:M (without opening a project or model) the controls are there. However, once I open anything the progress bar (showing the progress of opening the file) stays on the status bar covering the controls. Probably on old issue in V14--I don't see anyway around it.
Rusty
-
They are still there for me. Go to the View menu and make sure "Status Bar" is still ON.
Hm... are you on V14? Weird!! Are you in a modeling window? BTW, Status Bar is on and I see it but there is nothing on the right side. I have two large flat screens and keep all pallets on the secondary monitor. AM is full screen in the primary monitor. I'm not on my devl system right now but next time I am I'll fool around and see if I can get the controls to appear.
Thanks,
Rusty
If u didnt do it till now u may want to reset A:M to the default settings...
See u
*Fuchur*
Oh, that would be painful! Anyway to save custom shortcut keys and/or settings?
Rusty
-
They are still there for me. Go to the View menu and make sure "Status Bar" is still ON.
Hm... are you on V14? Weird!! Are you in a modeling window? BTW, Status Bar is on and I see it but there is nothing on the right side. I have two large flat screens and keep all pallets on the secondary monitor. AM is full screen in the primary monitor. I'm not on my devl system right now but next time I am I'll fool around and see if I can get the controls to appear.
Thanks,
Rusty
-
Hi,
Can someone tell me what forum I should put posts like this?
I'm back on v14. There use to be controls on the status bar to rotate the view by specific degrees and axis but I don't see this anymore (in modeling mode). Is there still a way to do this?
Thanks!
Rusty
-
As others have mentioned the color is too uniform, too overall crayola "flesh" or play-doh putty looking.
Don't forget that skin tones include blues, greens, yellow, purple, crimson undertones, depending on how thick the skin, how close to the surface are the veins, as well as discolorizations for imperfections, sun damage, alcohol/drug abuse, ethnic group
Thanks! Looks like it has a few things I can use. I started the face color map out with the skull, then the face muscles and ligaments, then major veins, then etc., etc., etc, --really way beyond anything sensible, LOL.
Rusty
-
On the fine wrinkle lines... In his "Digital Lighting and Rendering" book Jeremy Birne suggests to add some red at the bottom of the wrinkles. Same color all the way through is unnatural.
Don't happen to know the page # do you?
Rusty
Yikes, my library's gotten out of date--got the first edition. :-(
Rusty
-
On the fine wrinkle lines... In his "Digital Lighting and Rendering" book Jeremy Birne suggests to add some red at the bottom of the wrinkles. Same color all the way through is unnatural.
Don't happen to know the page # do you?
Rusty
-
Rusty... is that an actual person you've modeled?
If so, you might take a pic of him with good light and start comparing that and your render and say "what's different between the two and how can I eliminate that?"
If I knew a way to duplicate lighting between AM and reality I would!
Rusty


Need another effect...
in Work In Progress / Sweatbox
Posted
Hi again,
I need to simulate the Aurora around the top of a planet. See:
http://en.wikipedia.org/wiki/File:Aurora_B...ace_by_NASA.jpg
And with movement (green, white and red swirls with streamers shoup wardspwards):
Ideas?
Thanks!
Rusty