sonofpat
-
Posts
137 -
Joined
-
Last visited
Content Type
Profiles
Forums
Events
Everything posted by sonofpat
-
Cool
-
Hi mtpeak2, I was by my parents for most of the day and am only now reading your message so please forgive me for not responding before.Here goes, You may have the IK_Hands pose switched on and the Right Hand IK null is breaking the elbow backwards which drives the arm rotation mechanism out of wack. Try switching off IK_Hands and see if this solves your problem. If you must use IK_Hands switch on the visibility of the Hand IK Nulls in bones folder of the model first. You can then drag the IK Nulls to to correct any problem Likes this. Pease do not give up I will solve this even if I have to rebuild the arm rig from scratch by a different method. Paul, <Sorry, Patos, but my original joy has subsided a little.> Please do not apologize this is necessary if the rig to is be improved. <there only seems to be a thigh control for the left side> There is one for both thigh but the visibility of the right side was switched off some where. I had all the bones switched on in the model and intended to switch off the appropriate ones in each pose but doing so switch them off in the model also. After trying in vain to solve this I gave up and posted the model as it was. Since you needed it I have switched on both the knee and thigh control bones in this version @ http://www.sonofpat.com/sure_rig/Sure_Rig2.prj NB there was no name change since it is just Sure_Rig2.prj with a few bones made visible. Please let me know if you have anymore problems.
-
Naomi is in the finished work forum of cgtalk see a larger image of her @ http://www.cgtalk.com/showthread.php?t=167581 Now lets put her on the front page ;-) (Shameless plug)
-
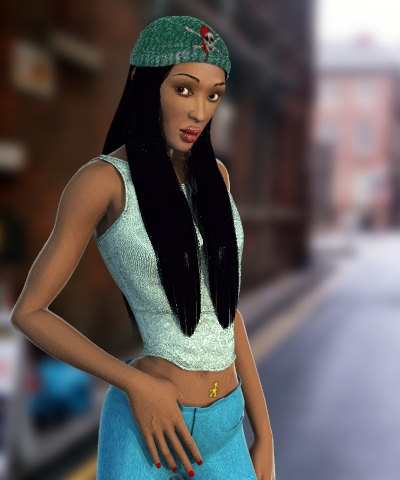
Tweaked the upper arm,elbows and right hand as suggested by the members of the cgtalk forum. comments are welcomed
-
Thanks for the suggestions. I had to use gaussian blur since I use the gimp. Steps 1.Rectangular selection 2.Feather 3.gaussian blur 4.selection expand 5.repeat 3 and 4 until satisfied The effect is best seen in on the yellow road line on the left Luv Pat
-
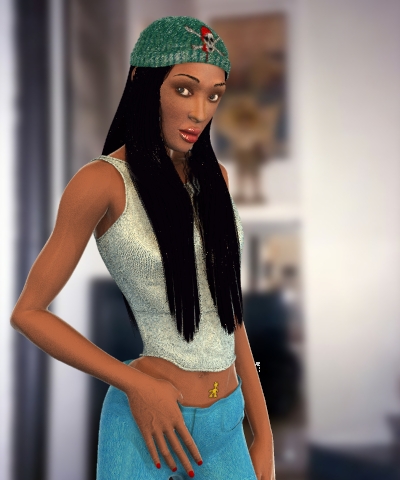
2 indoor. this is the one on the cgtalk forum,
-
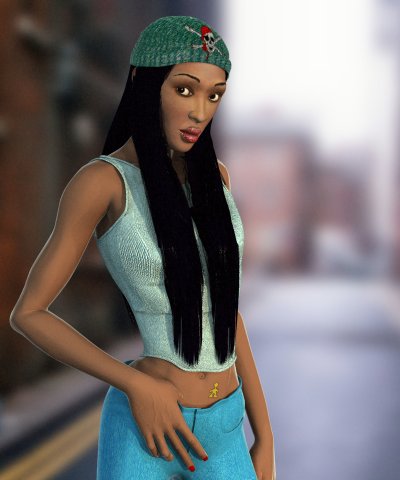
sorry about that. Here they are 1 natural light
-
great modelling. one crit though the toes seems too flat to me.If you thicken them as they get closer to the foot they will look better. Luv Pat
-
Yves for some strange reason I've been having a little trouble with my favourite 3d software when I first tried your natural light setup.I was getting good quick renders in the cho but when I rendered to a file the image was much darker than it should be. I suspect the project file may have become corrupted in some way because eventually it caused AM(10.5) to crash every time it was loaded. After having this problem with two versions of the project I became desperate yesterday and was about to post screen captures so you could see. However AM finally settled on the third attempt of the project late yesterday afternoon so I can now show off a naturally lit Naiomi. I used spotlights instead of bulbs because they seem to give me greater control over the shadows. I had to change the specularity in the model and the hair fell apart with this lighting. Despite this I am pleased with how it is turning out and your setup is now a prized addition to my little bag of 3D tricks. Thank you once again for making a better cg artist out of me. For those who have not seen my indoor version here it is. I consider the first part of the Naiomi Campbell project and I will like to thank everyone supported me despite the entish (tree beard) approach I took to it. I will now move on to animating her. That will have to wait for now because I want to refine my animation skills first. In addition I have a few outstanding rigging tutorials from the project and a face to finish for the list. To top this off my vacation ended yesterday. It may take sometime but I will finnish the project. In the meantime keep an eye out for my animation "lab rat" ole Joe in this part of the forum. Thanks again Luv Pat
-
Shame on you Yves, you don't know your own skylight riggs when you see them in action :-) ,heh heh heh. Yes that shading is mainly a combination of your skylight 25 along with Gary Martins ambient rim material that Ed Lynch gave me sometime ago. This along with all the help am getting from you guys makes Naiomi a real AM community gal. I played with the default lights in the cho until I go smiting I liked.Then I dropped in your skylight rig and reduced the intensity of all the lights to compensate for the over exposure caused by the sky lights.The clothes have patch images for bump and color maps. I was going for natural lighting without the washed out look that a lot of sky lit images have.I do not much ability in terms of lighting so I was completely blown away when I saw the first test render. As for the composition here is the latest image. I still have to tweak the fingers. Thank you for all your great advice. LUV Pat
-
Thanks for all the comments and suggestions. I have resized and tilted the hand and played wih the elbow which made a great improvement as you can see The elbow and forearm may still need a little work. I am going for the realistic head and stylized body look, because I want the model to look more elegant and sexy than a real person. I haven't quite pinned down the body as yet - as you all saw the hands were way too big and the elbows too narrow along with the other issue raised. So I still have some tweaking to do. I am trying to texture the hand and the body right now, so more changes will come later. Luv Pat
-
Hi everyone, I'll be finishing Naomi by next week and I'm quite pleased with the way she's turned out. Here is a sneak peak of how she's coming along. As usual, all comments and criticisms are welcomed. Luv Pat
-
Excellent modelling but you can work on the eyes to make them look evil even if it is unshaded. Luv Patos
-
I have just finished building a facial rig for Niomi. It consist of a series of poses that some what mimic the muscles of the face Which was inspired by this article @ http://www.gamasutra.com/features/20000414/lander_01.htm among others. These poses are driven by a "funky user interface" as seen in other software packages. The core of the interface is made up bones and nulls whose translation and rotation drives the poses.This I learnt from Bill Young's visime project. (Thanks Bill).These are arranged to make animation as intuitive as possible. An outline of the model is used as a guide for animating on the fly. I intend to use this in conjunction with the traditional phonemes and expression. Here is an image that should make things clearer A tutorial version of the rig is also attached below.Please give it a try and tell me how it can be improved. I will do a full blown tutorial for newbies when I have the time but I am preoccupied with finishing Niomi right now. LUV Pat FaceRig.prj
-
Hi again, Just uploaded a tutorial on the rigging of niomi's fingers@ http://free.hostdepartment.com/s/sonofpat/Fingers.html All comments are welcomed. LUV Pat
-
Hi again, Just uploaded a tutorial on the rigging of niomi's hinge joints@ http://free.hostdepartment.com/s/sonofpat/Elbows.html All comments are welcomed LUV Pat
-
Thank you Yves A compliment from you means a lot to me because I have immence respect your CG skills and not to mention the tremendous contribution that you have made to the AM community. The Naomi project is running behind right now because my system suffered a literal burn out - surge protector and all. This chewed up all my money for AM upgrade, and books such as Stop Steering, etc; and really sapped my ego at one point in time. Thankfully, the project was backed up, so I was able to get up and running from where I'd left off. I am still doing battle with the local shipping company to recover the cost of undelivered equipment. So a word of cheer amidst all of this, really lit me up. Over the weekend, I wil be uploading the final installation of the "joint rig" tutorial. This time on knees and elbows. The approach here is completely different to anything I've ever seen and I will love some feedback from you when it is posted. Thanks again Luv Pat
-
Hi again, I have uploaded a tutorial that shows how naomi hip was setup @ http://free.hostdepartment.com/s/sonofpat/Hips.html The strengths of this setup are once it done you do not have to keyframe the mesh at different bone angles and you can accurately control the movement of the cps as the joint moves. Some feedback would be appreciated. Luv Pat
-
Hi again, I am hoping to post a simple model with the rig I am developing for Niomi at the tutorial site. My plan is to do a tut each key joint and post the model at the end. However I was asked to post the shoulder so others can play with.So here it is.It is a simplified cartoon model but the principle is the same. Luv Pat Shoulder.mdl
-
Thanks JacK, I am interested cog cd in because I only hear good things about it.However I will not purchase it just yet because to do so now will defeat the goal of the Niomi project which is to push my skills in modelling,texturing,rigging and character animation to the higgest and share what I have learned with AM community.The effort is slooow in coming but is paying big dividends for me of which the rig is one.I don't know what new discoveries I will make but with your encouragement I will keep pushing Luv Pat
-
You can see the rig in action @ http://free.hostdepartment.com/s/sonofpat/shoulders.html There are two flash movies at the top of the page. One shows the arm bieng lifted from the front view and the other shows how the shoulder rotates in the side view. luv Pat
-
Hi Steelshark, I do not have version 11 as yet so I have not been able to play with the new implementation of CP weights. However I don't see why it may not be possible to duplicate the rig using weights. The only drawback I see to using cp weight is that their pivots cannot be adjusted as needs be as bones can, for eg, if you look at my setup, the bone at the front of the armpit is short and doesn't pivot very much because the cp (skin) it controts does not move very much whereas the bone at the top is long because the skin it controls stretches a lot when the arm hangs down. A possible work around may be in te position of the biceps as suggested in my rig. My upgrade is due at the end of the month maybe I will give it a shot. luv Pat
-
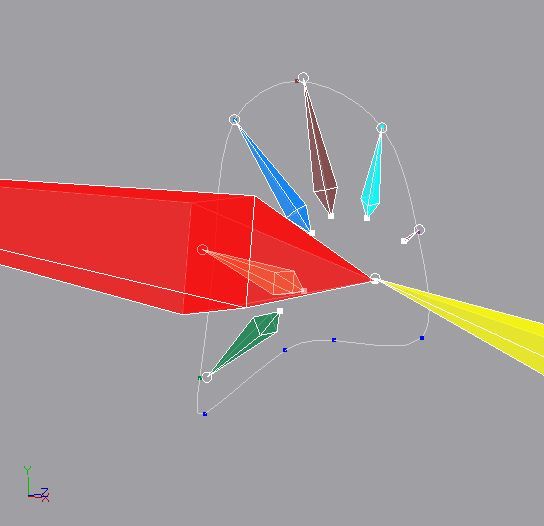
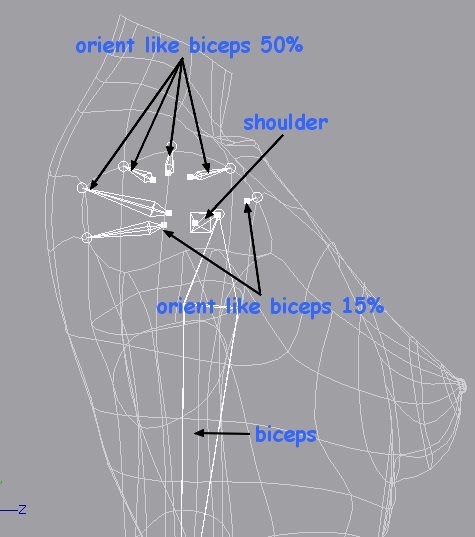
THE SETUP: The skin bones each have an orient-like constraint to the biceps with enforcement varying from 50% at the very top and back to 15% below the armpit in the back and front. The position of the root of each of these bones were tweeked to get the desired movement of the mesh. That's all for now. If I can find the time I will probably write a proper tutorial BTW I call this the skinbone joint set up.
-
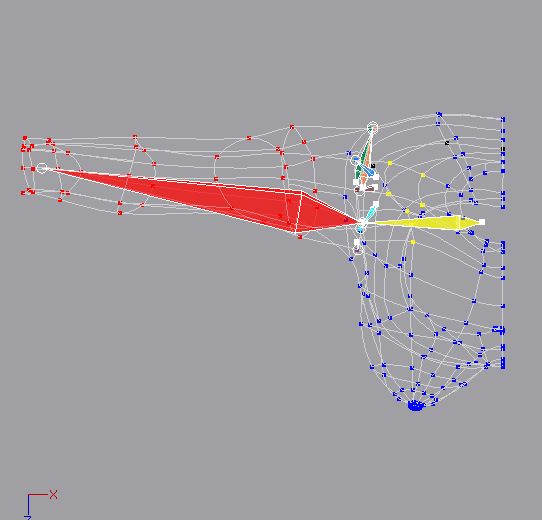
Here's a top view. Note the forward position of the biceps. This allows the arm to pivot in a more natural position when it is extended forward.
-
A bird's eye view of the shoulder ring and the skinbones that control it are shown for clarity