


PeterS
-
Posts
42 -
Joined
-
Last visited
Content Type
Profiles
Forums
Events
Posts posted by PeterS
-
-
That's the easy part...just run into the garage, open your toolbox, grab a mallet (or any blunt heavy object you find laying around), and go to town on your monitor. One word of advice though, some monitors have a pesky plastic film on them. If you've got one of those, you really gotta put some elbow grease into your swing when you make those bump maps. Have fun

-
Pretty easy to test. Set your clock ahead one month and click apply. Now run your computer for a few days like you normally would and see what happens. I'm not gonna try, let's get Vern to try it, he'll try anything


-
Looks very nice. One thing that detracts a little for me is the ratio of upper body to legs. Maybe that's just part of the toon look?
-
A rotoscope is just a reference picture. Unless you are creating something original, you can find rotoscopes of just about anything on the internet or in a bookstore. What is it you want to model?
-
-
Thanks for the breakdown John:-) This is all new to me, but I'm trying to keep up here.
-
Hi John:
I am very interested in what you are doing and how you are doing it. As Matt already asked, did you use a sphere to transfer the reflections? If so, what kind and size? What type of camera, resolution, etc? If not, what kind of HDR map did you use? And what exactly is tone mapping and why is it necessary? Are you following any tutorials?
I've started to play around with IBL and am having all sorts of trouble with the renders getting a heavy oversaturated blue cast anytime I change the Ambiance settings. I think it may be a bug or possibly related to my video card. It happens with any HDR image I use in any project I try it in.
Keep posting your progress and experiences please.
-
And the winner is.............
-
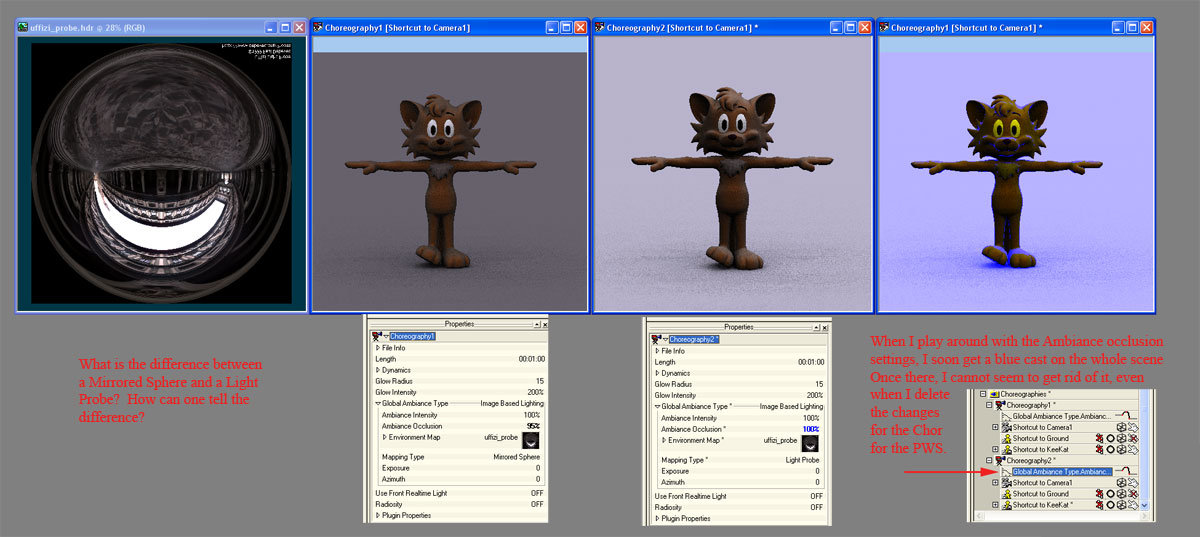
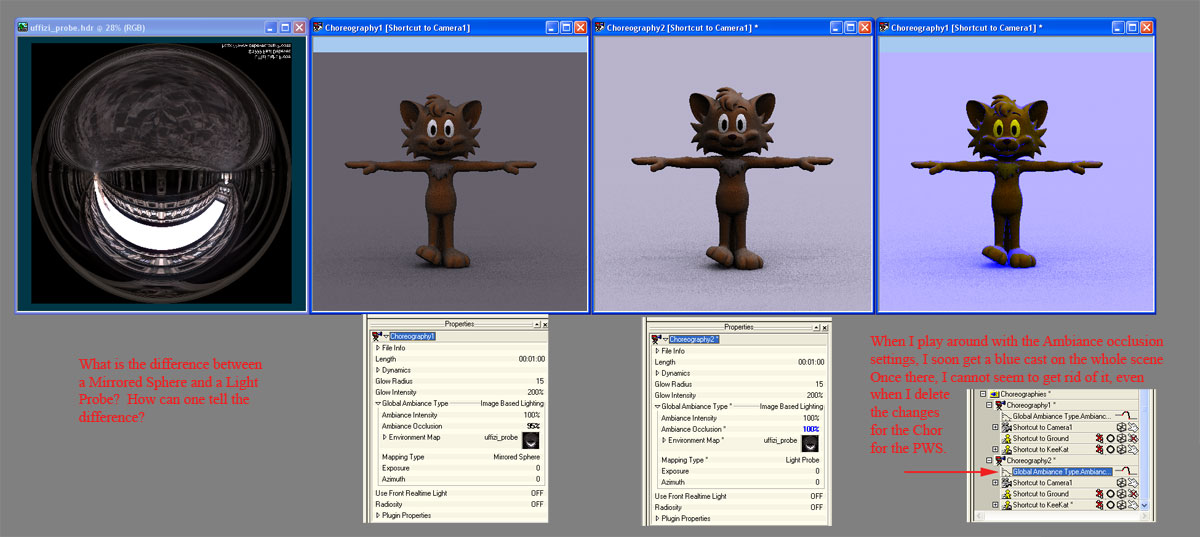
This is interesting: When I change the mapping type from Mirrored Sphere or Light Probe (both give the blue cast to the scene) to Lattitude-Longitude, the cast disappears and the colors seem to come back to normal. I did flip the sphere in HDRshop, could the resultant save have something to do with this problem?
-
Well, it keeps happening to my projects whenever I adjust the global ambiance or intensity. Saving the project, then closing and reopening doesn't help. Neither does closing AM altogether and reopening AM and then the project. So far it seems that once the chor turns that blueish color nothing brings it back. This must be a bug and I will report it.
-
Wow, that looks absolutely great. The snow, the billowing cover, the whole effect. Superb!
-
Yes, I have the latest versions of both 13 and 15. The change almost always occurs when I change the Ambiance Occlusion setting under the Global Ambiance Type in the PWS. I'll start from scratch and see if it happends again.
-
To keep it simple and repeatable, I started with a default Chor and deleted all the lights out of it. Next I imported the uffizi_probe HDRI and KeeKat. Once a new chor was created, I dragged KK to the chor and selected IBL for the chor ambiance type. Now I made two chors, the only difference being that in the first chor, I set the mapping type to Mirrored Sphere and in the other chor to Light probe. It gave two different renders with the "Render lock mode", the second render with the Light Probe setting actually casting a light magenta hue over the scene. When is it advisable to use Mirrored Sphere mapping type vs Light Probe? I suppose it depends on the image used, right? But how do you tell if you have a Light Probe or a Mirrored Shpere image? Next, when I change the Ambiance Occlusion settings in the chor for the Global Ambiance Type, I seem to get what is a bug in the program, because the chor now turns light purple with a heavy purple cast on the models in the chor. After the chor reaches that state, there is nothing I can do to bring it back to the normal renders I had before. I tried deleting the Ambiance properties under the chor and setting the Global Ambiance Type to None, saving the project, and then resetting the Global Ambiance to IBL. It still has the purple cast. I've repeated this in V.13 and V.15. Could someone give me some input on this or verify this for me before I send in a bug report? Thank you.
-
Compare the length and thickness of the candles to the book. I would make the candles proportionally thicker with bigger wax residue. I know this does not address the lighting, but it will add to the overall feel of the scene. JMHO
-
Looks a bit robotic
-
Great model. Would you post a wireframe?
-
Very nice model. How did you do the hair? I especially like the whispy hair over her shoulders.
-
Can't wait to see a render
-
Couple of things: Why a cone angle of 0 degrees? What is the light supposed to illuminate? Please post a couple of shots of your chor - one from directly overhead and one from camera angle. Also, you can always fake it by putting in a bulb light in the chor and putting it really close to the other light but in line with the camera. Then just have the lens flare come from that.
-
ok, here's a step by step:
1: open AM
2: Start a new project by clicking "new" under Project
3: Double click "Choreographies" in the PWS (Project Work Space) to get a new Chor window
4: Put the cursor in the center of the chor window right click and chose new light
5: Put the cursor over the highlight of the new light, right click and you should have a menu pop up with an option to select "Select Cache(light1)"
6: This option will be bold, select that one
7: Once selected, the Objects folder in the PWS will open and highlight the new light - Light1. Now look under the properties pane and expand the "Options" tab.
8: Once the "Options" tab is expanded, you must click "Lens Flare" to show "ON"
9: Now go back to the choreography window, hit"Q" and click anywhere in the chor window - What do you get?
10: To see the light and lens flare better, delete the ground, pick black for the camera's background color and do another quick render.
The attached picture is exactly what I got following my directions.

-
You can't see the light or the light's lens flare? You can only see a light if volumetrics are on or the light is reflecting off something. If you can't see the lens flare, you probably don't have it turned on in the PWS (Project Work Space) Object folder. You need to turn on lens flare for the light in the Object folder. Once you've done that, do a quick render in the chor and you should see it.
-
-
Hmmm, try this: in the choreography window right click and add a new light. Select the light in the Project Work Space and make it a type "bulb" if it isn't already. Under it's properties make sure that lens flare is turned on. For now, have the light positioned to the side of your Photon model. BTW, you don't even need your Photon model since the light already creates the illusion of the photon. None of the above examples uses a model to create the photon, just the light with lens flare. Since you are using a bulb light, you also don't have to aim it at the camera... Let me start up AM real quick and see if I left anything out...hold on...I started a new chor, right clicked in the middle of it and created a new light. Now right click on the "shortcut to light1" and select "Select Cache Light1". Once there, select "options" and click "lens flare" "ON". If you do a render now by hitting "Q" and clicking anywhere in the Chor window, you should get a light with a lens flare. A quick render wil also show the flare.
I did not try to have an ambient model next to the light, so for now get rid of your photon model, as you don't need it anyways.
-
What does the CD look like? What Character is on the CD? If it's a legit AM cd, I would reinstall it and see if that helps. If it's a current version and the cd is physically bad, maybe contact Hash to see if you can get a replacement.

The original NCC 1701 Enterprise
in Work In Progress / Sweatbox
Posted
When the first few glimpses of the new Enterprise came out, I was thrown by the funky redesign of the nacelles with the addition of the small wings? ailerons? in the rear of the pods and as mentioned the closer angle of the dangle, ha, ha. Me no likey either. Any of Gabriel Koerner's designs would have been much better than what we will get now. As far as the interior is concerned, I get the feeling that this new Enterprise is about 50 years ahead of the original. The layout and design looks so much more advanced to me - well maybe not the spooky hallways.
When the BMW Z4 roadster first came out, I thought, what were they thinking (no flames from Z4 owners please). Kind of the same feeling I got when looking at the new Enterprise. Oh well, maybe I'll come up with my own design for the old girl and model that for fun.