


Francois
-
Posts
38 -
Joined
-
Last visited
Content Type
Profiles
Forums
Events
Posts posted by Francois
-
-
With the exception of RealSoft I'm not sure if any 3D app has the capability to convert any given object into a light. Since Fluorecent lights doesn't have a defined beam of light, it should be quite easy to fake though.
I have never attempted this but I'm planning on using this method in the near future. To make your fluerecent light you basically just have to enable glow on the material you apply to the model of the light. This should make the light appear to shine. Then just add a light in the general location of the fluerecent tube to add the physical shine and that should work. For the reflections of the light against the ceiling, for example, you might have to add another light shing towards the fluerecent tube.
Let me know if this works please.
-
Hi I'm impressed too. This is quite a big improvement from your previous head. Keep it up. Looks like you're getting there much quiker than most.
-
Hi Nates may be right because codecs can cause all sorts of problems in an editor. You might also try the following: Establish what fieldorder your capturing device uses. In other words odd field first or even field first. Then set the "Field render" option in AM to "ON" and change the additional option that appears to "odd" or "even" to match that of your capturing device. As far as I know, DV is always odd field first, however, I have found that the truth in this mostly depends on your capturing device. Also, you might have to change your rendered animation from 30fps (Non-drop) to 29.97fps in another video editor if you are using NTSC. If you are using PAL then you have no problem with frame rates. Good luck
-
Hi I agree that hair without colision detection is good for grass (but not even always). As with a lot of AM's other "semi-completed" features you can achieve the effect you want but there unfortunately is an artifact (A hell of a lot of work). You can increase the stiffness of the hair to 90% by which you'll have more control over the hair and make it lie as you want in a still image. However, you need to physically animate the hair during animation because it loses a lot (and I mean a lot) of its dynamics during animation.
-
Hi Not trying to make you dispondent but the reason you're having trouble finding models for AM is because, even though AM has several importers, models imported from other formats are totally useless without an enormous amount of tweaking. Therefor you have to rely on only the amount of users of AM whereas polygon or nurbs software are almost 100% compatible through the use of formats such as OBJ, FBX, IGES, PAR, 3DS and other formats. Thus making the sources for obtaining models and characters extremely vast. I agree with Zandoria in saying that you should maybe find someone to do a custom model for you. I've actually just aquired the services of a few AM users for set building. You may find, though, that most AM users are reluctant to part with high quality character models at a price that a non-commercial project justifies. I imagine that this is mainly because of the ridiculous amount of work AM requires to build a nice and smooth character.
-
I don't know if this would help answer your question but I've found one thing that I cannot display in the PWS. I haven't been able to adjust percentage based values (such as the color of V11's hair) in the PWS. I might be too ignorant to know how though but I spent quite a bit of time trying.
-
Hi Video projectors were made to project normal tv video (like the aspects given below) so even though your physical viewing area is much larger than a TV the resolution stays the same. Your video appeared grainy cause you had a totally wrong aspect ratio. (You would see the same thing if you play back a tv aspect file on your PC screen at full screen.) Your aspect ratio needs to be as follows: For PAL: 720x576 at 72dpi For NTSC: 720x480 at 72dpi Im not sure exactly what they're called but you do get video projectors intended for computer monitor projection which would run perfectly at the aspect ratios you've given. You also get Laser Disk & DVD projectors which run at all sorts of strange aspect ratios. These 2 types of projectors are still extremely expensive and very few institutions use them. Make sure if the projector on which you want to show your video isn't one of these. If not, try the aspects I've given.
-
Hi There I have an opportunity for those of you who would like to get their work viewed by thousands and possibly tens of thousands of people. (The sets will be viewed by millions as it will be broadcast via satellite) Except for that, you might even make a sweet buck or two. If you are good and fast at creating backdrops (3D sets) then this opportunity is for you. The display will not only be for your sets but if you'd like you can add any image you are proud of. I need 8 sets to be built. Please note that you will have to be proficiant at using decals as texture maps as the current render times are averaged at 30min per frame and I would not like to increase this by much. And now for the future possibilty this holds for you: In about a year from now I will be starting the creation of a full length feature film. If your work is excepted for this project you will be considered first for the team who will be working on the film. If you need further details please contact me off the list at music@vepsi.com I hope to receive a lot of enquiries and to hear from you soon. Sincerely Francois de Swardt
-
Hi There I've got a problem. I know how to animate materials in v10.5 & 11 but when I save the project the material animation does not get saved with the project. This means that every time AM crashes (at least once a day) and I have to re-open my project, I have to redo the material animation. Is there something one has to do in order to save the material animation as well? Also, is there a way to make the driver animation thingy in the PWS, which enables one to do driver animation, be switched on by default? Thanx for your help. Francois
-
Hi There I think your approach to decal your model instead of using procedurals is a very good one. If you use procedural textures you will see your rendering time increase exponentially. Anyway... If you would like to create good texture maps I can suggest something that I found to be extremely useful. You can download a free Poser model from the net. Just do a search at google.com. There are millions of free ones out there. These models usually come with texture maps. Studying Poser texture maps will give you a very good idea of how to "flatten" your map in order to for it to roll over your character to create a more realistic finishing. You can also pick up on how to position your CP's to apply the texture map. I hope this helps you. Francois
-
Hi I've finished a model in 10.5 and want to move and scale the control points in the actual model in order to reposition it. In 8.5 there was a little check box called "move control points with bone" which enabled one to move or scale the bone and the control points would follow. How would I accomplish this in 10.5? Thanx Francois
-
Hi
It looks really good. I especially like the way you got the halo to shine.
Francois
-
Hi Phil
the picture that shows the arm has some lines showing is that from the lighting or the messWell that is on the mesh. Unfortunately I do not have much time at my disposal so I have to make due with certain things I'm not happy with.
This is also my very first character model so I had to learn as I went along.
The amount of time I spent smoothing out the model is rediculous.
Thanks for your comments though.
Francois
-
Hi
Great work!
I don't know the character as I lost touch with the Superhero development stuff round-about 1988 and at that time I hadn't seen her in a comic. So I don't know what she's supposed to look like but I must say you've managed to capture that comic feel.
Will you be doing true 3D or toon rendering?
Good stuff...
Francois
-
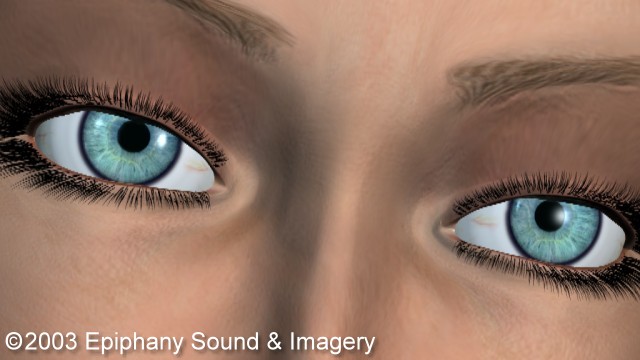
Did you use post on the images, for that "soft" look?
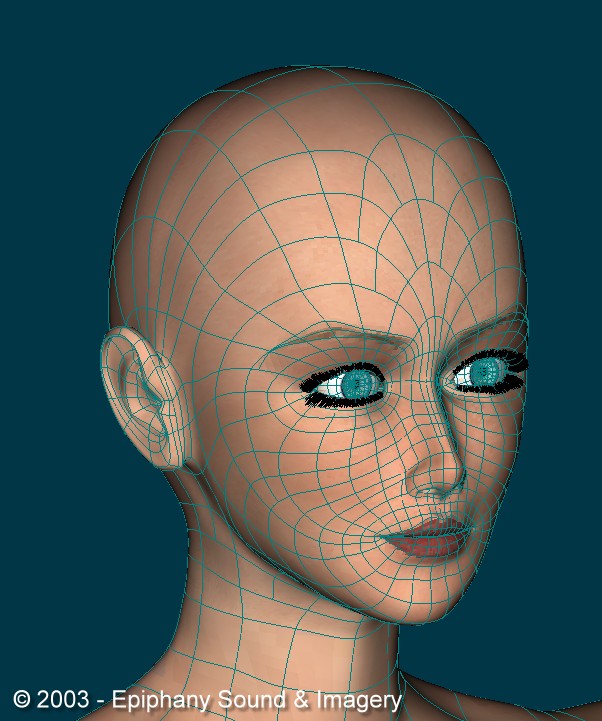
Could we see a wireframe of the head?
Hi Guys
Thanx for the positive comments.
I used a photo editor to add the "soft" post effect. You'll notice I didn't add it to the image of the eyes. The reason is that it looks very good in the animation render but as 1 single image it looks more like oily skin.
Anyway... As requested, here's the wireframe. The method I devised to move the 5-pointers away from the eyes onto the high forehead looks rediculous in the wireframe but it works extremely well and I can recommend it.
-
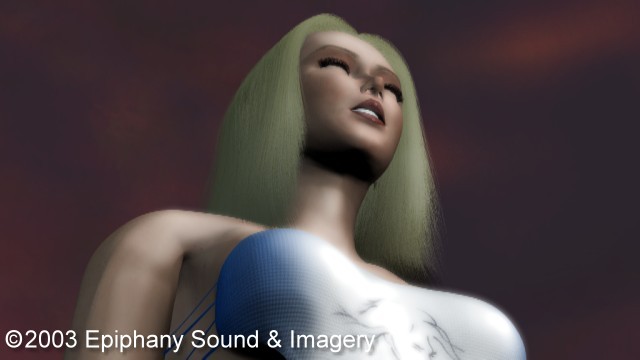
Image No 4
-
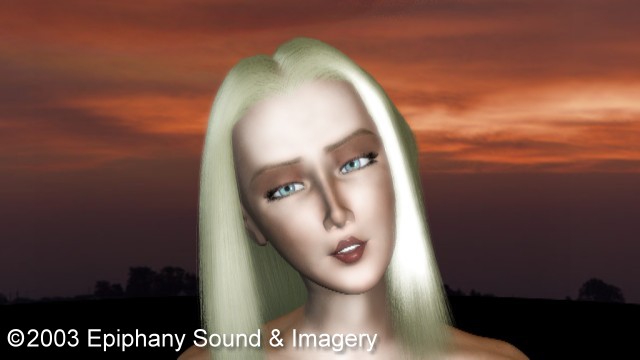
Image No 3
-
Image No 2
-
Hi Evre1
I've finally got some images to show. Here are some frames of the music video I'm currently working on. Please note that the steppy kind of effect is due to interlacing/deinterlacing. I don't know how to paste more than one image in a message, so I will post the next 3 images in consequtive replies.
Please let me know what you think.
Oh by the way the video will be wide screen and that's why the images are so disperportionate. (16x9)
Hope you like...
Francois


-
Hi
For the amount of time you spent, I must say that it doesn't look bad at all.
I don't know if you are going for a toony type of look but I've got 1 or 2 suggestions for you if you don't mind:
1. Try getting the eye lids a bit further away from the eye ball. This will make the eye seem more like a seperate object from the head.
2. If you would like a less squarish face, try tweaking the splines on the cheek in the top view to follow a kind of "S" shape from the nose to the ear. This will eliminate the "flatness" on the cheek an will help the mouth blend in a bit better.
Anyway... "Keep on keepin' on"
Francois
-
Hi Jim
... or shall I say "Spline Man"

Great work (as always). You must be the guy I've seen who's got A:M best under control.
I wish I knew how you get a model in AM so smooth. Are you 100% AM compatible or do you just have the world's patience?
By the way, I'm using the same type of effect in my current project (A Music Video), however, in Ulead products it's on board (not a plug-in).
Enough rambling... If you hadn't mentioned the finger nails and hair I wouldn't have noticed as I think you are "the Man" and I don't scout any pictures of your's for mistakes. (They are truly few)
Great work
Francois
-
Hi List
I'm relatively new to 10.5 an I've got a question.
How do I save animation of a material together with an action? I know this might be a dumb question but I come from version 8.5 and there it was easy cause one actually dragged the shortcut to the material into the action and then simply saved it.
In 10.5 it seems to be unneccesserily difficult.
Can someone please help me?
Thanx
Francois
-
Hi
I must say it's looking pretty good. Not shabby for a first time at all.
Good work
-
Hi
I'm unable to view the images. Is there a URL?
Thanx
Francois
Modelling for animation.
in (2003-2004)
Posted
Hi
I've had to rebuild my entire model because of this very issue. Unfortunatly with limbs it isn't quite as easy to say something will be animatable or not. The other guys raised some valid points as far as limb animation is concerned. In my experience the most horrible places to model for easy animation are the shoulders and thigh-to-hip joints because of their extreme range of movements.
Two tips I can give you for animatable modeling are these:
1. Never-ever use 5-point patches or hooks in the area where movement is to take place or directly adjoining it.
2. Try to have your 4-point patches in the areas of movement to be as close to square as possible.
Hope this helps.