


dcnelson
-
Posts
17 -
Joined
-
Last visited
Content Type
Profiles
Forums
Events
Posts posted by dcnelson
-
-
To see it you'll have to select 'Deutsch' instead of 'English', then select 'OUR WORK' and
in the upper left corner click on 'REGAL UNTEN'. It's the first film on the left.
I don't speak German so I have no idea what is being said. But it's done with the usual Soulcage
excellence.
-
Threadbare, hmmmm.... I was trying to go for a stylized look - but I guess it didn't come off that well. My choices for density & thickness obviously doesn't show the full extent of what AM is capable - I was sorta going for comedic. Might be better in an animation - but then again it might not - will have to consider Rogaine therapy.
I know it's just my opinion, but I think the density and thickness you've chosen makes for a 'wonderful' stylized look. I'd vote that you stick with it.
My only other thought is that the faces of Heidi Fleece and the Pwofessor are a bit too similar in appearance. You might consider tweeking their faces some to differentiate them a bit more (their glasses don't count). Now if they are suppose to look alike due to family resemblance (whether biological or too many years spent together) or by the artist's choice (yours) then please ignore my comment.
Regardless, just wanted to say that I love the style you've got going here.
-
You can find his stuff at http://www.bprince.com/
-
Just a thought -- you may consider using a lathe cross section of 4 (instead of 8) on your character's eye stalks. That way you wouldn't need to have any hooks where the eye stalks connect to the eyeballs on the one end and the head on the other. Plus it will reduce your patch count (which is always a good thing).
Interesting character.

Dean
-
I found the solution for future reference..
First I assigned all the cps of the jaw to the jaw bone.
Then I turned on the falloff for the lip bones(no assigning of cps)
Then for each lip bone, I calculated the weights which can be manually adjusted later if needed.
Yeah, that's right; that was what I said, or should I say, tried to say in my post.

My second paragraph is suppose to be equivalent to your 1st step. But after re-reading mine I can see it wasn't very well written.
For all my words, your three lines say it best.
As a side note regarding your 2nd step: it does work to assign the single CP that you want at full strength (100%) to its lip bone. But those CPs that are to be weighted less than 100% must not be assigned to the lip bone. (This is not to say that your way doesn't work.)
Thanks for posting your solution. After reading your previous reply to my post I was quite puzzled as to why what I had posted wasn't working for you since it worked for me. Now I know -- I'm not very good at communicating.

-
Perhaps I don't understand what you're really looking for, but I think CP weighting will accomplish what you're after. (At least the following has allowed me to do exactly what I think you are desiring to do. But it only works in version 11.)
First off you will need to assign all of the CPs of the facial area that you want weighted to your lip bones to another bone. As a suggestion consider assigning those CPs on the upper lip and above to the head bone, and those on the lower lip and below to the jaw bone.
Next you will create one new bone per lip CP (just as you show in your picture), each assigned to their respective CP in the usual way. This is your CP1 with 100% influence.
Now for each of these lip bones do the following 5-steps:
- 1. In the modeling window (in modeling mode) select the CPs that you want to be weighted with the current lip bone and hide all of the others.
2. Switch to bones mode and in the PWS turn on "Has Falloff" in the Property Panel for the lip bone that is to affect these CPs.
3. Make the inner capsule as small as possible by setting "Pivot Inner" and "End Inner" to 1%.
4. Make the outer capsule as large as required to encompass all the CPs that you want to affect by setting "Pivot Outer" and "End Outer". Where the CPs fall within the outer capsule will affect the weights assigned. (Don't worry about whether any of the hidden CPs would lie within the capsule. Step 5 will only affect the CPs currently visible.)
5. Now right-click on the current lip bone in either the PWS or in the modeling window and select "Compute CP Weights". This will only involve the selected lip bone and the currently visible CPs. (Be careful not to select "Compute All CP Weights". It's not the same thing.)
To verify that it worked, in the modeling window (in modeling mode), select the CPs and right-click on the selected group and select "Edit CP Weights...". This tool will show you the percentages that were assigned to the bones. If you don't like the numbers you can edit them.
You could also ignore steps 1-5 and simply use the Edit CP Weights tool to assign bones and set percentages. (This method is far more tedious if you're dealing with a lot of CPs.)
Hope this helps.
Dean
- 1. In the modeling window (in modeling mode) select the CPs that you want to be weighted with the current lip bone and hide all of the others.
-
Hi Victor, your restatement is quite clear.
What you stated seemed to me like the way to go with CP weighting, but in my experimenting I could see that there were alternative approaches. So I thought I'd ask for the clarification. I also asked in part, because of the interest of others in your facial rig. I figured someone else may benefit as well from the CP weighting issue being clearly described.
Thanks for taking the time and being willing to share how you did what you did.
Dean
-
Hi Victor,
Your new facial animation does indeed look better; I especially like the fuller quality of the cheeks.
I do have another question which may seem like it has an obvious answer, at least it did to me until I started second guessing myself. You previously stated that,
The points around the mouth are assigned to the UD bones and are weighted using AMweights to give them a nice falloff. This was a tedious process, and luckily version 11 will have the AMweights functionality built in.Now my question has to do with exactly which CPs are affected by the AMweighted falloff of a single UD bone?
My assumption was (and is) that it is only those CPs that make up the spline that attaches to the mouth's CP to which the UD bone is assigned. And that none of the adjacent up/down splines are affected. (I really hope you can understood what I'm trying to say.)
Is this in fact what you did?
Thanks again,
Dean
-
(KenH @ Mar 30 2004, 01:30 PM)(modernhorse @ Mar 30 2004, 06:23 PM)
I think it would be neat if we could move the manipulator box once and have it stick, until moved again. Say drag it off to the side and have it stay there.
You can do this. At least in Beta 3...or do you mean have it act like the properties/pose window?
(I don't seem to know how to quote properly. Ken, how did you get modernhorse's post date in parentheses on the line with the word QUOTE?)
Anyway, I think modernhorse is saying that it would be nice if the manipulator properties would stay put, until later moved by the artist. At the moment if you click on another CP the manipulator properties flys off to be near the newly clicked CP. Or if you change one of the fields in the manipulator properties, it will also move back to the CP it's associated with. (Sorry, modernhorse, if I'm putting words in your mouth.)
I just tried this in V11 beta 3 and the manipulator properties didn't stay put, but acted as I just described. Ken, if I'm missing something, please clue me in, because I'd love if the manipulator properties could be moved to a location in the modeling window of my choosing and stay put regardless of what CPs I click on or fields I modify. (In the past, I've sent this in as a feature request to Hash, Inc.)
As it is, I find that the manipulator properties is usually in the way on all but the simplist of models.

-
Hi Victor,
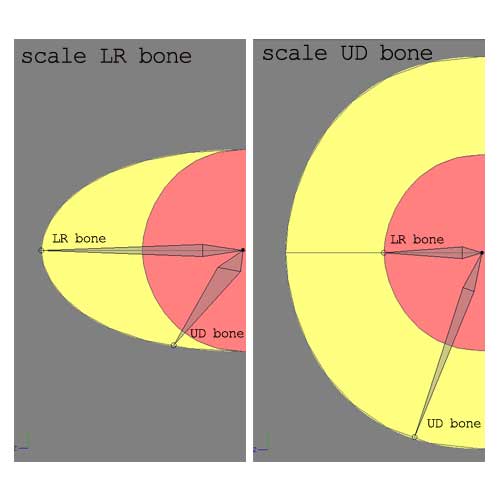
I would always scale the LR bone because it is the parent bone, and I want both the UD and the LR bones to have the same scale so that they will both behave in the same way. Same for translations.I totally agree regarding translations. However, I did notice the following differences when scaling the LR bone versus scaling the UD bone.
Given that each UD bone is a child of its corresponding LR bone.
If one scales the LR bone in its Z-axis, then the UD bone will only scale to the degree it is pointing in the direction of the LR bone's Z-axis. See diagram on the left.
If one scales the UD bone in its Z-axis, then the UD bone will retain its full scale length regardless of how it is moved, whether by rotating itself around its own X-axis or by rotating the LR bone around its Y-axis. See diagram on the right.
The reddish semi-circles represent the area described by the rotation of the UD bone about its X-axis with no scaling.
The yellowish areas describe the rotation of the UD bone about its X-axis with the corresponding scaling.
Just some food for thought.
Thanks,
Dean
-
Hi Victor,
The problem which prevented me from using a single bone for both UD and LR rotations is that the UD bones which actually move the mesh are not horizontally oriented. They angle down from the center of the head to the mouth. This is fine for up and down (X) rotation, but if I were to rotate them in Y they would arc up around the head making a smile, rather than moving lattitudinally (is that a word?). Therefore I decided to parent each of them to another bone (LR) that was oriented horizantally and would rotate along the sphere's lattitude. Does this make sense?Yeah, everything you said makes perfect sense. Thanks for the advice.
Thanks again,
Dean
Hi Zack,
Victor just answered your first two questions (see the quote in this reply). And to answer your question about whether two bones per CP will make animating tedious and whether picking the right bone each time could be a pain in the neck -- well, actually the bones are hidden and you use pose sliders to manipulate them. In Victors case, the jaw bone remains visible and can be moved to affect the hidden CP bones. I'm considering hiding the jaw bone and using pose sliders for it.
Hope that helps.
Dean
-
What a wonderful character and facial rig test! (If only my tests turned out so well.) WOW!
And thanks for sharing some of the details about your facial rig. I noticed that you had a pose slider labeled "Corner_L_IO". I assume that "IO" stands for "In-Out", as "LR" stands for "Left-Right" and "UD" for "Up-Down". Also (assuming that the bones' roll handles point either up or down) In-Out involves scaling a bone in its Z-axis, Left-Right involves rotating a bone around its Y-axis, and Up-Down involves rotating a bone around its X-axis. Correct?
In trying to play with a test rig based on your facial rig, I noticed that one could either scale or translate the bone in its Z-axis. Translating moved the center of the sphere described by the bone as its radius. This seems to have some interesting possibilities, but I assume that you used scaling since you do not want your sphere's center to move. Correct?
You mentioned that you found that using a single bone for both Left-Right and Up-Down rotations caused some unspecified problems. Assuming I'm on track (which may be a bad assumption on my part), did you find any issues regarding which bone you scaled (i.e., the LR bone or the UD bone)?
I was also wondering in regards to your character's arm rig whether you were going with a strictly FK rig? IK? or one that can select for either?
Thanks in advance for any answers you may provide. It is greatly appreciated. I've been struggling with the rigging of my character's mouth for a few months now and have been encouraged by seeing your facial rig. Although my character's head isn't spherical, it appears I can adapt your rig to my situation.
Thanks again,
Dean
-
I found the toolbar button for setting 'biased' styled normals and another one for setting 'perpendicular' styled normals, but I didn't find any for setting 'averaged' styled normals. I added them to the modeling toolbar. Created a model, saved it; selected the model's CPs, hit the biased normals button, saved it; did same for the perpendicular normals button. (I didn't find that these buttons toggled, rather they just set the selected group to whatever that button represented.) There is a section within the .mdl file bracketed by [NORMALS] [ENDNORMALS]. For the same model this section differs only very slightly between the default setting and the biased normals setting. The perpendicular normals setting resulted in a more noticeable difference. In looking through the .mdl file I saw no indication as to which setting or style is in effect. How does A:M know whether it's doing the default or one of the others? I have been working with a model that I originally created in A:M 8.0 and have brought forward with each new release of A:M (I'm now running A:M 10.5o). It appears to be using perpendicular normals. When I switch to biased normals it looks much better. But how do I get it to use the default (averaged?) normals? Thanks for any clarification and help anybody can give me. Dean
-
First off I want to thank you for creating these tutorials and for including the head model. I'm new to decaling and your tutorials are quite helpful. I really appreciated the fact that you included the steps done in PhotoShop. (I would love to see the other tutorials that you have proposed doing.)
I was wondering what considerations one should have regarding the number of pixels that comprise a decal. I noticed that what looked fine rendered at a distance got quite pixelated when rendered very close up. (I'm thinking of the mesh lines that were screen captured and then applied as a decal.) Should one be scaling the image up (increasing the number of pixels) in PhotoShop before one starts painting in the details? What are the rules regarding the size of decals?
I also noticed that the mesh blurs/stretches where I had moved CP's during the flatten stage. This was most noticeable in the area of the nose especially the nostrils, whose CPs had to move the greatest distance. Stretching also occurred under the chin, those CPs were moved as well. The back edge of the face had a lot of stretching though I didn't move any of those CPs. I'm assuming that anything I paint will be stretched in like fashion. How does one deal with this?
Thanks,
Dean

Complete Animatic Sequences
in TWO: General Discussion
Posted
I've just viewed the entire set of animatics. They reveal a depth of talent and experience.
Very well done.
I am curious why the tinman and tingirl were unaffected by water -- it rained on them while they
were on a mountain and they also fell into a river. I would have expected that they would have
seized from rust (as the tinman did in the 'Wizard of Oz').
Perhaps this was explained in the animatics (and I missed it), or in the book (which I haven't read).