

pleavens
-
Posts
597 -
Joined
-
Last visited
Content Type
Profiles
Forums
Events
Posts posted by pleavens
-
-
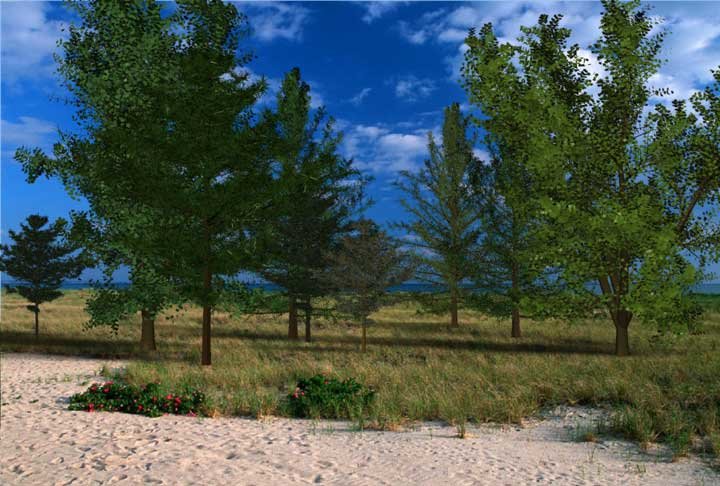
You may have looked into this already, but I thought that you may be interested in the results I got from a test of rendering trees imported as Props. This is a crude test with only basic diffuse color added to the Props. The same models can have image maps applied to UV's that should work in AM. (I have not tested this to be sure)
[attachmentid=20421]
There are 9 trees created from 3 Props in this image, yet AM rendered the frame in 45 sec (5pass with shadows 720*486)
The process:
1. Create tree in Arbaro (export to OBJ)
2. Import OBJ in *lender (no fgons or materials)
3. Scale 500%
4. select trunk and apply material color.
5. select branches and apply material color.
6. select leaves and apply material color.
7. rotate 90 in "x"
8. export to OBJ with material groups
Now in AM
1. Import OBJ tree as a PROP
2. Drag Prop objects into Chor and scale/position to liking.
3. Refine material colors in each Props shortcut.
AM got somewhat sluggish as I added the models, but it was still reasonable working in wireframe mode.
It sounds like a lot of work, but I did all this in 3 hrs starting from scratch.
<edit> now the bad news.. AM (13h) looses the Props material when you re-open the project, so once again I have wasted my time trying to find a way to help. Sorry</edit>

Phil
-
Sound's like something I could find time to play with.
Phil Leavens
-
I'll come down for at least one day.
Phil Leavens
-
Several suggestions.
Try a test render in ver 13 using image based lighting and ambient occlusion. The AO will handle the soft shadows, as well as giving the vehicle surfaces a non-cg surface look and the IBL will provide the enviroment color variation needed to make the vehicles look like they "belong" in the scene.
I would guess that render times may be fairly reasonable if you use a low AO setting and smooth it with motion blur. (in comparison to using a light rig) The only light you would need would be a "shadow only" light.
Careful to use a copy of the set if you do this, ver 13 projects will not load in 12.
------------------
Question, do you have an enviroment map material on these models?
Phil
-
Phil,
Just wondering...is compensating the "aim at" null necessary? I can't see the reason for needing a compensation on that.
THanks,
Nos
I usually have a camera setup that I like before doing the null, so using compensate keeps my camera aimed the way I want it.
BTW, you can also use the same null to drive the lighting around with the camera.
Phil
-
What's the easiest way to make the camera revolve around a center? In other programs, I could move the 'geometric center' of the object. In this case, do I need to move the 'camera bone'?
1. Put a null in the center of focus.
2. Scale it large for easy access.
3. Constrain the camera to "translate-to" and "aim at" the null. Turn ON "compensate mode" while setting each constraint.
Now you can rotate the null around it's "y" axis and the camera will spin around the null at a fixed distance.
(if you convert the nulls rotation type to "euler" you can just type in 360 in the "y" rotation property to set a keyframe for a complete turn. Be sure to key the "0" location first.)
Sounds more complex then it is.
Phil
-
Your new example video is great!
Thanks,
Phil
-
I've had this idea for a while, but never came around trying it out.
With some texturing I think it could be rather convincing. What do you think?
[attachmentid=10616]
Dynamic boolean?
-
Sure Phil, Thanks!
Here's the .prj.
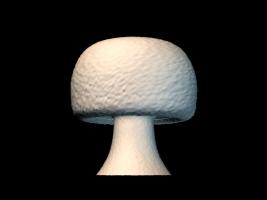
Looks like there were several things that might have contributed to the banding.
1. The scale of the "cloud" model was very different then the scale of the "profile" model. This caused the "cloud" to be very compressed to fit the action.
2. The density of the "cloud" model is probably much higher then needed for this usage of displacements, not to mention a greatly increased render time requirement.
The attached project has the mods I made. As the cloud model was scaled down to match the profile, the materials gradient position no longer matches what you had and will have to be re-adjusted.
Be careful with the material, adjust it at the model level as making adjustments at the material level does not override the drivers.
If I were doing this from scratch, I would make everything at a much larger scale, as it is to keep your Shroom action working, it was necessary to scale the material and it's percentage of displacement down dramatically.
[attachmentid=10536]
[attachmentid=10535]
-
The "Group Project" software (what I'm also calling the "automatic updater") can send/receive 1 file, a group of related files (needed to do a shot), or EVERYTHING. Our experience has been that we need to make the default operation as simple as possible, so if you just pick the "receive" menuitem, then everything will download onto your computer. However, with just a little bit of effort on your part, you can get just the files you need.
Is there a thread on this that I've missed?
Edit - never mind, I found the info on SVN.
Phil
-
I'm confused, are you doing the displacement with an animated quicktime decal, or are you using an animated procedural material?
Phil
I've done both. And I get the same banding in each case. I've sent this scenario to Hash; hopefully they'll turn up something.
If you want, I'll be happy to look at the procedural version of the model.
Phil
-
Here's a wireframe shot with a couple rendered sections. Note that the displacement is driven by a procedural material.
I do get some gamma/alpha issues but I can fix those by "refreshing" the mesh and, if I remove the texture, I get a nice smooth render.
I'm confused, are you doing the displacement with an animated quicktime decal, or are you using an animated procedural material?
Phil
-
I'd love to see the Loon inflate from a small sphere into it's body shape first, then with a "pop" each arm, leg and head would turn "right side out"
No idea how to do it off hand, but we need to keep in mind that the Hash programmers are there to help create the tools necessary for the movie as part of ver 13.
Phil
-
I found it critical to use uncompressed video. The problem is that the compressed video will create slight variations of the grayscale value which will mess up your intended displacement.
Phil
I'm using A:M to render the displacement maps and the compression bands are in the .TGA's that it produces. Is there any way to get around that?
You can try running a "threshold" image adjustment followed by a gaussian blur on the tga sequence. That should even out the surface yet provide the displacement you want.
Phil
-
In the animated displacement tests I have done..
Animated displacement map stuff.
I found it critical to use uncompressed video. The problem is that the compressed video will create slight variations of the grayscale value which will mess up your intended displacement.
Phil
-
First I thought of cloth myself, but then I reconsidered. I get the impression that inflating a Loon will look something like inflating a flexible rubber balloon and A:M cloth "out of the box" doesn't behave like that. If you let an inflated cloth Loon lose in gravity, it will behave like an inflexible cloth Loon not like something loosing it its shape due to loosing air.
However, cloth will probably be used in some way, but I'm afraid we will not get a convincing effect from using it "out of the box".
/Anders
Ok, good point, how about using the "conform" plugin? Marcel has mentioned that it would be easy for him to create an animated version.
1. Model a fully deflated Loon.
2. Animated Conform the inflated Loon down to the deflated Loon, tweak as needed.
3. Now use the cloth process on the animation, but only to give the model a "rubbery" look.
Do all this as an Action, or convert to an Action from a choreography.
Apply the action as additive (and reversed) in the final choreography and animate position and rotation as needed using the base model bone.
Phil
-
Sounds like a job for cloth and Newton physics.
1. Place inflated Loon above ground or object it will start from.
2. Add animated "idle" cycle.
3. 30 to 60 frames later add choreography action.
4. Apply cloth material to entire Loon (self collision ON) / may have to use a second "Loon with cloth" constrained to the "non cloth Loon" and swap them at the transition from "idle" to "deflating".
5. Animate cloth settings and gravity to define Loon "deflating"
6. Apply and animate Newton physics to define Loon dropping onto surface and losing it's form.
7. Render and reverse sequence.
Solid Loon surfaces can be hand animated to fit the action if needed.
A camera cut from (close-up) Loon just starting to deflate to (body-shot) Loon inflated would simplify things. (reversed of course)
I think JohnL had a test that did something like this.
Should be simple, but the Devil will be in the details as always.
Phil
-
Is this a version 12 plugin?
I dumped it to the hxt directory of 11.1 ( on windows machine) and nothing related to Voodoo shows up in
either Model -> Plugins -> import or in Model -> import Or in an action or Chor.
Maybe I'm out of practice at importing stuff.
John
Right click on the camera shortcut in a choreography.
Phil
-
-
Here is the latest version of the modeled environment.
This is the first test render, and there are a LOT of things to add, and tweak.
I had to do this to get around all the problems I was having with the video footage.
The total environment in less than 800 patches.
That doesn't include the vehicles.
http://www.dustinproductions.com/files/cog...deled-25fps.m1v
David
Nice job!
Phil
-
Here's a stabilizer plugin for VirtualDub.
http://www.guthspot.se/video/deshaker.htm
Some of the plugins for VDub are pretty impressive.
If we could get a plugin to import Voodoo camera capture text output to AM, the whole process would be covered.
Phil
-
The in-car shot is really taxing me.
Using the footage as a roto for the scene is tough because I'm trying to keep the shadow catcher properly aligned, not to mention the hours I spent in AE trying to get the jitters out of the footage.
Then of course keeping everything in the correct perspective.................. ugh...
Sounds like a job for SynthEyes or other camera matching software. Have you tried processing it that way? Perhaps a two step process of image stabilization, followed by camera tracking.
Phil
-
Ok, I found it.
-
I'll have to check on my development machine at the office. If I still have the project. I'll post the model here tomorrow morning. (Pacific)
There's a link to what may be a usable screw head in this thread.
http://www.hash.com/forums/index.php?showtopic=1587&hl=
Phil


Scarecrow
in TWO Texturing
Posted
<pops out of cave>
Hello.
After holding back from saying anything after Nancy's first postings of the TinWoodsman, I just have to say this after seeing her Cirque D'Oziteers.
Turn Nancy loose to do whatever the heck she wants with the artistic direction of this movie! The characters are SO much more vibrant and visually interesting in her most outrageous versions. She understands how to use colors to effect our perceptions and emotions, use this talent.
Many forms of entertainment go to great lengths to make the performers visually stand out to the audience. Storys are told daily on the stage by artists in outrageous outfits, while careful lighting and costume changes/modifications are used to manipulate the audiences perception of the artist to fit the moment.
Why not do the same here? I get the sense that Nancy is trying to do the "right thing" of keeping the style within a level that will be exceptable to everyone raised on the "Toy Story" visual style. Screw that! if this movie has a chance of grabbing attention it will need to stand out, and here is the way to make it do so.
Great job Nancy!
</Back to cave>
Phil L