

pixmite
-
Posts
231 -
Joined
-
Last visited
Content Type
Profiles
Forums
Events
Posts posted by pixmite
-
-
Is version 18 incompatible with my version 17 web subscription? Version 18 asked for a license key upon startup. I tried the one that came with my version 17 subcription and it gives me the subscription expired message. What am I doing wrong please?
-
OK folks:
I get a error message when I attempt to render an animation. I looked at all the settings I couldn't any place to set anything from 16 to 24 bit. Any ideas? As always, thanks in advance for any advice you can provide.
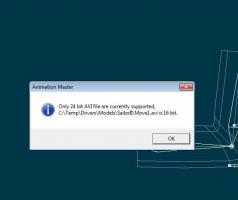
Choose "uncompressed" in the compression settings for AVI. That's the only off-the-shelf AVI codec that works with A:M.
It will make a huge file. Recompressing to Quicktime with Quicktime Pro or in 32-bit A:M is recommended for web posting.
Thanks that did the trick!
-
Interesting. I haven't seen this error except when trying to open a file.
Is this with v17b?
It's 17a - didn't know that there was a b, must have just come out

-
OK folks:
I get a error message when I attempt to render an animation. I looked at all the settings I couldn't any place to set anything from 16 to 24 bit. Any ideas? As always, thanks in advance for any advice you can provide.
-
I think this is broken. I got the CHM file and put it in the v17 folder but after a restart, Help gets me this screen
Thats exactly what I get. Its unfortunate, because the last reference material I have on how to use this product is a bit dated, verion 11
-
OK folks I've upgraded to version 17 and having a bit of problem with the help file installation. When I click “Help” sends me to a download link. So I download the file and unzip it into the main AM directory as per the instructions. Now when I click “Help” I get and errored browser page saying that it cannot get to the internet??? I think I'm missing something simple here. Can anyone enlighten me please? Thanks in advance for any advice you can give.
Pixmite
-
Thanks everyone for the feedback. Some great suggestions.
-
Well I usually use a pose for that ,then you have control in an action and the cho
Well that would work. Thanks for the tip!
If use a pose to govern all eye lid and blink activity then I would not have the problem of making my chor action match the first frame of my external eye blink action. So in conclusion, I guess I'm trying to unnecessarily create an external action, i.e. keep it in the choreography.
Other than a looping walk, is there any other type of actions that lend themselves to be saved separately? i.e are there any good guidelines on when to save an action externally vs. keeping it in the Choreography? Once again, thanks for any advice you can offer.
-
Fellow AMers:
Question regarding Action vs. Choreography Actions. Which technique is better for something like a character eye-blink. Is it better to define them as part of the Choreography Action, or is it better create them separately, and then repeatedly sprinkle them into the Choreography (What I would assume is better).
If it is better to create a non-chorography action then my question expands a little…..
The eye lids of my model when I crafted it were set in the completely open position, i.e. the scarred look. This suggest to me that I’ll need to partially close the eye lids in the first frame of the choreography to exactly match the first frame of a potential eye blink for consistency. That sounds a bit klugey, especially if create any other eye lid movement before attempting to apply the external eye-blink action again. That being said, it makes it sound like an external eye-blink action is a bad idea. I must be missing something simple here; can anyone offer some advice on this? Thanks in advance for any eye opening wisdom you can impart
-
Aha! It’s the old preverbal Advanced Properties ploy! I was hoping it would be something simple like that. Thanks once again for the wisdom!
Pixmite
-
Ok,
I've check my version 15 and the result is the attached file. As you can see I do not have the same menu option as the previous responder. In short, once 1 Smart Skin has been added to a bone it dissables the application of a second. I tryied this in:
Model mode - right clicking on a bone
In the project work space click on the bone
In action clicking on a bone
None worked
So the question now is can anyone with version 15 add a second to Smart Skin to a single bone and if so how do you access it?
Once again thanks in advance for any suggestions you can provide.
Pixmite

-
Hmm... I thought I tried that, but it looks like I might have done it from the wrong window. Will try again with my version 15 tonight. Thanks for taking the time to point it out.
Pixmite
-
Fellow AMers:
Several versions ago it was possible to create multiple smart skins for any given bone. I used to leverage this capability to create characters that morphed from one form to another. Example: A man transforming into a werewolf.
In order to do this the model needed a set of smart skins for the human from and another for the werewolf from. I would then tie the SS enforcement to the same pose slider that governed the transformation. I.e. one going to 100% while the other goes to 0%.
I used to be able to right click on the bone and select “New Smart Skin” from the menu, but now if there is already one in place, it will not give me an option to add another. Perhaps with the implementation of control point waiting Hash thought that there was no longer a need to accommodate multiple SS per bone???
So the question is: Does anyone know if this feature still exists and if so, how to access it? Alternatively if you were tasked to animate a werewolf transformation, how would you go about it?
The challenge: The fact that the extent of variance of the model’s geometry at the two extremes makes the SS and control point waiting for one extreme unusable for the other. You could approach this problem by building two models (one for each extreme) and just use a pose for the transition, but this leads to a highly unanimated / boring transformation – i.e. no model movement is possible other than the transformation itself, which is something I’m trying to avoid.
As always thanks in advance for any pointers / advice that you can provide.
Pixmite
-
thanks for the tips, I'll try them out.
-
So I’ve got these 3 bones arranged in a row that have a cascading parent child relationship. The bones are not in a straight line. The first points up and to the right at a 45 deg angle the remaining 2 attached to it pointing directly to the right. If I scale the first bone that is on the 45 deg, the other to are shortened and distorted in the direction of the shortened parent. Is there any way to prevent the 2nd and 3rd bones from being impacted (scaled / distorted) by the scaling of the first while still maintaining their parent child relationship? Thanks in advance for any pointers you can give.
Pixmite
-
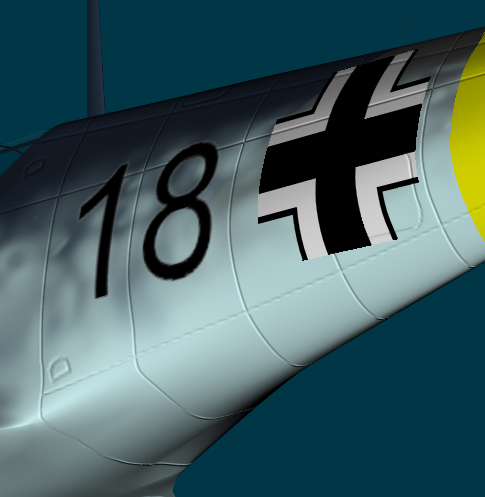
All here's the TA-DA pic. Its a new Bump decal where no stamps were scaled in the UV editor. Note that you can still see the jags on the color decal, I haven't created a non-scaled stamp version of that one yet.
Pixmite
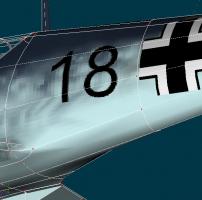
If you look closely at the picture associated with the quote above, you can see that some of my panel lines that are not vertical are a bit rough. I'm pretty sure that this is due to the resolution of my panel line image not being high enough so that the anti-aliasing is visible on the model when rendered. This can also be seen around the edges of the number “18” decal.
Does anyone have a good rule of thumb on establishing the necessary resolution of an image applied to a decal stamp to make the anti-aliasing of the decal not noticeable when rendered?
Example: If my decal Stamp is 3” X 5” then the image applied to the stamp should be 12” X 15” to hide all anti-aliasing, i.e. a ratio of 3 to 1.
Pixmite
-
All here's the TA-DA pic. Its a new Bump decal where no stamps were scaled in the UV editor. Note that you can still see the jags on the color decal, I haven't created a non-scaled stamp version of that one yet.
Pixmite

-
Fellow AMers:
Thanks for all your suggestions; they were a great help to discover what the underlining (no pun intended) problem was.
I did some further experimenting last night. First, I did try the bump decal set for cylindrical mapping, which didn’t work.
Next I tried a fresh decal that I quickly created and it worked great! So I said to myself… Self what beep beep is going on here???

Well….
When I originally stated that I didn’t edit the points in the UV editor after a stamped the decal wasn’t completely accurate. Following the Zandoria Decal Tutorial, I was maximizing the real estate of my blank decal by selecting the entire CP group of the two fuselage stamps together, scaled them up and moved them to a more strategic location on the decal in the UV editor.
While performing my quick test above, I neither moved nor scaled the complete stamps. Upon further experimenting moving the stamps where found to not cause the problem, but scaling the Stamps did.
So the moral of the story is….
DO NOT SCALE COMPLICATED COMPOUND CURVE SPLINE GEOMETRY IN THE UV EDITOR!
Lastly, if you look closely at the camouflage decal of the first image posted above you can see that it affected it as well. I also up-scaled the CPs of this Stamp in the UV editor when I created it.
Does this sound like a bug or just me not understand the limitations of the UV editor?
Once again, thanks everyone for your suggestions, you we all were a great help!
Pixmite

-
Below is the shaded wire frame version. Some of the area in question has a 5-point patch or a hook but not all of the problem area????
I'd prefer not to have to model all of the panel lines if possible. A cylindrical map might work for all the vertical lines, but I'll probably need another decal for the horizontal ones. I'll give it a try and report back to this thread.
As for setting the bump % to -100, this is done at the decal level, to fix my problem it would have to be done at the Stamp level.
Lastly, I would tend to agree that this is a bug, if a color decal doesn't have any problems why should a bump map?
Pixmite
-
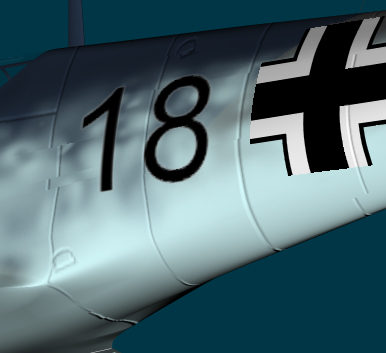
This is a continuation of a topic started here:
http://www.hash.com/forums/index.php?showtopic=18978
Below is an Image of my model to which I applied a bump decal with straight lines which render with jags. The decal is un-edited in the UV editor. No points were dragged or the model flattened.
Any ideas on how to fix this? or a better approach to straight lines?
Pixmite
P.S. Vernon - I think you were right about the optical illusion. I rendered it from another couple of angles and it looked correct. I was late, what can I say.

-
As requested here is the ver 12.0 model file. I tried to upload a 1MB AVI but the server grew impacient an deleted the process (56Kb line), so you'll have to render it yourself. Let me know what you think of it?
Pixmite
-
I think we're trying to accomplsh the same thing (control the velocity of the spin with a pose slider) If I suceed with my model I'll post it.
Well I think I did it, but I’m not quite sure. The reason being is that I’m not quite sure I fully understand what AM is doing, but I have been able to get the effect I was looking for so I thought I’d share.
The first attempt, based on XTAZ’s prop model concept from this thread:
I created a pose that did nothing and named it throttle, and then in an action I changed the pose value over time. I added this action to the chorography and set the cycle length for the prop to be an expression whose value is set to the pose value. As the animation plays out, the cycle length was changing in accordance with my action, however it didn’t seem to have any effect on the model. The velocity wasn’t changing. I’m guessing that AM may only look at the cycle length parameter of the chorography when it starts, so despite the fact that I was able to dynamically change it, my model only seemed to respond to its initial value.
The Second attempt (the one that works, I think):
I added a second bone to the prop model (calling it throttle) to which no control points are assigned. I then created a throttle pose, which scaled this new bone in the Z direction. I set the Z rotation value of my prop model bone to the Z scale value of the throttle bone. Multiplying this expression by ChorTime() and a constant I was able to control the rate of rotation with the pose slider. I set various pose values in an action to simulate the non-linear rotation nature of an aircraft engine going through a start up sequence and I got the effect I was looking for!!!
Note: Some strange behavior that I don’t really understand: If I reduce my throttle value over time too quickly the prop starts to spin backwards? This occurs before the Nyquist rate is reached. Any ideas what I’m missing/not understanding?
If anyone is interested in the modle file I can posted later today.
Pixmite
-
[...]I guess I'm too stubborn to give up on this yet. Here is my latest idea which is currently giving me mixed results; I take the concept that XTAZ introduces with this thread one step further by instead of assigning the cycle length of the prop rotation action to 1 in the choreography, I assign it the value of a pose via an expression.
The pose doesn't do anything except generate a percentage from 1 to 100. I then create an action that changes the pose value over time. By applying both of these actions to the model in the choreography, the cycle length (therefore the RPM) changes over time.
Yes of course it does and if that was your challenge, I misunderstood it. What I was trying to do was to control the actual angular velocity for the propeller with a pose slider and that I still think is very hard to do in A:M, but I might be wrong. Actually, I hope I'm wrong :-)
I think we're trying to accomplsh the same thing (control the velocity of the spin with a pose slider) If I suceed with my model I'll post it.
-
[...]The propller spining beyond the Nyquist rate concept is fantastic and its been something I've looking to simulate for a long time.
An example of this :-)
[attachmentid=11008][attachmentid=11009]
I have one additional challenge though... Is it possible to use a value drawn from a pose to set the number of cycles through an expresion? This would allow one to control the PRM of the propeller like a throttle throughout an action.I've thought about that, but since the absolute rotation is a function of all previous RPM settings, i see no simple way to achieve this in A:M. You would need a Sum() or rather a Quadrature() function for this.
It would be simple to have a plug-in calculate the quadrature of one channel and put the result in an other, but it would be much more awkward for the user. I'm not sure the average user will use a Quadrature() function enough for Hash to take the trouble. I'm almost sure it would be a waste... ;-)
I guess I'm too stubborn to give up on this yet. Here is my latest idea which is currently giving me mixed results; I take the concept that XTAZ introduces with this thread one step further by instead of assigning the cycle length of the prop rotation action to 1 in the choreography, I assign it the value of a pose via an expression.
The pose doesn't do anything except generate a percentage from 1 to 100. I then create an action that changes the pose value over time. By applying both of these actions to the model in the choreography, the cycle length (therefore the RPM) changes over time.
So far I gotten mixed results, sometimes it looks like the prop never moves when I render an image, sometimes it does, and still sometimes I get a syntax error with the expression. In short, I need to learn more about expression assignments, especially since I'm trying to assign a variable to a parameter instead of a function.
Pixmite


v18.0 Release
in * Latest Info *
Posted
Sorry - false alarm - I went 2 years back instead of one. guess I need to delete some old emails