

jpappas
-
Posts
476 -
Joined
-
Last visited
Content Type
Profiles
Forums
Events
Posts posted by jpappas
-
-
phatso,
I always thought the advantage of adding Lights directly into a model were more evident in cases where the light was an intrinsic part of the model, like a car's headlights, or the beam from a flashlight, or a large spaceship with lights around it's hull. In these cases it seems easier to add those lights right in the Model window. I mean, you can do these type of lights in a Chor and use Constraints to tie them to the model, but it seems like an extra complication. Otherwise I totally agree with you, that if you're aim is to actually light a model then stick with using Lights in the Chor only.
-Jim
-
Congratulations Chris, and to all who entered! Architecture contests are a kind of tribute to the Peak spline function, where would we be without it?!
-Jim
-
Hi Joe,
I believe when we talk about Anisotropic in A:M we usually refer to the Anisotropic Shader and it's uses. Here's a thread from a little while ago with a brief description of Anisotropic and other Shaders:
http://www.hash.com/forums/index.php?s=&am...st&p=245359
In a general sense, Isotropic means something with the same intensity while Anisotropic is something with changes in intensity, so a metal object with fine grooves usually needs an anisotropic shader to capture that look.
Now Gradients edges in A:M... this most likely is the Gradient Combiner Material with the Edge Threshold option, so that the edge of any object can have one look (or Attribute) while the inner part has another. Is this what you were thinking of? The Gradient Combiner with Edge Threshold has many uses, but one common one is to fake the look of something being backlit so the rim of the object is always brighter, or to get the look of something very soft like velvet with a sheen on the edges. KeeKat has a velvet material doesn't he?
If I have more time I can post some picture examples.
-Jim
-
To even take a guess we'll need much more information, such as:
1. are there any keyframes on anything for those frames? (maybe the Spec. intensity got keyed, or a Light, etc..)
2. is the camera moving in these two examples or is it still?
3. are you rendering with MultiPass?
4. can you save a copy of the scene and start removing things one at a time and see if you can break it down to a simple example where it still happens?
5. does it only happen when you render to file or also when you Quick Render?
-Jim
-
Largento,
I didn't realize Barry's tutorials didn't cover weighting - but do they cover fan bones? That's another area that I don't seem to find many tutorials on. Colin talks about them a little in the Cooper tutorial and there's some basic tutorials that show a fan bone applied to a simple cylinder, but I haven't seen a tutorial that sets up a fan bone on something like a shoulder or hip, and goes one step at a time.
thanks!
-Jim
-
Hi,
I did this one a little while back about cleaning up bad splines after the Font Wizard, it's right in the Tutorial section:
http://www.hash.com/forums/index.php?s=&am...st&p=249764
-Jim
-
DeeJayEss,
I really like this, nice job! I loved that dynamic camera view when it tracks behind the butterfly, and also the way you've built banking into the turns (by the way, did you use an expression for that too?) The change in smoke color and showing the x/y/z grid - very cool! I'm curious to see what additions you'll make in the next version.
-Jim
-
Hi,
As for the 16-bits of precision, as Bendytoons states, you can render to a 16-bit PNG or an EXR for even more precision. It could be that the Z-buffer option is now truly deprecated in which case this method might warrant a second consideration.
Hey John!
In the past, I used to use this depth render all the time in Photoshop. These days I prefer sticking with A:M's Multi-Pass since it gives you both near and far focus blur at the same time. I'm not an AE guy so you might know better about how that would work.
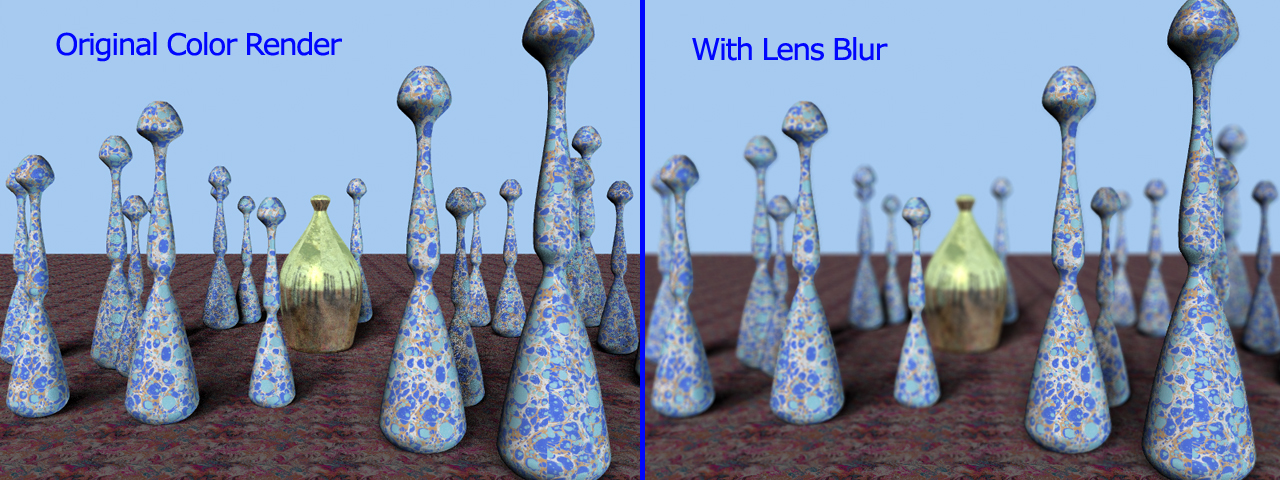
For PS, load up your 16-bit color image and also your 16-bit depth render. Invert the depth image, then create an Alpha Channel in the color image, and copy the depth image into the Alpha Channel. Now in Photoshop CS2 you can just use the Lens Blur filter on the Color image and you're all set. Lens Blur uses the Alpha Channel for it's depth information which makes it all quite easy. In fact, I see it even has an invert option right there.
Before the days of the Lens Blur filter I would Control-Click the thumbnail image of the Alpha Channel in Photoshop which creates a selection of only the brightest parts of the image, then I would switch back to the color image with that selection, Inverse the selection so it was on only selected for the deeper parts of the image, then applied a simple Gaussian Blur. Not as precise, but it still does a nice job. And all this can be automated using Actions.
BTW, I've never tried using a black fog image, but it sounds interesting.
Below is a sample image, I decided to run through a test of this again for the sake of this topic, it took just a few moments. I used a 16-bit PNG for the color and depth images, and the final image was finally down-converted to an 8-bit JPG so I could post it here.
-Jim

-
Hi,
I'm not sure about the Depth Buffer option. There is another easy way to generate depth images as regular renders, so I'll outline that in case it helps you.
1. turn on Fog in the camera options
2. use a pure white image for the fog image (size of the image doesn't seem to matter, I've used 512x512)
3. turn off all the lights in the Choreography (switch Active to Off on each light)
4. make sure no model in the scene has any Ambience intensity, or other self-illumination
5. adjust the start and end points of the fog to you're liking
6. In Render options, use Final, and just turn on the Fog option (all other options can be off)
You'll get a grayscale render representing depth.
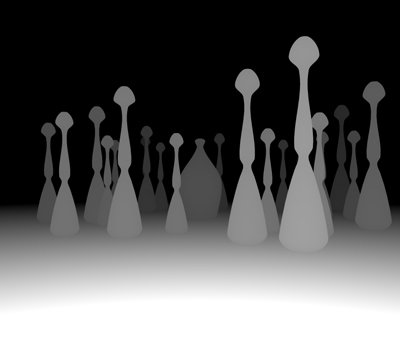
Since the fog image is white the depth information might be reversed for the program you intend to use it with, but you can easily inverse the images in any paint program. Here's an example I just setup, and inversed in my paint program.
-Jim
-
-
hi,
Just thinking out loud, this is probably one way.
Simple example, let's say you decalled your object and have two completely different Color image maps. So you applied one decal but added two Color Images. A:M will only show the bottom-most Image in the stack (I always get this mixed up, maybe it's the one on top). To make the first Color image disappear and reveal the one below it you should be able to assign a Pose slider to the Image's Percentage amount (zero to 100). Then you can slide it to zero to reveal the image beneath it, pretty much like a transparency. It would be the same method for multiple Bump maps, Specular Maps, etc..
-Jim
-
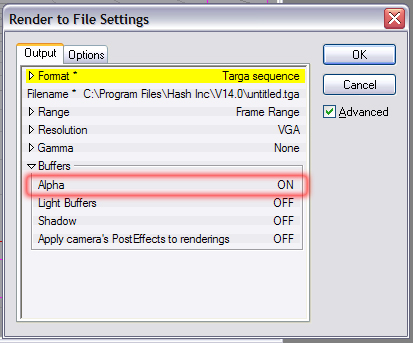
Hi,
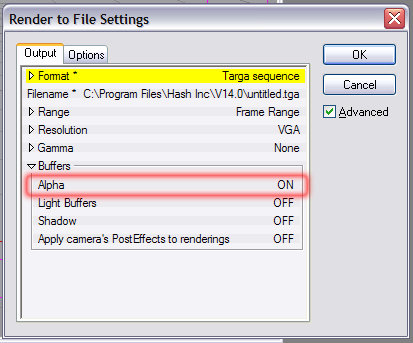
TGA files support Alpha channels and usually in A:M that option is on by default, so that may be the reason, make sure to turn this option off in the Render to File Settings.
-Jim
-
Hi,
This is one of the better sites for free-to-use texture maps. There's a limit to how many you can download each day.
-Jim
-
Luuk,
Could you describe the current payment system? It looks like we give you our email, then a day later you email back an invoice? How is payment made with this invoice?
thanks!
-Jim
-
Vern, you must be using your Jedi mind tricks and now look, three of us have updated the primitives as a result! Now where is my tin-foil hat anyway?

Yves, I'm looking forward to your new website update and the new additions to the primitives family. Sounds great!
-Jim
-
Done!
 These files can now also be found in the Tutorial forum.
Rob,
Per your suggestion, I opened one of the .mdl files in Wordpad and searched for the current magnitude amount, 360. I found lot's of matches, but each match was couched in a dense set of other values. If one does an automated replace, how can one be sure they are only changing the correct values? I do agree with this approach if it can be done. Doing each one with the mouse results in a nice case of precision elbow and twitchy wrist.
Vern,
After I read that old thread a little voice popped in my head and said, go ahead and help Vern out! Poor guy's losing sleep over this, LOL!

Rodney,
You're beginning to see through my master plan:
1. update bevels on primitives
2. (still in planning)
3. take over the world
-Jim
-
Hey Martin,
Here's the full set. Besides the magnitude change, I also made one minor update to all the primitives (even ones which don't have bevels like spheres, the cone and the grid). I reset the Ambience Intensity from 20% back to zero in each. They all had this ambience instensity built into them but I never knew if there was a reason.
Also, the Squared Wy never had the center filled in, Yves left it as a challenge for the users, so alongside the original, I also included one with the center filled from Rhett Jackson (jandals) which I found in one of his posts in the forum, this also has the bevel mags, updated to 360.
Let me know if you'd like this posted in the main forums, and if so, which forum.
thx!
-Jim
-
Hi Fellows,
I was reading some old threads and came across this one between Yves and Vern in 2005:
http://www.hash.com/forums/index.php?s=&am...st&p=133123
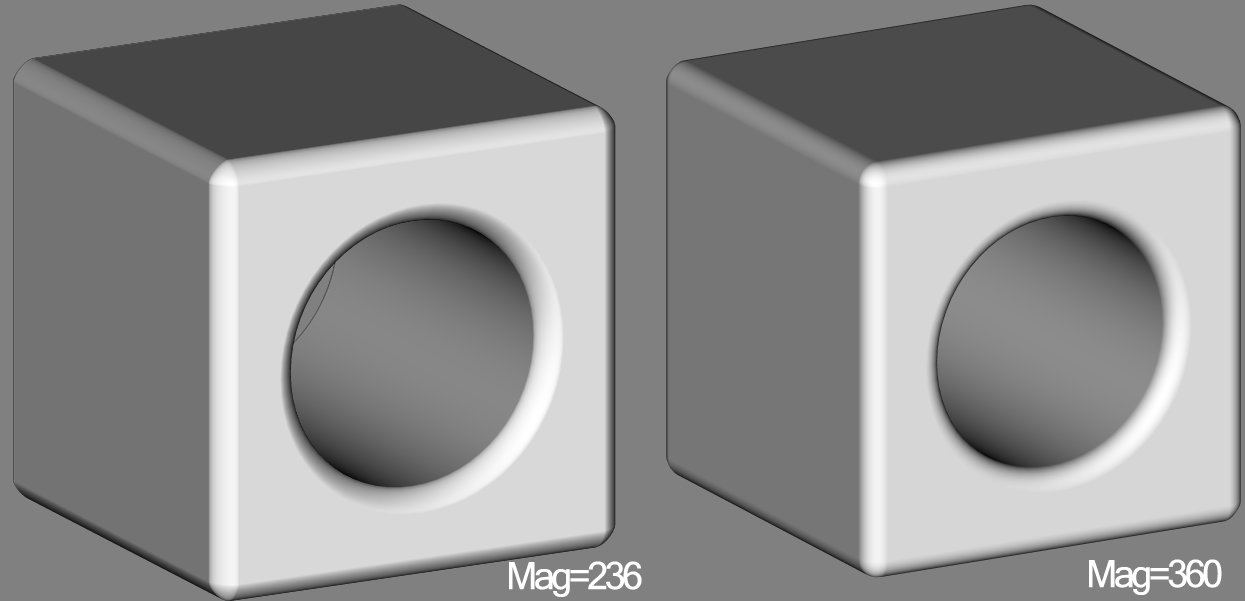
I checked the primitive models that come on the A:M CDs from versions 11 through 14, and the magnitudes of the bevels are all still set to 236, so I went through each primitive model and changed the bevel magnitudes to 360 and re-saved them (this came close to giving me carpal tunnel syndrome but I finished safely!)
When rendered, I think the bevels on the updated primitives look smoother, this is most noticable when the camera is up close.
Assuming this is a good update, I wanted to ask the Fellows and the great employees at Hash, which is the best way to share these? I can Zip these and upload them right to the forum, but if folks think it's worth it, maybe we can add them to future shipments of A:M in the Models folder?
-Jim
-
Stian,
Holy cow! I figured you used some automated method, like some magical use of the Duplicator wizard, or Sweeper. To stitch all those in by hand - that's amazing.
-Jim
-
Hi Stian,
Next up is the ball tank (whats the english word for that particular part?I was going to suggest resevoir, but Wikipedia has a diagram and says it's the hopper. BTW, I enjoy watching the progress and seeing the updates, very nice!
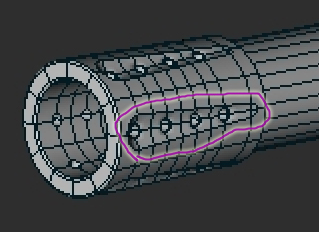
its all on the go, which also makes it hard to make a tutorial.Could we ask questions just about one area? I'm curious about how you did the oval indentations on the muzzle. I think if I were modelling this I would have been lazy and used a displacement map.
 If I were to guess, I'd say you created the oval indentation shape first, then added the little screw heads, then arranged and copied six of these into a circle, but I'm not sure what method you used to merge these into the cylinder that makes up the muzzle, other than doing it all by hand. I would love to hear how you did this part.
 -Jim

-
Hi Camillo,
There's two ways to do this, it's a bit tricky at first since each method thinks outside the box. But both methods are in the forum here somewhere too, try to search for 'chain'. I'll just do a real quick summary below because I'm sure to get some steps wrong without reviewing step by step.
Method #1 - the distorted circle:
In general, the idea is you make a model that's a perfect circle shape with the chain pieces arranged along the edge of the circle. You add two bones in the middle, one just for rotating, the other attached to all the CPs in the chain, one bone has to be a parent of the other, I forget which. Then you create an Action, and a distortion object, and you distort this circle into your chain shape. Now in the Chor you add the circle chain model, drop the Action on it to distort it into a chain shape, then just rotate the rotate bone, it will rotate like a simple circle but constrain itself to the distorted chain shape. This method is the easiest, but has the problem that your chain links will get slightly distorted as they go around corners, so it works better for belts than chains.
Method #2 - the double path:
Have each chain link follow a path in the shape of the chain. The trick here is you need to have the path twice as long as normal, so if your path is a circle, have the path wrap itself around the circle shape twice, I separate them by a pixel or two so you can zoom in and see each section of spline as needed. This way, each chain link you contrain to the path can complete the path using only 50% Ease in an Action instead of 100%. This gives you the room to add all the chain links without bunching up at the end (which is what happens when you have to use 100% Ease to get to the end of the chain).
Again, this is just an overview! Try digging into each discussion on the forum and if you are stuck, I'll try to help further.
-Jim
-
Ramon,
Looks like you're on your way!
Nancy,
Using this for clouds, what a great idea! With some transparency it could work.
-Jim
-
heyVern,
We must both be geniuses!
Because when I was learning about subframe techniques it was your thread (and that other MUFOOF one) that got me to finally understand it. And wow! What a powerful feature, it adds a whole new dimension to A:M.-Jim
-
heyVern, Ramon,
I've only been skimming through this so forgive me if this is on the wrong track, but if you want to blur just an otherwise normal object, the method that pops into my mind would be a subframe motion blur applied with an Action, like the airplane propellar method described awhile back somewhere in the forum. You make an Action of however many frames where you move the object back and forth, then when you apply the Action to the object, set it's Cycle Length to a subframe amount, like 0.1. Then you have to use MultiPass and Motion Blur when you render. This allows you to render normally without compositing and for the object in question, every frame rendered will have the complete motion of that Actoin, and with Motion Blur, will show it blurred.
-Jim


Work without the Disk
in New Users
Posted
For A:M versions that need the CD, it only checks the CD when the program first starts up, once started you can remove the CD. It shouldn't be running slower in anyway, unless you possibly have a slower CD drive and you access the CD for the Data folder (containing the included models, materials, etc..) If this is the case you can easily copy the data folder to your hard drive.
You could also upgrade to A:M version 15, only costs $50. This version runs without the CD and is only runable on the computer you install it to.
-Jim