


HomeSlice
-
Posts
4,676 -
Joined
-
Last visited
Content Type
Profiles
Forums
Events
Posts posted by HomeSlice
-
-
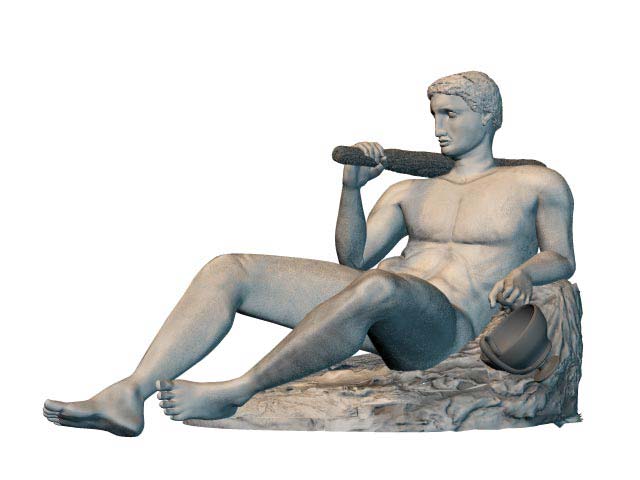
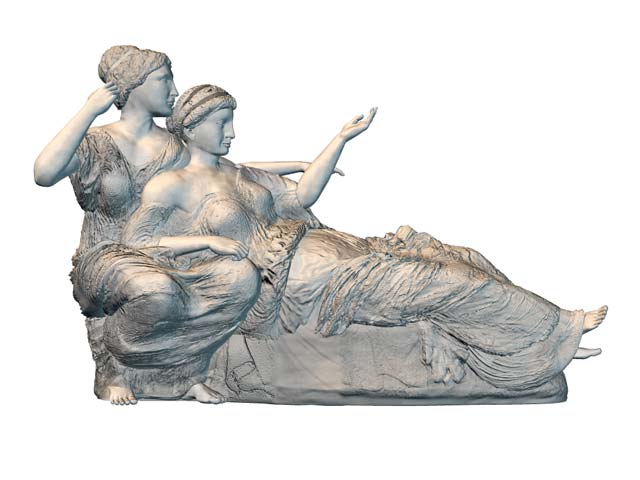
I made a Flash presentation for the author of a book I've been helping to illustrate that showcases all the models I made for the reconstruction of the East Pediment of the Parthenon. The book is called The Parthenon Code: Mankind's History in Marble. These models are textured and in color! This was alot of work but well worth it

http://www.holmesbryant.com/east_ped/

-
I'm sure some the modeling gurus can come up with a much better solution, but here's my contribution anyway. I just took your pictures and re-drew some of the lines. For me, there isn't any trick to avoiding these types of situations other than experience. You just start to sense alot earlier that you are going to paint yourself into a corner, and you do your spline rearranging before things get too out of hand. So I guess you are doing exactly what you need to do in order to avoid this sort of thing in the future
Model, model, model.....Oh, this thread doesn't provide an option to upload pictures.
Hmmm, OK go here to the WIP forum.
http://www.hash.com/forums/index.php?act=ST&f=7&t=4857
Here's a picture that shows what my initial attempt at fixing this would be.
-
Sorry, since the forum this was posted in doesn't allow for pictutre uploads, I started a thread here so I could show a way to respline his model.
I'm sure some the modeling gurus can come up with a much better solution, but here's my contribution anyway. I just took your pictures and re-drew some of the lines. For me, there isn't any trick to avoiding these types of situations other than experience. You just start to sense alot earlier that you are going to paint yourself into a corner, and you do your spline rearranging before things get too out of hand. So I guess you are doing exactly what you need to do in order to avoid this sort of thing in the future
Model, model, model.....
-
Beautiful Scene! Great lighting, nice shadows and modelling. All that is geometry? No cookie cut or displacement maps? Arw you a masochist? :-) Really nice set. Hope to see more of what you're working on.
-
I've seen this image before, but since you posted it here I thought i would add my comments too. This is a great image for a backdrop. It really has alot of ambience. Nice texture and lighting work! It doesn't seem finished though. Right now it seems the focal point is the window because it's so much brighter. So I look to the window to get the "punch line" or message, but I can't see a message other than the allusion to a distorted reality, which is cool, but that just sets the context, it doesn't deliver the punch. I know you have a strong message because it is in your other work. Just include it here and you will have yet another piece that needs to be framed and on display somewhere!
-
Hash's implimentation of Displacement is a bit of a mystery to me. It doesn't generate any more splines or patches, but when I crank up my realtime viewing resolution to Variable, the displacement shows.... and also slows my realtime view down to something like 2 seconds per frame (as opposed to "frames per second" lol)
Using both displacement and bump maps is a great way to get needed detail while cutting down on patch count. A displacement map will adjust the general contour of an area. The bump maps add the little details. When I want more depth or contour in an area, I add more splines. The more splines I have in an area, the more contour a displacement map will provide.
BEWARE though! Displacement maps look Really Ugly on 5 point patches. I mean, unacceptably ugly. So you have to devise ways to work around that inconvenience.
Displacement MATERIALS on the other hand, don't seem to mind how many or how few patches I'm using. When I can get away with using a material instead of a map I do because a disp. material is so much more effective. Procedural materials are still a challenge for me though. It takes time and alot of experimentation for me to get something I like, and I still don't have a lot of control over that particulars of the material.
-
Yves, you're an absolute genius. You've been very busy lately. Your final render is eye popping. You have a knack for approaching these things in a methodical way so the rest of us can learn from your experience. All I can say is WoW, and Thank You for the information.
Holmes
-
Thanks John. Sure, why not go for perfection? Who knows, maybe one day I'll hit it. I've already replaced the head of the reclining figure from the first picture I posted because it looked too pouty and the fix was just too elusive for me, so I just replaced the whole head.

-
Congratulations on your second head :) Keep it up buddy! You can delete about half you spines and cut your tweaking time in half as well.
-
Hi John,
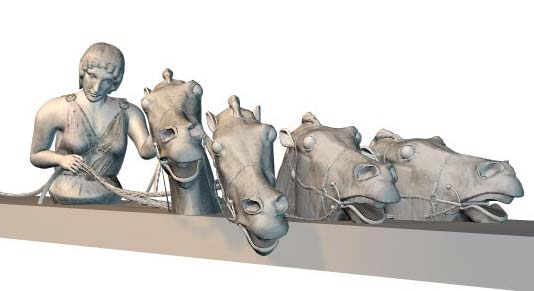
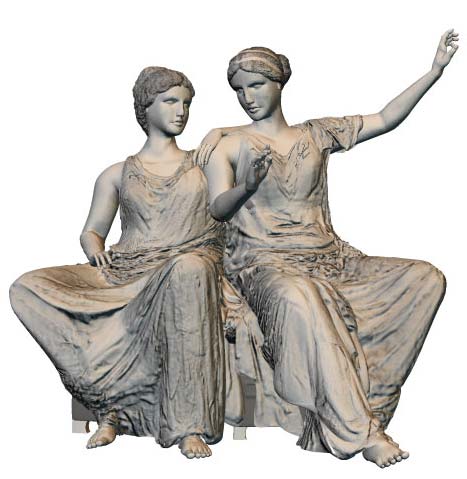
Thanks for the comment. Do you mean the shoulders on the woman with the horses, and the two women sitting? Now that you mention it, the right shoulder on the woman with the horses does look too rounded or something. Is that what you mean? I didn't see that before :-) If I have time, I would like to fix that now. What is it about the shoulders on the two women sitting? The shoulders, or at least the arms, on most of the statues have been broken off, so that is a gray area that I can "adjust".
Holmes
-
I can only guess at why the author wants these done in 3D. I think during all the hours he spent researching the subject, he was dreaming about what these sculptures looked like restored in full 3D, so when he realized it could be done, he went for it. He has plans to have me do the entire Parthenon and all the sculptures, metopes, friezes and murals. I think he wants to give his readers an idea of what it was really like to, for example, approach the entrance and look up at the east pediment in the early morning light as one is walking up the steps. He wants to bring the subject to life. What *I* think would be cool is to allow people to rotate these models on screen to see what they looked like from all angles. Those crazy Greek artists sculpted amazing detail in areas they must have known would never be seen, and it is not so easy to find good pictures from too many angles. regretably, I had to guess quite often about what some aspect looked like because I didn't have any photos that showed it. It was a little frustrating because I know there are some people who have easy access to that information, they can just walk over and look at the original sculpture, or one of the plaster casts that have been done. I would love to have the budget to fly over to the museum in Switzerland that has plaster copies of all the existing sculpture and have every sculpture photographed to MY specifications so I would have some great rotoscopes and texture sources to work with. The thought gives me goose bumps

-
Here's another view. Thanks for all the comments everyone. It's such a boost when fellow artists whom you respect really like your work.
-
The purple crayon trick sure would have saved me alot of time if I had thought of it :-)
Just to show what a half textured model looks like. Here are a couple of views of the one I'm working on right now. I still have 4 or 5 more hours to go creating all the color stamps adn adjusting them. Then several more hours converting all my color stamps to bump/displacement maps and adding them and adjusting things and making a MILLION little tweaks here and there....
Oh, to answer you question xor, I'm doing these for a book about Greek art and religion.

-
The yellow teeth are great. Is this guy going to be one of a duo or trio? Or is he just an anonomous member of a large school?
You should consider finding a digital fine art association in your area. Your work falls under the catetgory of fine art I think and sometimes it's difficult for digital fine artists to find respectable venues to show their work. The digital fine art society I'm a lurking member of is always sponsoring shows and demonstrations and things in the local area.
-
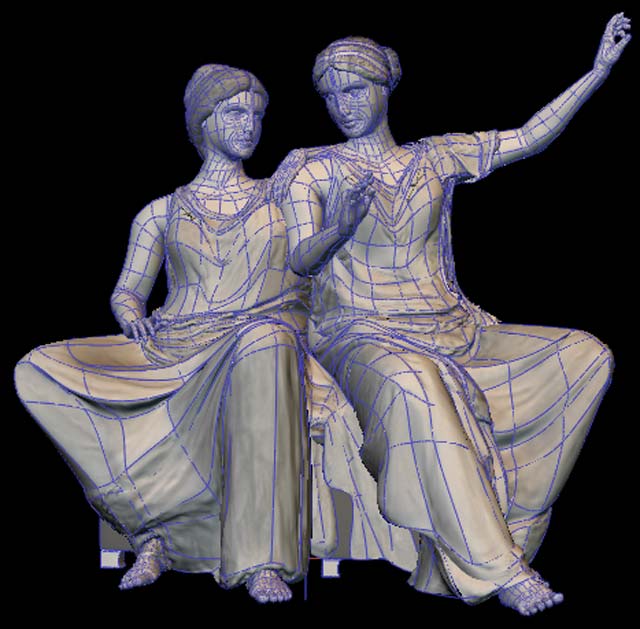
Here's another wireframe.
-
Here are wireframes of the two most cloth intensive pieces. I struggled mightily to find a solution for the cloth. My criteria were
1) It must look good rendered at @1200 pixels
2) the folds- at least the major folds- had to match the reference photos Very Closely.
3) When Arctic Pigs rises from the dead I plan to show these suckers in all their 3D glory on the web, so they had to be rotatable(ie-no billboards)
4) I must be able to finish a figure in a week or under
I came to the conclusion that Less Is More. My first models had huge numbers of splines because I was trying to model nearly all of the folds and creases. I was really getting bogged down in Muscle Mode hell when trying to pose them, and I wasn't getting the accuracy that was required. The biggest challenge is that I can't just have folds that look believable, they have to match what survives of the original sculpture, so after posing the models, I have to do quite a bit of work in muscle mode.
The solution I found is to use Fewer Splines, not more, and (for the most part) just hit the major contours and anything that's noticable when turning the model. Then I open my reference pictures and very meticulously cut out little pieces and stamp the pieces on the corresponding section of the model in an ACTION window. How small the individual decal is depends on the curvature of the model section. I rarely have pictures taken from straight views. I will have one picture that is mostly from the front and a little from the left at 1.4 meters above the floor and then I will have one that is mostly of the back and shows a little of the left at 2 meters above the floor. And I have to reconcile these two different perspectives and figure out what shape the dang thing really is. The same object can look very very different from two not-so-different perspectives.
So I go through the reference pictures looking for surfaces that appear to be perpendicular to the camera. Then I cut them out and make an alpha mask. I feather the alpha 8 or 16 pixels depending on the resolution of the photo, then I manually repaint the black areas of the alpha because they aren't alway pure black and I was getting some ugly lines from poorly masked decals. Then I rotate the model to approximate the angle from which the particular photo was taken, hide everything but the patches I want to apply the decal to AND the adjacent patches surrounding (for smooth blending of all the decals), and Stamp it with a color decal at 100%. I don't flatten the model. Often I'll have to open the UV editor and adjust points so the decals blend together more or less.
When I have the entire model stamped, I open each map in Photoshop and run a High Pass filter on it so it is mostly gray with white highlights, then I paint/blur/smudge the map to accent the highlights and smooth out irregularities and artifacts. Then I save this as
Its a good thing I didn't have to worry about rendering at higher resolutions because I used a ton of maps and I couldn't find very many hi rez pictures of the right angles to get my textures from. If I want to print these larger, I'll have to do a bit of painting of the maps in Photoshop.

-
wow, thanks! The client wants to texture them if there's time. I have to finish the East Pediment and do the central scene of the West Pediment by April 1st. That's alot of modeling, something like 13 more models in three months. The book I'm doing these for will be published in black and white, so color isn't so important.
Thanks again for the comments,
Holmes
-
Last one I'm posting... promise

Holmes
-
and another...

Holmes
-
And another
-
And another...
These models hold a personal interest for me too, so critiques are really appreciated. And if you know these sculptures and see some glaring mistake I've done please tell me. I may not be able to fix it for this job because the timeline is sorta tight, but for my personal interest, I'd like to go back to these and get them as accurate as I can. Sometimes is was difficult to model a particular perspective because I just couldn't find a good picture of that particular angle.
Holmes

-
Hi,
Here are pictures of some of the pieces I've been working on for a project I'm doing reconstructing the east pediment of the Parthenon in Athens. I'm so greatful I got a shot at a project like this. In addition to improving my art skills immesurably, it has stretched my skill and understanding of Animation Master way beyond what they were before I started this.
Holmes
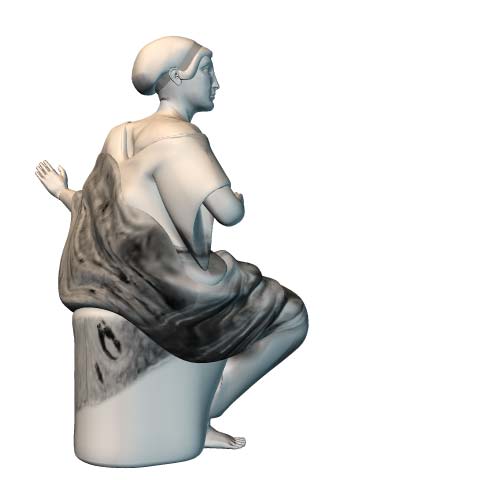
Greek Statues: Textured and Colored!
in Work In Progress / Sweatbox
Posted
The link above takes you to the Flash presentation(page sizes are 200K-400K). The picture above is one view of what the author identifies as the Hesperides. There are several views of each model in the Flash presentation.
Homeslice