DCLeadboot
-
Posts
40 -
Joined
-
Last visited
Content Type
Profiles
Forums
Events
Everything posted by DCLeadboot
-
I've been looking at lip-synch myself - but I find the tutorial in the booklet doesn't work with my own model and my own test sound-clip. I use those "Dope Sheets", but I find that even after setting each word to its correct place on the soundtrack, the mouth still moves out of synch with the sound. I'm thinking I'll have to do this manually - like I do with Flash, which I incidentally find that a lot better for simple 2D animation!
-
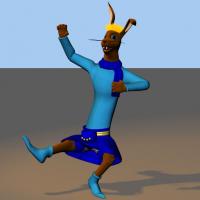
Well, after some experimenting, I may have figured out a method I tried before where the kilt is controlled by a hierarchy of bones. The LeftKilt bones are under the LeftThigh bone, and the RightKilt bones answer to the movement of the RightThigh. Each one controls a half-ring of splines on their side, so that each piece can be animated with the legs and then rotated, translated or scaled where appropriate. The render snapshot shows Danbuster in a wild pose (though, at this stage, I haven't completed the SmartSkin for the upper torso, arms, head, etc - I'm still working on this model) Hopefully, this may work for me.

-
Well, in terms of the corruption, it might have been a save within the model file that went wrong. The model file, when I looked at it in Explorer and Notepad, was completely blank (0 Kb and no programming text to be seen) - that's why I had no choice but to recover the old one. In future, I plan on keeping things backed up a little more regularly in a ZIP file. Quick Edit: BTW, I found out why the arms were raised way above the head. It's because they were trying to find an old default pose with the relationship "Dynamic Pose" at 0% - of course, the scale was off, since I'd put in a new skeleton. Deleting the actions from that relationship has fixed the model back into it's standard T-pose, at least.
-
I'm not even sure what you mean by "shrink pose" - but I tried taking your advice, and this was the result. While the legs shrank in from nothing, the lower-part of the kilt (which is the SimCloth - the upper-part is the "attached" group) was just as crazy as ever. It got as nearly to frame 20, by which time the legs were back to normal size, and then an error came up declaring the algorithm as unsolvable and giving up the simulation. This isn't going to work - I know it! Also, I had a corruption-problem with my model earlier on, causing me to lose nearly everything - fortunately, I had an old backup model saved from long before I started refining it. ^^; I was forced to practically rig this model from the ground up - and while I managed to get the body, legs, head and such back where it was (minus the extra bones for things like the scarf-tail, fingers, tongue, ears, etc) now the arms are thrown too high, too. I never had that sort of issue with the BonelessThom. Danbuster_MadKilt2.mov
-
Hmmm, may be a case of re-rigging the kilt a little to move with the legs, I guess... SmartSkin does seem to be less... unpredictable. Especially as Danbuster is the sort of guy liable to use the kilt as a parachute or hoik it up to cross rivers - the comic-effect being the Union Jack undershorts showing at such moments! What had you in mind in terms of a Dynamic Constraint, though?
-
This is certainly a case of a guy who left Animation:Master for years and came back... For the record, I'm still running with Animation 2006 here - that was the version I'd upgraded to before I gave it up in despair because my old computer used to crash it. I've now upgraded to a brand new "Windows 7 Home" machine, which runs it very nicely. Anyway, to the subject of my problem. My hare Danbuster's kilt is an essential part of his quirky personality, but not to the point of absurdity I wouldn't have thought. I just tried attaching a SimCloth material to the ring-splines that make up his kilt below the belt, using the defaults from the "Waving the Flag" tutorial in the book - and this attached three-second movie is the result. Now... I rather think this is ever so slightly wrong... ^^; I mean, the kilt should hang normally and only react to movement or collision with the legs. How do I set this up right, please? Danbuster_TheMadKilt.mov
-
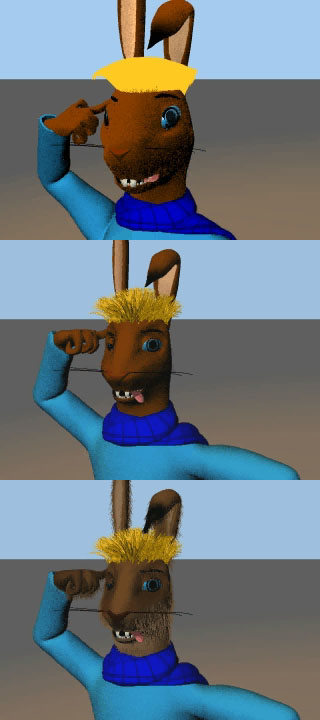
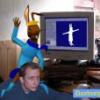
A couple of weeks ago, during the June-deal offer, I managed to upgrade my version of A:M from 10.5 to 13.0. And what a leap that was! While I still had the earlier version, I tried to make do with what I could - but one major setback was the uselessness of the hair feature. Now, somewhere in the advancement, I have since gained those new hair and grooming features that allow me so much more control over my hair and fur, to say nothing of the brilliant render quality! The attached image shows the progression of my personal alter-ego character, Danbuster Cameronean Leadboot - shown in the last rendered frame of my avatar animation, striking his silly pose. The first picture is a snapshot of that 10.5 Danbuster: as you can see the hair rendered flat and frankly looks... rubbish! The second picture is a 'reupholstered' Danbuster that I altered in 13.0. In my opinion, the former model was too generic and not really Danbuster as he looks in my Flash cartoons and artwork. Using some Flash-based drawings as a rotoscope, I started out by refining his appearance. As a result, he came out much more streamlined, longer, skinner and with a much smaller head and defined features. The gapped-buckteeth, an important personal feature, have been spaced out further. All this meant that the model pose sliders had to be fixed. The third picture shows, what I hope to be, a final production (for now). I gave Danbuster some short, fine fur. I had to sort a few things out, but I managed to paint a number of decals onto the model for the fur to set its colour (and length on paws, face and inner ears). So, now that I have him finished, I would appreciate some constructive feedback on him before I go on to create my other anthro character models (and clean up the existing ones).

-
Of hair particles and file renders.
DCLeadboot replied to DCLeadboot's topic in Work In Progress / Sweatbox
I have finally been able to afford an upgrade of Animation:Master! -
Did you mean an actual A:M Plug-In for Macromedia Director? I didn't know there was one, I'm afraid. No, what I did was render everything as they were needed. For room environments, a panaramic picture was prepared, using a render of a 360 camera spin and Autostitch. (The Billiard Room scene is attached as an example) This was then set up in Director as a Fake QuickTime Virtual Reality. The last 800 pixels of the image is used at both ends for the panaromic flipping methods. Clues, suspects and flashbacks were accessed by hotspot images locked in place on the image. When a clue is clicked, a short 2-second lead-in animation shows the room from Inspector Ewe's POV as he focuses on what you have found. A textual description appears beneath, set up by the program code. The flashbacks in each of the nine rooms, clue lead-ins and other cinematics were all rendered as QuickTime movies. Sound and editing was taken care of, using Adobe After Effects. So the 3D imagery was used as still images or Quicktime movies. No A:M Plug-In was required or used.

-
Latest news on my Crazy Cluedo project: I have it completed on a DVD-R ready to hand in the next time I am in Uni. Just have to wait to see what mark it gets, though.
-
Of hair particles and file renders.
DCLeadboot replied to DCLeadboot's topic in Work In Progress / Sweatbox
Sometimes, what I see rendered in the workspace and what is rendered in files are two different things. Despite the fact that hair should be shaded and all, when there is a lot of hair and things in the frame, the hair in the movie file is rendered as flat colour. Any idea why that is? -
I take a look at some of those links and the first question that springs to mind is - how? Those look good!
-
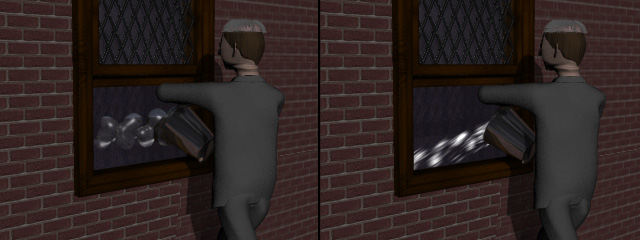
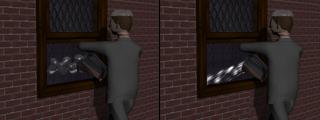
I have been working on one of my alternate funny endings for my Cluedo parody project. This ending shows butler/undercover inspector/narrator (Earle Grey/Fred Herring) cleaning the windows. He concludes, inviting the player to come back again sometime, then turns to rinse the window - only to find that somebody just opened the window! I really wanted to do this one, so I experimented with particle systems. The first experiment was with Blobbies. I wasn't happy with it. For a start, it took far too long to render - and besides the water looked more like gello. The second experiment was with Streaks, which I have used. I am pleased with it. I achived the throwing of the water by setting the Z force from 500 to 0 (fading momentum), Y force from 0 to -100 (gravity) and Particle Emittions from 2500 to 0 (water fades out). Does anybody else have any interesting experiences to share?
-
Well, that Autostitch program certainly saved a lot of headaches! I experimented first of all and, satisfied with the results, I followed these steps: 1. I rendered a 33-frame clip of the scene with a fixed camera doing 360 (the first and last frames finished up the same). 2. I imported the movie into Adobe After Effects and exported the frames as JPEGs. 3. I left the donkey-work to Autostitch. 4. I opened the resulting image in Adobe Photo Elements to tidy up the top and bottom edges. The result can be seen below. This is the Hall. In practice, the upturned table in front of the alcove will be a separate entity, because in the game it will be subject to change depending on the clue structure (solutions). A:M users may recognise the table, the hatstand, the two suits of armour and the axe as archive models. I had to construct the rest of the room myself. That's 1 down 8 to go.

-
Finally getting back to my Cluedo project, I am near to finishing the Hall scene. The only thing I'm lacking is a grandfather clock that I haven't built yet. The 3D scene itself will be used properly for some short animations, but for my purposes the interactive part will be done in Macromedia Director using QTVR. (Off-topic: for those who don't know what that is, QTVR is Quick Time Virtual Reality. A panoramic wrap-around image is used as the background and by sliding the image left and right it looks as though you are in a virtual scene. Hotspots will be used to represent clues and other things.) What I need to know is how to create panoramic scenes using A:M? Do I need snapshots that I stick together? Or is there some easy way of doing it? (I will attach snapshots of the room later)
-
Of hair particles and file renders.
DCLeadboot replied to DCLeadboot's topic in Work In Progress / Sweatbox
There is a way of adding a colour decal to hair, just like a surface, if the hair emitter is already set up. A colour fill with a stippled or grained effect may be one other idea. Nice model, BTW -
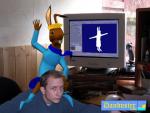
The file attached here shows the start and ending frames of a two-second clip of my alter-ego, Danbuster Cameronean Leadboot. He is posing for the camera in his own fun-loving crazy little way. It was intended for my avatar, though only a few frames now exist because of the limit. The wild blond hair is a hair emitter. I had to do it like that, because it was too difficult to accomplish fuzzy hair that sticks straight up using a mesh (as I have with my other models). The fur on the body was accomplished by using a fairly rough and low-scale bump map. The hair is the problem. In preview mode, it renders fully shaded. Here, in the rendered file, the first frame is coloured properly but the quality is terrible. The remaining frames are rendered at good quality, but the hair is flat. Can someone please explain this? It's not major in itself, but it does make it look bad. BTW, my version of A:M is 10.5r. I only got this near the start of this year and I can't readily afford an upgrade!

-
Canterbury Christ Church University College, at the Thanet Campus. And yes, I see your point. I have quite a long neck anyway, but if I raise the neckline and bow-tie, it should be OK.
-
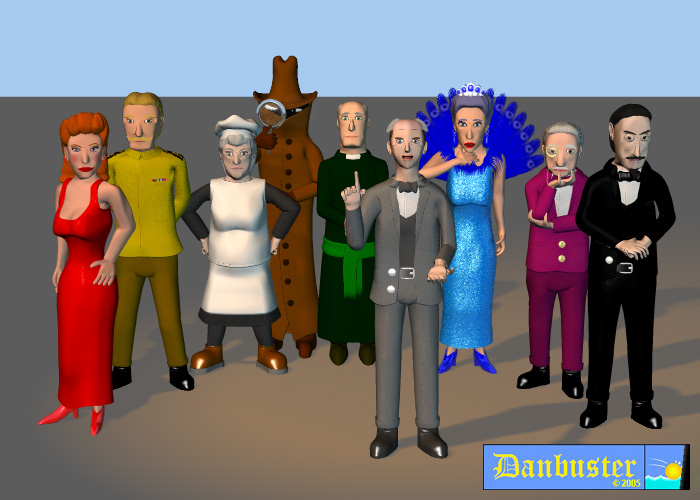
Strangely enough, I haven't seen any further input on this topic for a whole week. Nevertheless, I have taken note of what input I have had and this latest attachment shows the characters after a few changes. I have altered the skin tones, making them more realistic, and given them a slight roughness. That is, 2% Roughness and 5% Roughness Scale. Anything more started to look too much like granite, quartz or marble surfaces! I have given individuality to the skin tones. For instance, Mustard has been made more yellow, Scarlett is pinker and White looks more sallow. You will also notice three additional characters involved with this topic. On the extreme right, you see Dr Black, the murder victim. He is a sinister man, always up to no good and is constantly being murdered by one character or another. For that reason, I also made his skin very pale indeed. In the very front at the centre stands Earle Grey, the butler. This is actually me in a butler costume and ill-fitting skin wig. Comedy is the emphasis. Lurking, at the very back is the Inspector, Mr Ewe (as in 'you' the player of the game). Just a stereotypical inspector type in trench coat and hat - the face is hidden, leaving only a pair of luminous eyes. What do you think now? Better or worse?
-
I know that they christen babies. (Splash a little water on their heads) Being non-conformist Baptist, I'm afraid I wouldn't know!
-
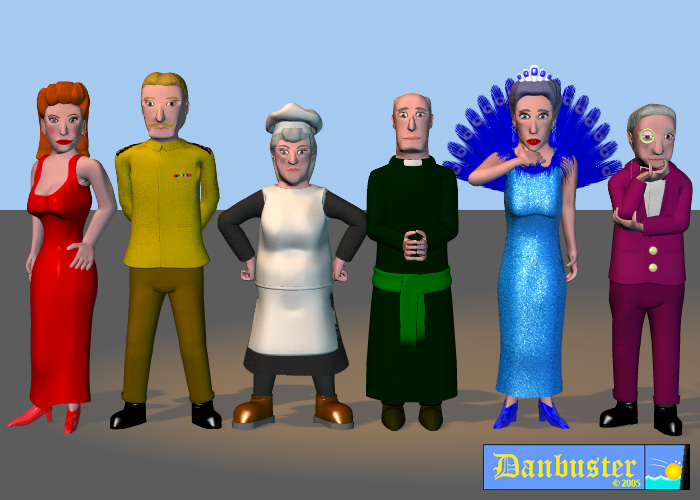
I am studying a BA in Digital Media. So far, so good. I've got through the first two years. Now, when I start my third and final year, one thing we have been warned of in advance is a Specialised Study project. We've got plenty of time to plan and I want to make the most of it. I have decided to make an interactive Macromedia Director based project, based on the well-known game of Cluedo. Influenced by Hasbro Interactive games, you get to solve the mystery by actually searching the rooms for clues, questioning the suspects and viewing flashbacks of previous events. I plan to make it a parody, calling it Crazy Cluedo and making it funny. The suspects have the most ridiculous motives for murder and often behave like big kids at any given opportunity - even Dr Black himself. The only sensible characters are Earle Grey, the butler (played by a costumed model of me), who is your narrator and guide, and Mr Ewe the Inspector (the player). Here's where Animation:Master comes in. I have been building models for the characters and weapons (I'll deal with the rooms later), and just lately copying, pasting and amending 'Lip sync' poses. The 3D scenes and props will be used as the graphical base for the game and for animated sequences such as flashbacks. The weapons and characters are complete as they stand, but I would like some opinions on what I have created here. My drawing style is very cartoony, but I like to aim for believability with it. I've had more practice with anthropomorphic animals. In the attached image, you see the six Cluedo characters who are suspected of murdering Dr Black. The facial designs were based on the cards in our board game at home, but altered slightly in transition. These are my first completed character models ever. Miss Scarletina Scarlett, the attractive young heiress who is Dr Black's niece. I wanted a sexy figure and a beautiful face. Colonel Coleman Mustard, the retired army officer. I wanted a strong, heroic-looking guy who stands for no nonsense. Mrs Snowdrop White, the old housekeeper. I was thinking of someone short, dumpy and cross-looking. Reverend Bethnal Green, the parish minister. I decided to make him C of E and give him a cassock. He acts holy, but has more than a little to hide, I'm afraid. Mrs Prunella Peacock, a wealthy widow. Maybe she was attractive herself, but now she is past her prime. She still dresses flashily, nonetheless. Professor Victor Plum, an eccentric biologist. In planning, I wanted a sense of Patrick Moore (hence the monocle), but he finished up with a bit of Einstein. So I mixed both characteristics. I want to keep the monocle, but I can't make the chain hang right. The monocle moves (Kinematic) to a target, but the Dynamics won't work properly. It goes mad instead. Please let me know what you think and what changes I can make to improve them. Any workable advice on decent skin and hair textures would be most welcome. (If you wish, I can later provide further snapshots of these characters, or the other models involved.)