

gazzamataz
-
Posts
753 -
Joined
-
Last visited
Content Type
Profiles
Forums
Events
Posts posted by gazzamataz
-
-
I have tired Maya, Cinema 4D, Pixels 3D and Studio Max - some more intensively than others. Out of all of them AM has the best workflow of the lot! It is also the best CA tool I have tried and quite alot easier to learn. I think that it has not been used more at studios because of its spline technology (makes it less compatible with poly programs), it's rendering, it's not the worlds greatest at FX (getting better though) and it can be a bit wobbly - if you know what I mean...

I must say that version 10.5 is proving rather delightful
 If the new hair features are what they say they are well it's gonna get better!
 -
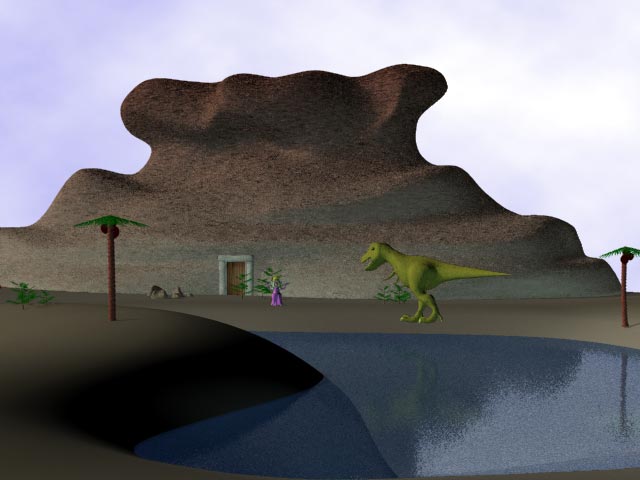
Just thought I give you all a peak at another scene that I have been working on from the same story… needs some more vegatation and the rocks need more definition but it's all great fun!!!
-
Zaryin said:
I am glad to be back at my project again, not only that but using AM again is a GREAT feeling!Glad to se you are working on your project againJim said:
wackyWhat do you mean wacky? My middle name's wacky! Vernon adopted it I invented it
-
Darklimit said:
That's exactly what I want - none of this photo-realistic stuff - takes too long to do that LOLI like the cartoon feel it hasMega said:
What are you planning to do with the background? Also, what type of lighting are you using?I am not planning on doing too much with the backgrund at the moment... I think I will render out some trees as a layer and slap it on to make it look like a wood in the background or hills or something. AS for the lighting
 I haven't done a thing other than just mod the default lights that a new choreography creates.
Sean C said:
Looks like something you'd see in a kids showAgain, that's exactly what I want! It's intended for a series of Children's stories that I have been working on since I was... oh, let me see now... er... hum...
Thanks for the comments people, I really appreciate them it! Helps kick me into gear and get on with this project
-
DarkLimit
Love those fish! But I do have a few critics
1) Your fish need to look a bit more scaly, their skins look more like those on Frankenstein's Monster with scars on, but then these are horror fish right?
2) If these fish are based on DEEP sea fish (Angler, Lampfish etc.) then perhaps they should be a little more transleucent - mind you that would be bloody hard to achieve without modeling internal geometry - perhaps just the teeth being slightly transleucent?
3) Did you model them with there mouths closed? Not that it matters too much but it might make it easier to have modeled them with their mouths closed as they you can then put a pose on them with the mouths open unless you have already done this.
There that didn't hurt did it ?

-
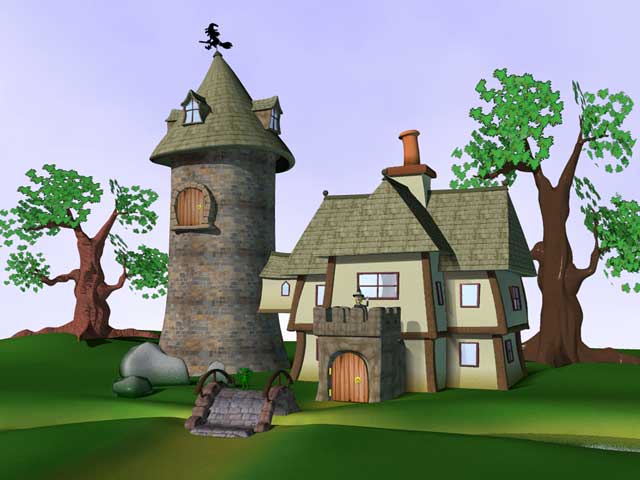
Well, I have resumed work on me pet-project and have been adding things to Peg's Mansion as well as colouring it in!
It still needs work on the tree leaves and bark, and the obvious tile pattern on the tower - but hey! - I have never really done this texturing bit before
I have the '3D Painting & Texturing' book on the way which should help alot! Looking forward to your comments
-
Not that I use these shortcuts much but they would be handy... I cannot seem to get Vector Branch (Shift+V), Shaded Branch (Shift+X), Bound Branch (Shift +
 , Wireframe Branch (Shift+W) or Curved Branch (Shift +C) to work...
When I click on a root bone of say an arm branch the whole model turns into Vector, Shaded, Bound, Wireframe or Curved display no the particular branch. Is this feature not really used anymore with the advent of much faster cheaper graphics cards?
-
Lovely work William and thanks for sharing the project! Did you learn how to create these sort of shaders from the Anzovins Materials Tutorial CD? I am thinking of getting it since I am naff at texturing and materials - especially shaders. I never could get my head around them
-
Thanks for the tips chaps! I seems all I had to do was download the latest On2_VP3.qxt and replace the one in my system folder. I went to this site [url="http://www.theora.org/"]http://www.theora.org/[/url] but obviously didn't look hard enough! :rolleyes: So it's all working beutifully now - so thanks again, and Gilles is that you? Are you back from exile?
-
Errr... not sure about this one, I wanted to watch an old (?) video on rigging from the Eggington Productions mob which uses the On2 VP3 Video 3.2 codec. I thought I already had this installed on my computer but Quicktime prompted me that it wasn't, so off I went to the website to get the latest version which is 6. I downloaded and installed that... didn't work, tried the earliest version they had on the site version 5... still didn't work. So I hunted around and dug up the original version 3 installer and installed that... didn't work. Took all versions off of my machine and reinstalled on the version 3. Yup, you guessed it - still didn't work. Anyone got any ideas? I would appreciate it there are still some good tips from the classic Eggprops videos :D
-
Right, I know there is a Mirror Bones Plugin from ST45 which doesn't work quite right with 10.5 cos it doesn't keep CP assignments. I have also searched the web forum but I cannot find what I want and I cannot remember how to do it - I have tried! All I want to do is copy the bones on one side of the character and flip them to the other. The old fshioned way, which I cannot rememeber, is to ctrl drag the root bone you wish to flip to dublicate it in the PWS, parent it to a new bone in the middle of the model and scale it -100 in the X axis... won't let me do this... Please, someone tell me how!
-
I am experiencing a little problem. When I try to log into the AM community through AM it says I don't have an internet connection. This was working fine until recently. I am using broadband which is on constantly and working. Is this because my subscription to Hash has expired? I am using AM 10.5o on a Dell 8200 1.8ghz, 768 RAM, Quadro4 750XGL with Win2K SP4. Many thanks!
-
Gee Fanks Noel - I will try this!
I new this bit since, as you say, it won't work otherwise...you have to constrain your feet to a null or bone that isn't a child of the pelvis.You get more control over the balance with the balance rig from the cd, because it knows to put the pelvis back when you lift a foot.Don't quite understand this bit though, if you lift the foot target up and move it forward the pelvis will follow. When you lift the foot up and move it back surely the pelvis will move back to satisfy the maths in the expression?
I will try this out as mentioned above to satisfy my curiosity - it seems that if an expression could resolve this it would mean I don't need a pose with extra bones and constraints which would help streamline me rig.
-
I haven't delved at all into the expressions available in AM so I thought I'd ask before I try the impossible

I use the Egginton Rig (similar to the Hash Rig) which has a pose called balance, which we all know plants the hips directly between the to feet nulls when activated. To establish this feat a collection of bones is created with various constraints in order to make it work, whilst you normally just plonk this on your model and adjust it to suit can this effect be achieved using expressions?
There is an easy way of doing it in Maya but can it be done in AM?
The mel syntax is something like:
pelvis tx = (leftfoot.tx + rightfoot.tx)/2
pelvis tz = (leftfoot.tz + rightfoot.tz)/2
-
Hi Hashers
I have discovered a strange anomally and I wondered what I am doing wrong cos I cannot seem to fix it!
When I render my scene using the Q (Render mode) it renders away quite happily using the settings in the tools options box. However, when I render away using Shift Q (Render Lock Mode) it takes longer and seems to invoke the raytracer even when I have turned this off...
Is it invoking the multipass gibberish (haven't got round to playing with this yet)even though I haven't got it switched on. The Render Lock Mode should take a lot less time than the Render Mode since it is progressive. I don't get this problem at home - is it the graphics card perhaps?
Your thoughts and assistance please!
Dell Dimension 8200
Pentium4 1.8ghz
Quadro 750 XGL
Windows 2K SP3
AM 10.5j
-
Charles
Your link doesn't seem to be working... I have tried twice, is the link broken?
-
All I can say is at last! I can now find answers at home, at work wherever and hopefully we will be able to post WIPs up. I guess I still can't swear though...
New characters WIP
in Showcase
Posted
Obvious I know, but have you tried asking Hash Support? Is it an OpenGL DirectX thing? I had render problems in 10.5 usig OpenGL but I switched to DirectX - problem gone... more due to the crap drivers for my video card I suspect